Brochure
Page 1
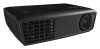
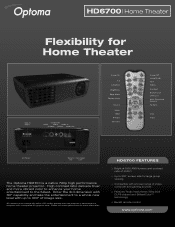
... and gaming sources J Features Texas Instruments 720p DC3 DLP® chipset and BrilliantColor™ technology J Backlit remote control www.optoma.com HD6700| Home Theater Flexibility for Home Theater VGA-In/ YPbPr Composite HDMI Video Audio-In S-Video RS-232 Audio-Out Power On 4:3 Letterbox Brightness Edge Mask Display Mode Source Menu HDMI S-Video 3D Invert Power Off Lamp Mode 16:9 Native Contrast Source Lock Overscan Multi-Directional Selector Re-Sync VGA Video AC Power Security Kensington Bar Lock The Optoma HD6700 is connected to the...
... and gaming sources J Features Texas Instruments 720p DC3 DLP® chipset and BrilliantColor™ technology J Backlit remote control www.optoma.com HD6700| Home Theater Flexibility for Home Theater VGA-In/ YPbPr Composite HDMI Video Audio-In S-Video RS-232 Audio-Out Power On 4:3 Letterbox Brightness Edge Mask Display Mode Source Menu HDMI S-Video 3D Invert Power Off Lamp Mode 16:9 Native Contrast Source Lock Overscan Multi-Directional Selector Re-Sync VGA Video AC Power Security Kensington Bar Lock The Optoma HD6700 is connected to the...

Brochure
Page 2
... 146 Control Panel Power/ Standby Menu Keystone Correction Source Keystone Correction Power LED Lamp LED Temp LED Re-Sync Select Four Directional Keys Optional Accessories Lamp: BL-FU185A Remote Control: BR-3053B Carrying Case: BK-4006 Power Cord (1m): BC-PUPIXY01 Power Cord (11m): BC-PUPIXY11 HDMI Cable (7.5m): BC-HMHMXX08 Composite Cable (1.8m): BC-COCOXX02 VGA Cable (1.8m): BC-VGVGXX02 VGA Cable (5m): BC-VGVGXX05 VGA to Component Adapter: BC-VGCRXY00 Ceiling Mount: BM-5001U 92" Matte White 16:9 Manual Pull-Down Screen: DS-9092PMG+ Specifications Display...
... 146 Control Panel Power/ Standby Menu Keystone Correction Source Keystone Correction Power LED Lamp LED Temp LED Re-Sync Select Four Directional Keys Optional Accessories Lamp: BL-FU185A Remote Control: BR-3053B Carrying Case: BK-4006 Power Cord (1m): BC-PUPIXY01 Power Cord (11m): BC-PUPIXY11 HDMI Cable (7.5m): BC-HMHMXX08 Composite Cable (1.8m): BC-COCOXX02 VGA Cable (1.8m): BC-VGVGXX02 VGA Cable (5m): BC-VGVGXX05 VGA to Component Adapter: BC-VGCRXY00 Ceiling Mount: BM-5001U 92" Matte White 16:9 Manual Pull-Down Screen: DS-9092PMG+ Specifications Display...

User Guide
Page 1
... to operate 20 Menu Tree 21 IMAGE 23 IMAGE | Advanced 25 DISPLAY 28 DISPLAY | 3D 31 SETUP 32 SETUP | Signal -RGB Source 34 SETUP | Signal -Video Source........... 35 OPTIONS 36 OPTIONS | Advanced 37 OPTIONS | Lamp Settings 38 Appendices 39 Troubleshooting 39 Image Problems 39 Other Problems 40 Projector Status Indication 41 Remote Control Problems 42 Replacing the lamp 43 Compatibility Modes 45 Computer Compatibility 45 Video Compatibility 46 RS232 Commands 47 RS232 Pin Assignments 47 RS232 Protocol Function List 48 Ceiling Mount Installation 51 Optoma...
... to operate 20 Menu Tree 21 IMAGE 23 IMAGE | Advanced 25 DISPLAY 28 DISPLAY | 3D 31 SETUP 32 SETUP | Signal -RGB Source 34 SETUP | Signal -Video Source........... 35 OPTIONS 36 OPTIONS | Advanced 37 OPTIONS | Lamp Settings 38 Appendices 39 Troubleshooting 39 Image Problems 39 Other Problems 40 Projector Status Indication 41 Remote Control Problems 42 Replacing the lamp 43 Compatibility Modes 45 Computer Compatibility 45 Video Compatibility 46 RS232 Commands 47 RS232 Pin Assignments 47 RS232 Protocol Function List 48 Ceiling Mount Installation 51 Optoma...

User Guide
Page 2
.... 9. See projector enclosure for repair. 7. Only use attachments/accessories specified by appropriate service personnel. 2 The unit should only be repaired by the manufacturer. 6. DANGEROUS HIGH VOLTAGES ARE PRESENT INSIDE THE ENCLOSURE. Important Safety Instruction 1. Do not install near water or moisture. Do not use the projector near heat sources such as radiators, heaters, stoves or any ventilation openings. To ensure reliable operation of...
.... 9. See projector enclosure for repair. 7. Only use attachments/accessories specified by appropriate service personnel. 2 The unit should only be repaired by the manufacturer. 6. DANGEROUS HIGH VOLTAGES ARE PRESENT INSIDE THE ENCLOSURE. Important Safety Instruction 1. Do not install near water or moisture. Do not use the projector near heat sources such as radiators, heaters, stoves or any ventilation openings. To ensure reliable operation of...

User Guide
Page 3
... lamp itself. When switching the projector off, please ensure the cooling cycle has been completed before disconnecting power. will show on -screen display "OPTIONS | Lamp Settings" menu after replacing the lamp module (refer to change the lamp as soon as described on until ▀■ Warning- English Usage Notice Precautions Please follow the procedures listed under "Replacing the Lamp" section on . Please do not expose this user's guide...
... lamp itself. When switching the projector off, please ensure the cooling cycle has been completed before disconnecting power. will show on -screen display "OPTIONS | Lamp Settings" menu after replacing the lamp module (refer to change the lamp as soon as described on until ▀■ Warning- English Usage Notice Precautions Please follow the procedures listed under "Replacing the Lamp" section on . Please do not expose this user's guide...

User Guide
Page 13
... "Source Lock" has been set to "Off". If you connect multiple sources at the same time, press the "SOURCE" button on the control panel or direct source keys on the remote control to "OPTIONS". Securely connect the power cord and signal cable. The projector will turn Green. The startup screen will display in approximately 10 seconds. The Power LED will now turn red. 3. English Installation Powering the projector on/off Powering on the screen (computer, notebook, video player, etc). Remove the lens cap...
... "Source Lock" has been set to "Off". If you connect multiple sources at the same time, press the "SOURCE" button on the control panel or direct source keys on the remote control to "OPTIONS". Securely connect the power cord and signal cable. The projector will turn Green. The startup screen will display in approximately 10 seconds. The Power LED will now turn red. 3. English Installation Powering the projector on/off Powering on the screen (computer, notebook, video player, etc). Remove the lens cap...
User Guide
Page 14
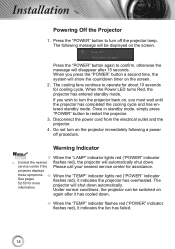
... "LAMP" indicator lights red ("POWER" indicator Contact the nearest flashes red), the projector will be switched on the screen. 2. Under normal conditions, the projector can be displayed on the screen. The following a power off procedure. service center if the Please call your nearest service center for cooling cycle. Once in standby mode, simply press "POWER" button to operate for about 10 seconds for assistance. Installation Powering off the projector lamp. When the Power LED turns Red, the projector has entered standby mode...
... "LAMP" indicator lights red ("POWER" indicator Contact the nearest flashes red), the projector will be switched on the screen. 2. Under normal conditions, the projector can be displayed on the screen. The following a power off procedure. service center if the Please call your nearest service center for cooling cycle. Once in standby mode, simply press "POWER" button to operate for about 10 seconds for assistance. Installation Powering off the projector lamp. When the Power LED turns Red, the projector has entered standby mode...

User Guide
Page 17
..."SOURCE" to your item selection. Power LED Indicates the projector's status. 17 Control Panel English Using the Control Panel POWER Refer to the input source. RE-SYNC Automatically synchronize the projector to the "Power On/Off the Projector" section on -screen display (OSD) menu. Keystone Use to launch the on pages 13-14. Temp LED Indicates the projector's temperature status. MENU Press "MENU" to adjust image distortion caused by tilting the projector. (±40 degrees) Lamp LED Indicates the projector's lamp status. User Controls Control Panel & Remote Control...
..."SOURCE" to your item selection. Power LED Indicates the projector's status. 17 Control Panel English Using the Control Panel POWER Refer to the input source. RE-SYNC Automatically synchronize the projector to the "Power On/Off the Projector" section on -screen display (OSD) menu. Keystone Use to launch the on pages 13-14. Temp LED Indicates the projector's temperature status. MENU Press "MENU" to adjust image distortion caused by tilting the projector. (±40 degrees) Lamp LED Indicates the projector's lamp status. User Controls Control Panel & Remote Control...

User Guide
Page 18
... the display image. User Controls Lamp 3D Invert VGA Remote Control Using the Remote Control Power On Refer to the "Power On" section on page 14. Mask off a few pixels on each edge of the image to be displayed. Use the function to adjust if image source happens to be displayed. Select auto detection all connector ports or lock current connector port. Part of the display image. 18 LBX Native Brightness Contrast EdgeMask Source Lock Overscan Enable the viewing of the picture. Control...
... the display image. User Controls Lamp 3D Invert VGA Remote Control Using the Remote Control Power On Refer to the "Power On" section on page 14. Mask off a few pixels on each edge of the image to be displayed. Use the function to adjust if image source happens to be displayed. Select auto detection all connector ports or lock current connector port. Part of the display image. 18 LBX Native Brightness Contrast EdgeMask Source Lock Overscan Enable the viewing of the picture. Control...

User Guide
Page 22
User Controls Main Menu OPTIONS Sub Menu Source Lock High Altitude Information Hide Background Color Test Pattern Advanced Lamp Settings Reset Auto Power Off (min.) Sleep Timer (min.) Exit Lamp Hours Lamp Reminder Brightness Mode Lamp Reset Exit Settings On / Off On / Off On / Off Black / Red / Blue / Green / White None / Grid / White Pattern 0-180 0-995 On / Off STD/Bright Yes/No Noottee Please note that the on-screen display (OSD) menus vary according to the signal type selected...
User Controls Main Menu OPTIONS Sub Menu Source Lock High Altitude Information Hide Background Color Test Pattern Advanced Lamp Settings Reset Auto Power Off (min.) Sleep Timer (min.) Exit Lamp Hours Lamp Reminder Brightness Mode Lamp Reset Exit Settings On / Off On / Off On / Off Black / Red / Blue / Green / White None / Grid / White Pattern 0-180 0-995 On / Off STD/Bright Yes/No Noottee Please note that the on-screen display (OSD) menus vary according to the signal type selected...
User Guide
Page 29
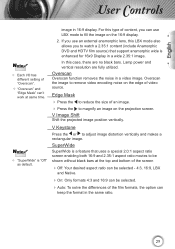
...:9 display. 2. Overscan Overscan function removes the noise in 16:9 display. V Keystone Press the or to remove video encoding noise on the projection screen. Overscan the image to adjust image distortion vertically and makes a rectangular image. Noottee "SuperWide" is "Off" as default. For this case, there are fully utilized. English User Controls Noottee Each I/O has different setting of "Overscan". "Overscan" and "Edge Mask" can't work...
...:9 display. 2. Overscan Overscan function removes the noise in 16:9 display. V Keystone Press the or to remove video encoding noise on the projection screen. Overscan the image to adjust image distortion vertically and makes a rectangular image. Noottee "SuperWide" is "Off" as default. For this case, there are fully utilized. English User Controls Noottee Each I/O has different setting of "Overscan". "Overscan" and "Edge Mask" can't work...

User Guide
Page 32
Press "Enter" to select your preferred language. The image is the default selection. User Controls SETUP Language Choose the multilingual OSD menu. Press or into the sub menu and then use the or key to finalize the selection. Projection Front-Desktop This is projected straight on the screen. Rear-Desktop When selected, the image will appear reversed. Front-Ceiling When selected, the image will turn upside down. 32
Press "Enter" to select your preferred language. The image is the default selection. User Controls SETUP Language Choose the multilingual OSD menu. Press or into the sub menu and then use the or key to finalize the selection. Projection Front-Desktop This is projected straight on the screen. Rear-Desktop When selected, the image will appear reversed. Front-Ceiling When selected, the image will turn upside down. 32

User Guide
Page 38
User Controls OPTIONS | Lamp Settings Lamp Hours Display the projection time. Lamp Reminder Choose this function to show or to dim the projector lamp which will appear 30 hours before suggested replacement of lamp. The message will lower power consumption and extend the lamp life. BRIGHT: Choose "BRIGHT" to increase the brightness. Brightness Mode STD: Choose "STD" to hide the warning message when the changing lamp message is displayed. Lamp Reset Reset the lamp hour counter after replacing the lamp. 38
User Controls OPTIONS | Lamp Settings Lamp Hours Display the projection time. Lamp Reminder Choose this function to show or to dim the projector lamp which will appear 30 hours before suggested replacement of lamp. The message will lower power consumption and extend the lamp life. BRIGHT: Choose "BRIGHT" to increase the brightness. Brightness Mode STD: Choose "STD" to hide the warning message when the changing lamp message is displayed. Lamp Reset Reset the lamp hour counter after replacing the lamp. 38

User Guide
Page 39
... the cables and power connections are not bent or broken. Check if the projection lamp has been securely installed. If a problem persists, please contact your projector, please refer to 10.5 meters) from the projector. The image is stretched when displaying 16:9 DVD title When you play anamorphic DVD or 16:9 DVD, the projector will show the best image in 16:9 format on -screen...
... the cables and power connections are not bent or broken. Check if the projection lamp has been securely installed. If a problem persists, please contact your projector, please refer to 10.5 meters) from the projector. The image is stretched when displaying 16:9 DVD title When you play anamorphic DVD or 16:9 DVD, the projector will show the best image in 16:9 format on -screen...
User Guide
Page 41
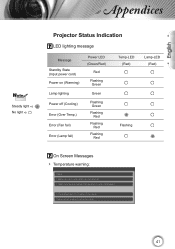
English Appendices Noottee Steady light No light Projector Status Indication LED lighting message Message Standby State (Input power cord) Power on (Warming) Lamp lighting Power off (Cooling) Error (Over Temp.) Error (Fan fail) Error (Lamp fail) Power LED (Green/Red) Red Flashing Green Green Flashing Green Flashing Red Flashing Red Flashing Red Temp-LED (Red) Flashing Lamp-LED (Red) On Screen Messages Temperature warning: 41
English Appendices Noottee Steady light No light Projector Status Indication LED lighting message Message Standby State (Input power cord) Power on (Warming) Lamp lighting Power off (Cooling) Error (Over Temp.) Error (Fan fail) Error (Lamp fail) Power LED (Green/Red) Red Flashing Green Green Flashing Green Flashing Red Flashing Red Flashing Red Temp-LED (Red) Flashing Lamp-LED (Red) On Screen Messages Temperature warning: 41

User Guide
Page 42
Appendices Fan failed: Lamp warning: Remote Control Problems If the remote control does not work Check the operating angle of the remote control is within 7 m (±0°) of the IR receivers on the projector. Make sure there are exhausted. 42 Move to within ±15° both horizontally and vertically of one of the projector. Make sure the batteries are inserted correctly. Replace batteries if they are not any obstructions between the remote control and the projector.
Appendices Fan failed: Lamp warning: Remote Control Problems If the remote control does not work Check the operating angle of the remote control is within 7 m (±0°) of the IR receivers on the projector. Make sure there are exhausted. 42 Move to within ±15° both horizontally and vertically of one of the projector. Make sure the batteries are inserted correctly. Replace batteries if they are not any obstructions between the remote control and the projector.
User Guide
Page 43
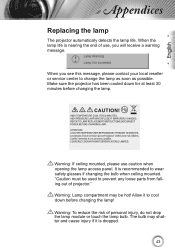
.... 43 The bulb may be used to cool down for at least 30 minutes before changing the lamp! When you will receive a warning message. "Caution must be hot! When the lamp life is nearing the end of projector." Warning: Lamp compartment may shatter and cause injury if it to prevent any loose parts from falling out of use caution when opening the lamp access panel. Allow...
.... 43 The bulb may be used to cool down for at least 30 minutes before changing the lamp! When you will receive a warning message. "Caution must be hot! When the lamp life is nearing the end of projector." Warning: Lamp compartment may shatter and cause injury if it to prevent any loose parts from falling out of use caution when opening the lamp access panel. Allow...

User Guide
Page 44
... power cord. 4. Lift up the lamp handle and remove the lamp module slowly and carefully. 4 To replace the lamp module, reverse the previous steps. 8. Switch off the power to clean the lamp module if it was accidentally touched. 2 3 4 Lamp Replacement Procedure: 1. Lamp Reset: (i) Press "MENU" (ii) Select "OPTIONS" (iii) Select "Lamp Settings" (iv) Select "Lamp Reset" (v) Select "Yes". 44 Use a dry cloth to the projector by pressing the "POWER" button...
... power cord. 4. Lift up the lamp handle and remove the lamp module slowly and carefully. 4 To replace the lamp module, reverse the previous steps. 8. Switch off the power to clean the lamp module if it was accidentally touched. 2 3 4 Lamp Replacement Procedure: 1. Lamp Reset: (i) Press "MENU" (ii) Select "OPTIONS" (iii) Select "Lamp Settings" (iv) Select "Lamp Reset" (v) Select "Yes". 44 Use a dry cloth to the projector by pressing the "POWER" button...

User Guide
Page 49
...31 0D 3D Mode DLP-Link ~XX230 0 7E 30 30 32 33 30 20 30 0D 3D Mode Off English ~XX231 1 7E 30 30 32 33 31 20 31 0D 3D Sync Invert On ~XX231... 7E 30 30 39 31 20 a 0D Signal Automatic n=0 disable; Position n = -5 (a=2D 35) ~ 5 (a=35) By timing ~XX77 n 7E 30 30 37 37 20 aabbcc 0D Security Security Timer Month/Day/Hour n = mm/dd/hh mm = 00 ...Color Blue ~XX104 2 7E 30 30 31 30 34 20 32 0D Black ~XX104 3 7E 30 30 31 30 34 20 33 0D Red ~XX104 4 7E 30 30 31 30 34 20 34 0D Green ~XX104 5 7E 30 30 31 30 34 20 35 0D White ~XX106 n 7E 30 30 31 30 36 20 a 0D Auto Power...
...31 0D 3D Mode DLP-Link ~XX230 0 7E 30 30 32 33 30 20 30 0D 3D Mode Off English ~XX231 1 7E 30 30 32 33 31 20 31 0D 3D Sync Invert On ~XX231... 7E 30 30 39 31 20 a 0D Signal Automatic n=0 disable; Position n = -5 (a=2D 35) ~ 5 (a=35) By timing ~XX77 n 7E 30 30 37 37 20 aabbcc 0D Security Security Timer Month/Day/Hour n = mm/dd/hh mm = 00 ...Color Blue ~XX104 2 7E 30 30 31 30 34 20 32 0D Black ~XX104 3 7E 30 30 31 30 34 20 33 0D Red ~XX104 4 7E 30 30 31 30 34 20 34 0D Green ~XX104 5 7E 30 30 31 30 34 20 35 0D White ~XX106 n 7E 30 30 31 30 36 20 a 0D Auto Power...

User Guide
Page 50
... Standby/Warming/Cooling/Out of Range/Lamp fail/ INFOn n : 0/1/2/3/4/6/7/8/9 = Standby/Warming/Cooling/Out of Range/Lamp fail/ Fan Lock/Over Temperature/Lamp Hours Running Out/Cover Open Fan Lock/Over Temperature/Lamp Hours Running Out/Cover Open READ from projector 232 ASCII Code HEX Code Function Projector Return Description ~XX121 1 7E 30 30 31 32 31 20 31 0D Input Source Commands OKn n : 0/1/2/3/4 = None/VGA/SVideo/Video/HDMI ~XX122 1 7E 30 30 31 32 32 20 31 0D Software...
... Standby/Warming/Cooling/Out of Range/Lamp fail/ INFOn n : 0/1/2/3/4/6/7/8/9 = Standby/Warming/Cooling/Out of Range/Lamp fail/ Fan Lock/Over Temperature/Lamp Hours Running Out/Cover Open Fan Lock/Over Temperature/Lamp Hours Running Out/Cover Open READ from projector 232 ASCII Code HEX Code Function Projector Return Description ~XX121 1 7E 30 30 31 32 31 20 31 0D Input Source Commands OKn n : 0/1/2/3/4 = None/VGA/SVideo/Video/HDMI ~XX122 1 7E 30 30 31 32 32 20 31 0D Software...


