
User Manual
Page 1
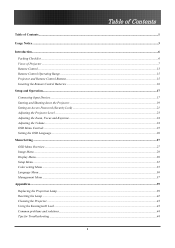
... ...27 Image Menu ...28 Display Menu...30 Setup Menu ...32 Color setting Menu ...35 Language Menu ...36 Management Menu ...37 Appendices...39 Replacing the Projection Lamp ...39 Resetting the Lamp ...42 Cleaning the Projector...43 Using the Kensington® Lock ...43 Common problems and solutions...44 Tips for Troubleshooting ...44 1
... ...27 Image Menu ...28 Display Menu...30 Setup Menu ...32 Color setting Menu ...35 Language Menu ...36 Management Menu ...37 Appendices...39 Replacing the Projection Lamp ...39 Resetting the Lamp ...42 Cleaning the Projector...43 Using the Kensington® Lock ...43 Common problems and solutions...44 Tips for Troubleshooting ...44 1

User Manual
Page 2
Projection Size...49 Timing Mode Table...50 Projector Dimensions ...51 Regulatory Compliance...52 FCC Warning...52 Canada...52 Safety Certifications...52 EN 55022 Warning ...52 RoHS Compliant ...52 2 Table of Contents LED Error Messages ...45 Image Problems ...46 Lamp Problems...46 Remote Control Problems...47 Audio Problems ...47 Having the Projector Serviced...48 Specifications...49 Projection Distance V.S.
Projection Size...49 Timing Mode Table...50 Projector Dimensions ...51 Regulatory Compliance...52 FCC Warning...52 Canada...52 Safety Certifications...52 EN 55022 Warning ...52 RoHS Compliant ...52 2 Table of Contents LED Error Messages ...45 Image Problems ...46 Lamp Problems...46 Remote Control Problems...47 Audio Problems ...47 Having the Projector Serviced...48 Specifications...49 Projection Distance V.S.

User Manual
Page 3
... in this manual to alert you read this manual for future reference. DANGER: Do not point the laser in the unit. Aside from the projection lamp, there are denoted in bold font as books or bags on an unstable surface, cart, or stand. Avoid using the projector. Important: Provides additional ... strongly recommended that you of the projector. Do not place heavy objects such as in this example: "Push the Menu button on Optoma product. Throughout this manual, component parts and items in the OSD menus are no user-serviceable parts in the eyes. Usage Notice Usage Notice ...
... in this manual to alert you read this manual for future reference. DANGER: Do not point the laser in the unit. Aside from the projection lamp, there are denoted in bold font as books or bags on an unstable surface, cart, or stand. Avoid using the projector. Important: Provides additional ... strongly recommended that you of the projector. Do not place heavy objects such as in this example: "Push the Menu button on Optoma product. Throughout this manual, component parts and items in the OSD menus are no user-serviceable parts in the eyes. Usage Notice Usage Notice ...

User Manual
Page 4
.... This product may contain other electronic waste that can be hazardous if done incorrectly. For lamp specific disposal information check WWW.LAMPRECYCLE.ORG. Refer to "Replacing the Projection Lamp" on page 52. 4 Remove the batteries from the remote control when storing or not...the Projector" on the power cord. Important Recycle Instructions: Lamp(s) inside this procedure. Replacing the Lamp Replacing the lamp can be in use the supplied power cord. Before replacing the lamp: Unplug the power cord. Allow the lamp to cool for about one hour. Regulatory Warnings Before ...
.... This product may contain other electronic waste that can be hazardous if done incorrectly. For lamp specific disposal information check WWW.LAMPRECYCLE.ORG. Refer to "Replacing the Projection Lamp" on page 52. 4 Remove the batteries from the remote control when storing or not...the Projector" on the power cord. Important Recycle Instructions: Lamp(s) inside this procedure. Replacing the Lamp Replacing the lamp can be in use the supplied power cord. Before replacing the lamp: Unplug the power cord. Allow the lamp to cool for about one hour. Regulatory Warnings Before ...

User Manual
Page 7
LABEL DESCRIPTION Focus Focuses the projected image Lens zoom Enlarges the projected image Screws Holds lamp to protect lens when not in use Height-adjuster but- Do not obstruct any of Projector Front-right View Introduction 1 2 3 8 37 65 4 ITEM 1. 2. 3. 4. 5. 6. 7. 8. Views of ... use Lens cover Slide across to projector See "Top view-OSD buttons and LEDs" IR receiver Receiver for good air circulation, which keeps the projector lamp cool.
LABEL DESCRIPTION Focus Focuses the projected image Lens zoom Enlarges the projected image Screws Holds lamp to protect lens when not in use Height-adjuster but- Do not obstruct any of Projector Front-right View Introduction 1 2 3 8 37 65 4 ITEM 1. 2. 3. 4. 5. 6. 7. 8. Views of ... use Lens cover Slide across to projector See "Top view-OSD buttons and LEDs" IR receiver Receiver for good air circulation, which keeps the projector lamp cool.

User Manual
Page 8
... VOL-/ Left cursor Decreases volume Navigates and changes settings in the OSD SEE PAGE: 24 24 Lamp LED Keystone/ UP cursor Power LED Orange Lamp ready-you can safely turn on or off the projector Flashing Lamp not ready-do not press the power button Corrects image-trapezoid (wider top) effect Navigates and...
... VOL-/ Left cursor Decreases volume Navigates and changes settings in the OSD SEE PAGE: 24 24 Lamp LED Keystone/ UP cursor Power LED Orange Lamp ready-you can safely turn on or off the projector Flashing Lamp not ready-do not press the power button Corrects image-trapezoid (wider top) effect Navigates and...

User Manual
Page 19
The POWER and LAMP LEDs on the projector turn on the projector. The projector splash screen displays and connected devices are supported through the VGA connector.) Setup and Operation 6. ...Starting and Shutting down the Projector 1. Connect the power cord to the projector [A] Connect the other end to on the connected devices. 4. Ensure the LAMP LED is on a steady (not flashing) orange and then press the Power button to turn on page 21 if Security Lock is connected, press the...
The POWER and LAMP LEDs on the projector turn on the projector. The projector splash screen displays and connected devices are supported through the VGA connector.) Setup and Operation 6. ...Starting and Shutting down the Projector 1. Connect the power cord to the projector [A] Connect the other end to on the connected devices. 4. Ensure the LAMP LED is on a steady (not flashing) orange and then press the Power button to turn on page 21 if Security Lock is connected, press the...

User Manual
Page 20
Turn off . 8. The projector will turn off the main Power switch when the Lamp LED stops flashing. Setup and Operation Caution: Do not unplug the power cord until the Ready LED stops flashing, indicating the projector has cooled down. 20 When the "Power Off? / Press Power again" message appears, press the Power button. 7.
Turn off . 8. The projector will turn off the main Power switch when the Lamp LED stops flashing. Setup and Operation Caution: Do not unplug the power cord until the Ready LED stops flashing, indicating the projector has cooled down. 20 When the "Power Off? / Press Power again" message appears, press the Power button. 7.
User Manual
Page 33
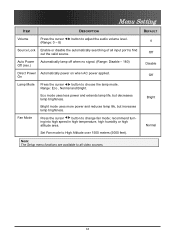
...Fan Mode Press the cursor button to choose the lamp mode. Range: Eco , Normal and Bright. Eco mode uses less power and extends lamp life, but increases lamp brightness. Bright mode uses more power and reduces lamp life, but decreases lamp brightness. recommend turning into high speed in high ...Disable Off Bright Normal Note: The Setup menu functions are available to all input port to find out the valid source. Auto Power Automatically lamp off when no signal. (Range: Disable - 180) Off (min.) Direct Power Automatically power on when AC power applied. Source Lock Enable...
...Fan Mode Press the cursor button to choose the lamp mode. Range: Eco , Normal and Bright. Eco mode uses less power and extends lamp life, but increases lamp brightness. Bright mode uses more power and reduces lamp life, but decreases lamp brightness. recommend turning into high speed in high ...Disable Off Bright Normal Note: The Setup menu functions are available to all input port to find out the valid source. Auto Power Automatically lamp off when no signal. (Range: Disable - 180) Off (min.) Direct Power Automatically power on when AC power applied. Source Lock Enable...

User Manual
Page 34
Menu Setting Setup Menu Functions Available for Connected Source Function RGB Projection Type O Video Type Audio Input O Volume O Source Lock O Auto Power Off O Direct Power On O Lamp Mode O Fan Mode O O = available video source DVI Component Video Composite Video O O O O O O O O O O O O O O O O O O O O O O O O O S-Video O O O O O O O O O 34
Menu Setting Setup Menu Functions Available for Connected Source Function RGB Projection Type O Video Type Audio Input O Volume O Source Lock O Auto Power Off O Direct Power On O Lamp Mode O Fan Mode O O = available video source DVI Component Video Composite Video O O O O O O O O O O O O O O O O O O O O O O O O O S-Video O O O O O O O O O 34

User Manual
Page 38
... - Off) Security Press the cursor button to enter the You can only use the following four cursor buttons, in the password fields. See "Resetting the Lamp" on page 21 for the blank screen. (Range: Black - Green - See "Setting an Access Password (Security Lock)" on page 42. Red - or Enter button to..., it must be entered every time after you enable Security Lock a Register Password dialog box appears: DEFAULT 0% Blue On Disable Status Reset You can see Lamp Hours , Video Information , Active Source and Reset...
... - Off) Security Press the cursor button to enter the You can only use the following four cursor buttons, in the password fields. See "Resetting the Lamp" on page 21 for the blank screen. (Range: Black - Green - See "Setting an Access Password (Security Lock)" on page 42. Red - or Enter button to..., it must be entered every time after you enable Security Lock a Register Password dialog box appears: DEFAULT 0% Blue On Disable Status Reset You can see Lamp Hours , Video Information , Active Source and Reset...

User Manual
Page 39
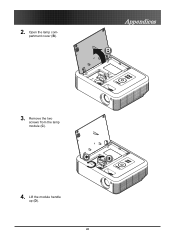
... projector at least an hour before replacing the lamp. Replacing the Projection Lamp Appendices Appendices The projection lamp should be replaced with a certified replacement part, which you can order from your local dealer. It should be disposed of the new lamp-doing so may shorten its operation life. Warning...: Be sure to do so could result in a severe burn. 1. The lamp contains a certain amount of mercury and should only be replaced when it burns...
... projector at least an hour before replacing the lamp. Replacing the Projection Lamp Appendices Appendices The projection lamp should be replaced with a certified replacement part, which you can order from your local dealer. It should be disposed of the new lamp-doing so may shorten its operation life. Warning...: Be sure to do so could result in a severe burn. 1. The lamp contains a certain amount of mercury and should only be replaced when it burns...
User Manual
Page 40
Lift the module handle up (D). 40 Appendices B 3. Remove the two screws from the lamp module (C). C D 4. 2. Open the lamp compartment cover (B).
Lift the module handle up (D). 40 Appendices B 3. Remove the two screws from the lamp module (C). C D 4. 2. Open the lamp compartment cover (B).

User Manual
Page 41
5. Reverse steps 1 to 5 to remove the lamp module D (D) Appendices 6. Pull firmly on the module handle to install the new lamp module. 41
5. Reverse steps 1 to 5 to remove the lamp module D (D) Appendices 6. Pull firmly on the module handle to install the new lamp module. 41

User Manual
Page 42
... down to the Management menu. 3. Press the cursor buttons in this order: ; ; ; . Press the cursor or Enter button. The Status menu appears again showing the Lamp Hours reset to zero. Press the cursor button to move down to the following: 1. Appendices Resetting the...
... down to the Management menu. 3. Press the cursor buttons in this order: ; ; ; . Press the cursor or Enter button. The Status menu appears again showing the Lamp Hours reset to zero. Press the cursor button to move down to the following: 1. Appendices Resetting the...

User Manual
Page 46
...When the Ready LED is clean. Adjust the Focus on the screen 1. Problem: The image is streaked 1. Problem: The color of the OSD. Lamp Problems Problem: There is blurred 1. Appendices Image Problems Problem: No image appears on the projector. 2. Ensure the projector-to the screen as possible.... 2. Put the old lamp back in the correct order. Problem: The image is no contrast Adjust the Contrast setting on the Utility menu of the projected image does...
...When the Ready LED is clean. Adjust the Focus on the screen 1. Problem: The image is streaked 1. Problem: The color of the OSD. Lamp Problems Problem: There is blurred 1. Appendices Image Problems Problem: No image appears on the projector. 2. Ensure the projector-to the screen as possible.... 2. Put the old lamp back in the correct order. Problem: The image is no contrast Adjust the Contrast setting on the Utility menu of the projected image does...


