
User manual
Page 3
......44 Setup network control settings menu 45 Info menu...50 3D Setup...51 maintenance 52 Replacing the lamp...52 Replacing the lamp (continued 53 Installing and cleaning the dust filter 54 additional information 55 Compatible resolutions...55 Image size... and projection distance 56 Projector dimensions and ceiling mount installation 61 IR remote codes...62 Using the Information button...64 Troubleshooting...64 Warning indicators...66 Specifications...68 Optoma...
......44 Setup network control settings menu 45 Info menu...50 3D Setup...51 maintenance 52 Replacing the lamp...52 Replacing the lamp (continued 53 Installing and cleaning the dust filter 54 additional information 55 Compatible resolutions...55 Image size... and projection distance 56 Projector dimensions and ceiling mount installation 61 IR remote codes...62 Using the Information button...64 Troubleshooting...64 Warning indicators...66 Specifications...68 Optoma...

User manual
Page 4
...air flow. ‡‡ To reduce the risk of important operating and maintenance (servicing) instructions in the literature accompanying the appliance. Please call Optoma before you to dangerous voltages or other apparatus such as recommended in this may cause electric shock. ‡‡ Do not attempt to service... product's enclosure that may become damaged. ‡‡ Do not block the light coming out of the projector lens when in operation. The lamp inside the projector becomes very hot during operation and the gases my ignite and result in a fire. ‡‡ Do not use the ...
...air flow. ‡‡ To reduce the risk of important operating and maintenance (servicing) instructions in the literature accompanying the appliance. Please call Optoma before you to dangerous voltages or other apparatus such as recommended in this may cause electric shock. ‡‡ Do not attempt to service... product's enclosure that may become damaged. ‡‡ Do not block the light coming out of the projector lens when in operation. The lamp inside the projector becomes very hot during operation and the gases my ignite and result in a fire. ‡‡ Do not use the ...
User manual
Page 5
... the manufacturer. ‡‡ Do not look into straight into the projector lens during operation. Please be subjected to change the lamp as soon as non standard installation may be more likely than adults to page 38). ‡‡ When switching the projector off... pictures immediately and consult a medical specialist: (1) altered vision; (2) light-headedness; (3) dizziness; (4) involuntary movements such as described on until the lamp module has been replaced. Do not use or store the projector in certain Projector pictures or video games. Allow 90 seconds for a long period of...
... the manufacturer. ‡‡ Do not look into straight into the projector lens during operation. Please be subjected to change the lamp as soon as non standard installation may be more likely than adults to page 38). ‡‡ When switching the projector off... pictures immediately and consult a medical specialist: (1) altered vision; (2) light-headedness; (3) dizziness; (4) involuntary movements such as described on until the lamp module has been replaced. Do not use or store the projector in certain Projector pictures or video games. Allow 90 seconds for a long period of...

User manual
Page 9
Lamp Cover 13. INTRODUCTION Product Overview 12 34 56 7 11 10 9 48 15 12 13 10 14 Note: Do not block projector inlet or outlet air vents. Lens 12. Ventilation (outlet) 14. KensingtonTM Lock Port 15. Keypad 6. Speaker No Item 9 Lens Cap 10. IR Receiver 5. Power Socket 8. Tilt-Adjustment Feet 11. Ventilation (inlet) English 9 Zoom Ring 3. Input / Output 7. Focus Ring 2. Lens Shift Ring 4. No Item 1.
Lamp Cover 13. INTRODUCTION Product Overview 12 34 56 7 11 10 9 48 15 12 13 10 14 Note: Do not block projector inlet or outlet air vents. Lens 12. Ventilation (outlet) 14. KensingtonTM Lock Port 15. Keypad 6. Speaker No Item 9 Lens Cap 10. IR Receiver 5. Power Socket 8. Tilt-Adjustment Feet 11. Ventilation (inlet) English 9 Zoom Ring 3. Input / Output 7. Focus Ring 2. Lens Shift Ring 4. No Item 1.

User manual
Page 11
Re-Sync 5. Four Directional Select Keys 6. On/Standby LED 9. Keystone Correction 3. Temp LED No Item 7. Lamp LED 10. Information 4. Menu English 11 Enter 2. Source 11. Power 8. INTRODUCTION Keypad 1 2 11 3 10 4 9 8 7 65 No Item 1.
Re-Sync 5. Four Directional Select Keys 6. On/Standby LED 9. Keystone Correction 3. Temp LED No Item 7. Lamp LED 10. Information 4. Menu English 11 Enter 2. Source 11. Power 8. INTRODUCTION Keypad 1 2 11 3 10 4 9 8 7 65 No Item 1.

User manual
Page 13
... other that table top or ceiling mount. Your room layout or personal preference will invalidate the warranty and may shorten the lifetime of the projector lamp or the projector itself. Note: The further away the projector is designed to distance table on pages 56-60. English 13 IMPORTANT! Do not operate... size for a given distance, please refer to be horizontal and not tilted either forwards/backwards or left/right. For none standard installation advise please contact Optoma.
... other that table top or ceiling mount. Your room layout or personal preference will invalidate the warranty and may shorten the lifetime of the projector lamp or the projector itself. Note: The further away the projector is designed to distance table on pages 56-60. English 13 IMPORTANT! Do not operate... size for a given distance, please refer to be horizontal and not tilted either forwards/backwards or left/right. For none standard installation advise please contact Optoma.

User manual
Page 16
... ‡‡ Make sure the IR transmitter of the remote control is not being shined by sunlight or fluorescent lamps directly. ‡‡ Please keep the remote controller away from fluorescent lamps for over 2 meters or the remote controller might become malfunction. ‡‡ If the remote control is closed... to Inverter-Type fluorescent lamps, it might become ineffective from the remote control to the screen and reflecting the IR beams back to storage conditions. ‡‡ ...
... ‡‡ Make sure the IR transmitter of the remote control is not being shined by sunlight or fluorescent lamps directly. ‡‡ Please keep the remote controller away from fluorescent lamps for over 2 meters or the remote controller might become malfunction. ‡‡ If the remote control is closed... to Inverter-Type fluorescent lamps, it might become ineffective from the remote control to the screen and reflecting the IR beams back to storage conditions. ‡‡ ...

User manual
Page 22
Position Brightness Mode [Lamp Base Data] Reset 3D 3D Mode Values Cancel [Default] Yes -50~50 -50~50 -50~50 -50~50 -50~50 -50~50 Cancel [Default] Yes ...
Position Brightness Mode [Lamp Base Data] Reset 3D 3D Mode Values Cancel [Default] Yes -50~50 -50~50 -50~50 -50~50 -50~50 -50~50 Cancel [Default] Yes ...

User manual
Page 24
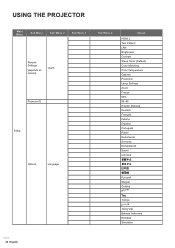
USING THE PROJECTOR Main Menu Sub Menu Screen Type Sub Menu 2 [WXGA / WUXGA models] Lamp Settings Lamp Reminder Lamp Reset Filter Usage Hours Optional Filter Installed Sub Menu 3 Filter Settings Filter Reminder Setup Filter Reset Direct Power On Signal Power On* Auto Power Off (...
USING THE PROJECTOR Main Menu Sub Menu Screen Type Sub Menu 2 [WXGA / WUXGA models] Lamp Settings Lamp Reminder Lamp Reset Filter Usage Hours Optional Filter Installed Sub Menu 3 Filter Settings Filter Reminder Setup Filter Reset Direct Power On Signal Power On* Auto Power Off (...

User manual
Page 25
... Magenta Grid White Grid White Off [Default] On [Default] Off HDMI 2 [Default] Test Pattern LAN Brightness Contrast Sleep Timer Color Matching Color Temperature Gamma Projection Lamp Settings Zoom Freeze MHL HDMI 2 Test Pattern LAN Brightness Contrast Sleep Timer Color Matching Color Temperature Gamma Projection...
... Magenta Grid White Grid White Off [Default] On [Default] Off HDMI 2 [Default] Test Pattern LAN Brightness Contrast Sleep Timer Color Matching Color Temperature Gamma Projection Lamp Settings Zoom Freeze MHL HDMI 2 Test Pattern LAN Brightness Contrast Sleep Timer Color Matching Color Temperature Gamma Projection...
User manual
Page 26
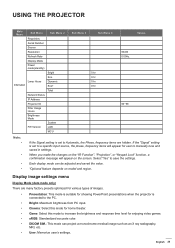
USING THE PROJECTOR Main Menu Sub Menu Sub Menu 2 Sub Menu 3 Remote Settings [depends on remote] User3 Projector ID Setup Options Language Sub Menu 4 Values HDMI 2 Test Pattern LAN Brightness Contrast Sleep Timer [Default] Color Matching Color Temperature Gamma Projection Lamp Settings Zoom Freeze MHL 00~99 English [Default] Deutsch Français Italiano Español Português Polski Nederlands Svenska Norsk/Dansk Suomi Magyar Čeština ไทย Türkçe Tiếng Việt Bahasa Indonesia Română Slovakian 26 English
USING THE PROJECTOR Main Menu Sub Menu Sub Menu 2 Sub Menu 3 Remote Settings [depends on remote] User3 Projector ID Setup Options Language Sub Menu 4 Values HDMI 2 Test Pattern LAN Brightness Contrast Sleep Timer [Default] Color Matching Color Temperature Gamma Projection Lamp Settings Zoom Freeze MHL 00~99 English [Default] Deutsch Français Italiano Español Português Polski Nederlands Svenska Norsk/Dansk Suomi Magyar Čeština ไทย Türkçe Tiếng Việt Bahasa Indonesia Română Slovakian 26 English
User manual
Page 29
... will appear on model and region. USING THE PROJECTOR Main Menu Sub Menu Regulatory Serial Number Source Resolution Refresh Rate Display Mode Power mode(standby) Lamp Hours Information Network Status IP Address Projector ID Filter Usage Hours Brightness Mode FW Version Sub Menu 2 Bright Eco. When you made the changes on...
... will appear on model and region. USING THE PROJECTOR Main Menu Sub Menu Regulatory Serial Number Source Resolution Refresh Rate Display Mode Power mode(standby) Lamp Hours Information Network Status IP Address Projector ID Filter Usage Hours Brightness Mode FW Version Sub Menu 2 Bright Eco. When you made the changes on...

User manual
Page 31
... signal (the frequency and phase items are grayed out). English 31 Position: Adjust the horizontal positioning of the image. Return the factory default settings for lamp-based projectors. ‡‡ Bright: Choose "Bright" to correct it. ‡‡ H. Use this function to increase the brightness. ‡‡... and phase items will be extended. ‡‡ Reset Eco+: When Eco+ mode is activated, the brightness level of inactivity. The lamp life will appear for IR 3D Glasses. 3D - 2D Use this option to disable the 3D function or select the appropriate the 3D function...
... signal (the frequency and phase items are grayed out). English 31 Position: Adjust the horizontal positioning of the image. Return the factory default settings for lamp-based projectors. ‡‡ Bright: Choose "Bright" to correct it. ‡‡ H. Use this function to increase the brightness. ‡‡... and phase items will be extended. ‡‡ Reset Eco+: When Eco+ mode is activated, the brightness level of inactivity. The lamp life will appear for IR 3D Glasses. 3D - 2D Use this option to disable the 3D function or select the appropriate the 3D function...

User manual
Page 32
... in 16:9 mode. In this situation, the image will be black bars around the image in 16:9 display. In this case, there are fully utilized. Lamp power and vertical resolution are no black bars. Display aspect ratio menu Aspect Ratio Select the aspect ratio of content, you use external 16x9 lens...
... in 16:9 mode. In this situation, the image will be black bars around the image in 16:9 display. In this case, there are fully utilized. Lamp power and vertical resolution are no black bars. Display aspect ratio menu Aspect Ratio Select the aspect ratio of content, you use external 16x9 lens...
User manual
Page 38
... to show or to turn mute off the audio out while the lamp is displayed. The message will appear 30 hours before suggested replacement of the projector. Lamp Reset Resets the lamp hour counter after replacing the lamp. 38 English USING THE PROJECTOR Display keystone menu Keystone Adjust the image...WUXGA models only) Choose the screen type from 16:9 and 16:10. Use this option to temporarily turn mute on the side panel of lamp. Note: "Mute" function affects both internal and external speaker volume. Audio mute menu Mute Use this option to reassign the available Audio Input...
... to show or to turn mute off the audio out while the lamp is displayed. The message will appear 30 hours before suggested replacement of the projector. Lamp Reset Resets the lamp hour counter after replacing the lamp. 38 English USING THE PROJECTOR Display keystone menu Keystone Adjust the image...WUXGA models only) Choose the screen type from 16:9 and 16:10. Use this option to temporarily turn mute on the side panel of lamp. Note: "Mute" function affects both internal and external speaker volume. Audio mute menu Mute Use this option to reassign the available Audio Input...

User manual
Page 41
... command. Setup options menu Language Select the multilingual OSD menu between HDMI 2, test pattern, LAN, brightness, contrast, sleep timer, color matching, color temperature, gamma, projection, lamp settings, zoom, freeze, and MHL. The available options include "Off", "CC1", and "CC2". Power On Link* CEC power on model and region. Power Off Link...
... command. Setup options menu Language Select the multilingual OSD menu between HDMI 2, test pattern, LAN, brightness, contrast, sleep timer, color matching, color temperature, gamma, projection, lamp settings, zoom, freeze, and MHL. The available options include "Off", "CC1", and "CC2". Power On Link* CEC power on model and region. Power Off Link...

User manual
Page 50
... ‡‡ Serial Number ‡‡ Source ‡‡ Resolution ‡‡ Refresh Rate ‡‡ Display Mode ‡‡ Power Mode (Standby) ‡‡ Lamp Hours in total and in a set mode as listed below: ±± Bright ±± Eco. ±± Dynamic ±± Eco+ ±± Total...
... ‡‡ Serial Number ‡‡ Source ‡‡ Resolution ‡‡ Refresh Rate ‡‡ Display Mode ‡‡ Power Mode (Standby) ‡‡ Lamp Hours in total and in a set mode as listed below: ±± Bright ±± Eco. ±± Dynamic ±± Eco+ ±± Total...

User manual
Page 52
...: If ceiling mounted, please use , a warning message will appear on the screen. Allow it is hot! maintenance Replacing the lamp The projector automatically detects the lamp life. The bulb may shatter and cause injury if it to wear safety glasses if changing the bulb when ceiling mounted. Warning... Lamp Warning Lamp life exceeded. Caution must be used to change the lamp as soon as possible. When you see this message, please contact your local reseller or service center ...
...: If ceiling mounted, please use , a warning message will appear on the screen. Allow it is hot! maintenance Replacing the lamp The projector automatically detects the lamp life. The bulb may shatter and cause injury if it to wear safety glasses if changing the bulb when ceiling mounted. Warning... Lamp Warning Lamp life exceeded. Caution must be used to change the lamp as soon as possible. When you see this message, please contact your local reseller or service center ...

User manual
Page 53
... the projector to the projector by pressing the " " button on the lamp module. 3 7. Disconnect the power cord. 4. To replace the lamp module, reverse the previous steps. 10. Lift up the lamp handle. 4 8. Lamp Reset: (i) Press "Menu" > (ii) Select "Setup" > (iii) Select "Lamp Settings" > (iv) Select "Lamp Reset" > (v) Select "Yes". English 53 Switch off the power to...
... the projector to the projector by pressing the " " button on the lamp module. 3 7. Disconnect the power cord. 4. To replace the lamp module, reverse the previous steps. 10. Lift up the lamp handle. 4 8. Lamp Reset: (i) Press "Menu" > (ii) Select "Setup" > (iii) Select "Lamp Settings" > (iv) Select "Lamp Reset" > (v) Select "Yes". English 53 Switch off the power to...

User manual
Page 54
...filter, reverse the previous steps. 2 1 54 English Do not touch the glass area of the lamp. MAINTENANCE Note: The screw on the lamp cover and the lamp cannot be turned on if the lamp cover has not been placed back on the remote control or the projector keypad. 2. Remove the dust... filter carefully.1 4. The projector cannot be removed. Hand oil can cause the lamp shatter. Disconnect the power cord. 3. Clean or replace the dust filter.2 5. Switch off the power to clean the dust filter every three months....
...filter, reverse the previous steps. 2 1 54 English Do not touch the glass area of the lamp. MAINTENANCE Note: The screw on the lamp cover and the lamp cannot be turned on if the lamp cover has not been placed back on the remote control or the projector keypad. 2. Remove the dust... filter carefully.1 4. The projector cannot be removed. Hand oil can cause the lamp shatter. Disconnect the power cord. 3. Clean or replace the dust filter.2 5. Switch off the power to clean the dust filter every three months....


