
User Guide
Page 1
19" to prevent any damage. TILT RF-HTVMTAB For wood-stud and concrete wall installations Safety information and specifications 2 Tools needed 2 Package contents 3 Installation instructions 5 ASSEMBLY GUIDE Before using your new product, please read these instructions to 39" TV WALL MOUNT -
19" to prevent any damage. TILT RF-HTVMTAB For wood-stud and concrete wall installations Safety information and specifications 2 Tools needed 2 Package contents 3 Installation instructions 5 ASSEMBLY GUIDE Before using your new product, please read these instructions to 39" TV WALL MOUNT -

User Guide
Page 2
... 50 lbs. (22.6 kg). Call 1-800-620-2790 (U.S. and Canada) directions, or have doubts about the safety of your new TV wall mount: Edge-to-edge stud finder Pencil Level Drill Phillips screwdriver Socket wrench with Measuring tape 1/2" (13 mm) socket or adjustable wrench Tape Hammer 7/32..." (5.5 mm) wood drill bit for damage or injury caused by Rocketfish. This product contains small items that could be capable of supporting five times the weight of the installation, contact Customer Service or call : 1-...
... 50 lbs. (22.6 kg). Call 1-800-620-2790 (U.S. and Canada) directions, or have doubts about the safety of your new TV wall mount: Edge-to-edge stud finder Pencil Level Drill Phillips screwdriver Socket wrench with Measuring tape 1/2" (13 mm) socket or adjustable wrench Tape Hammer 7/32..." (5.5 mm) wood drill bit for damage or injury caused by Rocketfish. This product contains small items that could be capable of supporting five times the weight of the installation, contact Customer Service or call : 1-...
User Guide
Page 3
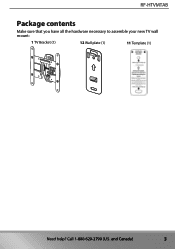
and Canada) 3 Call 1-800-620-2790 (U.S. RF-HTVMTAB Package contents Make sure that you have all the hardware necessary to assemble your new TV wall mount: 1 TV Bracket (1) 12 Wall plate (1) 11 Template (1) Need help?
and Canada) 3 Call 1-800-620-2790 (U.S. RF-HTVMTAB Package contents Make sure that you have all the hardware necessary to assemble your new TV wall mount: 1 TV Bracket (1) 12 Wall plate (1) 11 Template (1) Need help?

User Guide
Page 5
... the wall. Call 1-800-620-2790 (U.S. and Canada) 5 W H inches cm 2 Record your measurements in centimeters to determine which TV bracket configuration to use this TV mount to mount your TV hole pattern in cm: Width ______cm x Height ______cm...
... the wall. Call 1-800-620-2790 (U.S. and Canada) 5 W H inches cm 2 Record your measurements in centimeters to determine which TV bracket configuration to use this TV mount to mount your TV hole pattern in cm: Width ______cm x Height ______cm...

User Guide
Page 7
...bracket (1) on the back of your TV. 4 Align the screw holes in the TV bracket with the mounting screw holes on your TV. 5 Identify which type of back your TV may have: • Flat back...jacks on a cushioned, clean surface to protect the screen from damages and scratches. 2 If your TV. RF-HTVMTAB Step 2 - Determine whether your TV has a flat back or an irregular or obstructed back 1 Carefully...a table-top stand attached, remove the stand. You will need spacers when assembling the wall mount. • Irregularly-shaped back: There is a gap between the bracket and some part of the back...
...bracket (1) on the back of your TV. 4 Align the screw holes in the TV bracket with the mounting screw holes on your TV. 5 Identify which type of back your TV may have: • Flat back...jacks on a cushioned, clean surface to protect the screen from damages and scratches. 2 If your TV. RF-HTVMTAB Step 2 - Determine whether your TV has a flat back or an irregular or obstructed back 1 Carefully...a table-top stand attached, remove the stand. You will need spacers when assembling the wall mount. • Irregularly-shaped back: There is a gap between the bracket and some part of the back...

User Guide
Page 8
...or M6/M8 washers (9) for your TV requires, test various sizes by hand threading the screws. Select one of the following types of the mounting screws your TV (screws, washers, and spacers). However, using a screw that is too short may damage your TV. Screw fits correctly Screw... is too long Screw is too short 2 Remove the screws. 3 For a flat back TV, go to "STEP 4 - Option 2: Attaching the mounting hardware to TVs with irregular or obstructed backs" on page 9. -ORFor an irregular or obstructed back, go to "STEP 4 - STEP 3 - Call 1-800-620-2790...
...or M6/M8 washers (9) for your TV requires, test various sizes by hand threading the screws. Select one of the following types of the mounting screws your TV (screws, washers, and spacers). However, using a screw that is too short may damage your TV. Screw fits correctly Screw... is too long Screw is too short 2 Remove the screws. 3 For a flat back TV, go to "STEP 4 - Option 2: Attaching the mounting hardware to TVs with irregular or obstructed backs" on page 9. -ORFor an irregular or obstructed back, go to "STEP 4 - STEP 3 - Call 1-800-620-2790...
User Guide
Page 9
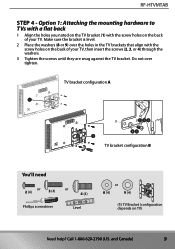
Do not over the holes in the TV brackets that align with the screw holes on TV) Need help? and Canada) 9 Option 1: Attaching the mounting hardware to TVs with a flat back 1 Align the holes you noted on the TV bracket (1) with the screw holes on the back of your TV, ... (U.S. TV bracket configuration A TV bracket configuration B You'll need or 2 (4) 3 (4) or 4 (4) Phillips screwdriver Level or 8 (4) 9 (4) (1) TV Bracket (configuration depends on the back of your TV. RF-HTVMTAB STEP 4 -
Do not over the holes in the TV brackets that align with the screw holes on TV) Need help? and Canada) 9 Option 1: Attaching the mounting hardware to TVs with a flat back 1 Align the holes you noted on the TV bracket (1) with the screw holes on the back of your TV, ... (U.S. TV bracket configuration A TV bracket configuration B You'll need or 2 (4) 3 (4) or 4 (4) Phillips screwdriver Level or 8 (4) 9 (4) (1) TV Bracket (configuration depends on the back of your TV. RF-HTVMTAB STEP 4 -

User Guide
Page 10
... not over the holes in the TV bracket and insert the screws (5, 6, or 7) through the washers, TV bracket, and spacers. and Canada) Option 2: Attaching the mounting hardware to TVs with irregular or obstructed backs 1 Place the spacers (10) over the screw holes on TV) 10 Need help? Make sure the bracket...
... not over the holes in the TV bracket and insert the screws (5, 6, or 7) through the washers, TV bracket, and spacers. and Canada) Option 2: Attaching the mounting hardware to TVs with irregular or obstructed backs 1 Place the spacers (10) over the screw holes on TV) 10 Need help? Make sure the bracket...
User Guide
Page 11
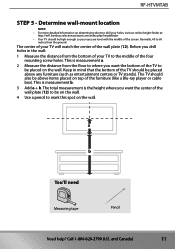
... is measurement a. 2 Measure the distance from the floor to where you want the center of the four mounting screw holes. Keep in the wall: 1 Measure the distance from the ground. Call 1-800-620-2790 (U.S. RF-HTVMTAB STEP 5 - This is the height where you drill holes in mind that the bottom of the... of the furniture (like a Blu-ray player or cable box). aA bB You'll need Measuring tape Pencil Need help? and Canada) 11 Determine wall-mount location NOTE: • For more detailed information on top of the screen.
... is measurement a. 2 Measure the distance from the floor to where you want the center of the four mounting screw holes. Keep in the wall: 1 Measure the distance from the ground. Call 1-800-620-2790 (U.S. RF-HTVMTAB STEP 5 - This is the height where you drill holes in mind that the bottom of the... of the furniture (like a Blu-ray player or cable box). aA bB You'll need Measuring tape Pencil Need help? and Canada) 11 Determine wall-mount location NOTE: • For more detailed information on top of the screen.

User Guide
Page 14
... mark the lag bolt hole locations (2). Call 1-800-620-2790 (U.S. CAUTION: Avoid potential injuries or property damage! Option 2: Installing on page 4) into mortar between blocks. Mount the wall plate directly onto the concrete surface. DO NOT over-tighten the lag bolts (C1). 14 Need help?
... mark the lag bolt hole locations (2). Call 1-800-620-2790 (U.S. CAUTION: Avoid potential injuries or property damage! Option 2: Installing on page 4) into mortar between blocks. Mount the wall plate directly onto the concrete surface. DO NOT over-tighten the lag bolts (C1). 14 Need help?
User Guide
Page 18
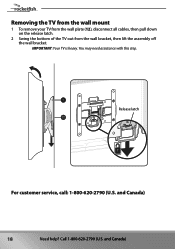
and Canada) 18 Need help? and Canada) You may need assistance with this step. Release latch For customer service, call: 1-800-620-2790 (U.S. Call 1-800-620-2790 (U.S. Removing the TV from the wall mount 1 To remove your TV from the wall plate (12), disconnect all cables, then pull down on the release latch. 2 Swing the bottom of the TV out from the wall bracket, then lift the assembly off the wall bracket. IMPORTANT: Your TV is heavy.
and Canada) 18 Need help? and Canada) You may need assistance with this step. Release latch For customer service, call: 1-800-620-2790 (U.S. Call 1-800-620-2790 (U.S. Removing the TV from the wall mount 1 To remove your TV from the wall plate (12), disconnect all cables, then pull down on the release latch. 2 Swing the bottom of the TV out from the wall bracket, then lift the assembly off the wall bracket. IMPORTANT: Your TV is heavy.
