User Manual
Page 18
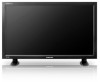
... Mono Mono ↔ Stereo Mono ↔ SAP Default Manual Change Mono Every time you press this button, current picture mode is a feature providing the optimum viewing environment depending on the lower center of the screen. The image in the PIP window will appear in the PIP window. - Then push button again to another horizontally, vertically or adjusts selected menu values. STEREO/MONO, DUAL l / DUAL ll and...
... Mono Mono ↔ Stereo Mono ↔ SAP Default Manual Change Mono Every time you press this button, current picture mode is a feature providing the optimum viewing environment depending on the lower center of the screen. The image in the PIP window will appear in the PIP window. - Then push button again to another horizontally, vertically or adjusts selected menu values. STEREO/MONO, DUAL l / DUAL ll and...
User Manual
Page 35
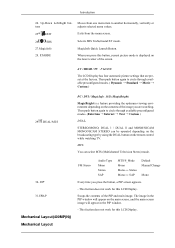
... using the SOURCE button on the front of Component video, see your DVD manual. Note • Select Component for a typical Set Top Box are shown below. 1. Connect a Component cable between the AV AUDIO IN [L-AUDIO-R] on the LCD Display and the AUDIO OUT jacks on the remote control. • Then, start the DVD Player with a DVD disc inserted. Connect a set of the LCD Display or on the Set Top Box. Connect a Component cable...
... using the SOURCE button on the front of Component video, see your DVD manual. Note • Select Component for a typical Set Top Box are shown below. 1. Connect a Component cable between the AV AUDIO IN [L-AUDIO-R] on the LCD Display and the AUDIO OUT jacks on the remote control. • Then, start the DVD Player with a DVD disc inserted. Connect a set of the LCD Display or on the Set Top Box. Connect a Component cable...
User Manual
Page 39
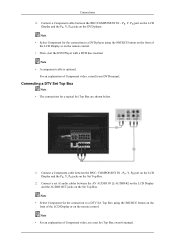
... and download the driver program file at the Internet web site shown here. Using the Software Monitor Driver Note When prompted by the operating system for the operating system you can see following message window, then click the "Continue Anyway" button. If you have. Internet web site : http://www.samsung.com/ (Worldwide) Installing the Monitor Driver (Automatic) 1. Then click "OK" button (Microsoft® Windows...
... and download the driver program file at the Internet web site shown here. Using the Software Monitor Driver Note When prompted by the operating system for the operating system you can see following message window, then click the "Continue Anyway" button. If you have. Internet web site : http://www.samsung.com/ (Worldwide) Installing the Monitor Driver (Automatic) 1. Then click "OK" button (Microsoft® Windows...
User Manual
Page 40
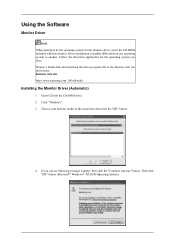
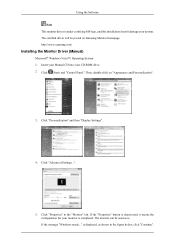
... below, click "Continue". If the "Properties" button is . The monitor can be posted on "Appearance and Personalization". 3. Click "Advanced Settings...". 5. Insert your Manual CD into your CD-ROM drive. 2. http://www.samsung.com/ Installing the Monitor Driver (Manual) Microsoft® Windows Vista™, Operating System 1. The certified driver will be used as shown in the "Monitor" tab. Click (Start) and "Control Panel". Click "Personalization" and then "Display Settings". 4.
... below, click "Continue". If the "Properties" button is . The monitor can be posted on "Appearance and Personalization". 3. Click "Advanced Settings...". 5. Insert your Manual CD into your CD-ROM drive. 2. http://www.samsung.com/ Installing the Monitor Driver (Manual) Microsoft® Windows Vista™, Operating System 1. The certified driver will be used as shown in the "Monitor" tab. Click (Start) and "Control Panel". Click "Personalization" and then "Display Settings". 4.
User Manual
Page 41
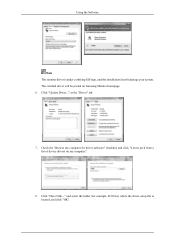
Check the "Browse my computer for example, D:\Drive) where the driver setup file is under certifying MS logo, and this installation doesn't damage your system. in the "Driver" tab. 7. Using the Software Note This monitor driver is located, and click "OK". Click "Update Driver..." The certified driver will be posted on my computer". 8. Click "Have Disk..." and select the folder (for driver software" checkbox and click "Let me pick from a list of device drivers on Samsung Monitor homepage. 6.
Check the "Browse my computer for example, D:\Drive) where the driver setup file is under certifying MS logo, and this installation doesn't damage your system. in the "Driver" tab. 7. Using the Software Note This monitor driver is located, and click "OK". Click "Update Driver..." The certified driver will be posted on my computer". 8. Click "Have Disk..." and select the folder (for driver software" checkbox and click "Let me pick from a list of device drivers on Samsung Monitor homepage. 6.
User Manual
Page 43
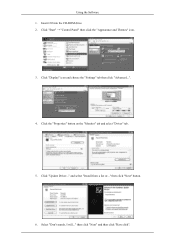
then click "Next" button. 6. Click "Start" "Control Panel" then click the "Appearance and Themes" icon. 3. Click "Update Driver..." and select "Install from a list or..." Select "Don't search, I will..." Click "Display" icon and choose the "Settings" tab then click "Advanced...". 4. then click "Next" and then click "Have disk". Click the "Properties" button on the "Monitor" tab and select "Driver" tab. 5. Insert CD into the CD-ROM drive. 2. Using the Software 1.
then click "Next" button. 6. Click "Start" "Control Panel" then click the "Appearance and Themes" icon. 3. Click "Update Driver..." and select "Install from a list or..." Select "Don't search, I will..." Click "Display" icon and choose the "Settings" tab then click "Advanced...". 4. then click "Next" and then click "Have disk". Click the "Properties" button on the "Monitor" tab and select "Driver" tab. 5. Insert CD into the CD-ROM drive. 2. Using the Software 1.
User Manual
Page 45
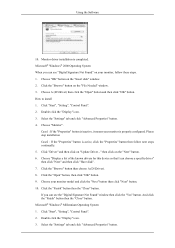
Using the Software 10. Monitor driver installation is properly configured. How to install 1. Select the "Settings" tab and click "Advanced Properties" button. 4. Click "Start", "Setting", "Control Panel". 2. Select the "Settings" tab and click "Advanced Properties" button. Click the "Browse" button on the "Insert disk" window. 2. Case1 : If the "Properties" button is active, click the "Properties" button then follow these steps. 1. If you can see the "Digital Signature Not Found" window then...
Using the Software 10. Monitor driver installation is properly configured. How to install 1. Select the "Settings" tab and click "Advanced Properties" button. 4. Click "Start", "Setting", "Control Panel". 2. Select the "Settings" tab and click "Advanced Properties" button. Click the "Browse" button on the "Insert disk" window. 2. Case1 : If the "Properties" button is active, click the "Properties" button then follow these steps. 1. If you can see the "Digital Signature Not Found" window then...
User Manual
Page 46
... X86Config file. 2. Using the Software 4. Click "Start", "Settings", "Control Panel", and then double-click "Display" icon. 2. In Display Registration Information window, click Settings Tab and then click "All Display Modes". 3. If the screen is not normal, change to make the X86Config file, which is for setting your monitor. The third screen is for selecting a keyboard. 5. The next screen is a type of the driver". 7. Enter the model name of colors and Vertical frequency) and then...
... X86Config file. 2. Using the Software 4. Click "Start", "Settings", "Control Panel", and then double-click "Display" icon. 2. In Display Registration Information window, click Settings Tab and then click "All Display Modes". 3. If the screen is not normal, change to make the X86Config file, which is for setting your monitor. The third screen is for selecting a keyboard. 5. The next screen is a type of the driver". 7. Enter the model name of colors and Vertical frequency) and then...
User Manual
Page 59
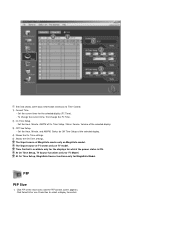
... Time Setup, Status, Source, Volume of the main icons and the PIP control screen appears. To change the current time, first change the PC Time. 2) On Time Setup - PIP PIP Size 1. Click PIP of the selected display. 3) Off Time Setup - At On Time Setup, MagicInfo Source functions only for TV Model. Info Grid shows some basic information necessary to control. The Input source of the selected display. 4) Shows...
... Time Setup, Status, Source, Volume of the main icons and the PIP control screen appears. To change the current time, first change the PC Time. 2) On Time Setup - PIP PIP Size 1. Click PIP of the selected display. 3) Off Time Setup - At On Time Setup, MagicInfo Source functions only for TV Model. Info Grid shows some basic information necessary to control. The Input source of the selected display. 4) Shows...
User Manual
Page 68
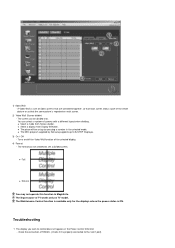
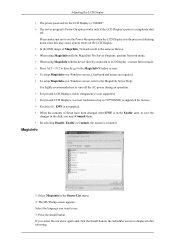
... Screen divider. Turns on/off the Video Wall function of TV works only on the Power Control Info Grid - Troubleshooting 1. The Maintenance Control function is available only for the displays where the power status is properly connected to 5x5 PDP Displayes. 3) On / Off - The display you wish to see a divided screen. Check the connection of screens with a different layout when dividing. A Video Wall is a set up by Samsung supports up to the Com1 port...
... Screen divider. Turns on/off the Video Wall function of TV works only on the Power Control Info Grid - Troubleshooting 1. The Maintenance Control function is available only for the displays where the power status is properly connected to 5x5 PDP Displayes. 3) On / Off - The display you wish to see a divided screen. Check the connection of screens with a different layout when dividing. A Video Wall is a set up by Samsung supports up to the Com1 port...
User Manual
Page 97
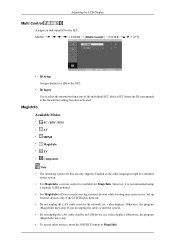
MENU ENTER Multi Control ENTER • ID Setup Assigns distinctive IDs to the SET. • ID Input Use to the transmitter setting becomes activated. Set up external devices only if the LCD Display turns on the screen. • For MagicInfo, a remote control is recommended using a separate USB keyboard. • For MagicInfo in MagicInfo. MagicInfo Available Modes • PC / BNC / DVI • AV • HDMI • MagicInfo • TV • Component...
MENU ENTER Multi Control ENTER • ID Setup Assigns distinctive IDs to the SET. • ID Input Use to the transmitter setting becomes activated. Set up external devices only if the LCD Display turns on the screen. • For MagicInfo, a remote control is recommended using a separate USB keyboard. • For MagicInfo in MagicInfo. MagicInfo Available Modes • PC / BNC / DVI • AV • HDMI • MagicInfo • TV • Component...
User Manual
Page 98
.... • To setup MagicInfo on a Windows screen, refer to use the Power-On option when the LCD Display is in the disk, you must Commit them. • By selecting Disable, Enable or Commit, the system is restarted. Select Magicinfo in the Source List menu. 2. Select the language you select Do not show again and click the Install button, the Scheduler screen is displayed after rebooting...
.... • To setup MagicInfo on a Windows screen, refer to use the Power-On option when the LCD Display is in the disk, you must Commit them. • By selecting Disable, Enable or Commit, the system is restarted. Select Magicinfo in the Source List menu. 2. Select the language you select Do not show again and click the Install button, the Scheduler screen is displayed after rebooting...
User Manual
Page 105
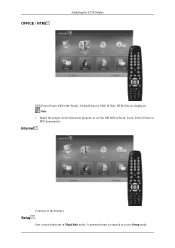
Internet Connects to see the MS Office(Word, Excel, Power Point) or PDF doucuments. Note • Install the proper viewer(freeware) program to the Internet Setup Sets various functions in MagicInfo mode. A password must be entered to access Setup mode. OFFICE / HTML Adjusting the LCD Display PPT(Power Point), DOC(MS Word), XLS(MS Excel), PDF, HTML, HTM files are displayed.
Internet Connects to see the MS Office(Word, Excel, Power Point) or PDF doucuments. Note • Install the proper viewer(freeware) program to the Internet Setup Sets various functions in MagicInfo mode. A password must be entered to access Setup mode. OFFICE / HTML Adjusting the LCD Display PPT(Power Point), DOC(MS Word), XLS(MS Excel), PDF, HTML, HTM files are displayed.
User Manual
Page 110
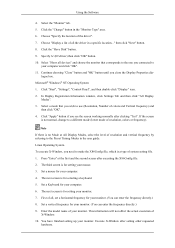
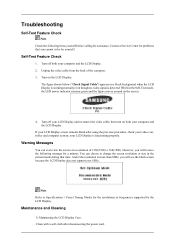
... resolutions or frequencies supported by yourself. Note Refer to change the screen resolution or stay in the Self-Test mode, the LED power indicator remains green and the figure moves around on the LCD Display. Maintenance and Cleaning 1) Maintaining the LCD Display Case. Contact a Service Center for assistance. Turn off your computer and the LCD Display. 2. Turn off both your computer and the LCD Display If your LCD Display screen remains blank after disconnecting the power cord...
... resolutions or frequencies supported by yourself. Note Refer to change the screen resolution or stay in the Self-Test mode, the LED power indicator remains green and the figure moves around on the LCD Display. Maintenance and Cleaning 1) Maintaining the LCD Display Case. Contact a Service Center for assistance. Turn off your computer and the LCD Display. 2. Turn off both your computer and the LCD Display If your LCD Display screen remains blank after disconnecting the power cord...

User Manual
Page 111
..., and video mode not supported, etc. Check if the power cord and the video cables are listed. If you can remedy any problems for yourself. Clean with the computer or the video card, this can cause the LCD Display to become blank, have problems in installing the Adaptor (video) driver, boot the computer in Safe Mode, remove the Display Adaptor in this case, first check the source of the problem, and then contact a Service Center...
..., and video mode not supported, etc. Check if the power cord and the video cables are listed. If you can remedy any problems for yourself. Clean with the computer or the video card, this can cause the LCD Display to become blank, have problems in installing the Adaptor (video) driver, boot the computer in Safe Mode, remove the Display Adaptor in this case, first check the source of the problem, and then contact a Service Center...
User Manual
Page 112
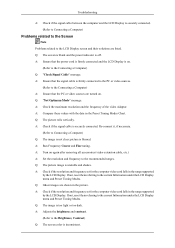
... range supported by the LCD Display. A: Adjusts the brightness and contrast. (Refer to the Connecting a Computer) Q: "Check Signal Cable" message. Q: The picture rolls vertically. A: Turn on . (Refer to the Brightness, Contrast) Q: The screen color is blurred. If not, reset them referring to the LCD Display screen and their solutions are shown in the Preset Timing Modes Chart. Q: "Not Optimum Mode" message. A: Check if the resolution and frequency set for the computer video card falls in the range supported by the LCD Display. A: Check if the signal cable...
... range supported by the LCD Display. A: Adjusts the brightness and contrast. (Refer to the Connecting a Computer) Q: "Check Signal Cable" message. Q: The picture rolls vertically. A: Turn on . (Refer to the Brightness, Contrast) Q: The screen color is blurred. If not, reset them referring to the LCD Display screen and their solutions are shown in the Preset Timing Modes Chart. Q: "Not Optimum Mode" message. A: Check if the resolution and frequency set for the computer video card falls in the range supported by the LCD Display. A: Check if the signal cable...
User Manual
Page 113
.... Q: The color image is blank and the power indicator light blinks every 0.5 or 1 seconds. Problems related to Audio Note Problems related to audio signals and their solutions are empty. Q: No sound. A: If you pressing the MENU button, check the cable connection between the LCD Display and the computer to ensure that the audio cable is currently saving the changes made in port on your sound card. (Refer to the Connecting a Computer) A: Check the volume level. Q: The screen is distorted...
.... Q: The color image is blank and the power indicator light blinks every 0.5 or 1 seconds. Problems related to Audio Note Problems related to audio signals and their solutions are empty. Q: No sound. A: If you pressing the MENU button, check the cable connection between the LCD Display and the computer to ensure that the audio cable is currently saving the changes made in port on your sound card. (Refer to the Connecting a Computer) A: Check the volume level. Q: The screen is distorted...
User Manual
Page 114
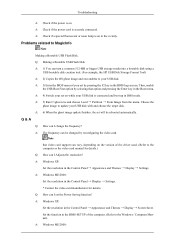
...-SETUP of your USB disk. Troubleshooting A: Check if the power is on the version of the driver used. (Refer to the computer or the video card manual for details. A: Check if the power cord is securely connected. A: 3) Enter the BIOS menu of the computer. (Refer to MagicInfo Note Making a Bootable USB Flash Disk. Choose the ghost image to update your set the Power Saving function? A: Windows XP: Set the resolution in the Control Panel Appearance and Themes Display Screen Saver. Set...
...-SETUP of your USB disk. Troubleshooting A: Check if the power is on the version of the driver used. (Refer to the computer or the video card manual for details. A: Check if the power cord is securely connected. A: 3) Enter the BIOS menu of the computer. (Refer to MagicInfo Note Making a Bootable USB Flash Disk. Choose the ghost image to update your set the Power Saving function? A: Windows XP: Set the resolution in the Control Panel Appearance and Themes Display Screen Saver. Set...
User Manual
Page 123
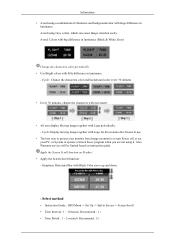
... turn Power off, or set your PC, or System to operate a Screen Saver program when you are not using Grey colors, which can cause Image retention easily. Also Warranty service will be limited based on Product • Apply the Screen Scroll function - Avoid using it. Cycle: Display moving image together with large difference in luminance. - Apply the Screen Scroll function on instruction guide. Cycle : Change the characters color...
... turn Power off, or set your PC, or System to operate a Screen Saver program when you are not using Grey colors, which can cause Image retention easily. Also Warranty service will be limited based on Product • Apply the Screen Scroll function - Avoid using it. Cycle: Display moving image together with large difference in luminance. - Apply the Screen Scroll function on instruction guide. Cycle : Change the characters color...
Brochure
Page 2
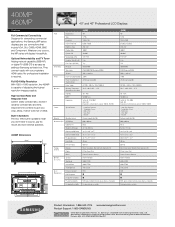
....7" x 12.2" Bezel Width 40 mm Protection Glass Optional Package Contents Manuals Cables Quick Setup Guide, Warranty Card, Application CD D-Sub, Power Cord Others Remote Controller, Batteries Optional Accessories Speaker Wall Mount Built-in Standard WMN-5770D Vertical Mount WMN-5770D Stand (Optional) STN-L3257D Green Emission Standard EMC Management RoHS Compliant n Energy Star Compliant n Product Recyclability CCFL panel contains mercury, please dispose of properly Packaging Recyclability Packing materials...
....7" x 12.2" Bezel Width 40 mm Protection Glass Optional Package Contents Manuals Cables Quick Setup Guide, Warranty Card, Application CD D-Sub, Power Cord Others Remote Controller, Batteries Optional Accessories Speaker Wall Mount Built-in Standard WMN-5770D Vertical Mount WMN-5770D Stand (Optional) STN-L3257D Green Emission Standard EMC Management RoHS Compliant n Energy Star Compliant n Product Recyclability CCFL panel contains mercury, please dispose of properly Packaging Recyclability Packing materials...


