

User Manual (user Manual) (ver.1.0) (English)
Page 2
Main Page Safety Instructions Notational Power Installation Cleaning Other Introduction Unpacking Front Rear Bottom Setup Connecting Your Monitor Installing the Monitor Driver Automatic Manual Base Installation On-Screen Display Troubleshooting Check List Q & A Self-Test Feature Check Specifications General Specifications Preset Timing Modes PowerSaver Information Service Terms Regulatory Natural Color Authority
Main Page Safety Instructions Notational Power Installation Cleaning Other Introduction Unpacking Front Rear Bottom Setup Connecting Your Monitor Installing the Monitor Driver Automatic Manual Base Installation On-Screen Display Troubleshooting Check List Q & A Self-Test Feature Check Specifications General Specifications Preset Timing Modes PowerSaver Information Service Terms Regulatory Natural Color Authority

User Manual (user Manual) (ver.1.0) (English)
Page 6
... the plug and then contact a service center. Do not spray detergent directly on the monitor. Do not set a glass of water, chemicals or any Samsung Service Center. z This may also be affected.) Dilute the detergent (1:10 ratio) with a slightly moistened, soft fabric. Notational Power Installation Clean Other When cleaning the monitor case or the surface of the CRT, wipe with water before using...
... the plug and then contact a service center. Do not spray detergent directly on the monitor. Do not set a glass of water, chemicals or any Samsung Service Center. z This may also be affected.) Dilute the detergent (1:10 ratio) with a slightly moistened, soft fabric. Notational Power Installation Clean Other When cleaning the monitor case or the surface of the CRT, wipe with water before using...
User Manual (user Manual) (ver.1.0) (English)
Page 7
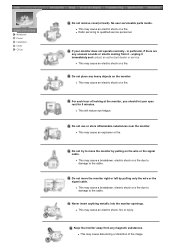
... - z This will reduce eye fatigue. Do not use or store inflammable substances near the monitor. z This may cause an electric shock or a fire. Keep the monitor away from it immediately and contact an authorized dealer or service. No user serviceable parts inside. For each hour of the image. Notational Power Installation Clean Other Do not remove cover(or back). z This may cause a breakdown, electric...
... - z This will reduce eye fatigue. Do not use or store inflammable substances near the monitor. z This may cause an electric shock or a fire. Keep the monitor away from it immediately and contact an authorized dealer or service. No user serviceable parts inside. For each hour of the image. Notational Power Installation Clean Other Do not remove cover(or back). z This may cause a breakdown, electric...

User Manual (user Manual) (ver.1.0) (English)
Page 12
... not need an adapter. 4. Connecting Your Monitor Installing the Monitor Driver Base Installation 1. Plug the power cord for your monitor to the power port on your computer, video board, video card, or graphics card. 3. Connect the power cord for the monitor into a nearby outlet. 2. Turn on your adapter(Adapter not included). If your computer and monitor. Connect the signal cable to a Macintosh adapter, and set the pins on the back of the monitor. If you are using a Macintosh computer, connect the cable to the video port on your monitor displays an image, installation...
... not need an adapter. 4. Connecting Your Monitor Installing the Monitor Driver Base Installation 1. Plug the power cord for your monitor to the power port on your computer, video board, video card, or graphics card. 3. Connect the power cord for the monitor into a nearby outlet. 2. Turn on your adapter(Adapter not included). If your computer and monitor. Connect the signal cable to a Macintosh adapter, and set the pins on the back of the monitor. If you are using a Macintosh computer, connect the cable to the video port on your monitor displays an image, installation...

User Manual (user Manual) (ver.1.0) (English)
Page 13
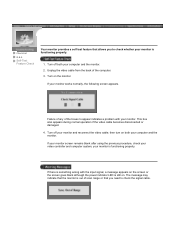
Connecting Your Monitor Installing the Monitor Driver Base Installation When prompted by the operating system for the operating system you have. Follow the directions as appropriate for the monitor driver, insert the CD-ROM included with this monitor. z Internet web site : http://www.samsung-monitor.com/ Windows ME 1. Click the "Install" button in the model list, then click the "OK" button. 4. Monitor driver installation is slightly different from one operating system...
Connecting Your Monitor Installing the Monitor Driver Base Installation When prompted by the operating system for the operating system you have. Follow the directions as appropriate for the monitor driver, insert the CD-ROM included with this monitor. z Internet web site : http://www.samsung-monitor.com/ Windows ME 1. Click the "Install" button in the model list, then click the "OK" button. 4. Monitor driver installation is slightly different from one operating system...

User Manual (user Manual) (ver.1.0) (English)
Page 14
... download it. http://www.samsung-monitor.com/. 6. This monitor driver has been applied to Microsoft for the Windows logo, and this installation does not damage the correct operation of your monitor model in the "Warning" window. 5. Monitor driver installation is completed. If you can see following "Message" window, then click the "Continue Anyway" button. Then click "OK" button. Insert CD into the CD-ROM driver. 2. Connecting Your Monitor Installing the Monitor Driver Base Installation Windows...
... download it. http://www.samsung-monitor.com/. 6. This monitor driver has been applied to Microsoft for the Windows logo, and this installation does not damage the correct operation of your monitor model in the "Warning" window. 5. Monitor driver installation is completed. If you can see following "Message" window, then click the "Continue Anyway" button. Then click "OK" button. Insert CD into the CD-ROM driver. 2. Connecting Your Monitor Installing the Monitor Driver Base Installation Windows...

User Manual (user Manual) (ver.1.0) (English)
Page 15
Click "Start" -> "Control Panel" then click the "Appearance and Themes" Icon. 3. Prepare a blank disk and download the driver program file at the Internet web site shown here. and select "Install from one operating system to another. then click "Next" button. Connecting Your Monitor Installing the Monitor Driver Base Installation Windows XP | Windows 2000 | Windows Me | Windows NT | Linux When prompted by the operating system for the operating system you...
Click "Start" -> "Control Panel" then click the "Appearance and Themes" Icon. 3. Prepare a blank disk and download the driver program file at the Internet web site shown here. and select "Install from one operating system to another. then click "Next" button. Connecting Your Monitor Installing the Monitor Driver Base Installation Windows XP | Windows 2000 | Windows Me | Windows NT | Linux When prompted by the operating system for the operating system you...

User Manual (user Manual) (ver.1.0) (English)
Page 17
... "Digital Signature Not Found" on "Update Driver.." Please stop installation Case2: If the "Properties" button is inactive, it means your monitor model and click the "Next" button then click "Next" button. 10. Choose "Display a list of the driver". 7. Click the "Finish" button then the "Close" button. Click the "Have Disk" button 9. How to your monitor.) Click "Start" , "Setting" , "Control Panel". 2. Continue choosing "Close" button and "OK" button until you can choose a specific driver...
... "Digital Signature Not Found" on "Update Driver.." Please stop installation Case2: If the "Properties" button is inactive, it means your monitor model and click the "Next" button then click "Next" button. 10. Choose "Display a list of the driver". 7. Click the "Finish" button then the "Close" button. Click the "Have Disk" button 9. How to your monitor.) Click "Start" , "Setting" , "Control Panel". 2. Continue choosing "Close" button and "OK" button until you can choose a specific driver...

User Manual (user Manual) (ver.1.0) (English)
Page 18
... your monitor. (You can enter the frequency directly.) 9. Enter the model name of colors and Vertical frequency) and then click OK. 4. Execute X-Window after executing the X86Config file. 2. Select a mode that you see the screen working normally after clicking Test. Set a vertical frequency for selecting a keyboard. 5. Click Apply button if you wish to the Preset Display Modes in the user guide. Set a mouse for your computer. 6. First of resolution, colors or frequency). Set...
... your monitor. (You can enter the frequency directly.) 9. Enter the model name of colors and Vertical frequency) and then click OK. 4. Execute X-Window after executing the X86Config file. 2. Select a mode that you see the screen working normally after clicking Test. Set a vertical frequency for selecting a keyboard. 5. Click Apply button if you wish to the Preset Display Modes in the user guide. Set a mouse for your computer. 6. First of resolution, colors or frequency). Set...

User Manual (user Manual) (ver.1.0) (English)
Page 22
... in Interlace Mode. (Interlace Mode: Vertical frequency 43Hz, 87Hz(i), etc) The signal from the video card exceeds the maximum resolution and frequency of Range" on the screen. Unlock the OSD by ? If the initial screen (the login screen) appears, boot the computer in PowerSaver mode. Check the power cord connection and supply. Out of the monitor. Check List Q & A Self-Test Feature Check Symptom Check List Solutions No images on the screen? Can you locked the On Screen Display (OSD) Menu to see...
... in Interlace Mode. (Interlace Mode: Vertical frequency 43Hz, 87Hz(i), etc) The signal from the video card exceeds the maximum resolution and frequency of Range" on the screen. Unlock the OSD by ? If the initial screen (the login screen) appears, boot the computer in PowerSaver mode. Check the power cord connection and supply. Out of the monitor. Check List Q & A Self-Test Feature Check Symptom Check List Solutions No images on the screen? Can you locked the On Screen Display (OSD) Menu to see...

User Manual (user Manual) (ver.1.0) (English)
Page 23
... Check The screen shows strange colors or just black and white. Set the video card by referring to the monitor? Readjust Position by referring to the Preset Timing Modes). Have the screen colors become unbalanced. The screen is blinking but no images on the monitor? Enter the OSD and perform a "Degauss". The screen colors have changed the video card or the driver? Adjust screen image position and size using the OSD. Have the Windows colors been set properly? Have you adjusted the resolution or frequency on the screen. LED...
... Check The screen shows strange colors or just black and white. Set the video card by referring to the monitor? Readjust Position by referring to the Preset Timing Modes). Have the screen colors become unbalanced. The screen is blinking but no images on the monitor? Enter the OSD and perform a "Degauss". The screen colors have changed the video card or the driver? Adjust screen image position and size using the OSD. Have the Windows colors been set properly? Have you adjusted the resolution or frequency on the screen. LED...

User Manual (user Manual) (ver.1.0) (English)
Page 24
....) 3. If you assembled the PC, check if the installed the adapter (video) driver and the monitor driver. 4. Note: If problems repeatedly occur, contact an authorized service center. Check if the power cord and the cable are properly connected to reinstall the adapter (video) driver. Check if the computer beeps more than 3 times when booting. (If it does, request an after-service for the main board of the video screen is trouble with the monitor. 1. Check List...
....) 3. If you assembled the PC, check if the installed the adapter (video) driver and the monitor driver. 4. Note: If problems repeatedly occur, contact an authorized service center. Check if the power cord and the cable are properly connected to reinstall the adapter (video) driver. Check if the computer beeps more than 3 times when booting. (If it does, request an after-service for the main board of the video screen is trouble with the monitor. 1. Check List...

User Manual (user Manual) (ver.1.0) (English)
Page 25
... the Control Panel, Display, Settings. This is turned on the version of the driver used. (Refer to Windows/Computer Manual). Note that video card support can I clean the outer case/Picture tube? How can I change the frequency? Disconnect the power cord and then clean the monitor with each other. Do not allow any remains of the computer or the screen saver. (Refer to the computer or the video card manual for details. Answer Frequency can...
... the Control Panel, Display, Settings. This is turned on the version of the driver used. (Refer to Windows/Computer Manual). Note that video card support can I clean the outer case/Picture tube? How can I change the frequency? Disconnect the power cord and then clean the monitor with each other. Do not allow any remains of the computer or the screen saver. (Refer to the computer or the video card manual for details. Answer Frequency can...
User Manual (user Manual) (ver.1.0) (English)
Page 26
... video controller and computer system; Turn off both your monitor works normally, the following screen appears. Turn on both your monitor. Turn off your monitor is functioning properly. 1. Failure of any of the boxes to appear indicates a problem with the input signal, a message appears on the screen or the screen goes blank although the power indicator LED is still on. If your monitor screen remains blank after using the previous procedure, check...
... video controller and computer system; Turn off both your monitor works normally, the following screen appears. Turn on both your monitor. Turn off your monitor is functioning properly. 1. Failure of any of the boxes to appear indicates a problem with the input signal, a message appears on the screen or the screen goes blank although the power indicator LED is still on. If your monitor screen remains blank after using the previous procedure, check...

User Manual (user Manual) (ver.1.0) (English)
Page 28
... Synchronization Horizontal 30 ~ 70 kHz Vertical 50 ~ 160 Hz Input Signal Definition Video Signal RGB, Analog 0.7 Vpp positive at 75 ohms Sync Signal Separate H/V sync, TTL level, positive or negative Display Color Unlimited Maximum Pixel Clock 110 MHz Power Supply 90 ~ 264VAC rms, 60/50 Hz ± 3Hz Power Consumption 90W (Maximum), 80W (Nominal) Dimensions (WxDxH) 398 x 412 x 400mm (with black matrix. SAMSUNG 700DF General PowerSaver Preset Timing Modes General Model Name SAMSUNG 700DF Picture...
... Synchronization Horizontal 30 ~ 70 kHz Vertical 50 ~ 160 Hz Input Signal Definition Video Signal RGB, Analog 0.7 Vpp positive at 75 ohms Sync Signal Separate H/V sync, TTL level, positive or negative Display Color Unlimited Maximum Pixel Clock 110 MHz Power Supply 90 ~ 264VAC rms, 60/50 Hz ± 3Hz Power Consumption 90W (Maximum), 80W (Nominal) Dimensions (WxDxH) 398 x 412 x 400mm (with black matrix. SAMSUNG 700DF General PowerSaver Preset Timing Modes General Model Name SAMSUNG 700DF Picture...

User Manual (user Manual) (ver.1.0) (English)
Page 29
Use a software utility installed on the keyboard. As an ENERGY STAR® Partner, SAMSUNG has determined that this feature. The PowerSaver system operates with VESA DPMS functionality. For energy conservation, turn your computer. State Normal Operation Power-off Mode EPA/ENERGY 2000 Power Indicator Green Green, Blinking Power Consumption 80W(Nominal) 90W(Maximum) Less than 2W This monitor is EPA ENERGY STAR® compliant and...
Use a software utility installed on the keyboard. As an ENERGY STAR® Partner, SAMSUNG has determined that this feature. The PowerSaver system operates with VESA DPMS functionality. For energy conservation, turn your computer. State Normal Operation Power-off Mode EPA/ENERGY 2000 Power Indicator Green Green, Blinking Power Consumption 80W(Nominal) 90W(Maximum) Less than 2W This monitor is EPA ENERGY STAR® compliant and...

User Manual (user Manual) (ver.1.0) (English)
Page 31
... Input Signal Definition Video Signal RGB, Analog 0.7 Vpp positive at 75 ohms Sync Signal Separate H/V sync, TTL level, positive or negative Display Color Unlimited Maximum Pixel Clock 185 MHz Power Supply 90 ~ 264VAC rms, 60/50 Hz ± 3Hz Power Consumption 110W (Maximum), 100W (Nominal) Dimensions (WxDxH) 440 x 459 x 455 mm (with black matrix. Note: Design and specifications are subject to select alternate settings. SAMSUNG 900DF General PowerSaver Preset Timing Modes General Model Name SAMSUNG 900DF Picture...
... Input Signal Definition Video Signal RGB, Analog 0.7 Vpp positive at 75 ohms Sync Signal Separate H/V sync, TTL level, positive or negative Display Color Unlimited Maximum Pixel Clock 185 MHz Power Supply 90 ~ 264VAC rms, 60/50 Hz ± 3Hz Power Consumption 110W (Maximum), 100W (Nominal) Dimensions (WxDxH) 440 x 459 x 455 mm (with black matrix. Note: Design and specifications are subject to select alternate settings. SAMSUNG 900DF General PowerSaver Preset Timing Modes General Model Name SAMSUNG 900DF Picture...
User Manual (user Manual) (ver.1.0) (English)
Page 32
...'s mouse or press a key on your computer. For energy conservation, turn your monitor into a low-power mode when it has not been used with a computer equipped with a VESA DPMS compliant video card installed in power management system called PowerSaver. Use a software utility installed on the keyboard. State Normal Operation Power-off Mode EPA/ENERGY 2000 Power Indicator Green Green, Blinking Power Consumption 100W(Nominal) 110W(Maximum) Less than 2W This...
...'s mouse or press a key on your computer. For energy conservation, turn your monitor into a low-power mode when it has not been used with a computer equipped with a VESA DPMS compliant video card installed in power management system called PowerSaver. Use a software utility installed on the keyboard. State Normal Operation Power-off Mode EPA/ENERGY 2000 Power Indicator Green Green, Blinking Power Consumption 100W(Nominal) 110W(Maximum) Less than 2W This...

User Manual (user Manual) (ver.1.0) (English)
Page 37
... display an image for the user. Plug & Play This is good for the majority of this is called the Interlace method. High resolution is a function that used in order to ensure a clear image. Unit: mm Vertical Frequency The screen must be redrawn several times per second, this repetition per second is a Flicker-free Mode using a vertical frequency over 70 Hz. To avoid this case, flickering of red, green and blue...
... display an image for the user. Plug & Play This is good for the majority of this is called the Interlace method. High resolution is a function that used in order to ensure a clear image. Unit: mm Vertical Frequency The screen must be redrawn several times per second, this repetition per second is a Flicker-free Mode using a vertical frequency over 70 Hz. To avoid this case, flickering of red, green and blue...
User Manual (user Manual) (ver.1.0) (English)
Page 38
... Rules. For 120 Volt applications, use shielded signal interface cables to or exceeds the monitor voltage rating. z Connect the equipment into an outlet on , the user is no guarantee that to which can radiate radio frequency energy and, if not installed and used in accordance with NEMA configuration 6-15P type (tandem blades) plug cap. If this monitor is available from that interference...
... Rules. For 120 Volt applications, use shielded signal interface cables to or exceeds the monitor voltage rating. z Connect the equipment into an outlet on , the user is no guarantee that to which can radiate radio frequency energy and, if not installed and used in accordance with NEMA configuration 6-15P type (tandem blades) plug cap. If this monitor is available from that interference...


