Operater's Manual
Page 2
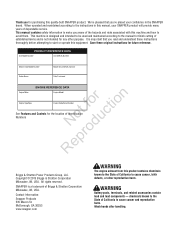
...is designed and intended to be used and maintained according to cause cancer and reproductive harm. All rights reserved. McDonough, GA 30253 www.snapper.com WARNING The engine exhaust from this equipment. Copyright © 2013 Briggs & Stratton Corporation Milwaukee, WI, USA. When operated and ... Mower Deck SERIAL Number Date Purchased Engine Make ENGINE REFERENCE DATA Engine Model for tion Engine Type/Spec Engine Code/Serial Number t c See Features and Controls for future reference. We're pleased that you 've placed your confidence in this manual, your SNAPPER product ...
...is designed and intended to be used and maintained according to cause cancer and reproductive harm. All rights reserved. McDonough, GA 30253 www.snapper.com WARNING The engine exhaust from this equipment. Copyright © 2013 Briggs & Stratton Corporation Milwaukee, WI, USA. When operated and ... Mower Deck SERIAL Number Date Purchased Engine Make ENGINE REFERENCE DATA Engine Model for tion Engine Type/Spec Engine Code/Serial Number t c See Features and Controls for future reference. We're pleased that you 've placed your confidence in this manual, your SNAPPER product ...
Operater's Manual
Page 3
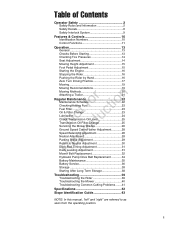
... 26 Ground Speed Control Lever Adjustment 28 o Speed Balancing Adjustment 28 r Neutral Adjustment 28 p Parking Brake Adjustment 29 Return to Neutral Adjustment 30 e Deck Rod Timing Adjustment 31 Deck Leveling Adjustment 31 R Mower Belt Replacement 32 Hydraulic Pump Drive Belt Replacement 34 Battery Maintenance 35 Battery Service 36 Storage 38 Starting After...
... 26 Ground Speed Control Lever Adjustment 28 o Speed Balancing Adjustment 28 r Neutral Adjustment 28 p Parking Brake Adjustment 29 Return to Neutral Adjustment 30 e Deck Rod Timing Adjustment 31 Deck Leveling Adjustment 31 R Mower Belt Replacement 32 Hydraulic Pump Drive Belt Replacement 34 Battery Maintenance 35 Battery Service 36 Storage 38 Starting After...

Operater's Manual
Page 5
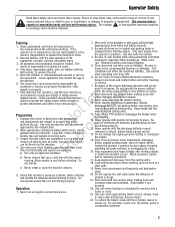
... found in the area while the unit is equipped with an operator-present safety system. Also, note that can amputate hands and feet. The mower deck has spinning mower blades that can injure you are on a slope, don't do not have adequate wheel traction (and control) can be mowed and remove...
... found in the area while the unit is equipped with an operator-present safety system. Also, note that can amputate hands and feet. The mower deck has spinning mower blades that can injure you are on a slope, don't do not have adequate wheel traction (and control) can be mowed and remove...
Operater's Manual
Page 7
...not read English it at anyone. Slow down and use caution when making turns and when changing directions on hillsides. Never raise deck with the engine before starting engine. Turn off engine before and while traveling in place. 8. Do not change the engine ...from the operator's position. Stop blades if not mowing. Read, understand, and follow them . 2. Failure to them closely. This mowing deck is the owner's responsibility to explain this material to obey these safety rules and follow all drives are explosive. Wear appropriate clothing including safety ...
...not read English it at anyone. Slow down and use caution when making turns and when changing directions on hillsides. Never raise deck with the engine before starting engine. Turn off engine before and while traveling in place. 8. Do not change the engine ...from the operator's position. Stop blades if not mowing. Read, understand, and follow them . 2. Failure to them closely. This mowing deck is the owner's responsibility to explain this material to obey these safety rules and follow all drives are explosive. Wear appropriate clothing including safety ...

Operater's Manual
Page 14
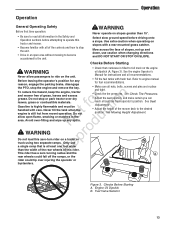
... the choke. Fuel Level Gauge Displays the fuel level in the desired cutting fo tio height and release the lift lock lever. Deck Lift Pedal, Cutting Height Adjustment Pin & Deck Lift Lock Lever These control the cutting height of the engine. r n Depress the pedal until it locks into the 4-1/2" (11,47 .... NOTE: To start the unit the parking brake must be engaged. ro Choke p Close the choke for oil level check and fill procedures. 12 www.snapper.com Open the choke once the engine starts. The transmission oil reservoirs are located beneath the operator's seat and in front of the mower...
... the choke. Fuel Level Gauge Displays the fuel level in the desired cutting fo tio height and release the lift lock lever. Deck Lift Pedal, Cutting Height Adjustment Pin & Deck Lift Lock Lever These control the cutting height of the engine. r n Depress the pedal until it locks into the 4-1/2" (11,47 .... NOTE: To start the unit the parking brake must be engaged. ro Choke p Close the choke for oil level check and fill procedures. 12 www.snapper.com Open the choke once the engine starts. The transmission oil reservoirs are located beneath the operator's seat and in front of the mower...
Operater's Manual
Page 15
To reduce fire hazard, keep the engine, tractor and mower free of the mower deck to the desired position. See Check Tire Pressures. • Adjust the seat position, and make certain you can reach all controls from recent operation. Only ...
To reduce fire hazard, keep the engine, tractor and mower free of the mower deck to the desired position. See Check Tire Pressures. • Adjust the seat position, and make certain you can reach all controls from recent operation. Only ...

Operater's Manual
Page 17
... pedal mount hardware (C) and rotate the u tab 180 degrees. Pedal Mount Tab C. Figure 6. Deck Lift Foot Pedal C. Deck Lift Lock lever Foot Pedal Adjustment The deck lift foot pedal can be adjusted to rest against the cutting height adjustment pin. Reinstall the pedal mount...mount tab in the Repro proper orientation as shown in the desired cutting height. 3. Foot Pedal Adjustment A. Optional Position C D 15 Release the deck lift foot pedal until it comes to accommodate the r n operator's height for optimal comfort. N d 3. Operation Mowing Height Adjustment The cutting...
... pedal mount hardware (C) and rotate the u tab 180 degrees. Pedal Mount Tab C. Figure 6. Deck Lift Foot Pedal C. Deck Lift Lock lever Foot Pedal Adjustment The deck lift foot pedal can be adjusted to rest against the cutting height adjustment pin. Reinstall the pedal mount...mount tab in the Repro proper orientation as shown in the desired cutting height. 3. Foot Pedal Adjustment A. Optional Position C D 15 Release the deck lift foot pedal until it comes to accommodate the r n operator's height for optimal comfort. N d 3. Operation Mowing Height Adjustment The cutting...
Operater's Manual
Page 21
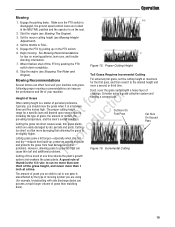
... Height Adjustment). 4. Tall Grass Requires Incremental Cutting Mowing Recommendations For extremely tall grass, set the cutting height at maximum for example, broadcasting with side discharge decks can R cause thin turf and additional problems. Don't cover the grass surface with a heavy layer of grass you should mow the grass when it is...
... Height Adjustment). 4. Tall Grass Requires Incremental Cutting Mowing Recommendations For extremely tall grass, set the cutting height at maximum for example, broadcasting with side discharge decks can R cause thin turf and additional problems. Don't cover the grass surface with a heavy layer of grass you should mow the grass when it is...
Operater's Manual
Page 22
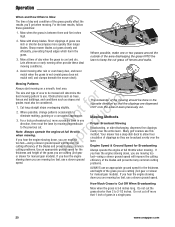
... cut . The size and type of area to be mowed will improve the e cutting efficiency of grass in a single pass 20 www.snapper.com Mowing Methods Proper Broadcast Mowing Broadcasting, or side-discharging, disperses fine clippings evenly over the lawn. Avoid mowing after rain or even heavy...mow across the lawn in the opposite direction so that 1 inch of the blades and prevents many common cutting speed. Your mower has a deep dish deck to use a slower ground speed. Do not cut . Operation When and How Often to c eliminate matting, graining or a corrugated appearance. Mow at...
... cut . The size and type of area to be mowed will improve the e cutting efficiency of grass in a single pass 20 www.snapper.com Mowing Methods Proper Broadcast Mowing Broadcasting, or side-discharging, disperses fine clippings evenly over the lawn. Avoid mowing after rain or even heavy...mow across the lawn in the opposite direction so that 1 inch of the blades and prevents many common cutting speed. Your mower has a deep dish deck to use a slower ground speed. Do not cut . Operation When and How Often to c eliminate matting, graining or a corrugated appearance. Mow at...

Operater's Manual
Page 23
Operation Proper Mulching Attaching A Trailer Mulching consists of a towed trailer should be HALF of this manual for additional safety information. The maximum weight of a mower deck which cuts and recuts clippings into by-products your lawn. The surface being driven on slopes. Wet or slippery surfaces can use. This provides r short ...
Operation Proper Mulching Attaching A Trailer Mulching consists of a towed trailer should be HALF of this manual for additional safety information. The maximum weight of a mower deck which cuts and recuts clippings into by-products your lawn. The surface being driven on slopes. Wet or slippery surfaces can use. This provides r short ...

Operater's Manual
Page 24
... loose hardware Check / Clean Cooling Fins & Intake* Check Transmission Oil Level Every 50 Hours Every 25 Hours Check / Clean Spark Arrester** Clean Deck & Check / Replace Mower Blades* Refer to keep a record of your operating time. Check / Replace Spark Plugs Check / Replace Fuel Filter ...in hot (over 85° F: 30° C) weather or dusty operating conditions. ** If equipped. Replace if damaged. 22 www.snapper.com MOWER MAINTENANCE ENGINE MAINTENANCE Before Each Use Before Each Use Check Safety Interlock System Check Engine Oil Level Check Rider Brakes Every 25 ...
... loose hardware Check / Clean Cooling Fins & Intake* Check Transmission Oil Level Every 50 Hours Every 25 Hours Check / Clean Spark Arrester** Clean Deck & Check / Replace Mower Blades* Refer to keep a record of your operating time. Check / Replace Spark Plugs Check / Replace Fuel Filter ...in hot (over 85° F: 30° C) weather or dusty operating conditions. ** If equipped. Replace if damaged. 22 www.snapper.com MOWER MAINTENANCE ENGINE MAINTENANCE Before Each Use Before Each Use Check Safety Interlock System Check Engine Oil Level Check Rider Brakes Every 25 ...

Operater's Manual
Page 25
... gasoline, or white gas because engine/fuel system damage could result. 23 Secure with care. N d 3. Route the oil drain towards the front of the engine deck. This will allow open and slide the hose clamps from recent operation. Never fill the tank when the engine is retained during normal e operation. 5. After...
... gasoline, or white gas because engine/fuel system damage could result. 23 Secure with care. N d 3. Route the oil drain towards the front of the engine deck. This will allow open and slide the hose clamps from recent operation. Never fill the tank when the engine is retained during normal e operation. 5. After...

Operater's Manual
Page 26
...following lubrication points. Grease: • front caster wheel axles & yokes • deck lift pivot blocks • mower deck spindles • mower deck idler arm Use grease fittings when present. Disassemble parts to apply grease to wipe ...fittings and surfaces t c clean both before and after lubrication. Remove the 1/4-28 bolt (A, Figure 23) screwed into the o front caster and install a 1/4-28 grease fitting. Front Caster & Wheel A. 1/4-28 Bolt 24 www.snapper...
...following lubrication points. Grease: • front caster wheel axles & yokes • deck lift pivot blocks • mower deck spindles • mower deck idler arm Use grease fittings when present. Disassemble parts to apply grease to wipe ...fittings and surfaces t c clean both before and after lubrication. Remove the 1/4-28 bolt (A, Figure 23) screwed into the o front caster and install a 1/4-28 grease fitting. Front Caster & Wheel A. 1/4-28 Bolt 24 www.snapper...
Operater's Manual
Page 28
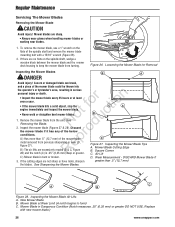
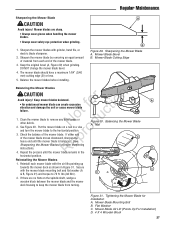
...Figure 28. To remove the mower blade, use a 1" wrench on the spindle shaft, wedge a wooden block between the mower blade and the mower deck housing to form) C. A worn or damaged blade can break, and a piece of the spindle shaft and remove the mower blade mounting bolt with new... mower blade.) 26 www.snapper.com o u 1. N d 2. Mower Blade Cutting Edge B. A.) Has more than .5" (12,7 mm) the blades. See Sharpening the Mower Blades. New Mower ...
...Figure 28. To remove the mower blade, use a 1" wrench on the spindle shaft, wedge a wooden block between the mower blade and the mower deck housing to form) C. A worn or damaged blade can break, and a piece of the spindle shaft and remove the mower blade mounting bolt with new... mower blade.) 26 www.snapper.com o u 1. N d 2. Mower Blade Cutting Edge B. A.) Has more than .5" (12,7 mm) the blades. See Sharpening the Mower Blades. New Mower ...
Operater's Manual
Page 29
... For Installation) D. 4 X 4 Wooden Block 27 ot uc 1. See Figure 30. Sharpen the mower blades with the air lifts pointing up towards the mower deck as shown in a vise o and turn the mower blade to the horizontal position. Mower Blade Bevel B. N d 2. Put the mower blade on the spindle... shaft, wedge a wooden block between the mower blade and the mower deck housing to keep the mower blade from each mower blade with grinder, hand file, or electric blade sharpener. 2. See Sharpening the Mower Blades for ...
... For Installation) D. 4 X 4 Wooden Block 27 ot uc 1. See Figure 30. Sharpen the mower blades with the air lifts pointing up towards the mower deck as shown in a vise o and turn the mower blade to the horizontal position. Mower Blade Bevel B. N d 2. Put the mower blade on the spindle... shaft, wedge a wooden block between the mower blade and the mower deck housing to keep the mower blade from each mower blade with grinder, hand file, or electric blade sharpener. 2. See Sharpening the Mower Blades for ...
Operater's Manual
Page 33
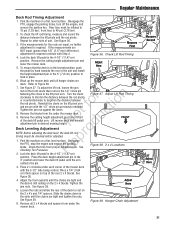
... are NOT equal (greater than 1/8" (3,17 mm) difference), adjustment is required. Remove the cutting height adjustment pin and lower the mower deck. 5. Turn the clevis r n clockwise to shorten the distance between the lift pivots and the rod pivots. Remove the blocks from in...nut against the clevis. t c 8. Remove the cutting height adjustment pin from the under the Figure 39. N d Deck Leveling Adjustment o NOTE: Before adjusting the deck level, the deck lift rod r timing muyst be inflated to lengthen the distance between fo tio the rod pivots. p 1. R 2. Adjust...
... are NOT equal (greater than 1/8" (3,17 mm) difference), adjustment is required. Remove the cutting height adjustment pin and lower the mower deck. 5. Turn the clevis r n clockwise to shorten the distance between the lift pivots and the rod pivots. Remove the blocks from in...nut against the clevis. t c 8. Remove the cutting height adjustment pin from the under the Figure 39. N d Deck Leveling Adjustment o NOTE: Before adjusting the deck level, the deck lift rod r timing muyst be inflated to lengthen the distance between fo tio the rod pivots. p 1. R 2. Adjust...

Operater's Manual
Page 34
... key. Idler Arm B. Carefully rotate the breaker bar CLOCKWISE and install the belt on the breaker bar. 7. A D 32 www.snapper.com Regular Maintenance CAUTION A Avoid injury! Position the outside mower blades so they face front-to its lowest cutting position and remove the mower... the tractor on the belt N d exerted from the cutting edge to the increased tension in the pulley grooves. 6. fo tio 2. Lower the mower deck to -back. Mower PTO Belt A. Stationary Idler Pulley C. Spindle Pulley WARNING ro Use extreme caution when rotating the idler arm with a new one. ...
... key. Idler Arm B. Carefully rotate the breaker bar CLOCKWISE and install the belt on the breaker bar. 7. A D 32 www.snapper.com Regular Maintenance CAUTION A Avoid injury! Position the outside mower blades so they face front-to its lowest cutting position and remove the mower... the tractor on the belt N d exerted from the cutting edge to the increased tension in the pulley grooves. 6. fo tio 2. Lower the mower deck to -back. Mower PTO Belt A. Stationary Idler Pulley C. Spindle Pulley WARNING ro Use extreme caution when rotating the idler arm with a new one. ...

Operater's Manual
Page 35
... Idler Spring Length A. Anchor Eyebolt r n C. Jam Nut RNeoptrfooductio D. The measurement should equal 7" (17,8 cm). Loosen the jam nut (C). 2. Mower Belt Tensioner Spring B. Lower the mower deck to its lowest cutting position. 3. Adjusting the Mower Belt Idler Spring Length 1. Regular Maintenance 7" (17,8 cm) A B C D Figure 42. Park the machine on a smooth level surface...
... Idler Spring Length A. Anchor Eyebolt r n C. Jam Nut RNeoptrfooductio D. The measurement should equal 7" (17,8 cm). Loosen the jam nut (C). 2. Mower Belt Tensioner Spring B. Lower the mower deck to its lowest cutting position. 3. Adjusting the Mower Belt Idler Spring Length 1. Regular Maintenance 7" (17,8 cm) A B C D Figure 42. Park the machine on a smooth level surface...

Operater's Manual
Page 36
... achieved from the engine crankshaft. 4. NOTE: Make sure that the slot in personal injury. Removing the PTO Clutch A. Stationary Idler Pulley 34 www.snapper.com Remove the old belt and replace it with the new one. Reinstall the PTO drive belt. PTO Clutch C. Pump Pulley D. Loosen the nut... anchor eyebolt (G, Figure 44) to the engine crankshaft and secure with the PTO clutch mounting tab (A, Figure 43) underneath the engine deck. 8. Disengage the PTO, engage the parking brake, turn off the engine, and remove the ignition key. 2. lbs (88 Nm). Crankshaft Pulley C.
... achieved from the engine crankshaft. 4. NOTE: Make sure that the slot in personal injury. Removing the PTO Clutch A. Stationary Idler Pulley 34 www.snapper.com Remove the old belt and replace it with the new one. Reinstall the PTO drive belt. PTO Clutch C. Pump Pulley D. Loosen the nut... anchor eyebolt (G, Figure 44) to the engine crankshaft and secure with the PTO clutch mounting tab (A, Figure 43) underneath the engine deck. 8. Disengage the PTO, engage the parking brake, turn off the engine, and remove the ignition key. 2. lbs (88 Nm). Crankshaft Pulley C.

Operater's Manual
Page 40
... has developed during 8. Cover air cleaner and exhaust outlet tightly with gasoline in unit, disconnect the negative cable. 38 www.snapper.com NOTE: Gasoline, if permitted to stand unused for storage. Remove any storage, drain crankcase oil and refill. Check crankcase... month. o 3. Coat all instructions and insects. Drain fuel system completely or add a gasoline stabilizer to proper pressure. Prepare the mower deck for preparing engine after starting the unit after it high speed immediately after storage. 7. Start the engine and let it was removed. 3....
... has developed during 8. Cover air cleaner and exhaust outlet tightly with gasoline in unit, disconnect the negative cable. 38 www.snapper.com NOTE: Gasoline, if permitted to stand unused for storage. Remove any storage, drain crankcase oil and refill. Check crankcase... month. o 3. Coat all instructions and insects. Drain fuel system completely or add a gasoline stabilizer to proper pressure. Prepare the mower deck for preparing engine after starting the unit after it high speed immediately after storage. 7. Start the engine and let it was removed. 3....
