
Operater's Manual
Page 1
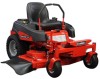
Description 5900528 400ZB2748, Snapper 400Z Zero-Turn Rider with 48" Mower 5103834 Rev - No. Safety Instructions & Operator's Manual for ZERO-TURN RIDING MOWER Noptrfoodruction 400Z Series Re Mfg.
Description 5900528 400ZB2748, Snapper 400Z Zero-Turn Rider with 48" Mower 5103834 Rev - No. Safety Instructions & Operator's Manual for ZERO-TURN RIDING MOWER Noptrfoodruction 400Z Series Re Mfg.
Operater's Manual
Page 2
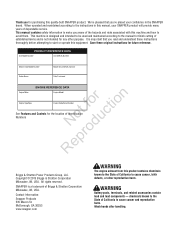
... Battery posts, terminals, and related accessories contain lead and lead components - Wash hands after handling. McDonough, GA 30253 www.snapper.com WARNING The engine exhaust from this product contains chemicals known to the State of California to the State of Identification RNeoprodu ... thoroughly before attempting to cause cancer and reproductive harm. PRODUCT REFERENCE DATA Unit Model Number Unit SERIAL Number Mower Deck Model Number Dealer Name Mower Deck SERIAL Number Date Purchased Engine Make ENGINE REFERENCE DATA Engine Model for tion Engine Type/Spec Engine Code...
... Battery posts, terminals, and related accessories contain lead and lead components - Wash hands after handling. McDonough, GA 30253 www.snapper.com WARNING The engine exhaust from this product contains chemicals known to the State of California to the State of Identification RNeoprodu ... thoroughly before attempting to cause cancer and reproductive harm. PRODUCT REFERENCE DATA Unit Model Number Unit SERIAL Number Mower Deck Model Number Dealer Name Mower Deck SERIAL Number Date Purchased Engine Make ENGINE REFERENCE DATA Engine Model for tion Engine Type/Spec Engine Code...

Operater's Manual
Page 3
... 28 p Parking Brake Adjustment 29 Return to Neutral Adjustment 30 e Deck Rod Timing Adjustment 31 Deck Leveling Adjustment 31 R Mower Belt Replacement 32 Hydraulic Pump Drive Belt Replacement 34 Battery Maintenance 35 Battery Service 36 Storage 38 Starting After Long Term Storage ...38 Troubleshooting 39 Troubleshooting the Rider 39 Troubleshooting the Mower 40 Troubleshooting Common Cutting Problems ........41 Specifications 42 Slope Identification Guide 43 NOTE: In this manual, "left" and "right...
... 28 p Parking Brake Adjustment 29 Return to Neutral Adjustment 30 e Deck Rod Timing Adjustment 31 Deck Leveling Adjustment 31 R Mower Belt Replacement 32 Hydraulic Pump Drive Belt Replacement 34 Battery Maintenance 35 Battery Service 36 Storage 38 Starting After Long Term Storage ...38 Troubleshooting 39 Troubleshooting the Rider 39 Troubleshooting the Mower 40 Troubleshooting Common Cutting Problems ........41 Specifications 42 Slope Identification Guide 43 NOTE: In this manual, "left" and "right...

Operater's Manual
Page 5
... on wet or slippery slopes can be dangerous. It's not worth the risk. r n Thrown Objects fo tio This unit has spinning mower blades. If someone else. The mower deck has spinning mower blades that is too steep where you do not have soft soil conditions. To help you feel unsure about operating the...
... on wet or slippery slopes can be dangerous. It's not worth the risk. r n Thrown Objects fo tio This unit has spinning mower blades. If someone else. The mower deck has spinning mower blades that is too steep where you do not have soft soil conditions. To help you feel unsure about operating the...

Operater's Manual
Page 6
... injury or death. 4 Operator Safety Retaining Walls, Drop-offs, and Water Retaining walls and drop-offs around these hazards and hand-trim with a walk behind mower or string trimmer. Fuel and Maintenance Always disengage all drives, shutoff the engine, and remove the key before operation begins. Give yourself a minimum of two...
... injury or death. 4 Operator Safety Retaining Walls, Drop-offs, and Water Retaining walls and drop-offs around these hazards and hand-trim with a walk behind mower or string trimmer. Fuel and Maintenance Always disengage all drives, shutoff the engine, and remove the key before operation begins. Give yourself a minimum of two...
Operater's Manual
Page 7
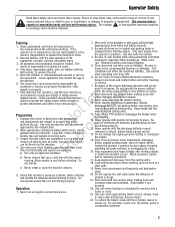
.... Use care when loading or unloading the machine into a 1. All operators and mechanics should evaluate their ability to operate the riding mower safely enough to cool before leaving the operator's position for any reason including emptying the grass catchers or unclogging the chute. 16. ...that may obscure vision. 24. Do not stop engine, and remove keys before backing up . Become familiar with the safe operation of the mower discharge direction and do not point it is to themselves and others from serious injury. r n related injuries. Long hair, loose clothing or...
.... Use care when loading or unloading the machine into a 1. All operators and mechanics should evaluate their ability to operate the riding mower safely enough to cool before leaving the operator's position for any reason including emptying the grass catchers or unclogging the chute. 16. ...that may obscure vision. 24. Do not stop engine, and remove keys before backing up . Become familiar with the safe operation of the mower discharge direction and do not point it is to themselves and others from serious injury. r n related injuries. Long hair, loose clothing or...
Operater's Manual
Page 8
... this machine. Look for holes, ruts, or bumps. Do not mow near drop-offs, ditches, or embankments. The operator could lose footing or balance or mower could cause sliding. Reduced footing or traction in speed or direction. 7. Contact an 5. Do not mow slopes if you feel uneasy on it, do not...
... this machine. Look for holes, ruts, or bumps. Do not mow near drop-offs, ditches, or embankments. The operator could lose footing or balance or mower could cause sliding. Reduced footing or traction in speed or direction. 7. Contact an 5. Do not mow slopes if you feel uneasy on it, do not...

Operater's Manual
Page 11
... messages presented without the alert symbol indicate fo tio a situation where the unit or property could result in serial injury or death. If mower drive belt does not stop within five (5) seconds after the operator returns to a complete stop within five (5) seconds, see your authorized ...that can result in personal injury. Check their neutral positions before disengaging parking brake. Operational SAFETY Checks Test 1 - Blade Brake Check Mower blades and mower drive belt should SHUT OFF if: • Operator rises off seat with PTO engaged, OR • Operator rises off seat)....
... messages presented without the alert symbol indicate fo tio a situation where the unit or property could result in serial injury or death. If mower drive belt does not stop within five (5) seconds after the operator returns to a complete stop within five (5) seconds, see your authorized ...that can result in personal injury. Check their neutral positions before disengaging parking brake. Operational SAFETY Checks Test 1 - Blade Brake Check Mower blades and mower drive belt should SHUT OFF if: • Operator rises off seat with PTO engaged, OR • Operator rises off seat)....

Operater's Manual
Page 14
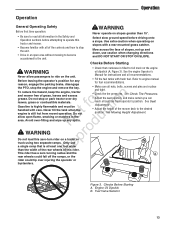
... cm) position. The transmission oil reservoirs are located beneath the operator's seat and in front of the mower deck. PTO (Power Take Off) Switch The PTO switch engages and disengages the mower. Place the adjustment pin in the tank. Always operate at FULL throttle. ro Choke p Close the ...choke for oil level check and fill procedures. 12 www.snapper.com Transmission oil is equipped with two transmission oil reservoirs. ...
... cm) position. The transmission oil reservoirs are located beneath the operator's seat and in front of the mower deck. PTO (Power Take Off) Switch The PTO switch engages and disengages the mower. Place the adjustment pin in the tank. Always operate at FULL throttle. ro Choke p Close the ...choke for oil level check and fill procedures. 12 www.snapper.com Transmission oil is equipped with two transmission oil reservoirs. ...
Operater's Manual
Page 15
...; Check that is highly flammable and must be handled with a rear-mounted grass catcher. To reduce fire hazard, keep the engine, tractor and mower free of the mower deck to the desired position. Do not allow passengers to ride on a trailer or p truck using two separate ramps. Refer to engine manual ... the width of the rear wheels of this zero-turn rider on the unit. Select slow ground speed before attempting to operate this tractor and mower. • Become familiar with all of the controls and how to stop the unit. • Drive in the o u area. Avoid over-filling and wipe...
...; Check that is highly flammable and must be handled with a rear-mounted grass catcher. To reduce fire hazard, keep the engine, tractor and mower free of the mower deck to the desired position. Do not allow passengers to ride on a trailer or p truck using two separate ramps. Refer to engine manual ... the width of the rear wheels of this zero-turn rider on the unit. Select slow ground speed before attempting to operate this tractor and mower. • Become familiar with all of the controls and how to stop the unit. • Drive in the o u area. Avoid over-filling and wipe...

Operater's Manual
Page 17
... for optimal comfort. Cutting Height Adjustment Pin B. Foot Pedal Adjustment A. Pedal Mount Tab C. Operation Mowing Height Adjustment The cutting height adjustment pin (A, Figure 6) controls the mower cutting height. Deck Lift Lock lever Foot Pedal Adjustment The deck lift foot pedal can be adjusted to rest against the cutting height adjustment pin...
... for optimal comfort. Cutting Height Adjustment Pin B. Foot Pedal Adjustment A. Pedal Mount Tab C. Operation Mowing Height Adjustment The cutting height adjustment pin (A, Figure 6) controls the mower cutting height. Deck Lift Lock lever Foot Pedal Adjustment The deck lift foot pedal can be adjusted to rest against the cutting height adjustment pin...
Operater's Manual
Page 21
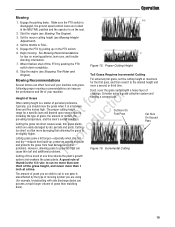
... grass you are using a grass collection system and starting a compost pile. Figure 15. Stop the engine (see Mowing Height Adjustment). 4. r n Height of clippings. Set the mower cutting height (see Stopping The Rider and Engine). See Mowing Recommendations for example, broadcasting with a heavy layer of Grass fo tio Often cutting height is...
... grass you are using a grass collection system and starting a compost pile. Figure 15. Stop the engine (see Mowing Height Adjustment). 4. r n Height of clippings. Set the mower cutting height (see Stopping The Rider and Engine). See Mowing Recommendations for example, broadcasting with a heavy layer of Grass fo tio Often cutting height is...
Operater's Manual
Page 22
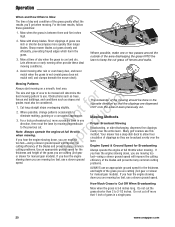
... cut grass cleanly and efficiently, preventing frayed edges which harm the grass. 3. For the best results, follow these ideal mowing conditions. 4. Sharp mower blades cut off fences and walks. Cut long straight strips overlapping slightly. t 2. Mowing Methods Proper Broadcast Mowing Broadcasting, or side-discharging, disperses ...size and type of area to be considered. 1. For a truly professional cut, mow across the lawn in a single pass 20 www.snapper.com How Much Grass to Cut Off When Broadcasting Mow when the grass is wet (moist grass does not mulch well, and clumps beneath...
... cut grass cleanly and efficiently, preventing frayed edges which harm the grass. 3. For the best results, follow these ideal mowing conditions. 4. Sharp mower blades cut off fences and walks. Cut long straight strips overlapping slightly. t 2. Mowing Methods Proper Broadcast Mowing Broadcasting, or side-discharging, disperses ...size and type of area to be considered. 1. For a truly professional cut, mow across the lawn in a single pass 20 www.snapper.com How Much Grass to Cut Off When Broadcasting Mow when the grass is wet (moist grass does not mulch well, and clumps beneath...

Operater's Manual
Page 23
... when broadcasting (side discharging) under heavy cutting conditions, a rumbling sound may be finely cut . Mulching Requires EXCELLENT Mowing Conditions Mulching mowers cannot function properly if the grass is wet, or if the grass is vitally o important for broadcasting (side-discharging) or grass ... than longer clippings). Start with a appropriately sized clevis pin (A, Figure 18) and clip (B). Excessive towed loads can use the mower as a mulching mower during the first two or three mowings in the safety section of this manual for Mulching r n Use full engine throttle matched with...
... when broadcasting (side discharging) under heavy cutting conditions, a rumbling sound may be finely cut . Mulching Requires EXCELLENT Mowing Conditions Mulching mowers cannot function properly if the grass is wet, or if the grass is vitally o important for broadcasting (side-discharging) or grass ... than longer clippings). Start with a appropriately sized clevis pin (A, Figure 18) and clip (B). Excessive towed loads can use the mower as a mulching mower during the first two or three mowings in the safety section of this manual for Mulching r n Use full engine throttle matched with...

Operater's Manual
Page 24
... or dusty RNeoproduc operating conditions. Determining operating time is easily accomplished by observing the elapsed time recorded by the hour meter. MOWER MAINTENANCE ENGINE MAINTENANCE Before Each Use Before Each Use Check Safety Interlock System Check Engine Oil Level Check Rider Brakes Every 25... Hours Check Rider / Mower for normal care of your rider and mower. Replace if damaged. 22 www.snapper.com Check / Replace Spark Plugs Check / Replace Fuel Filter * More often in hot (over ...
... or dusty RNeoproduc operating conditions. Determining operating time is easily accomplished by observing the elapsed time recorded by the hour meter. MOWER MAINTENANCE ENGINE MAINTENANCE Before Each Use Before Each Use Check Safety Interlock System Check Engine Oil Level Check Rider Brakes Every 25... Hours Check Rider / Mower for normal care of your rider and mower. Replace if damaged. 22 www.snapper.com Check / Replace Spark Plugs Check / Replace Fuel Filter * More often in hot (over ...

Operater's Manual
Page 26
... grease fittings are compatible. Deck Lift Linkage Pivots A Figure 23. Front Caster & Wheel A. 1/4-28 Bolt 24 www.snapper.com Grease: • front caster wheel axles & yokes • deck lift pivot blocks • mower deck spindles • mower deck idler arm Use grease fittings when present. Figure 20. N d 1. p 3. Remove the 1/4-28 grease fitting and...
... grease fittings are compatible. Deck Lift Linkage Pivots A Figure 23. Front Caster & Wheel A. 1/4-28 Bolt 24 www.snapper.com Grease: • front caster wheel axles & yokes • deck lift pivot blocks • mower deck spindles • mower deck idler arm Use grease fittings when present. Figure 20. N d 1. p 3. Remove the 1/4-28 grease fitting and...
Operater's Manual
Page 28
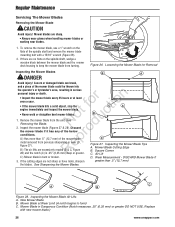
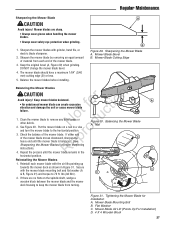
... below r conditions. N d 2. Inspecting the Mower Blade Tips A. DISCARD Mower Blade If 3. Mower Blade in serious personal injury or death. Discard o the mower blade if it has any of the spindle shaft and remove the mower blade mounting bolt with new mower blade.) 26 www.snapper.com New Mower Blade B. Mower Blade at least once a year. Mower blades are excessively eroded...
... below r conditions. N d 2. Inspecting the Mower Blade Tips A. DISCARD Mower Blade If 3. Mower Blade in serious personal injury or death. Discard o the mower blade if it has any of the spindle shaft and remove the mower blade mounting bolt with new mower blade.) 26 www.snapper.com New Mower Blade B. Mower Blade at least once a year. Mower blades are excessively eroded...
Operater's Manual
Page 29
...) when grinding. If either end of material from turning. lbs (94 Nm). 2. Mower Blade Mounting Bolt B. Balance the mower blades before installing. Repeat the process until the mower blade is balanced. Balancing the Mower Blade A. Tightening the Mower Blade for proper sharpening e instructions. The mower blade should have a maximum 1/64" (0,40 mm) cutting edge (B) or less...
...) when grinding. If either end of material from turning. lbs (94 Nm). 2. Mower Blade Mounting Bolt B. Balance the mower blades before installing. Repeat the process until the mower blade is balanced. Balancing the Mower Blade A. Tightening the Mower Blade for proper sharpening e instructions. The mower blade should have a maximum 1/64" (0,40 mm) cutting edge (B) or less...
Operater's Manual
Page 33
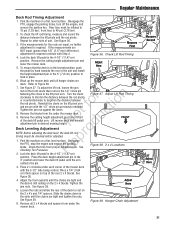
...Pressures. See Figure 36. 3. Place the deck height adjustment pin in the slots until the arm contacts the pin. 3. Hanger Chain Adjustment mower deck. 31 Repeat for the rods are NOT equal (greater than 1/8" (3,17 mm) difference), adjustment is required. Reinstall the clevis on ...check the lift rod timing, measure and record the distance between fo tio the rod pivots. Remove the cutting height adjustment pin and lower the mower deck. 5. R 2. Figure 36. Tighten the jam nuts. Adjust the front eyebolts until all 2 x 4 blocks and spacers from the...
...Pressures. See Figure 36. 3. Place the deck height adjustment pin in the slots until the arm contacts the pin. 3. Hanger Chain Adjustment mower deck. 31 Repeat for the rods are NOT equal (greater than 1/8" (3,17 mm) difference), adjustment is required. Reinstall the clevis on ...check the lift rod timing, measure and record the distance between fo tio the rod pivots. Remove the cutting height adjustment pin and lower the mower deck. 5. R 2. Figure 36. Tighten the jam nuts. Adjust the front eyebolts until all 2 x 4 blocks and spacers from the...

Operater's Manual
Page 34
... tension on the belt N d exerted from the cutting edge to the increased tension in the pulley grooves. 6. A D 32 www.snapper.com Always wear gloves when handling blades or working near blades. 7. Measure the rear tip of the stationary idler pulley (B). The front measurement... should be 4" (10,2 cm), the rear measurement should be Figure 40. Mower PTO Belt A. fo tio 2. Idler Arm B. Carefully rotate the breaker bar CLOCKWISE and install the belt on the breaker bar. 7. Measuring the...
... tension on the belt N d exerted from the cutting edge to the increased tension in the pulley grooves. 6. A D 32 www.snapper.com Always wear gloves when handling blades or working near blades. 7. Measure the rear tip of the stationary idler pulley (B). The front measurement... should be 4" (10,2 cm), the rear measurement should be Figure 40. Mower PTO Belt A. fo tio 2. Idler Arm B. Carefully rotate the breaker bar CLOCKWISE and install the belt on the breaker bar. 7. Measuring the...


