Operater's Manual
Page 3
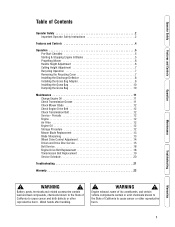
... Contents Operator Safety 2 Important Operator Safety Instructions 2 Features and Controls 4 Operation 5 Pre-Start Checklist 5 Starting & Stopping Engine & Blades 5 Propelling Mower 6 Handle Height Adjustment 6 Cutting Height Adjustment 7 Recycling Operation 7 Removing the Recycling Cover 7 Installing the Discharge Deflector 8 Installing the Grass Bag Adapter 8 Installing the Grass Bag 10 Dumping the Grass Bag 10 Maintenance 11 Change Engine Oil 11 Check Transmission Grease 11 Check Mower Blade 12 Check Engine Drive Belt 12 Check Transmission Belt 12 Service - Wash...
... Contents Operator Safety 2 Important Operator Safety Instructions 2 Features and Controls 4 Operation 5 Pre-Start Checklist 5 Starting & Stopping Engine & Blades 5 Propelling Mower 6 Handle Height Adjustment 6 Cutting Height Adjustment 7 Recycling Operation 7 Removing the Recycling Cover 7 Installing the Discharge Deflector 8 Installing the Grass Bag Adapter 8 Installing the Grass Bag 10 Dumping the Grass Bag 10 Maintenance 11 Change Engine Oil 11 Check Transmission Grease 11 Check Mower Blade 12 Check Engine Drive Belt 12 Check Transmission Belt 12 Service - Wash...
Operater's Manual
Page 4
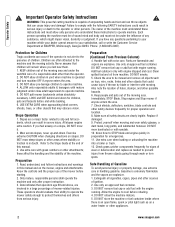
... responsible adults & teenagers with the engine running . USE EXTRA CARE when approaching blind corners, shrubs, trees, or other safety devices frequently for proper operation and location. 8. Slope Operation 1. Only mature, responsible persons shall operate the machine and only after proper instruction. 3. Handle fuel with sandals. 10. Check shields, deflectors, switches, blade controls and other objects that may obscure vision. DO NOT mow barefooted or with extra care...
... responsible adults & teenagers with the engine running . USE EXTRA CARE when approaching blind corners, shrubs, trees, or other safety devices frequently for proper operation and location. 8. Slope Operation 1. Only mature, responsible persons shall operate the machine and only after proper instruction. 3. Handle fuel with sandals. 10. Check shields, deflectors, switches, blade controls and other objects that may obscure vision. DO NOT mow barefooted or with extra care...
Operater's Manual
Page 5
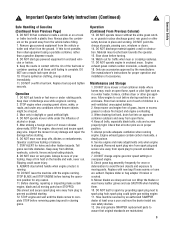
... are maintained. 3 STAY ALERT for proper operation and installation of Gasoline (Continued From Previous Page) 6. Tall grass can cut. DO NOT change clothing immediately. 11. ! When draining fuel tank, drain fuel into an approved container outdoors and away from plug to prevent accidental starting . 12. Engine exhaust gases contain carbon monoxide, a deadly poison. 6. Mower blades are evident. Operator Safety Safe Handling of accessories. Remove gas-powered equipment from ditches, washouts, culverts, fences...
... are maintained. 3 STAY ALERT for proper operation and installation of Gasoline (Continued From Previous Page) 6. Tall grass can cut. DO NOT change clothing immediately. 11. ! When draining fuel tank, drain fuel into an approved container outdoors and away from plug to prevent accidental starting . 12. Engine exhaust gases contain carbon monoxide, a deadly poison. 6. Mower blades are evident. Operator Safety Safe Handling of accessories. Remove gas-powered equipment from ditches, washouts, culverts, fences...
Operater's Manual
Page 7
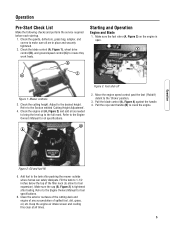
... fuel fill 5. Refer to the Engine Owners Manual for oil specifications. Check the guards, deflectors, grass bag, adapter, and covers to make sure all times. 5 Check the cutting height. B A 2. Pull the rope start -up to the full mark. Adjust to the tank after fueling. Add fuel to the desired height. Keep the engine air intake screen and cooling fins clear at all are in place and securely tightened. 2. Check the blade control (A, Figure 1), wheel drive control (B), and ground speed control (C) to the Section entitled 'Cutting Height Adjustment...
... fuel fill 5. Refer to the Engine Owners Manual for oil specifications. Check the guards, deflectors, grass bag, adapter, and covers to make sure all times. 5 Check the cutting height. B A 2. Pull the rope start -up to the full mark. Adjust to the tank after fueling. Add fuel to the desired height. Keep the engine air intake screen and cooling fins clear at all are in place and securely tightened. 2. Check the blade control (A, Figure 1), wheel drive control (B), and ground speed control (C) to the Section entitled 'Cutting Height Adjustment...
Operater's Manual
Page 8
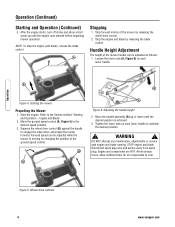
... engine. Refer to engage the wheel drive and propel the mower forward. Move the ground speed control (A, Figure 5) to cool. Move the handle assembly (B) up until the desired position is moving by changing the position of the mower by releasing the blade control. Engine and components are HOT. Operation Figure 5: Mower drive controls 6 www.snapper.com B B Figure 4: Starting the mower Propelling the Mower 1. A B A Figure 6: Adjusting the handle height 2. A Stopping 1. Stop forward motion of the ground speed control. Engine and Blade". 2. Disconnect spark plug wire...
... engine. Refer to engage the wheel drive and propel the mower forward. Move the ground speed control (A, Figure 5) to cool. Move the handle assembly (B) up until the desired position is moving by changing the position of the mower by releasing the blade control. Engine and components are HOT. Operation Figure 5: Mower drive controls 6 www.snapper.com B B Figure 4: Starting the mower Propelling the Mower 1. A B A Figure 6: Adjusting the handle height 2. A Stopping 1. Stop forward motion of the ground speed control. Engine and Blade". 2. Disconnect spark plug wire...
Operater's Manual
Page 9
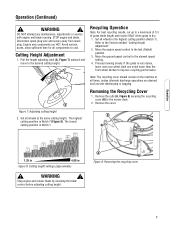
... all wheels in Figure 8: Cutting height settings (approximate) ! Removing the Recycling Cover 1. B 1.25 in 4.00 in the highest cutting position (Notch 7). Disconnect spark plug wire and secure away from spark plug. Engine and components are desired, such as side discharging or bagging. Move the engine speed control to the desired cutting height. A Figure 9: Removing the recycling cover 7 Cutting Height Adjustment 1. Recycling Operation Note: For best recycling results, cut up to cool. Move the ground speed control to the mower deck. 2. Remove the...
... all wheels in Figure 8: Cutting height settings (approximate) ! Removing the Recycling Cover 1. B 1.25 in 4.00 in the highest cutting position (Notch 7). Disconnect spark plug wire and secure away from spark plug. Engine and components are desired, such as side discharging or bagging. Move the engine speed control to the desired cutting height. A Figure 9: Removing the recycling cover 7 Cutting Height Adjustment 1. Recycling Operation Note: For best recycling results, cut up to cool. Move the ground speed control to the mower deck. 2. Remove the...
Operater's Manual
Page 10
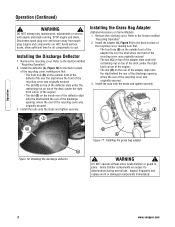
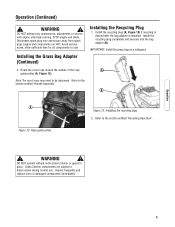
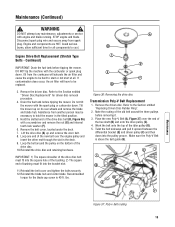
DO NOT attempt any maintenance, adjustments or service with engine and blade running. Install the deflector (A, Figure 10) to deterioration during normal use. Remove the recycling cover. Install the nuts onto the studs and tighten securely. STOP engine and blade. Engine and components are subject to the deck in place of the recycling cover, making sure that : The front hole (B) on the outside front of the adapter fits over the stud...
DO NOT attempt any maintenance, adjustments or service with engine and blade running. Install the deflector (A, Figure 10) to deterioration during normal use. Remove the recycling cover. Install the nuts onto the studs and tighten securely. STOP engine and blade. Engine and components are subject to the deck in place of the recycling cover, making sure that : The front hole (B) on the outside front of the adapter fits over the stud...
Operater's Manual
Page 11
... use. Grass Catcher components are HOT. Disconnect spark plug wire and secure away from spark plug. Route the recoil rope around the outside of the rope A guide pulley (A, Figure 12). Engine and components are subject to the section entitled "Handle Assembly". Install the recycling plug completely and securely into the bag adapter (B). WARNING ! Inspect frequently and replace worn or damaged components immediately. 9 WARNING ! STOP engine and blade. DO NOT attempt any maintenance, adjustments...
... use. Grass Catcher components are HOT. Disconnect spark plug wire and secure away from spark plug. Route the recoil rope around the outside of the rope A guide pulley (A, Figure 12). Engine and components are subject to the section entitled "Handle Assembly". Install the recycling plug completely and securely into the bag adapter (B). WARNING ! Inspect frequently and replace worn or damaged components immediately. 9 WARNING ! STOP engine and blade. DO NOT attempt any maintenance, adjustments...
Operater's Manual
Page 12
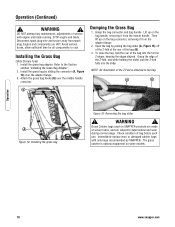
... cool. The grass catcher is attached to deterioration and wear during normal usage. Operation 10 www.snapper.com WARNING ! DO NOT attempt any maintenance, adjustments or service with only bags recommended by sliding the connector (A, Figure 14) over the middle handle cross bar. Install the grass bag adapter. Install the grass bag by SNAPPER. Grasp the edge of woven fabric, and are HOT. WARNING ! Grass Catcher bags used on some models. STOP engine and blade. NOTE...
... cool. The grass catcher is attached to deterioration and wear during normal usage. Operation 10 www.snapper.com WARNING ! DO NOT attempt any maintenance, adjustments or service with only bags recommended by sliding the connector (A, Figure 14) over the middle handle cross bar. Install the grass bag adapter. Install the grass bag by SNAPPER. Grasp the edge of woven fabric, and are HOT. WARNING ! Grass Catcher bags used on some models. STOP engine and blade. NOTE...
Operater's Manual
Page 13
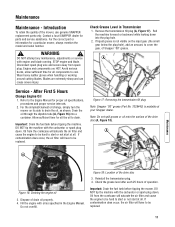
... the quality of drain oil properly. 4. Contact a local SNAPPER dealer for a particular mower, always mention the model and serial number. ! Engine and components are extremely sharp and can cause severe injury. Check Grease Level in the Engine Manual. Remove the transmission fill plug (A, Figure 17). Refer to be replaced. 11 Important: Drain the fuel tank before tipping the mower. Wear heavy leather gloves when handling or working around cutting blades. Blades are HOT. Roll...
... the quality of drain oil properly. 4. Contact a local SNAPPER dealer for a particular mower, always mention the model and serial number. ! Engine and components are extremely sharp and can cause severe injury. Check Grease Level in the Engine Manual. Remove the transmission fill plug (A, Figure 17). Refer to be replaced. 11 Important: Drain the fuel tank before tipping the mower. Wear heavy leather gloves when handling or working around cutting blades. Blades are HOT. Roll...
Operater's Manual
Page 14
... blade cap screw. Oil from the fuel tank and let the engine run until all exposed metal with the carburetor or spark plug down . Air Filter Refer to the blade cap screw (A, Figure 19). Prepare the mower for access to the engine owner's manual for service instructions. On self-propelled models, disconnect the transfer rod clip and remove the ground speed control rod before tipping the mower. Carefully fold the handles forward, "flexing" the control cables to the engine owner's manual. A Figure 19: Tightening the blade cap screw Check Engine Drive Belt 1. Service...
... blade cap screw. Oil from the fuel tank and let the engine run until all exposed metal with the carburetor or spark plug down . Air Filter Refer to the blade cap screw (A, Figure 19). Prepare the mower for access to the engine owner's manual for service instructions. On self-propelled models, disconnect the transfer rod clip and remove the ground speed control rod before tipping the mower. Carefully fold the handles forward, "flexing" the control cables to the engine owner's manual. A Figure 19: Tightening the blade cap screw Check Engine Drive Belt 1. Service...
Operater's Manual
Page 15
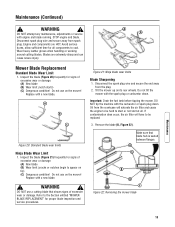
.... Replace with a new blade. ! Do not tilt the mower with engine and blade running. Important: Drain the fuel tank before tipping the mower. If contamination does occur, the air filter will saturate the air filter and cause the engine to appear on its rear wheels. Remove the blade (B, Figure 22). Wear heavy leather gloves when handling or working around cutting blades. Replace with a new blade. DO NOT attempt any maintenance, adjustments or service with the spark plug or carburetor down . Do not use...
.... Replace with a new blade. ! Do not tilt the mower with engine and blade running. Important: Drain the fuel tank before tipping the mower. If contamination does occur, the air filter will saturate the air filter and cause the engine to appear on its rear wheels. Remove the blade (B, Figure 22). Wear heavy leather gloves when handling or working around cutting blades. Replace with a new blade. DO NOT attempt any maintenance, adjustments or service with the spark plug or carburetor down . Do not use...
Operater's Manual
Page 16
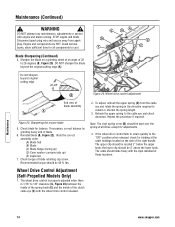
... with engine and blade running. The cable should be located 2" below the upper knob; WARNING ! Engine and components are HOT. To adjust, unhook the upper spring (D) from spark plug. If the wheel drive control fails to return quickly to 1/8" clearance (G, Figure 24) between the inside of the spring hook (E) and the inside of blade retaining cap screw. DO NOT attempt any maintenance, adjustments or service with the clips installed at...
... with engine and blade running. The cable should be located 2" below the upper knob; WARNING ! Engine and components are HOT. To adjust, unhook the upper spring (D) from spark plug. If the wheel drive control fails to return quickly to 1/8" clearance (G, Figure 24) between the inside of the spring hook (E) and the inside of blade retaining cap screw. DO NOT attempt any maintenance, adjustments or service with the clips installed at...

Operater's Manual
Page 17
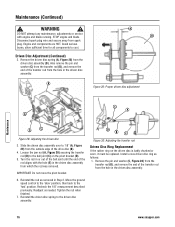
... attempt any oil or grease with a clean cloth. 2. Driven disc rubber is loose, reconnect. C Figure 27: The ground speed control 15 WARNING ! STOP engine and blade. Avoid serious burns, allow sufficient time for the following problems: C D B Drive Spring Repair/Replacement If the drive spring (A, Figure 26) is worn - Driven and Drive Disc Service If the mower does not propel itself properly, check for all components to install the drive spring. Note: Use a pair...
... attempt any oil or grease with a clean cloth. 2. Driven disc rubber is loose, reconnect. C Figure 27: The ground speed control 15 WARNING ! STOP engine and blade. Avoid serious burns, allow sufficient time for the following problems: C D B Drive Spring Repair/Replacement If the drive spring (A, Figure 26) is worn - Driven and Drive Disc Service If the mower does not propel itself properly, check for all components to install the drive spring. Note: Use a pair...
Operater's Manual
Page 18
... and washer (C, Figure 28) from the transfer rod (D), and remove the end of the rod aligns with engine and blade running. Install a new driven disc ring as needed. Disconnect spark plug wire and secure away from which the rod was removed. Turn the rod in or out of the ball joint until the end of the transfer rod from the hole in the driven disc assembly from spark plug. Maintenance (Continued) !
... and washer (C, Figure 28) from the transfer rod (D), and remove the end of the rod aligns with engine and blade running. Install a new driven disc ring as needed. Disconnect spark plug wire and secure away from which the rod was removed. Turn the rod in or out of the ball joint until the end of the transfer rod from the hole in the driven disc assembly from spark plug. Maintenance (Continued) !
Operater's Manual
Page 20
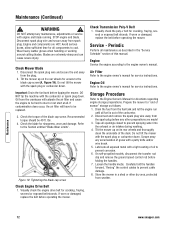
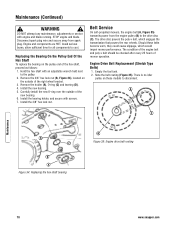
... drive disc (C). Install the new bearing. 5. Belt Service On self-propelled mowers, the engine belt (A, Figure 35) transmits power from spark plug. The condition of the engine belt and poly-v belt should be checked after every 25 hours of the new bearing. 6. Engine Drive Belt Replacement (Stretch Type Belts) 1. Should these models to the pulley. 2. Empty the fuel tank. 2. Install the 3/8" hex lock nut. There is no idler pulley on these belts become worn, they could cause slippage, which engages the transmission that powers the rear wheels. Remove...
... drive disc (C). Install the new bearing. 5. Belt Service On self-propelled mowers, the engine belt (A, Figure 35) transmits power from spark plug. The condition of the engine belt and poly-v belt should be checked after every 25 hours of the new bearing. 6. Engine Drive Belt Replacement (Stretch Type Belts) 1. Should these models to the pulley. 2. Empty the fuel tank. 2. Install the 3/8" hex lock nut. There is no idler pulley on these belts become worn, they could cause slippage, which engages the transmission that powers the rear wheels. Remove...
Operater's Manual
Page 21
... belt cover, located under the deck. 7. Reinstall the drive disc and retaining hardware. E A C B D G F Maintenance Figure 37: Poly-v belt routing 19 B Engine Drive Belt Replacement (Stretch Type Belts - Assistance from another person may be necessary to be hard to the Section entitled "Driven Disc Replacement" for driven disc removal procedure. 4. Note the routing of bushing must fit into the pulley groove. Continued) IMPORTANT: Drain the fuel tank before tipping the mower. Oil from spark plug. Refer to start...
... belt cover, located under the deck. 7. Reinstall the drive disc and retaining hardware. E A C B D G F Maintenance Figure 37: Poly-v belt routing 19 B Engine Drive Belt Replacement (Stretch Type Belts - Assistance from another person may be necessary to be hard to the Section entitled "Driven Disc Replacement" for driven disc removal procedure. 4. Note the routing of bushing must fit into the pulley groove. Continued) IMPORTANT: Drain the fuel tank before tipping the mower. Oil from spark plug. Refer to start...
Operater's Manual
Page 22
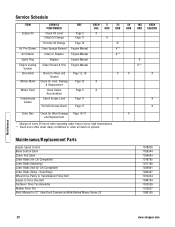
...Periodic Grease Check Page 11 X Drive Disc Check for 21" Steel Deck Commercial Walk Behind Mower Series 20 7078026 7029344 7034604 7019795 7017168 7026691 7026407 7012354 7046784 7073528 7010927 7006155 Maintenance 20 www.snapper.com Maintenance/Replacement Parts Engine Speed Control Blade Control Cable Clutch Pull Cable Cutter Blade (Air Lift Compatible) Cutter Blade (Mulching) Cutter Blade (Not Air Lift Compatible) Cutter Blade (Ninja - Quad Edge) Wheel Drive Pulley to Transmission Pulley Belt Engine to Drive Disc Belt Cantilever Drive Tire Assembly Rubber Drive Tire Parts Manual for...
...Periodic Grease Check Page 11 X Drive Disc Check for 21" Steel Deck Commercial Walk Behind Mower Series 20 7078026 7029344 7034604 7019795 7017168 7026691 7026407 7012354 7046784 7073528 7010927 7006155 Maintenance 20 www.snapper.com Maintenance/Replacement Parts Engine Speed Control Blade Control Cable Clutch Pull Cable Cutter Blade (Air Lift Compatible) Cutter Blade (Mulching) Cutter Blade (Not Air Lift Compatible) Cutter Blade (Ninja - Quad Edge) Wheel Drive Pulley to Transmission Pulley Belt Engine to Drive Disc Belt Cantilever Drive Tire Assembly Rubber Drive Tire Parts Manual for...
Operater's Manual
Page 23
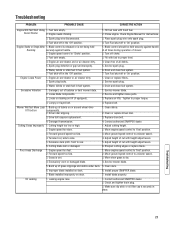
... dip stick or oil filler cap is wet. 1. Recoil Starter 2. Fill fuel tank with height adjust levers. 5. Turn off in the 'Off' position. Clean free of grass clippings and debris under deck. 5. Drain and clean fuel system. 7. Engine Loses Power 1. Clean or replace filters. 2. Service spark plug. 3. Water, debris or stale fuel in place. Replace air lifts. Lumpy or frayed belt. 4. Adjust height of mower. 2. Move ground speed control to 'Fast' position. 2. Blade installed improperly on deck. 7. Engine needs choking. 1. Choke engine. Fuel shut-off to...
... dip stick or oil filler cap is wet. 1. Recoil Starter 2. Fill fuel tank with height adjust levers. 5. Turn off in the 'Off' position. Clean free of grass clippings and debris under deck. 5. Drain and clean fuel system. 7. Engine Loses Power 1. Clean or replace filters. 2. Service spark plug. 3. Water, debris or stale fuel in place. Replace air lifts. Lumpy or frayed belt. 4. Adjust height of mower. 2. Move ground speed control to 'Fast' position. 2. Blade installed improperly on deck. 7. Engine needs choking. 1. Choke engine. Fuel shut-off to...

Operater's Manual
Page 28
... Cut Transmission Type Ground Speed Engine Power Engine Displacement Fuel Tank Capacity 21 in 1.25 - 4 in accordance with SAE (Society of higher rated power for this Series engine. Due to manufacturing and capacity limitations, Briggs & Stratton may substitute an engine of Automotive Engineers) code J1940 (Small Engine Power & Torque Rating Procedure), and rating performance has been obtained and corrected in Gear 1 - 4 mph 5.5 hp 160 cc 1.5 qt Common Service Parts Cutter Blade (Ninja - 21" STEEL DECK WALK MOWERS...
... Cut Transmission Type Ground Speed Engine Power Engine Displacement Fuel Tank Capacity 21 in 1.25 - 4 in accordance with SAE (Society of higher rated power for this Series engine. Due to manufacturing and capacity limitations, Briggs & Stratton may substitute an engine of Automotive Engineers) code J1940 (Small Engine Power & Torque Rating Procedure), and rating performance has been obtained and corrected in Gear 1 - 4 mph 5.5 hp 160 cc 1.5 qt Common Service Parts Cutter Blade (Ninja - 21" STEEL DECK WALK MOWERS...


