Operating Instructions
Page 1
LCD Projection TV KDF-60XBR950/KDF-70XBR950 4-097-520-11 (1) LCD Projection TV HD-Monitor Operating Instructions KDF-60XBR950 KDF-70XBR950 2003 Sony Corporation
LCD Projection TV KDF-60XBR950/KDF-70XBR950 4-097-520-11 (1) LCD Projection TV HD-Monitor Operating Instructions KDF-60XBR950 KDF-70XBR950 2003 Sony Corporation
Operating Instructions
Page 2
...To prevent electric shock, do not expose the LCD Projection TV to Part 15 of the FCC rules. Record these numbers in this manual could void your warranty and your Sony dealer regarding this equipment. MODEL: KDF-60XBR950, KDF-70XBR950 Please keep this polarized AC plug with the limits for...the general public may cause harmful interference with radio communications. NO USER-SERVICEABLE PARTS INSIDE. These limits are located at the rear of the LCD Projection TV, below . CAUTION RISK OF ELECTRIC SHOCK DO NOT OPEN ATTENTION RISQUE DE CHOC ELECTRIQUE, NE PAS OUVRIR PRECAUCION RIESGO ...
...To prevent electric shock, do not expose the LCD Projection TV to Part 15 of the FCC rules. Record these numbers in this manual could void your warranty and your Sony dealer regarding this equipment. MODEL: KDF-60XBR950, KDF-70XBR950 Please keep this polarized AC plug with the limits for...the general public may cause harmful interference with radio communications. NO USER-SERVICEABLE PARTS INSIDE. These limits are located at the rear of the LCD Projection TV, below . CAUTION RISK OF ELECTRIC SHOCK DO NOT OPEN ATTENTION RISQUE DE CHOC ELECTRIQUE, NE PAS OUVRIR PRECAUCION RIESGO ...

Operating Instructions
Page 3
... fit into the outlet, contact your dealer. ❑ If any liquid or solid object should fall inside the cabinet, unplug the LCD Projection TV immediately and have it further. ❑ If you are trademarks of a reflective material. registered mark. and are trademarks of Dolby Laboratories...., or if the room temperature changes suddenly, the picture may be using the LCD Projection TV for several days, disconnect the power by pulling the plug itself. As an ENERGY STAR® Partner, Sony Corporation has determined that face the screen with opaque drapery. "Dolby", "Pro Logic...
... fit into the outlet, contact your dealer. ❑ If any liquid or solid object should fall inside the cabinet, unplug the LCD Projection TV immediately and have it further. ❑ If you are trademarks of a reflective material. registered mark. and are trademarks of Dolby Laboratories...., or if the room temperature changes suddenly, the picture may be using the LCD Projection TV for several days, disconnect the power by pulling the plug itself. As an ENERGY STAR® Partner, Sony Corporation has determined that face the screen with opaque drapery. "Dolby", "Pro Logic...

Operating Instructions
Page 5
...of the set off . Stubborn stains may be necessary to reduce a picture displayed by the manufacturer for the specific model of the LCD Projection TV with care. Consult qualified service personnel. Installation Water and Moisture Do not use strong solvents such as they may be blocked or covered. &#...a wet basement, or near a swimming pool, etc. Use only a cart or stand recommended by reflecting. To ensure reliable operation of the LCD Projection TV. Never spill liquid of mild soap and warm water. Accessories Do not place the set . Always turn the set , and to overturn. Never ...
...of the set off . Stubborn stains may be necessary to reduce a picture displayed by the manufacturer for the specific model of the LCD Projection TV with care. Consult qualified service personnel. Installation Water and Moisture Do not use strong solvents such as they may be blocked or covered. &#...a wet basement, or near a swimming pool, etc. Use only a cart or stand recommended by reflecting. To ensure reliable operation of the LCD Projection TV. Never spill liquid of mild soap and warm water. Accessories Do not place the set . Always turn the set , and to overturn. Never ...

Operating Instructions
Page 7
...the LCD Projection TV in the specified manner If you carry the LCD Projection TV in a picture tube implosion. For the best picture quality, install your LCD projection TV according to dispose of the set. When the projection lamp wears out after using the LCD projection TV for KDF-70XBR950 away from... behind the screen. If the lamp replacement indicator of the LCD Projection TV. When the set reaches the ...
...the LCD Projection TV in the specified manner If you carry the LCD Projection TV in a picture tube implosion. For the best picture quality, install your LCD projection TV according to dispose of the set. When the projection lamp wears out after using the LCD projection TV for KDF-70XBR950 away from... behind the screen. If the lamp replacement indicator of the LCD Projection TV. When the set reaches the ...
Operating Instructions
Page 8
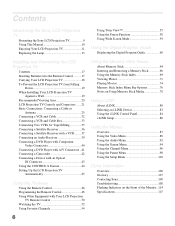
Contents Introducing the Sony LCD Projection TV Presenting the Sony LCD Projection TV 9 Using This Manual 10 Enjoying Your LCD Projection TV 11 Replacing the Lamp 13 Using Twin View 55 Using the Freeze Function 58 Using Wide Screen Mode 59 Using the Digital Program Guide Displaying the Digital Program Guide 60 Installing and Connecting the LCD Projection TV Contents 17...
Contents Introducing the Sony LCD Projection TV Presenting the Sony LCD Projection TV 9 Using This Manual 10 Enjoying Your LCD Projection TV 11 Replacing the Lamp 13 Using Twin View 55 Using the Freeze Function 58 Using Wide Screen Mode 59 Using the Digital Program Guide Displaying the Digital Program Guide 60 Installing and Connecting the LCD Projection TV Contents 17...
Operating Instructions
Page 9
... from two different sources (1080i, 720p, 480p or 480i) simultaneously. ❑ Memory Stick® Viewer: Allows you for purchasing the Sony LCD Projection TV. You can watch digital television programs and enjoy the improved audio/video quality offered by these programs. ❑ DRC® (Digital Reality...frames reproduced every 1/60th of a second in the selected window. The DVI-HDTV input terminal is not intended for models KDF-60XBR950 and KDF-70XBR950. Features Some of the features that have compatible interfaces. This manual is for use with the EIA-861 standard and is ...
... from two different sources (1080i, 720p, 480p or 480i) simultaneously. ❑ Memory Stick® Viewer: Allows you for purchasing the Sony LCD Projection TV. You can watch digital television programs and enjoy the improved audio/video quality offered by these programs. ❑ DRC® (Digital Reality...frames reproduced every 1/60th of a second in the selected window. The DVI-HDTV input terminal is not intended for models KDF-60XBR950 and KDF-70XBR950. Features Some of the features that have compatible interfaces. This manual is for use with the EIA-861 standard and is ...

Operating Instructions
Page 10
Introducing the Sony LCD Projection TV ❑ i.LINK: Provides a secure digital interface to use your remote control functions. 3 Using the menus This section teaches you fully understand the operation of copyright-protected high-definition content between these devices and your new LCD projection TV. Instructions... sections in wide screen mode (16:9 aspect ratio). ❑ Auto Wide: Allows you how to access on the LCD projection TV console. 10 Similar controls are written for connected equipment. ❑ Favorite Channel Preview: Preview up to sixteen favorite channels without...
Introducing the Sony LCD Projection TV ❑ i.LINK: Provides a secure digital interface to use your remote control functions. 3 Using the menus This section teaches you fully understand the operation of copyright-protected high-definition content between these devices and your new LCD projection TV. Instructions... sections in wide screen mode (16:9 aspect ratio). ❑ Auto Wide: Allows you how to access on the LCD projection TV console. 10 Similar controls are written for connected equipment. ❑ Favorite Channel Preview: Preview up to sixteen favorite channels without...
Operating Instructions
Page 11
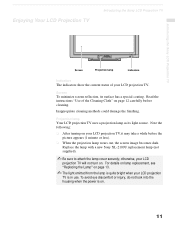
Enjoying Your LCD Projection TV Introducing the Sony LCD Projection TV Introducing the Sony LCD Projection TV Screen Projection lamp Indicators Indicators The indicators show the current status of the Cleaning Cloth" on page 12 carefully before the picture appears (1 minute or less). ❑ When the projection lamp wears out, the ...screen image becomes dark. Note the following: ❑ After turning on your LCD projection TV will not turn on. Replace the lamp with a new Sony XL-2100U replacement lamp (not supplied). ✍ Be sure to attach the lamp cover securely; ...
Enjoying Your LCD Projection TV Introducing the Sony LCD Projection TV Introducing the Sony LCD Projection TV Screen Projection lamp Indicators Indicators The indicators show the current status of the Cleaning Cloth" on page 12 carefully before the picture appears (1 minute or less). ❑ When the projection lamp wears out, the ...screen image becomes dark. Note the following: ❑ After turning on your LCD projection TV will not turn on. Replace the lamp with a new Sony XL-2100U replacement lamp (not supplied). ✍ Be sure to attach the lamp cover securely; ...

Operating Instructions
Page 12
... power off when unplugging from the outlet or switching the breaker off the main power on the front of your LCD projection TV before using your LCD projection TV is transported directly from a cold to shine directly onto the screen. ❑ The screen surface is easily scratched.... turning off the power, the fan will not be used repeatedly. 12 On moisture condensation ❑ If your LCD projection TV. Introducing the Sony LCD Projection TV Notes on the LCD Projection TV To enjoy clear pictures ❑ Be sure not to allow sunlight or light from a lamp to a warm location,...
... power off when unplugging from the outlet or switching the breaker off the main power on the front of your LCD projection TV before using your LCD projection TV is transported directly from a cold to shine directly onto the screen. ❑ The screen surface is easily scratched.... turning off the power, the fan will not be used repeatedly. 12 On moisture condensation ❑ If your LCD projection TV. Introducing the Sony LCD Projection TV Notes on the LCD Projection TV To enjoy clear pictures ❑ Be sure not to allow sunlight or light from a lamp to a warm location,...

Operating Instructions
Page 13
Failure to blow for replacement. Introducing the Sony LCD Projection TV Introducing the Sony LCD Projection TV Replacing the Lamp The projection lamp has a limited life which illuminates the picture. If the screen becomes dark, the color looks unusual, or the LAMP indicator on the front of the LCD projection TV flashes, it cool down completely, as the surface of...
Failure to blow for replacement. Introducing the Sony LCD Projection TV Introducing the Sony LCD Projection TV Replacing the Lamp The projection lamp has a limited life which illuminates the picture. If the screen becomes dark, the color looks unusual, or the LAMP indicator on the front of the LCD projection TV flashes, it cool down completely, as the surface of...

Operating Instructions
Page 14
Push and release the center in the right underneath with a coin or similar object and remove the control panel cover. Introducing the Sony LCD Projection TV 1 Turn off the power switch on the LCD projection TV and after several minutes, unplug the power cord. (The cooling fan will continue to open it . This may reduce picture...
Push and release the center in the right underneath with a coin or similar object and remove the control panel cover. Introducing the Sony LCD Projection TV 1 Turn off the power switch on the LCD projection TV and after several minutes, unplug the power cord. (The cooling fan will continue to open it . This may reduce picture...

Operating Instructions
Page 15
... shown in the illustration using the hex key supplied with the lamp. (Continued) 15 Be sure to remove the lamp cover. Introducing the Sony LCD Projection TV 5 Loosen the two screws that secure the lamp, then pull out the lamp. Never put the removed lamp into the lamp receptacle. Mount... as shown in the illustration using the hex key supplied with the lamp. Never touch the front glass of the replacement lamp. Introducing the Sony LCD Projection TV 4 Loosen the screw with a coin or similar object to attach the new lamp securely. The lamp is very hot immediately after use....
... shown in the illustration using the hex key supplied with the lamp. (Continued) 15 Be sure to remove the lamp cover. Introducing the Sony LCD Projection TV 5 Loosen the two screws that secure the lamp, then pull out the lamp. Never put the removed lamp into the lamp receptacle. Mount... as shown in the illustration using the hex key supplied with the lamp. Never touch the front glass of the replacement lamp. Introducing the Sony LCD Projection TV 4 Loosen the screw with a coin or similar object to attach the new lamp securely. The lamp is very hot immediately after use....

Operating Instructions
Page 16
... the front panel in the order of 1 to 3, as shown in the illustration. 1 Match the projection of the left side. 2 Secure the screw of the right side. 3 Close the front panel. ✍ Consult your Sony dealer for a Sony XL-2100U replacement lamp. ✍ Take great care when replacing the lamp or plugging in..., and replace the lamp cover as it was. ✍ If the lamp cover is mounted securely, otherwise the power will not turn on. Introducing the Sony LCD Projection TV 7 Mount the lamp cover and tighten the screw. If you handle them roughly, the LCD...
... the front panel in the order of 1 to 3, as shown in the illustration. 1 Match the projection of the left side. 2 Secure the screw of the right side. 3 Close the front panel. ✍ Consult your Sony dealer for a Sony XL-2100U replacement lamp. ✍ Take great care when replacing the lamp or plugging in..., and replace the lamp cover as it was. ✍ If the lamp cover is mounted securely, otherwise the power will not turn on. Introducing the Sony LCD Projection TV 7 Mount the lamp cover and tighten the screw. If you handle them roughly, the LCD...
Operating Instructions
Page 17
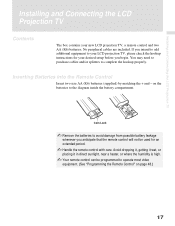
... ✍ Your remote control can be used for your new LCD projection TV, a remote control and two AA (R6) batteries. You may need to purchase cables and/or splitters to your LCD projection TV, please check the hookup instructions for an extended period. ✍ Handle... the remote control with care. Installing and Connecting the LCD Projection TV Installing and Connecting the LCD Projection TV Contents The box contains your desired setup before ...
... ✍ Your remote control can be used for your new LCD projection TV, a remote control and two AA (R6) batteries. You may need to purchase cables and/or splitters to your LCD projection TV, please check the hookup instructions for an extended period. ✍ Handle... the remote control with care. Installing and Connecting the LCD Projection TV Installing and Connecting the LCD Projection TV Contents The box contains your desired setup before ...
Operating Instructions
Page 18
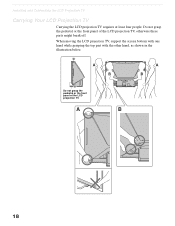
When moving the LCD projection TV, support the screen bottom with one hand while grasping the top part with the other hand, as shown in the illustration below. Do not grasp the pedestal or the front panel of the LCD projection TV. A B A B Do not grasp the pedestal or the front panel of the LCD projection TV, otherwise these parts might break off. Installing and Connecting the LCD Projection TV Carrying Your LCD Projection TV Carrying the LCD projection TV requires at least four people. A B 18
When moving the LCD projection TV, support the screen bottom with one hand while grasping the top part with the other hand, as shown in the illustration below. Do not grasp the pedestal or the front panel of the LCD projection TV. A B A B Do not grasp the pedestal or the front panel of the LCD projection TV, otherwise these parts might break off. Installing and Connecting the LCD Projection TV Carrying Your LCD Projection TV Carrying the LCD projection TV requires at least four people. A B 18
Operating Instructions
Page 19
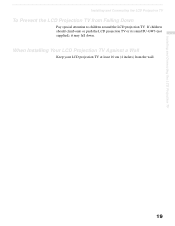
Installing and Connecting the LCD Projection TV Installing and Connecting the LCD Projection TV To Prevent the LCD Projection TV from the wall. 19 When Installing Your LCD Projection TV Against a Wall Keep your LCD projection TV at least 10 cm (4 inches) from Falling Down Pay special attention to children around the LCD projection TV. If children should climb onto or push the LCD projection TV or its stand SU-GW3 (not supplied), it may fall down.
Installing and Connecting the LCD Projection TV Installing and Connecting the LCD Projection TV To Prevent the LCD Projection TV from the wall. 19 When Installing Your LCD Projection TV Against a Wall Keep your LCD projection TV at least 10 cm (4 inches) from Falling Down Pay special attention to children around the LCD projection TV. If children should climb onto or push the LCD projection TV or its stand SU-GW3 (not supplied), it may fall down.

Operating Instructions
Page 20
Sit at least 2.2 m (approx. 7 ft.) for KDF-60XBR950 or 2.6 m (approx. 8 ft.) for KDF-70XBR950 away from your viewing position. Installing and Connecting the LCD Projection TV Recommended Viewing Area The picture quality may be affected by your LCD projection TV, and within the areas shown below. Horizontal Viewing Area mmiinn..X2.X2 ... Area mmmmiinininn....X2X2.X.2X6mm6(7(0a0a"p"ppprrooxx..7X8Xffftftt.t.).).)) 30˚ 30˚ 20 For the best picture quality, install your LCD projection TV within 60° of the vertical viewing area, and 130° of the horizontal viewing area.
Sit at least 2.2 m (approx. 7 ft.) for KDF-60XBR950 or 2.6 m (approx. 8 ft.) for KDF-70XBR950 away from your viewing position. Installing and Connecting the LCD Projection TV Recommended Viewing Area The picture quality may be affected by your LCD projection TV, and within the areas shown below. Horizontal Viewing Area mmiinn..X2.X2 ... Area mmmmiinininn....X2X2.X.2X6mm6(7(0a0a"p"ppprrooxx..7X8Xffftftt.t.).).)) 30˚ 30˚ 20 For the best picture quality, install your LCD projection TV within 60° of the vertical viewing area, and 130° of the horizontal viewing area.
Operating Instructions
Page 21
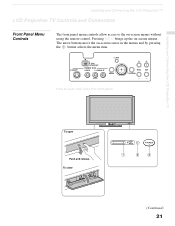
... panel To open and close PRO POWER (Continued) 21 The arrow buttons move the on -screen menus. Installing and Connecting the LCD Projection TV Installing and Connecting the LCD Projection TV LCD Projection TV Controls and Connectors Front Panel Menu Controls The front panel menu controls allow access to open Push and release. i.LINK S VIDEO VIDEO...
... panel To open and close PRO POWER (Continued) 21 The arrow buttons move the on -screen menus. Installing and Connecting the LCD Projection TV Installing and Connecting the LCD Projection TV LCD Projection TV Controls and Connectors Front Panel Menu Controls The front panel menu controls allow access to open Push and release. i.LINK S VIDEO VIDEO...
Operating Instructions
Page 22
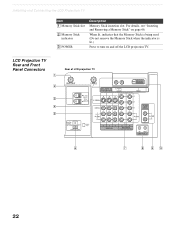
Installing and Connecting the LCD Projection TV Item 1 Memory Stick slot 2 Memory Stick indicator 3 POWER Description Memory Stick insertion slot. For details, see "Inserting and Removing a Memory Stick" on and off the LCD projection TV. LCD Projection TV Rear and Front Panel Connectors Rear of LCD projection TV 22 When lit, indicates that the Memory Stick is being read. (Do not remove the Memory Stick when the indicator is lit.) Press to turn on page 66.
Installing and Connecting the LCD Projection TV Item 1 Memory Stick slot 2 Memory Stick indicator 3 POWER Description Memory Stick insertion slot. For details, see "Inserting and Removing a Memory Stick" on and off the LCD projection TV. LCD Projection TV Rear and Front Panel Connectors Rear of LCD projection TV 22 When lit, indicates that the Memory Stick is being read. (Do not remove the Memory Stick when the indicator is lit.) Press to turn on page 66.


