Owners Manual
Page 1
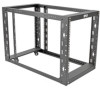
....tripplite.com/support Copyright © 2015 Tripp Lite. You could also win an ISOBAR6ULTRA surge protector-a $50 value! All rights reserved. 1 Register your product for quicker service and ultimate peace of mind. Owner's Manual SR12UBEXPNDKD 12U, 4-Post Open Frame Rackmount Kit with Casters and Adjustable Rail Important Safety Instructions 2 Parts List 2 Rack Assembly 3 Equipment Installation 6 Storage and Service 7 Warranty and Product Registration 7 Espa...
....tripplite.com/support Copyright © 2015 Tripp Lite. You could also win an ISOBAR6ULTRA surge protector-a $50 value! All rights reserved. 1 Register your product for quicker service and ultimate peace of mind. Owner's Manual SR12UBEXPNDKD 12U, 4-Post Open Frame Rackmount Kit with Casters and Adjustable Rail Important Safety Instructions 2 Parts List 2 Rack Assembly 3 Equipment Installation 6 Storage and Service 7 Warranty and Product Registration 7 Espa...
Owners Manual
Page 2
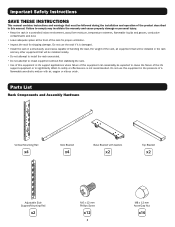
... Safety Instructions SAVE THESE INSTRUCTIONS This manual contains instructions and warnings that will be installed in the rack and any other equipment that must be expected to cause the failure of the life support equipment ...weight of the rack, all equipment that will be installed nearby. • Do not attempt to install the rack unassisted. • Do not attempt to install equipment without first stabilizing the rack. • Use of this equipment in life support applications where failure of this equipment can reasonably be followed during the installation and operation of the product...
... Safety Instructions SAVE THESE INSTRUCTIONS This manual contains instructions and warnings that will be installed in the rack and any other equipment that must be expected to cause the failure of the life support equipment ...weight of the rack, all equipment that will be installed nearby. • Do not attempt to install the rack unassisted. • Do not attempt to install equipment without first stabilizing the rack. • Use of this equipment in life support applications where failure of this equipment can reasonably be followed during the installation and operation of the product...
Owners Manual
Page 3
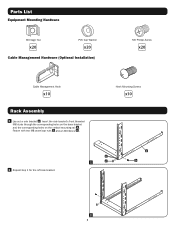
Parts List Equipment Mounting Hardware M6 Cage Nut x20 PVC Cup Washer x20 Cable Management Hardware (Optional Installation) M6 Phillips Screw x20 Cable Management Hook x10 Rack Assembly 1 Lay out a side bracket A . Hook Mounting Screws x10 2 Repeat step 1 for the left side bracket. Fasten with two M8 acorn/cap nuts C and an M6 Screw D . B 1 C A D 2 3 Insert the side bracket's front threaded M8 studs through the corresponding holes on the base bracket and the corresponding holes on the vertical mounting rail B .
Parts List Equipment Mounting Hardware M6 Cage Nut x20 PVC Cup Washer x20 Cable Management Hardware (Optional Installation) M6 Phillips Screw x20 Cable Management Hook x10 Rack Assembly 1 Lay out a side bracket A . Hook Mounting Screws x10 2 Repeat step 1 for the left side bracket. Fasten with two M8 acorn/cap nuts C and an M6 Screw D . B 1 C A D 2 3 Insert the side bracket's front threaded M8 studs through the corresponding holes on the base bracket and the corresponding holes on the vertical mounting rail B .
Owners Manual
Page 4
...The adjustable side mounting rails can be made prior to installing the equipment in the rack. 3 4 Repeat step 3 for the upper left side bracket. 5 6 4 A C D Fasten with an M6 Phillips screw D . Note: The front and rear vertical mounting rails support a fixed rail depth of 24, 25, 26, ...Final rail depth adjustments can be installed inside the rack. Rack Assembly 3 Determine the maximum estimated depth of the equipment to be positioned at depths of 36 inches (914 mm). B 6 Repeat step 5 for the remaining unused side bracket and adjustable side support/mounting rail. 4 5 Insert ...
...The adjustable side mounting rails can be made prior to installing the equipment in the rack. 3 4 Repeat step 3 for the upper left side bracket. 5 6 4 A C D Fasten with an M6 Phillips screw D . Note: The front and rear vertical mounting rails support a fixed rail depth of 24, 25, 26, ...Final rail depth adjustments can be installed inside the rack. Rack Assembly 3 Determine the maximum estimated depth of the equipment to be positioned at depths of 36 inches (914 mm). B 6 Repeat step 5 for the remaining unused side bracket and adjustable side support/mounting rail. 4 5 Insert ...
Owners Manual
Page 5
... of the top side brackets B . Then insert the right rear vertical mounting rail's holes through the rear threaded M8 studs of the bottom side brackets A . Rack Assembly 7 Insert the rear base bracket's holes through the rear threaded M8 studs of the bottom and top side brackets B . C A 8 9 Optional Cable Management Hooks: Fasten...
... of the top side brackets B . Then insert the right rear vertical mounting rail's holes through the rear threaded M8 studs of the bottom side brackets A . Rack Assembly 7 Insert the rear base bracket's holes through the rear threaded M8 studs of the bottom and top side brackets B . C A 8 9 Optional Cable Management Hooks: Fasten...
Owners Manual
Page 6
...required cage nuts are installed. 2 18 3 3 19 4 After installing the required cage nuts, use a cage nut tool (user-supplied) to the rack rail. To Remove Cage Nuts, Reverse Steps 1-3 4 Note: You may also include mounting hardware. Follow the instructions in your equipment documentation...an attachment point for equipment installation instructions. Place the cup washers between the screws and the equipment mounting brackets. Equipment Installation The SR12UBEXPNDKD can often be found in the "Mounting" or "Rackmounting" sections of the manual. If using sliding equipment rails...
...required cage nuts are installed. 2 18 3 3 19 4 After installing the required cage nuts, use a cage nut tool (user-supplied) to the rack rail. To Remove Cage Nuts, Reverse Steps 1-3 4 Note: You may also include mounting hardware. Follow the instructions in your equipment documentation...an attachment point for equipment installation instructions. Place the cup washers between the screws and the equipment mounting brackets. Equipment Installation The SR12UBEXPNDKD can often be found in the "Mounting" or "Rackmounting" sections of the manual. If using sliding equipment rails...
Owners Manual
Page 7
Review the installation and operation procedures in this manual. From here you . The RMA number, along with other rights which is covered by the warranty described in this manual to you. Mark the RMA number on service, visit www.tripplite.com/support. You'... website for the use whether this product, if used in accordance with shipping instructions, will repair or replace the product, at its original shipping container if possible. Service Your Tripp Lite product is required for any specific application. If the product should prove defective in material or...
Review the installation and operation procedures in this manual. From here you . The RMA number, along with other rights which is covered by the warranty described in this manual to you. Mark the RMA number on service, visit www.tripplite.com/support. You'... website for the use whether this product, if used in accordance with shipping instructions, will repair or replace the product, at its original shipping container if possible. Service Your Tripp Lite product is required for any specific application. If the product should prove defective in material or...