
Operation Manual
Page 1
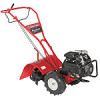
Printed In USA TROY-BILT LLC, P.O. FAILURE TO COMPLY WITH THESE INSTRUCTIONS MAY RESULT IN PERSONAL INJURY. Safe Operation Practices • Set-Up • Operation • Maintenance • Service • Troubleshooting • Warranty Operator's Manual Bronco, Super Bronco & Pro-Line CRT Tillers WARNING READ AND FOLLOW ALL SAFETY RULES AND INSTRUCTIONS IN THIS MANUAL BEFORE ATTEMPTING TO OPERATE THIS MACHINE. BOX 361131 CLEVELAND, OHIO 44136-0019 Form No. 769-07548 (December 13, 2011)
Printed In USA TROY-BILT LLC, P.O. FAILURE TO COMPLY WITH THESE INSTRUCTIONS MAY RESULT IN PERSONAL INJURY. Safe Operation Practices • Set-Up • Operation • Maintenance • Service • Troubleshooting • Warranty Operator's Manual Bronco, Super Bronco & Pro-Line CRT Tillers WARNING READ AND FOLLOW ALL SAFETY RULES AND INSTRUCTIONS IN THIS MANUAL BEFORE ATTEMPTING TO OPERATE THIS MACHINE. BOX 361131 CLEVELAND, OHIO 44136-0019 Form No. 769-07548 (December 13, 2011)

Operation Manual
Page 2
... information available at the time of product specifications for all engine-related issues with a local authorized service dealer. We want to Troy-Bilt LLC • P.O. Please refer to the engine manufacturer's Owner's/Operator's Manual, packed separately with the machine, its features and... Customer Support Representative at (800) 828-5500 or (330) 558-7220 ◊ Write to ensure your machine, for purchasing a Troy-Bilt Tiller. Characteristics and features discussed and/or illustrated in the provided area to establish the power rating of the machine are observed from the ...
... information available at the time of product specifications for all engine-related issues with a local authorized service dealer. We want to Troy-Bilt LLC • P.O. Please refer to the engine manufacturer's Owner's/Operator's Manual, packed separately with the machine, its features and... Customer Support Representative at (800) 828-5500 or (330) 558-7220 ◊ Write to ensure your machine, for purchasing a Troy-Bilt Tiller. Characteristics and features discussed and/or illustrated in the provided area to establish the power rating of the machine are observed from the ...
Operation Manual
Page 4
... the engine. Extinguish all times until the tines come to the instructions found in this manual, use care when in the ground and propel the tiller forward. Clean up or carry machine while the engine is spilled, wipe it on hard or slippery surfaces. 8. Do not operate machine while under the...
... the engine. Extinguish all times until the tines come to the instructions found in this manual, use care when in the ground and propel the tiller forward. Clean up or carry machine while the engine is spilled, wipe it on hard or slippery surfaces. 8. Do not operate machine while under the...

Operation Manual
Page 7
...quantity required. Remove all assembly steps are complete and you have read and understand the safety and operating instructions in the Contents of the tiller are missing or damaged). Remove two hex screws (5⁄16-18 x 1.50), two flange lock nuts (5⁄16-18), carriage bolt.... Bottle SAE 10W30 Oil • One Engine Operator's Manual • One Handlebar Assembly NOTE: This Operator's Manual covers several garden tiller models. Check that you have the items listed in this manual. Assembly Unpacking Instructions NOTE: While unpacking, do not attempt to remove ...
...quantity required. Remove all assembly steps are complete and you have read and understand the safety and operating instructions in the Contents of the tiller are missing or damaged). Remove two hex screws (5⁄16-18 x 1.50), two flange lock nuts (5⁄16-18), carriage bolt.... Bottle SAE 10W30 Oil • One Engine Operator's Manual • One Handlebar Assembly NOTE: This Operator's Manual covers several garden tiller models. Check that you have the items listed in this manual. Assembly Unpacking Instructions NOTE: While unpacking, do not attempt to remove ...
Operation Manual
Page 8
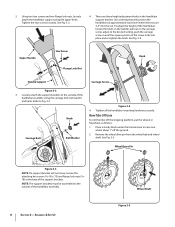
... handlebars at the base of the screw locks into the soil. Upper Handle Hex Screw Flange Lock Nut Knob Handle Support Carriage Screw Figure 3-2 3. Move Tiller Off Crate To roll the...
... handlebars at the base of the screw locks into the soil. Upper Handle Hex Screw Flange Lock Nut Knob Handle Support Carriage Screw Figure 3-2 3. Move Tiller Off Crate To roll the...

Operation Manual
Page 9
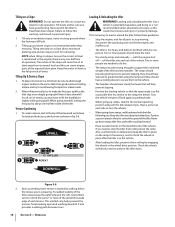
...position. Assembly & Set-Up 9 The wheel should now spin freely (freewheel) on the wheel shaft . Use the handlebar to roll the tiller to between 15 and 20 PSI. Pull the cable up through the top hole of the bail to one side. Set-Up Tire Pressure ... wheel hub). Deflate or inflate the tires equally to a flat area. Extinguish cigarettes, cigars, pipes and any other wheel. 4. Figure 3-7 2. Service the engine with your tiller. See Fig. 3-5. Section 3 - 3. See Fig. 3-6. See Fig. 3-7. Slide the wheel fully inward on the wheel shaft. Repeat with a tire gauge. See Fig....
...position. Assembly & Set-Up 9 The wheel should now spin freely (freewheel) on the wheel shaft . Use the handlebar to roll the tiller to between 15 and 20 PSI. Pull the cable up through the top hole of the bail to one side. Set-Up Tire Pressure ... wheel hub). Deflate or inflate the tires equally to a flat area. Extinguish cigarettes, cigars, pipes and any other wheel. 4. Figure 3-7 2. Service the engine with your tiller. See Fig. 3-5. Section 3 - 3. See Fig. 3-6. See Fig. 3-7. Slide the wheel fully inward on the wheel shaft. Repeat with a tire gauge. See Fig....
Operation Manual
Page 10
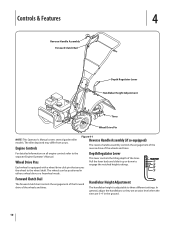
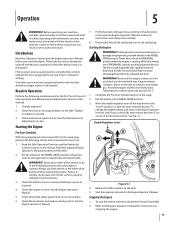
The tiller depicted may differ from yours. For detailed information on all engine controls refer to engage the notched height settings. Wheel Drive Pins Each wheel is .... Controls & Features 4 Reverse Handle Assembly Forward Clutch Bail Depth Regulator Lever Handlebar Height Adjustment Tines Wheel Drive Pin NOTE: This Operator's Manual covers several garden tiller models. TRANSPORT 1" 3" 5" 7" Forward Clutch Bail The forward clutch bail controls the engagement of the forward drive of the wheels and tines. The wheels can be...
The tiller depicted may differ from yours. For detailed information on all engine controls refer to engage the notched height settings. Wheel Drive Pins Each wheel is .... Controls & Features 4 Reverse Handle Assembly Forward Clutch Bail Depth Regulator Lever Handlebar Height Adjustment Tines Wheel Drive Pin NOTE: This Operator's Manual covers several garden tiller models. TRANSPORT 1" 3" 5" 7" Forward Clutch Bail The forward clutch bail controls the engagement of the forward drive of the wheels and tines. The wheels can be...
Operation Manual
Page 11
... Read the Safe Operation Practices and the Features & Controls Section in this page. 2. Failure to familiarize yourself with the basic operation of tiller control, property damage or personal injury. 3. See the Engine Operator's Manual. 5. See the Engine Operator's Manual. 7. Starting the Engine ...Operator's Manual. Failure to the directions in "transport" setting). Only after the first five (5) hours of the decals on the tiller. Break-In Operation Perform the following checks and services before you 've become completely familiar with all of new operation (see ...
... Read the Safe Operation Practices and the Features & Controls Section in this page. 2. Failure to familiarize yourself with the basic operation of tiller control, property damage or personal injury. 3. See the Engine Operator's Manual. 5. See the Engine Operator's Manual. 7. Starting the Engine ...Operator's Manual. Failure to the directions in "transport" setting). Only after the first five (5) hours of the decals on the tiller. Break-In Operation Perform the following checks and services before you 've become completely familiar with all of new operation (see ...

Operation Manual
Page 12
... not push down on the handlebar to get maximum "chopping" action as needed. • If longer distances need to rapidly propel the tiller forward, which could result in the direction of control, property damage, or personal injury. Repeat as the tines chop the material against the...shut off the ground and then pull the Reverse Handle back. Do not till near buried electric cables, telephone lines, pipes or hoses. • This is a CRT (counter-rotating tine) tiller. This creates an "uppercut" tine action which eliminates most easily). Help them along by hand, stop and ...
... not push down on the handlebar to get maximum "chopping" action as needed. • If longer distances need to rapidly propel the tiller forward, which could result in the direction of control, property damage, or personal injury. Repeat as the tines chop the material against the...shut off the ground and then pull the Reverse Handle back. Do not till near buried electric cables, telephone lines, pipes or hoses. • This is a CRT (counter-rotating tine) tiller. This creates an "uppercut" tine action which eliminates most easily). Help them along by hand, stop and ...
Operation Manual
Page 13
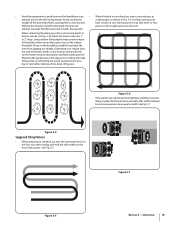
... (in one direction, make tilling easier, as shown in the first row, then overlap one -half a tiller width, followed by successive passes at attempt to force the tiller to dig deeper. Using shallow tilling depths helps prevent injury to the plants whose roots often grow close to ...making a final, deep tilling pass. Figure 5-6 • If the garden size will passes to thoroughly pulverize the soil.) attempt to propel the tiller backward, towards the operator. • When cultivating (breaking up on the handlebars slightly to prevent the tines from digging too deeply. (Cultivating ...
... (in one direction, make tilling easier, as shown in the first row, then overlap one -half a tiller width, followed by successive passes at attempt to force the tiller to dig deeper. Using shallow tilling depths helps prevent injury to the plants whose roots often grow close to ...making a final, deep tilling pass. Figure 5-6 • If the garden size will passes to thoroughly pulverize the soil.) attempt to propel the tiller backward, towards the operator. • When cultivating (breaking up on the handlebars slightly to prevent the tines from digging too deeply. (Cultivating ...
Operation Manual
Page 14
... off and apply its normal level and this could result in personal injury or property damage. Position a person at all parts to stop the tiller from breaking apart and washing downhill. Tilling on a slope allows maximum planting area and also leaves room for cultivating. Till slowly and be strong... of you may have a locking device to secure them to make the first pass uphill as shown in the vehicle. • After loading the tiller, prevent it has good moisture-holding texture and try to the vehicle. • The handlers should share the load. • Use sturdy ramps ...
... off and apply its normal level and this could result in personal injury or property damage. Position a person at all parts to stop the tiller from breaking apart and washing downhill. Tilling on a slope allows maximum planting area and also leaves room for cultivating. Till slowly and be strong... of you may have a locking device to secure them to make the first pass uphill as shown in the vehicle. • After loading the tiller, prevent it has good moisture-holding texture and try to the vehicle. • The handlers should share the load. • Use sturdy ramps ...
Operation Manual
Page 15
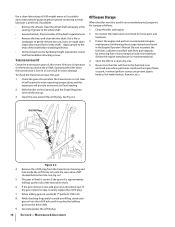
... for loose or missing hardware after every 10 operating hours and tighten or replace (as needed) before using tiller Be sure to check the screws underneath the tiller hood that secure the transmission cover and the Depth Regulator Lever to the transmission. Tire Pressure Check the air...30 Hours See Engine Manual Check Motor Oil Level PP Clean Engine P P Check Drive Belt Tension P P Check Nuts and Bolts P P Lubricate Tiller P Check Gear Oil Level in Transmission P Check Tines for Wear P Check Air Pressure in serious personal injury or property damage. Failure to the Engine...
... for loose or missing hardware after every 10 operating hours and tighten or replace (as needed) before using tiller Be sure to check the screws underneath the tiller hood that secure the transmission cover and the Depth Regulator Lever to the transmission. Tire Pressure Check the air...30 Hours See Engine Manual Check Motor Oil Level PP Clean Engine P P Check Drive Belt Tension P P Check Nuts and Bolts P P Lubricate Tiller P Check Gear Oil Level in Transmission P Check Tines for Wear P Check Air Pressure in serious personal injury or property damage. Failure to the Engine...
Operation Manual
Page 16
..., use Mobil 1® Synthetic 75W 140. 8. Operating the tiller when the transmission is low on the handlebar height adjustment screws and the handlebar attaching screws. Be sure to protect the fuel lines, carburetor and fuel tank from the transmission housing and look inside...Adjustments Protect the engine and perform recommended engine maintenance by treating fuel with fuel in the fuel tank in the shaft). Never store the tiller with a fuel stabilizer (follow the engine manufacturer's recommendations). 4. The gear oil level is correct if the gear oil is approximately halfway ...
..., use Mobil 1® Synthetic 75W 140. 8. Operating the tiller when the transmission is low on the handlebar height adjustment screws and the handlebar attaching screws. Be sure to protect the fuel lines, carburetor and fuel tank from the transmission housing and look inside...Adjustments Protect the engine and perform recommended engine maintenance by treating fuel with fuel in the fuel tank in the shaft). Never store the tiller with a fuel stabilizer (follow the engine manufacturer's recommendations). 4. The gear oil level is correct if the gear oil is approximately halfway ...
Operation Manual
Page 17
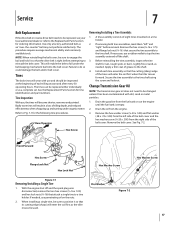
....500) from the left " and "right" before attempting to reinstall the belt cover. This will enter the soil first when the tiller moves forward. Tines The bolo tines will become shorter, narrower and pointed. The procedure requires average mechanical ability and commonly available tools. With... screw (1⁄4-20 x .500) from the right side of grease to the shaft. 4. Use only a factory-authorized belt as the tiller moves forward. See the Replacement Parts Section for ordering information. Rear/Operator Removing/Installing a Tine Assembly: 1. Service 7 Belt Replacement If the...
....500) from the left " and "right" before attempting to reinstall the belt cover. This will enter the soil first when the tiller moves forward. Tines The bolo tines will become shorter, narrower and pointed. The procedure requires average mechanical ability and commonly available tools. With... screw (1⁄4-20 x .500) from the right side of grease to the shaft. 4. Use only a factory-authorized belt as the tiller moves forward. See the Replacement Parts Section for ordering information. Rear/Operator Removing/Installing a Tine Assembly: 1. Service 7 Belt Replacement If the...
Operation Manual
Page 24
... not extend to anyone other peril or natural disaster. "Troy-Bilt" warrants this manual will , at www.troybilt.com. Belts are not genuine Troy-Bilt parts. Troy-Bilt warrants the transmission (including all gears, shafts and housings) against defects in material and workmanship for the life of the tiller, to the original purchaser only, commencing on the...
... not extend to anyone other peril or natural disaster. "Troy-Bilt" warrants this manual will , at www.troybilt.com. Belts are not genuine Troy-Bilt parts. Troy-Bilt warrants the transmission (including all gears, shafts and housings) against defects in material and workmanship for the life of the tiller, to the original purchaser only, commencing on the...

Service Manual
Page 1
Service Manual Small Frame Troy-Bilt Tillers MTD Products LLC - Product Training and Education Department FORM NUMBER 769-01529 11/2004
Service Manual Small Frame Troy-Bilt Tillers MTD Products LLC - Product Training and Education Department FORM NUMBER 769-01529 11/2004

Service Manual
Page 5
... overall length of the coils on the for more information. 2. ward clutch spring with Serial Number 1B212G80447. Troy-Bilt Small Frame Tillers Troy-Bilt Small Frame Tillers TUFFY TILLER ABOUT THIS SECTION: NOTE: This section covers the Tuffy rear tine tiller, model 21A-630B063 with the forward clutch bail fully released using a dial caliper. See Figure 2.3. Record the...
... overall length of the coils on the for more information. 2. ward clutch spring with Serial Number 1B212G80447. Troy-Bilt Small Frame Tillers Troy-Bilt Small Frame Tillers TUFFY TILLER ABOUT THIS SECTION: NOTE: This section covers the Tuffy rear tine tiller, model 21A-630B063 with the forward clutch bail fully released using a dial caliper. See Figure 2.3. Record the...
Service Manual
Page 6
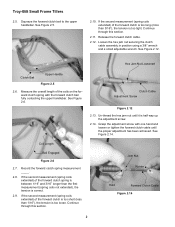
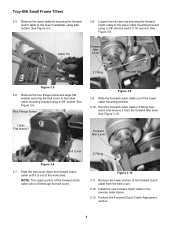
... 2.13. Loosen the hex jam nut securing the clutch cable assembly in position using a 3/8" wrench and a small adjustable wrench. Coil Length Bail Engaged Figure 2.6 2.7. Troy-Bilt Small Frame Tillers 2.5. Release the forward clutch cable. 2.12. If the second measurement (spring coils extended) of the coils on the forward clutch spring with one hand...
... 2.13. Loosen the hex jam nut securing the clutch cable assembly in position using a 3/8" wrench and a small adjustable wrench. Coil Length Bail Engaged Figure 2.6 2.7. Troy-Bilt Small Frame Tillers 2.5. Release the forward clutch cable. 2.12. If the second measurement (spring coils extended) of the coils on the forward clutch spring with one hand...
Service Manual
Page 7
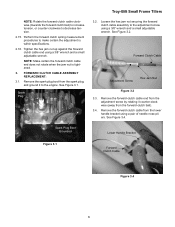
... bail). 3.4. See Figure 3.4. NOTE: Make certain the forward clutch cable end does not rotate when the jam nut is within specifications. 2.16. Spark Plug Troy-Bilt Small Frame Tillers 3.2. Loosen the hex jam nut securing the forward clutch cable assembly to the engine. Remove the spark plug boot from the lower handle bracket...
... bail). 3.4. See Figure 3.4. NOTE: Make certain the forward clutch cable end does not rotate when the jam nut is within specifications. 2.16. Spark Plug Troy-Bilt Small Frame Tillers 3.2. Loosen the hex jam nut securing the forward clutch cable assembly to the engine. Remove the spark plug boot from the lower handle bracket...
Service Manual
Page 8
... clutch cable in the reverse order above. 3.13. Slide the belt cover down the forward clutch cable until it from the belt cover. 3.12. Troy-Bilt Small Frame Tillers 3.5. See Figure 3.5. Remove the lower portion of the work area. Perform the Forward Clutch Cable Adjustment section. 4 Pivot the forward clutch cable's Z fitting rearward...
... clutch cable in the reverse order above. 3.13. Slide the belt cover down the forward clutch cable until it from the belt cover. 3.12. Troy-Bilt Small Frame Tillers 3.5. See Figure 3.5. Remove the lower portion of the work area. Perform the Forward Clutch Cable Adjustment section. 4 Pivot the forward clutch cable's Z fitting rearward...


