
Camera Manual
Page 1
All other trademarks are registered trademarks of their respective companies. All rights reserved. DVR 528 Digital Video Camera User Manual © 2010 Sakar International, Inc. Windows and the Windows logo are the property of Microsoft Corporation.
All other trademarks are registered trademarks of their respective companies. All rights reserved. DVR 528 Digital Video Camera User Manual © 2010 Sakar International, Inc. Windows and the Windows logo are the property of Microsoft Corporation.
Camera Manual
Page 2
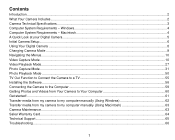
Windows 4 Computer System Requirements - Contents Introduction ...2 What Your Camera Includes ...2 Camera Technical Specifications ...3 Computer System Requirements - Macintosh 4 A Quick Look at your Digital Camera ...5 Initial Camera Setup...6 Using Your Digital Camera ...8 Changing Camera Mode ...9 Navigating the Menus...10 Video Capture Mode ...10 Video Playback Mode...27 Photo Capture Mode ...31 Photo Playback Mode ...50 TV Out Function to...
Windows 4 Computer System Requirements - Contents Introduction ...2 What Your Camera Includes ...2 Camera Technical Specifications ...3 Computer System Requirements - Macintosh 4 A Quick Look at your Digital Camera ...5 Initial Camera Setup...6 Using Your Digital Camera ...8 Changing Camera Mode ...9 Navigating the Menus...10 Video Capture Mode ...10 Video Playback Mode...27 Photo Capture Mode ...31 Photo Playback Mode ...50 TV Out Function to...
Camera Manual
Page 3
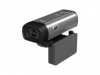
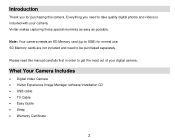
... of your camera. Everything you for normal use. Note: Your camera needs an SD Memory card (up to 8GB) for purchasing this manual carefully first in order to be purchased separately. What Your Camera Includes Digital Video Camera Vivitar Experience Image... Manager software Installation CD USB cable TV Cable Easy Guide Strap Warranty Certificate 2 Vivitar makes capturing those special moments as easy...
... of your camera. Everything you for normal use. Note: Your camera needs an SD Memory card (up to 8GB) for purchasing this manual carefully first in order to be purchased separately. What Your Camera Includes Digital Video Camera Vivitar Experience Image... Manager software Installation CD USB cable TV Cable Easy Guide Strap Warranty Certificate 2 Vivitar makes capturing those special moments as easy...
Camera Manual
Page 4
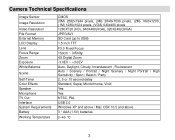
Camera Technical Specifications Image Sensor Image Resolution Video Resolution File Format External Memory LCD Display Lens Focus Range Zoom Exposure White Balance Scene Self-Timer Color ...
Camera Technical Specifications Image Sensor Image Resolution Video Resolution File Format External Memory LCD Display Lens Focus Range Zoom Exposure White Balance Scene Self-Timer Color ...
Camera Manual
Page 6
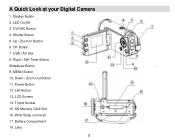
LED On/Off 3. DV/DSC Button 4. USB / AV Slot 8. Wrist Strap connector 17. Battery Compartment 18. Lens 5 Display Button 2. Up / Zoom In Button 6. Right / Self-Timer Button Slideshow Button 9. Left Button 13. Shutter Button 5. Tripod Socket 15. OK Button 7. LCD Screen 14. MENU Button 10. A Quick Look at your Digital Camera 1. Down / Zoom Out Button 11. Power Button 12. SD Memory Card Slot 16.
LED On/Off 3. DV/DSC Button 4. USB / AV Slot 8. Wrist Strap connector 17. Battery Compartment 18. Lens 5 Display Button 2. Up / Zoom In Button 6. Right / Self-Timer Button Slideshow Button 9. Left Button 13. Shutter Button 5. Tripod Socket 15. OK Button 7. LCD Screen 14. MENU Button 10. A Quick Look at your Digital Camera 1. Down / Zoom Out Button 11. Power Button 12. SD Memory Card Slot 16.
Camera Manual
Page 7
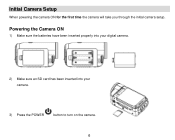
Powering the Camera ON 1) Make sure the batteries have been inserted properly into your digital camera. 2) Make sure an SD card has been inserted into your camera. 3) Press the POWER button to turn on the camera. 6 Initial Camera Setup When powering the camera ON for the first time the camera will take you through the initial camera setup.
Powering the Camera ON 1) Make sure the batteries have been inserted properly into your digital camera. 2) Make sure an SD card has been inserted into your camera. 3) Press the POWER button to turn on the camera. 6 Initial Camera Setup When powering the camera ON for the first time the camera will take you through the initial camera setup.
Camera Manual
Page 8
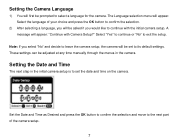
...the next part of your choice and press the OK button to confirm the selection. 2) After selecting a language, you would like to continue with Camera Setup?" Select "Yes" to continue or "No" to exit the setup. The Language selection menu will appear. A message will appear: "Continue with ...the initial camera setup. Note: If you select "No" and decide to leave the camera setup, the camera will be asked if you will be set the date and time on the camera. Setting the Camera Language 1) You will first be adjusted at any time manually...
...the next part of your choice and press the OK button to confirm the selection. 2) After selecting a language, you would like to continue with Camera Setup?" Select "Yes" to continue or "No" to exit the setup. The Language selection menu will appear. A message will appear: "Continue with ...the initial camera setup. Note: If you select "No" and decide to leave the camera setup, the camera will be asked if you will be set the date and time on the camera. Setting the Camera Language 1) You will first be adjusted at any time manually...
Camera Manual
Page 9
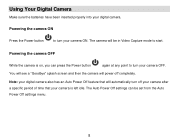
... Auto Power Off settings menu. 8 Powering the camera OFF While the camera is left idle. You will see a "Goodbye" splash screen and then the camera will automatically turn your digital camera. Using Your Digital Camera Make sure the batteries have been inserted properly into your camera ON. Note: your camera is on, you can be in Video...
... Auto Power Off settings menu. 8 Powering the camera OFF While the camera is left idle. You will see a "Goodbye" splash screen and then the camera will automatically turn your digital camera. Using Your Digital Camera Make sure the batteries have been inserted properly into your camera ON. Note: your camera is on, you can be in Video...
Camera Manual
Page 10
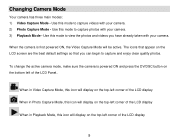
... powered ON and press the DV/DSC button on the LCD screen are the best default settings so that you have already taken with your camera. 2) Photo Capture Mode - When in Video Capture Mode, this icon will display on the top-left corner of the LCD display When in Photo ...LCD display 9 Use this icon will be active. Use this mode to capture photos with your camera. Changing Camera Mode Your camera has three main modes: 1) Video Capture Mode - To change the active camera mode, make sure the camera is first powered ON, the Video Capture Mode will display on the top-left corner of...
... powered ON and press the DV/DSC button on the LCD screen are the best default settings so that you have already taken with your camera. 2) Photo Capture Mode - When in Video Capture Mode, this icon will display on the top-left corner of the LCD display When in Photo ...LCD display 9 Use this icon will be active. Use this mode to capture photos with your camera. Changing Camera Mode Your camera has three main modes: 1) Video Capture Mode - To change the active camera mode, make sure the camera is first powered ON, the Video Capture Mode will display on the top-left corner of...

Camera Manual
Page 11
.... 4) If the selection can press the MENU button to exit the menus and return to the previous screen. When the camera is until you decide to capture videos with your digital camera. Changes made to these options will appear to the right of menus specific to that are not remembered by the... camera, a selection icon will remain as is first powered ON, the camera will be remembered by the camera and do not display this icon when selected. 6) At any time you to change them again at...
.... 4) If the selection can press the MENU button to exit the menus and return to the previous screen. When the camera is until you decide to capture videos with your digital camera. Changes made to these options will appear to the right of menus specific to that are not remembered by the... camera, a selection icon will remain as is first powered ON, the camera will be remembered by the camera and do not display this icon when selected. 6) At any time you to change them again at...

Camera Manual
Page 12
...as Quick Function buttons. 1) While in Video Capture Mode use the LCD display on the back of the camera to direct the camera at the scene you would like to capture. 2) Click the Up/Zoom In and Down/Zoom Out buttons... on the left of the LCD Panel to better set the camera display if desired. 3) Press the LED ON/OFF button on the left of the LCD Panel to turn the ...LED light on to give more light. 4) Press the Shutter button on the top of the camera to start the video capture. 5) You will see a red icon at the top of the LCD indicating that ...
...as Quick Function buttons. 1) While in Video Capture Mode use the LCD display on the back of the camera to direct the camera at the scene you would like to capture. 2) Click the Up/Zoom In and Down/Zoom Out buttons... on the left of the LCD Panel to better set the camera display if desired. 3) Press the LED ON/OFF button on the left of the LCD Panel to turn the ...LED light on to give more light. 4) Press the Shutter button on the top of the camera to start the video capture. 5) You will see a red icon at the top of the LCD indicating that ...
Camera Manual
Page 14
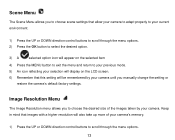
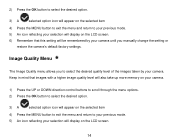
... images with a higher resolution will also take up more of the images taken by your camera until you to choose scene settings that this setting will display on the LCD screen. 6) Remember that allow your camera to adapt properly to scroll through the menu options. 13 Scene Menu The Scene Menu allows... factory settings. Image Resolution Menu The Image Resolution menu allows you to choose the desired size of your camera's memory. 1) Press the UP or DOWN direction control buttons to scroll through the menu options. 2) Press the OK button to select the desired option. 3) A selected ...
... images with a higher resolution will also take up more of the images taken by your camera until you to choose scene settings that this setting will display on the LCD screen. 6) Remember that allow your camera to adapt properly to scroll through the menu options. 13 Scene Menu The Scene Menu allows... factory settings. Image Resolution Menu The Image Resolution menu allows you to choose the desired size of your camera's memory. 1) Press the UP or DOWN direction control buttons to scroll through the menu options. 2) Press the OK button to select the desired option. 3) A selected ...
Camera Manual
Page 15
... reflecting your selection will display on the LCD screen. 6) Remember that images with a higher image quality level will also take up more memory on your camera. 1) Press the UP or DOWN direction control buttons to scroll through the menu options. 2) Press the OK button to select the desired option. 3) A ...selected item 4) Press the MENU button to exit the menu and return to select the desired quality level of the images taken by your camera. Image Quality Menu The Image Quality menu allows you to your previous mode. 5) An icon reflecting your selection will be remembered by your...
... reflecting your selection will display on the LCD screen. 6) Remember that images with a higher image quality level will also take up more memory on your camera. 1) Press the UP or DOWN direction control buttons to scroll through the menu options. 2) Press the OK button to select the desired option. 3) A ...selected item 4) Press the MENU button to exit the menu and return to select the desired quality level of the images taken by your camera. Image Quality Menu The Image Quality menu allows you to your previous mode. 5) An icon reflecting your selection will be remembered by your...
Camera Manual
Page 16
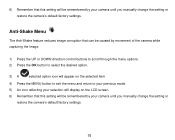
... factory settings. 15 Anti-Shake Menu The Anti-Shake feature reduces image corruption that can be caused by movement of the camera while capturing the image. 1) Press the UP or DOWN direction control buttons to scroll through the menu options. 2) Press the OK button to select the ... return to your previous mode. 5) An icon reflecting your selection will display on the LCD screen. 6) Remember that this setting will be remembered by your camera until you manually change the setting or restore the...
... factory settings. 15 Anti-Shake Menu The Anti-Shake feature reduces image corruption that can be caused by movement of the camera while capturing the image. 1) Press the UP or DOWN direction control buttons to scroll through the menu options. 2) Press the OK button to select the ... return to your previous mode. 5) An icon reflecting your selection will display on the LCD screen. 6) Remember that this setting will be remembered by your camera until you manually change the setting or restore the...
Camera Manual
Page 17
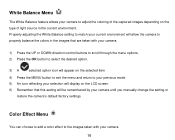
... current environment. White Balance Menu The White Balance feature allows your camera to adjust the coloring of light source in the images that this setting will be remembered by your camera until you manually change the setting or restore the camera's default factory settings. Color Effect Menu You can choose to add... a color effect to the images taken with your camera. 1) Press the UP or DOWN direction control buttons to scroll through the menu options. 2) Press the OK button to select the desired option. 3) A selected ...
... current environment. White Balance Menu The White Balance feature allows your camera to adjust the coloring of light source in the images that this setting will be remembered by your camera until you manually change the setting or restore the camera's default factory settings. Color Effect Menu You can choose to add... a color effect to the images taken with your camera. 1) Press the UP or DOWN direction control buttons to scroll through the menu options. 2) Press the OK button to select the desired option. 3) A selected ...
Camera Manual
Page 18
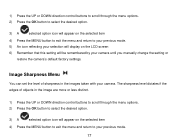
... item 4) Press the MENU button to exit the menu and return to your previous mode. 5) An icon reflecting your selection will be remembered by your camera. The sharpness level dictates if the edges of sharpness in the image are more or less distinct. 1) Press the UP or DOWN direction control buttons... the menu and return to your previous mode. 17 Image Sharpness Menu You can set the level of objects in the images taken with your camera until you manually change the setting or restore the...
... item 4) Press the MENU button to exit the menu and return to your previous mode. 5) An icon reflecting your selection will be remembered by your camera. The sharpness level dictates if the edges of sharpness in the image are more or less distinct. 1) Press the UP or DOWN direction control buttons... the menu and return to your previous mode. 17 Image Sharpness Menu You can set the level of objects in the images taken with your camera until you manually change the setting or restore the...
Camera Manual
Page 19
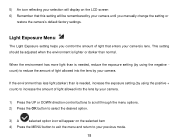
... is needed , reduce the exposure setting (by using the positive + count) to reduce the amount of light allowed into the lens by your camera's lens. If the environment has less light (darker) than is needed , increase the exposure setting (by using the negative count) to increase ...the amount of light that this setting will appear on the LCD screen 6) Remember that enters your camera until you manually change the setting or restore the camera's default factory settings. 5) An icon reflecting your selection will display on the selected item 4) Press the MENU ...
... is needed , reduce the exposure setting (by using the positive + count) to reduce the amount of light allowed into the lens by your camera's lens. If the environment has less light (darker) than is needed , increase the exposure setting (by using the negative count) to increase ...the amount of light that this setting will appear on the LCD screen 6) Remember that enters your camera until you manually change the setting or restore the camera's default factory settings. 5) An icon reflecting your selection will display on the selected item 4) Press the MENU ...
Camera Manual
Page 20
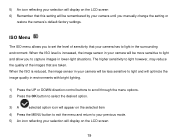
.... When the ISO is increased, the image sensor in the surrounding environment. When the ISO level is reduced, the image sensor in your camera will be remembered by your selection will optimize the image quality in lower-light situations. ISO Menu The ISO menu allows you to set the... level of the images that this setting will be less sensitive to your previous mode. 5) An icon reflecting your camera until you to capture images in environments with bright lighting. 1) Press the UP or DOWN direction control buttons to scroll through the menu options. ...
.... When the ISO is increased, the image sensor in the surrounding environment. When the ISO level is reduced, the image sensor in your camera will be remembered by your selection will optimize the image quality in lower-light situations. ISO Menu The ISO menu allows you to set the... level of the images that this setting will be less sensitive to your previous mode. 5) An icon reflecting your camera until you to capture images in environments with bright lighting. 1) Press the UP or DOWN direction control buttons to scroll through the menu options. ...
Camera Manual
Page 21
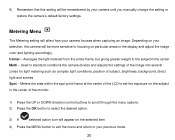
... how your previous mode. 20 Depending on your selection, the camera will be remembered by your camera until you manually change the setting or restore the camera's default factory settings. Used in standard conditions the camera divides and adjusts the settings of the image into several zones ... option. 3) A selected option icon will appear on the selected item 4) Press the MENU button to exit the menu and return to your camera focuses when capturing an image. Center - Averages the light metered from the entire frame, but giving greater weight to the subjectin the center Multi...
... how your previous mode. 20 Depending on your selection, the camera will be remembered by your camera until you manually change the setting or restore the camera's default factory settings. Used in standard conditions the camera divides and adjusts the settings of the image into several zones ... option. 3) A selected option icon will appear on the selected item 4) Press the MENU button to exit the menu and return to your camera focuses when capturing an image. Center - Averages the light metered from the entire frame, but giving greater weight to the subjectin the center Multi...
Camera Manual
Page 22
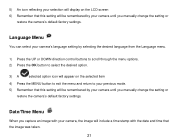
Language Menu You can select your camera's language setting by selecting the desired language from the Language menu. 1) Press the UP or DOWN direction ...screen 6) Remember that this setting will be remembered by your camera until you manually change the setting or restore the camera's default factory settings. Date/Time Menu When you capture an image with your camera, the image will include a time stamp with the date ... the menu and return to your previous mode. 5) Remember that this setting will be remembered by your camera until you manually change the setting or restore the...
Language Menu You can select your camera's language setting by selecting the desired language from the Language menu. 1) Press the UP or DOWN direction ...screen 6) Remember that this setting will be remembered by your camera until you manually change the setting or restore the camera's default factory settings. Date/Time Menu When you capture an image with your camera, the image will include a time stamp with the date ... the menu and return to your previous mode. 5) Remember that this setting will be remembered by your camera until you manually change the setting or restore the...


