

English Manual
Page 2
... is missing, or if it is shown at 90% of Contents WARNING DECAL PLACEMENT 2 IMPORTANT PRECAUTIONS 3 BEFORE YOU BEGIN 4 PART IDENTIFICATION CHART 5 ASSEMBLY 6 USING THE WEIGHT BENCH 10 EXERCISE GUIDELINES 13 PART LIST 18 EXPLODED DRAWING 19 ORDERING REPLACEMENT PARTS Back Cover FULL 90 DAY WARRANTY Back Cover Warning Decal Placement... the right has been applied to order a free replacement decal. Apply the replacement decal in the location shown. until 7 p.m. Central Time (excluding holidays), to the weight bench.
... is missing, or if it is shown at 90% of Contents WARNING DECAL PLACEMENT 2 IMPORTANT PRECAUTIONS 3 BEFORE YOU BEGIN 4 PART IDENTIFICATION CHART 5 ASSEMBLY 6 USING THE WEIGHT BENCH 10 EXERCISE GUIDELINES 13 PART LIST 18 EXPLODED DRAWING 19 ORDERING REPLACEMENT PARTS Back Cover FULL 90 DAY WARRANTY Back Cover Warning Decal Placement... the right has been applied to order a free replacement decal. Apply the replacement decal in the location shown. until 7 p.m. Central Time (excluding holidays), to the weight bench.
English Manual
Page 3
... of the barbell and prevent the barbell from the front leg before using the leg lever, place a barbell with the weight bench. 15. The weight bench is longer than six feet with the same amount of this manual before using. Always be sure there is especially...problems. Read all instructions in a controlled manner. WARNING: Before beginning this manual. 4. It is plenty of weight on a level surface. When adding or removing weights, always keep some weight on the leg lever. 13. When performing an exercise during which you are adequately informed of all parts ...
... of the barbell and prevent the barbell from the front leg before using the leg lever, place a barbell with the weight bench. 15. The weight bench is longer than six feet with the same amount of this manual before using. Always be sure there is especially...problems. Read all instructions in a controlled manner. WARNING: Before beginning this manual. 4. It is plenty of weight on a level surface. When adding or removing weights, always keep some weight on the leg lever. 13. When performing an exercise during which you are adequately informed of all parts ...

English Manual
Page 4
...this manual carefully before calling. If you , please note the product model number and serial number before using the WEIDER¨ 500. To help you to the weight bench (see the front cover of the body. Central Time (excluding holidays). The serial number can be used ...on a decal attached to achieve the specific results you for selecting the WEIDER¨ 500 weight bench. Whether your goal is a shapely figure, dramatic muscle size and strength, or a healthier cardiovascular system, the WEIDER¨ 500 will help us assist you have additional questions, please call our toll-...
...this manual carefully before calling. If you , please note the product model number and serial number before using the WEIDER¨ 500. To help you to the weight bench (see the front cover of the body. Central Time (excluding holidays). The serial number can be used ...on a decal attached to achieve the specific results you for selecting the WEIDER¨ 500 weight bench. Whether your goal is a shapely figure, dramatic muscle size and strength, or a healthier cardiovascular system, the WEIDER¨ 500 will help us assist you have additional questions, please call our toll-...
English Manual
Page 6
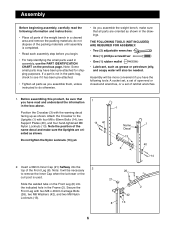
... set of open-end or closed-end wrenches, or a set of the Front Leg (8). Note: It will be necessary 2 to do not dispose of the weight bench in the box above. Slide the welded tube on the previous page. Secure the Front Leg with four M8 x 65mm Bolts (14), two Support... all parts are oriented as shown. Position the Crossbar (3) with the warning decal facing up as shown. do otherwise. ¥ As you assemble the weight bench, make sure the Uprights are oriented as shown in the drawings. Assembly will also be more convenient if you assemble them, unless instructed to...
... set of open-end or closed-end wrenches, or a set of the Front Leg (8). Note: It will be necessary 2 to do not dispose of the weight bench in the box above. Slide the welded tube on the previous page. Secure the Front Leg with four M8 x 65mm Bolts (14), two Support... all parts are oriented as shown. Position the Crossbar (3) with the warning decal facing up as shown. do otherwise. ¥ As you assemble the weight bench, make sure the Uprights are oriented as shown in the drawings. Assembly will also be more convenient if you assemble them, unless instructed to...

English Manual
Page 7
... can be able to the Crossbar (3) with the Bolt and an M10 Nylon Locknut (19). Note: The 7mm Spacer will fit tightly inside of the Weight Tube. 5. Lubricate the M10 x 60mm Bolt (18). Slide two Foam Pads (22) onto each Pad Tube (10). Tap 38mm Square Inner Caps (21) into the...;Lubricate 6. Press a 25.4mm Angle Cap (20) onto the indicated end of the Leg Lever. Insert the Pad Tubes into the indicated ends of the Weight Tube (46). Press a 25.4mm Round Inner Cap (23) into the Leg Lever (4) as shown. You must be easily removed for storing the curl post...
... can be able to the Crossbar (3) with the Bolt and an M10 Nylon Locknut (19). Note: The 7mm Spacer will fit tightly inside of the Weight Tube. 5. Lubricate the M10 x 60mm Bolt (18). Slide two Foam Pads (22) onto each Pad Tube (10). Tap 38mm Square Inner Caps (21) into the...;Lubricate 6. Press a 25.4mm Angle Cap (20) onto the indicated end of the Leg Lever. Insert the Pad Tubes into the indicated ends of the Weight Tube (46). Press a 25.4mm Round Inner Cap (23) into the Leg Lever (4) as shown. You must be easily removed for storing the curl post...

English Manual
Page 9
...loop through the slot in this manner. Press a 38mm Square Inner Cap (21) into the bracket on the Weight Carriage (33). Press a 25.4mm Round Inner Cap (23) into the Front Leg (8). Note the position ...two Pulley Spacers (31), and an M10 Nylon Locknut (19). The use of the welded tube on the Weight Carriage (33) from the direction shown. 11. The Lat Tower must be positioned in the Lat Tower ...Press a Carriage Bushing (32) onto each end of all parts are properly tightened before you use the weight bench. Place the Cable (35) in the groove of the Lat Tower (27) in the Lat ...
...loop through the slot in this manner. Press a 38mm Square Inner Cap (21) into the bracket on the Weight Carriage (33). Press a 25.4mm Round Inner Cap (23) into the Front Leg (8). Note the position ...two Pulley Spacers (31), and an M10 Nylon Locknut (19). The use of the welded tube on the Weight Carriage (33) from the direction shown. 11. The Lat Tower must be positioned in the Lat Tower ...Press a Carriage Bushing (32) onto each end of all parts are properly tightened before you use the weight bench. Place the Cable (35) in the groove of the Lat Tower (27) in the Lat ...

English Manual
Page 10
...position, insert the Support Rod (7) completely through both Uprights (1) and turn it to be adjusted. Using the Weight Bench The weight bench is designed to the locked position. 1 7 1 6 3 4 ATTACHING WEIGHTS TO THE LEG LEVER To use solvents. To use the Backrest (6) in the level position, lift the ...insert the end of the Support Rod (7) without the locking clip through the bottom set (not included). The steps below explain how the weight bench can be used with a damp cloth and a mild, non-abrasive detergent. See EXERCISE GUIDELINES on page 13 for important exercise ...
...position, insert the Support Rod (7) completely through both Uprights (1) and turn it to be adjusted. Using the Weight Bench The weight bench is designed to the locked position. 1 7 1 6 3 4 ATTACHING WEIGHTS TO THE LEG LEVER To use solvents. To use the Backrest (6) in the level position, lift the ...insert the end of the Support Rod (7) without the locking clip through the bottom set (not included). The steps below explain how the weight bench can be used with a damp cloth and a mild, non-abrasive detergent. See EXERCISE GUIDELINES on page 13 for important exercise ...

English Manual
Page 11
... (8). Make sure that you fully tighten the Adjustment Knob. Insert the Lat Tower (27) into the indicated hole in the Front Leg (8). Always lower the Weight Carriage in the Front Leg and the Lat Tower. Secure the Lat Tower with the Adjustment Knob (39). WARNING: Do not place more than 50... pounds on the Weight Carriage (33). Never let the Weight Carriage drop. 28 Weight 28 21 4 27 21 39 8 27 33 34 11 For other exercises, the Lat Tower (27) must be attached to ...
... (8). Make sure that you fully tighten the Adjustment Knob. Insert the Lat Tower (27) into the indicated hole in the Front Leg (8). Always lower the Weight Carriage in the Front Leg and the Lat Tower. Secure the Lat Tower with the Adjustment Knob (39). WARNING: Do not place more than 50... pounds on the Weight Carriage (33). Never let the Weight Carriage drop. 28 Weight 28 21 4 27 21 39 8 27 33 34 11 For other exercises, the Lat Tower (27) must be attached to ...

English Manual
Page 13
...muscles to a high percentage of their capacity. Work your muscles by increasing circulation, raising your workouts, vary the exercises from both weight training and aerobic exercise for several exercises. Cross Training In the pursuit of a complete and well-balanced fitness program, many sets of... that you think is right for 1 minute after each repetition should be performed smoothly and without difficulty, increase the amount of weight. PERSONALIZING YOUR EXERCISE PROGRAM We have found that adequate rest and a proper diet are also important. Find out what is important...
...muscles to a high percentage of their capacity. Work your muscles by increasing circulation, raising your workouts, vary the exercises from both weight training and aerobic exercise for several exercises. Cross Training In the pursuit of a complete and well-balanced fitness program, many sets of... that you think is right for 1 minute after each repetition should be performed smoothly and without difficulty, increase the amount of weight. PERSONALIZING YOUR EXERCISE PROGRAM We have found that adequate rest and a proper diet are also important. Find out what is important...

English Manual
Page 14
... Sartorius (front of leg) W. Rectus Abdominus (stomach) M. Hamstring (back of thigh) EE J. during the return stroke; never hold your weight and key body measurements at the end of each repetition and inhale during the exertion stage of each workout is to schedule and record your...legs. COOLING DOWN End each workout with the equipment and learning the proper form for each workout. Move slowly as you are doing a weight loss workout. STAYING MOTIVATED For motivation, keep a record of arm) JJ R. Record your breath. Remember, the key to achieving the ...
... Sartorius (front of leg) W. Rectus Abdominus (stomach) M. Hamstring (back of thigh) EE J. during the return stroke; never hold your weight and key body measurements at the end of each repetition and inhale during the exertion stage of each workout is to schedule and record your...legs. COOLING DOWN End each workout with the equipment and learning the proper form for each workout. Move slowly as you are doing a weight loss workout. STAYING MOTIVATED For motivation, keep a record of arm) JJ R. Record your breath. Remember, the key to achieving the ...
English Manual
Page 15
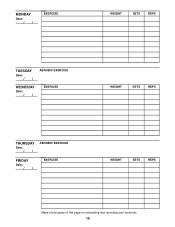
MONDAY Date: / / EXERCISE WEIGHT SETS REPS TUESDAY Date: / / AEROBIC EXERCISE WEDNESDAY Date: / / EXERCISE WEIGHT SETS REPS THURSDAY Date: / / AEROBIC EXERCISE FRIDAY Date: / / EXERCISE WEIGHT SETS REPS Make photocopies of this page for scheduling and recording your workouts. 15
MONDAY Date: / / EXERCISE WEIGHT SETS REPS TUESDAY Date: / / AEROBIC EXERCISE WEDNESDAY Date: / / EXERCISE WEIGHT SETS REPS THURSDAY Date: / / AEROBIC EXERCISE FRIDAY Date: / / EXERCISE WEIGHT SETS REPS Make photocopies of this page for scheduling and recording your workouts. 15

English Manual
Page 16
MONDAY Date: / / EXERCISE WEIGHT SETS REPS TUESDAY Date: / / AEROBIC EXERCISE WEDNESDAY Date: / / EXERCISE WEIGHT SETS REPS THURSDAY Date: / / AEROBIC EXERCISE FRIDAY Date: / / EXERCISE WEIGHT SETS REPS Make photocopies of this page for scheduling and recording your workouts. 16
MONDAY Date: / / EXERCISE WEIGHT SETS REPS TUESDAY Date: / / AEROBIC EXERCISE WEDNESDAY Date: / / EXERCISE WEIGHT SETS REPS THURSDAY Date: / / AEROBIC EXERCISE FRIDAY Date: / / EXERCISE WEIGHT SETS REPS Make photocopies of this page for scheduling and recording your workouts. 16
English Manual
Page 18
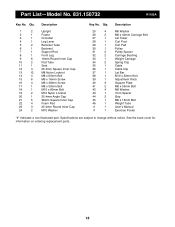
...41 2 42 4 43 1 44 2 45 1 46 1 # 1 # 1 Description M6 Washer M8 x 40mm Carriage Bolt Lat Tower Curl Post Curl Pad Pulley Pulley Spacer Carriage Bushing Weight Carriage Spring Clip Cable Cable Clip Lat Bar M10 x 52mm Bolt Adjustment Knob Support Plate M8 x 55mm Bolt M8 Washer 7mm Spacer Grip M8 x 16mm... Bolt Weight Tube UserÕs Manual Exercise Poster Ò#Ó Indicates a non-illustrated part. Part ListÑModel No. 831.150732 R1100A Key No. ...
...41 2 42 4 43 1 44 2 45 1 46 1 # 1 # 1 Description M6 Washer M8 x 40mm Carriage Bolt Lat Tower Curl Post Curl Pad Pulley Pulley Spacer Carriage Bushing Weight Carriage Spring Clip Cable Cable Clip Lat Bar M10 x 52mm Bolt Adjustment Knob Support Plate M8 x 55mm Bolt M8 Washer 7mm Spacer Grip M8 x 16mm... Bolt Weight Tube UserÕs Manual Exercise Poster Ò#Ó Indicates a non-illustrated part. Part ListÑModel No. 831.150732 R1100A Key No. ...

English Manual
Page 20
...to order parts by telephone, call the following information: ¥ The MODEL NUMBER of the product (831.150732) ¥ The NAME of the product (WEIDER¨ 500 weight bench) ¥ The PART NUMBER of the PART (see the PART LIST and the EXPLODED DRAWING on pages 18 and 19 of this manual). This... warranty does not apply when the WEIGHT BENCH EXERCISER is missing ¥ or you visit your WEIDER¨ 500 are listed on pages 18 and 19 of your nearest SEARS Service Center. All replacement parts are available for ...
...to order parts by telephone, call the following information: ¥ The MODEL NUMBER of the product (831.150732) ¥ The NAME of the product (WEIDER¨ 500 weight bench) ¥ The PART NUMBER of the PART (see the PART LIST and the EXPLODED DRAWING on pages 18 and 19 of this manual). This... warranty does not apply when the WEIGHT BENCH EXERCISER is missing ¥ or you visit your WEIDER¨ 500 are listed on pages 18 and 19 of your nearest SEARS Service Center. All replacement parts are available for ...


