Use and Care Guide
Page 4
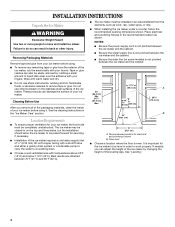
...in the recommended location as wind, rain, water spray, or drip. ■ When installing the ice maker under a counter, follow the recommended opening dimensions shown. Place electrical and plumbing fixtures in the "Ice Maker Care" section. NOTES: ■ Be sure the power supply cord is not pinched ...cm) Max. 11¹⁄₂" (29.2 cm) (38¹.⁄₂9"cm)9(2"2.9 cm) 24" (60.1 cm) A 28¹⁄₂" (72.4 cm) B 15" (38.1 cm) A. Floor level ■ Choose a location where the floor is not pinched between the ice maker and the cabinet. ■ Be sure the water...
...in the recommended location as wind, rain, water spray, or drip. ■ When installing the ice maker under a counter, follow the recommended opening dimensions shown. Place electrical and plumbing fixtures in the "Ice Maker Care" section. NOTES: ■ Be sure the power supply cord is not pinched ...cm) Max. 11¹⁄₂" (29.2 cm) (38¹.⁄₂9"cm)9(2"2.9 cm) 24" (60.1 cm) A 28¹⁄₂" (72.4 cm) B 15" (38.1 cm) A. Floor level ■ Choose a location where the floor is not pinched between the ice maker and the cabinet. ■ Be sure the water...
Trim Kit Instructions
Page 1
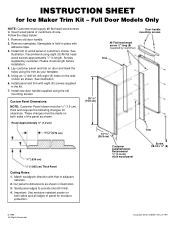
.... 3. Door handle mounting screws #6 Flat head wood screw 1⁄2" long (8) (supplied by customer. Remove old door handle. 2. Install trim to dimensions as your template. 5. Screws supplied by customer) Trim 2931⁄64" (74.9 cm) 14 33⁄64" (36.9 cm) Customer supplied ...panel. See illustration. 6. Custom Panel Dimensions: NOTE: Customer Panel shown must supply #6 flat head wood screws to provide smooth finish. 4. Recommend 3⁄4" (1.9 cm) thick wood panel Trim Screw, ...
.... 3. Door handle mounting screws #6 Flat head wood screw 1⁄2" long (8) (supplied by customer. Remove old door handle. 2. Install trim to dimensions as your template. 5. Screws supplied by customer) Trim 2931⁄64" (74.9 cm) 14 33⁄64" (36.9 cm) Customer supplied ...panel. See illustration. 6. Custom Panel Dimensions: NOTE: Customer Panel shown must supply #6 flat head wood screws to provide smooth finish. 4. Recommend 3⁄4" (1.9 cm) thick wood panel Trim Screw, ...