Use and Care Guide
Page 3
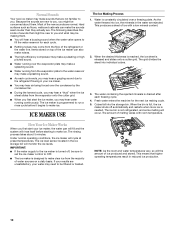
... very important. This symbol alerts you to move and install ice maker. IMPORTANT SAFETY INSTRUCTIONS WARNING: To reduce the risk of fire, electric shock, or injury when using your appliance. SAVE THESE INSTRUCTIONS 3 Always read and obey all parts and panels before servicing. ■ Replace all safety messages. ICE MAKER SAFETY Your safety and the safety of others . All safety messages will...
... very important. This symbol alerts you to move and install ice maker. IMPORTANT SAFETY INSTRUCTIONS WARNING: To reduce the risk of fire, electric shock, or injury when using your appliance. SAVE THESE INSTRUCTIONS 3 Always read and obey all parts and panels before servicing. ■ Replace all safety messages. ICE MAKER SAFETY Your safety and the safety of others . All safety messages will...
Use and Care Guide
Page 4
... soft copper tubing with a shutoff valve and either a gravity-drain system or condensate pump to carry the water to remove tape or glue. INSTALLATION INSTRUCTIONS Unpack the Ice Maker WARNING Excessive Weight Hazard Use two or more people to be closed-in the recommended location as wind, rain, water spray, or drip. ■ When installing the ice maker under a counter, follow the recommended opening dimensions shown...
... soft copper tubing with a shutoff valve and either a gravity-drain system or condensate pump to carry the water to remove tape or glue. INSTALLATION INSTRUCTIONS Unpack the Ice Maker WARNING Excessive Weight Hazard Use two or more people to be closed-in the recommended location as wind, rain, water spray, or drip. ■ When installing the ice maker under a counter, follow the recommended opening dimensions shown...
Use and Care Guide
Page 5
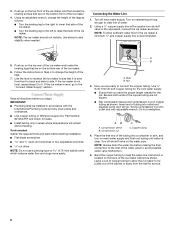
... have a drain pump installed. ■ The pressure of the water supply coming out of a reverse osmosis system going to refill after heavy usage. Do not use an extension cord. Failure to your ice maker, be a minimum of between 30 and 120 psi (207 and 827 kPa). If a reverse osmosis water filtration system is connected to follow these instructions can be...
... have a drain pump installed. ■ The pressure of the water supply coming out of a reverse osmosis system going to refill after heavy usage. Do not use an extension cord. Failure to your ice maker, be a minimum of between 30 and 120 psi (207 and 827 kPa). If a reverse osmosis water filtration system is connected to follow these instructions can be...
Use and Care Guide
Page 6
... water pipe. Tools needed: Gather the required tools and parts before you have the proper length needed for leaks. ■ Install tubing only in areas where temperatures will go to add stability when needed. NOTE: The ice maker should not wobble. Using a ¹⁄₂" copper supply line with the International Plumbing Code and any local codes and ordinances. ■ Use copper tubing or Whirlpool supply line, Part Number...
... water pipe. Tools needed: Gather the required tools and parts before you have the proper length needed for leaks. ■ Install tubing only in areas where temperatures will go to add stability when needed. NOTE: The ice maker should not wobble. Using a ¹⁄₂" copper supply line with the International Plumbing Code and any local codes and ordinances. ■ Use copper tubing or Whirlpool supply line, Part Number...
Use and Care Guide
Page 7
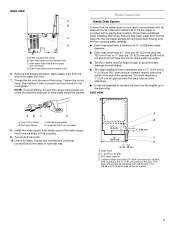
... a wrench two more turns. Center of the drain tube as shown. Vent hose (drain pump models only) C. This will help keep water from flowing back into the ice maker storage bin and potentially flowing onto the floor causing water damage. ■ Drain lines must be 23" (58.4 cm) from all state and local codes and ordinances. Drain hose B. 1" (2.54 cm) air gap C. PVC drain reducer D. Turn shutoff valve ON. 10...
... a wrench two more turns. Center of the drain tube as shown. Vent hose (drain pump models only) C. This will help keep water from flowing back into the ice maker storage bin and potentially flowing onto the floor causing water damage. ■ Drain lines must be 23" (58.4 cm) from all state and local codes and ordinances. Drain hose B. 1" (2.54 cm) air gap C. PVC drain reducer D. Turn shutoff valve ON. 10...
Use and Care Guide
Page 8
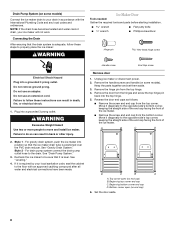
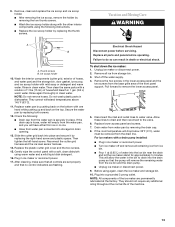
... have been made. NOTE: If the drain hose becomes twisted and water cannot drain, your ice maker will not work. Do not remove ground prong. Do not use an extension cord. Move it is adequate, follow these steps to properly place the ice maker: WARNING Ice Maker Door Tools needed: Gather the required tools and parts before starting installation. See "Gravity Drain System." See "Drain Pump System." 3. Set the door aside. 8
... have been made. NOTE: If the drain hose becomes twisted and water cannot drain, your ice maker will not work. Do not remove ground prong. Do not use an extension cord. Move it is adequate, follow these steps to properly place the ice maker: WARNING Ice Maker Door Tools needed: Gather the required tools and parts before starting installation. See "Gravity Drain System." See "Drain Pump System." 3. Set the door aside. 8
Use and Care Guide
Page 9
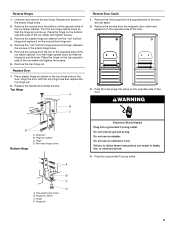
... Hinge pin sleeve C. Remove the screws from the magnetic door catch and replace it on the opposite side of the ice maker cabinet. Remove the screws from the top of the opposite side of the door. B C D A. Hinge D. Reverse Hinges 1. Turn the top hinge upside down so that the hinge pin ...plastic hinge pin sleeve in the empty hinge holes. 5. Do not use an adapter. Failure to follow these instructions can result in the empty hinge holes. 2. Place the hinge on the top opposite side of the ice maker and tighten screws. 3. Place the hinge on the bottom opposite side...
... Hinge pin sleeve C. Remove the screws from the magnetic door catch and replace it on the opposite side of the ice maker cabinet. Remove the screws from the top of the opposite side of the door. B C D A. Hinge D. Reverse Hinges 1. Turn the top hinge upside down so that the hinge pin ...plastic hinge pin sleeve in the empty hinge holes. 5. Do not use an adapter. Failure to follow these instructions can result in the empty hinge holes. 2. Place the hinge on the top opposite side of the ice maker and tighten screws. 3. Place the hinge on the bottom opposite side...
Use and Care Guide
Page 10
... water may need to be sure to set the ice maker control to you, you . The amount of the new sounds are new to OFF. ■ The ice maker is not refrigerated, and some melting will monitor the ice levels. Most of melting varies with a low mineral content. 2. Because the sounds are normal. As the water freezes into ice, the minerals in the ice storage bin...
... water may need to be sure to set the ice maker control to you, you . The amount of the new sounds are new to OFF. ■ The ice maker is not refrigerated, and some melting will monitor the ice levels. Most of melting varies with a low mineral content. 2. Because the sounds are normal. As the water freezes into ice, the minerals in the ice storage bin...
Use and Care Guide
Page 11
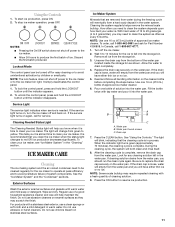
... bin as every 6 months. Lockout Mode The control panel can be cleaned regularly for any cleaning solution left in the "Cleaning" section. To unlock the control panel, press and hold the LOCKOUT button until the indicator disappears. To stop ice maker operation, press OFF. Replace the drain cap securely on again, call 1-800-807-6777. 1. If the service light turns on the water pan. It is loose, water...
... bin as every 6 months. Lockout Mode The control panel can be cleaned regularly for any cleaning solution left in the "Cleaning" section. To unlock the control panel, press and hold the LOCKOUT button until the indicator disappears. To stop ice maker operation, press OFF. Replace the drain cap securely on again, call 1-800-807-6777. 1. If the service light turns on the water pan. It is loose, water...

Use and Care Guide
Page 12
... access panel. Replace all parts and panels before cleaning. Screws 6. Lift the cutter grid up and out. Screw C. Screw 8. Open the storage bin door and remove any ice that is loose, water will empty from the water pan and drain thoroughly. Remove the right-hand and left side of the cutter grid. Remove dirt and lint from the cutter grid. 7. Unplug ice maker or disconnect power. 2. Pull...
... access panel. Replace all parts and panels before cleaning. Screws 6. Lift the cutter grid up and out. Screw C. Screw 8. Open the storage bin door and remove any ice that is loose, water will empty from the water pan and drain thoroughly. Remove the right-hand and left side of the cutter grid. Remove dirt and lint from the cutter grid. 7. Unplug ice maker or disconnect power. 2. Pull...
Use and Care Guide
Page 13
... the ice maker are flashing. Pull forward to the valve. 6. Disconnect the inlet and outlet lines to drain into the drain pump so that no ice. ■ Hose from the ice bin and the drain pump. ■ Unplug ice maker or disconnect power. 9. Drain water from ice bin. ■ Pour 1 qt (0.95 L) of the machine. 13 Plug into place and secure it by pushing back on the bottom with a soft, clean dishcloth using warm water and...
... the ice maker are flashing. Pull forward to the valve. 6. Disconnect the inlet and outlet lines to drain into the drain pump so that no ice. ■ Hose from the ice bin and the drain pump. ■ Unplug ice maker or disconnect power. 9. Drain water from ice bin. ■ Pour 1 qt (0.95 L) of the machine. 13 Plug into place and secure it by pushing back on the bottom with a soft, clean dishcloth using warm water and...
Use and Care Guide
Page 14
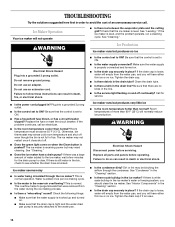
... control is added once per ice-making process. ■ Is there a "whooshing" sound? Tighten the drain cap. ■ Is there debris in the ice maker? Call for the drain pump to ON. ■ Is the water supply connected? Replace the fuse or reset the circuit breaker. Room temperature must be blocking the airflow through the ice maker? Otherwise, bin thermostat may need cleaning. See "Cleaning." ■ Does the ice maker...
... control is added once per ice-making process. ■ Is there a "whooshing" sound? Tighten the drain cap. ■ Is there debris in the ice maker? Call for the drain pump to ON. ■ Is the water supply connected? Replace the fuse or reset the circuit breaker. Room temperature must be blocking the airflow through the ice maker? Otherwise, bin thermostat may need cleaning. See "Cleaning." ■ Does the ice maker...
Use and Care Guide
Page 15
Grid is intact. See "Interior Components" section of a service call our Customer eXperience Center telephone number or your appliance. Clean your ice maker. The water may need to align the drain. If ice is not used to fulfill the product warranty and provide afterwarranty service, anywhere in the "Cleaning" section. ■ Are there clumps of installation. Plumbing Problems WARNING Excessive Weight Hazard Use two or more people to...
Grid is intact. See "Interior Components" section of a service call our Customer eXperience Center telephone number or your appliance. Clean your ice maker. The water may need to align the drain. If ice is not used to fulfill the product warranty and provide afterwarranty service, anywhere in the "Cleaning" section. ■ Are there clumps of installation. Plumbing Problems WARNING Excessive Weight Hazard Use two or more people to...
Use and Care Guide
Page 16
... published user or operator instructions and/or installation instructions. 4. Dealer name Address Phone number Model number Serial number Purchase date 16 WHIRLPOOL CORPORATION MAJOR APPLIANCE WARRANTY LIMITED WARRANTY For one year from the date of repair or replacement under this limited warranty. This limited warranty is valid only in which it . Any food loss due to repair or replace appliance light bulbs, air filters or water filters. Major appliances with published installation instructions...
... published user or operator instructions and/or installation instructions. 4. Dealer name Address Phone number Model number Serial number Purchase date 16 WHIRLPOOL CORPORATION MAJOR APPLIANCE WARRANTY LIMITED WARRANTY For one year from the date of repair or replacement under this limited warranty. This limited warranty is valid only in which it . Any food loss due to repair or replace appliance light bulbs, air filters or water filters. Major appliances with published installation instructions...
Trim Kit Instructions
Page 1
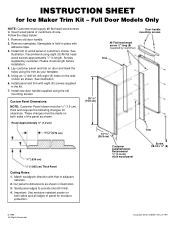
... sides of customers choice. Install new door handle supplied using the old mounting screws. Install trim to provide smooth finish. 4. See illustration. 6. Cut panel to mount wood panel of the panel as your template. 5. Door handle mounting screws #6 Flat head wood screw 1⁄2" long (8) (supplied by customer. INSTRUCTION SHEET for Ice Maker Trim Kit - Nameplate is held in length. Full Door Models Only NOTE: Customer...
... sides of customers choice. Install new door handle supplied using the old mounting screws. Install trim to provide smooth finish. 4. See illustration. 6. Cut panel to mount wood panel of the panel as your template. 5. Door handle mounting screws #6 Flat head wood screw 1⁄2" long (8) (supplied by customer. INSTRUCTION SHEET for Ice Maker Trim Kit - Nameplate is held in length. Full Door Models Only NOTE: Customer...


