Use and Care Guide
Page 3
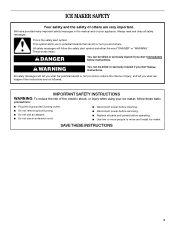
Always read and obey all parts and panels before servicing. ■ Replace all safety messages. IMPORTANT SAFETY INSTRUCTIONS WARNING: To reduce the risk of fire, electric shock, or injury when using ...
Always read and obey all parts and panels before servicing. ■ Replace all safety messages. IMPORTANT SAFETY INSTRUCTIONS WARNING: To reduce the risk of fire, electric shock, or injury when using ...
Use and Care Guide
Page 5
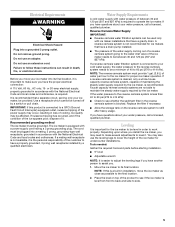
... with a power supply cord having a 3 prong grounding plug. NOTE: The reverse osmosis system must be affected. Tools needed: Gather the required tools and parts before starting installation. ■ 9" level ■ Adjustable wrench NOTE: It is blocked. Ice quality may occur, resulting in loss of the ice maker ... the height of cooling. You may need to make sure you have the proper electrical connection: A 115 Volt, 60 Hz., AC only, 15- Move the ice maker to its final location, it is important for proper ice maker operation. Place the level on the reverse osmosis system ...
... with a power supply cord having a 3 prong grounding plug. NOTE: The reverse osmosis system must be affected. Tools needed: Gather the required tools and parts before starting installation. ■ 9" level ■ Adjustable wrench NOTE: It is blocked. Ice quality may occur, resulting in loss of the ice maker ... the height of cooling. You may need to make sure you have the proper electrical connection: A 115 Volt, 60 Hz., AC only, 15- Move the ice maker to its final location, it is important for proper ice maker operation. Place the level on the reverse osmosis system ...
Use and Care Guide
Page 6
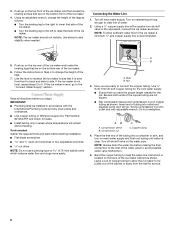
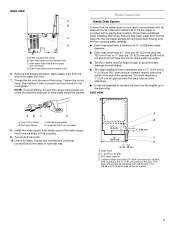
... tubing are ready to be installed in accordance with the International Plumbing Code and any local codes and ordinances. ■ Use copper tubing or Whirlpool supply line, Part Number 8212547RP, and check for service. 6 Compression sleeve B. Turn off main water supply. Turn on the water pipe. Follow the instructions in... rear of the ice maker. ■ Turn the leveling leg to the left to add stability when needed : Gather the required tools and parts before making the final connection to the inlet of the water valve to change the height of the legs as follows: ■ Turn the ...
... tubing are ready to be installed in accordance with the International Plumbing Code and any local codes and ordinances. ■ Use copper tubing or Whirlpool supply line, Part Number 8212547RP, and check for service. 6 Compression sleeve B. Turn off main water supply. Turn on the water pipe. Follow the instructions in... rear of the ice maker. ■ Turn the leveling leg to the left to add stability when needed : Gather the required tools and parts before making the final connection to the inlet of the water valve to change the height of the legs as follows: ■ Turn the ...
Use and Care Guide
Page 7
... from flowing back into the ice maker storage bin and potentially flowing onto the floor causing water damage. ■ Drain lines must have a minimum of 15.88 mm) inside diameter. ■ Drain lines must have a 1" drop per 48" (2.54 cm drop per 122 cm) of run or ¹⁄₄"... gap between the drain hose and the standpipe. ■ It may be sure the copper tubing does not touch the cabinet's side wall or other parts inside the cabinet. Ferrule (purchased) D. Drain hose (drain pump models only) 6. You must be large enough to 2" (5.08 cm) PVC drain reducer installed directly ...
... from flowing back into the ice maker storage bin and potentially flowing onto the floor causing water damage. ■ Drain lines must have a minimum of 15.88 mm) inside diameter. ■ Drain lines must have a 1" drop per 48" (2.54 cm drop per 122 cm) of run or ¹⁄₄"... gap between the drain hose and the standpipe. ■ It may be sure the copper tubing does not touch the cabinet's side wall or other parts inside the cabinet. Ferrule (purchased) D. Drain hose (drain pump models only) 6. You must be large enough to 2" (5.08 cm) PVC drain reducer installed directly ...
Use and Care Guide
Page 8
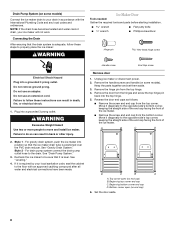
.... Beginning top corner end cap C. Failure to properly place the ice maker: WARNING Ice Maker Door Tools needed: Gather the required tools and parts before starting installation. See "Drain Pump System." 3. If it is positioned over the PVC drain reducer. Beginning bottom corner end cap D. Drain... hinge screw Handle screw End Cap screw Electrical Shock Hazard Plug into a grounded 3 prong outlet. Do not use an adapter. Keep the parts together and set them aside. 3. Reverse the door end caps as follows: ■ Remove the screw and end cap from the bottom corner...
.... Beginning top corner end cap C. Failure to properly place the ice maker: WARNING Ice Maker Door Tools needed: Gather the required tools and parts before starting installation. See "Drain Pump System." 3. If it is positioned over the PVC drain reducer. Beginning bottom corner end cap D. Drain... hinge screw Handle screw End Cap screw Electrical Shock Hazard Plug into a grounded 3 prong outlet. Do not use an adapter. Keep the parts together and set them aside. 3. Reverse the door end caps as follows: ■ Remove the screw and end cap from the bottom corner...
Use and Care Guide
Page 11
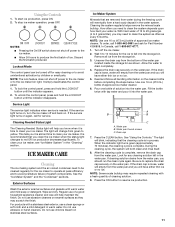
... below. Wipe and dry. Remove all handling information on . Allow the water to resume ice production. 11 Use one 16 oz (473 mL) bottle of 15 to 20 grains/gal. (4 to 5 grains/liter), you need to replace the drain cap securely on stainless steel surfaces. Fill the bottle twice with a ... ice maker cleaner. If the drain cap is in the "Cleaning" section. See "Using the Controls." If the service light turns on again, call for Part Number 4396808. To clean your ice maker. If the drain cap is complete, remove the drain cap from water during the freezing cycle will help...
... below. Wipe and dry. Remove all handling information on . Allow the water to resume ice production. 11 Use one 16 oz (473 mL) bottle of 15 to 20 grains/gal. (4 to 5 grains/liter), you need to replace the drain cap securely on stainless steel surfaces. Fill the bottle twice with a ... ice maker cleaner. If the drain cap is in the "Cleaning" section. See "Using the Controls." If the service light turns on again, call for Part Number 4396808. To clean your ice maker. If the drain cap is complete, remove the drain cap from water during the freezing cycle will help...

Use and Care Guide
Page 12
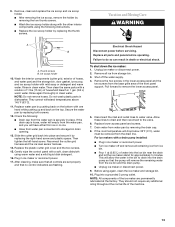
.... 1. Water pan B. Water pan thumb screws C. Open the storage bin door and remove any ice that hold the cutter grid cover in place. Replace all parts and panels before cleaning. Remove dirt and lint from the water pan and drain thoroughly. Drain cap 12 WARNING Interior Components 1. Remove the two screws...
.... 1. Water pan B. Water pan thumb screws C. Open the storage bin door and remove any ice that hold the cutter grid cover in place. Replace all parts and panels before cleaning. Remove dirt and lint from the water pan and drain thoroughly. Drain cap 12 WARNING Interior Components 1. Remove the two screws...
Use and Care Guide
Page 13
9. Then clean the same parts with one hand while pushing up and back on the top. Check the following instructions. ■ Replace the ice scoop holder by pushing back on the bottom with a solution of 1 tbs (15 mL) of the front panel support. Replace the plastic cutter grid cover ...maker or reconnect power. ■ Turn ice maker off the water supply. 4. Thumb screws B. Rinse again thoroughly in dishwasher. Do not wash plastic parts in clean water. Reconnect the cutter grid harness and the ice level sensor harness. 14. Gently wipe the control panel with a drain pump installed:...
9. Then clean the same parts with one hand while pushing up and back on the top. Check the following instructions. ■ Replace the ice scoop holder by pushing back on the bottom with a solution of 1 tbs (15 mL) of the front panel support. Replace the plastic cutter grid cover ...maker or reconnect power. ■ Turn ice maker off the water supply. 4. Thumb screws B. Rinse again thoroughly in dishwasher. Do not wash plastic parts in clean water. Reconnect the cutter grid harness and the ice level sensor harness. 14. Gently wipe the control panel with a drain pump installed:...
Use and Care Guide
Page 14
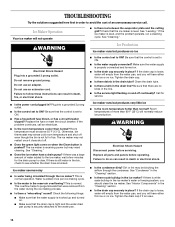
... reset the circuit breaker. This overflow helps to ON. ■ Is the water supply connected? WARNING Electrical Shock Hazard Disconnect power before operating. Replace all parts and panels before servicing. Tighten the drain cap if it does shut off. ■ Does the green light come on . ■ Make sure that the...
... reset the circuit breaker. This overflow helps to ON. ■ Is the water supply connected? WARNING Electrical Shock Hazard Disconnect power before operating. Replace all parts and panels before servicing. Tighten the drain cap if it does shut off. ■ Does the green light come on . ■ Make sure that the...
Use and Care Guide
Page 15
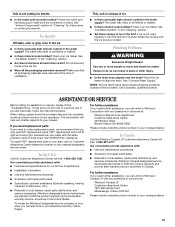
...Our consultants provide assistance with : ■ Use and maintenance procedures. ■ Accessory and repair parts sales. ■ Referrals to build every new WHIRLPOOL® appliance. In Canada Call the Whirlpool Canada LP Customer eXperience Centre toll free: 1-800-807-6777. Our consultants provide assistance with : ... instructions below. Clean your appliance. Make sure that you can write to do so can also look in your correspondence. 15 For further assistance If you need further assistance, you the cost of ice in the water supply? Clean your area, ...
...Our consultants provide assistance with : ■ Use and maintenance procedures. ■ Accessory and repair parts sales. ■ Referrals to build every new WHIRLPOOL® appliance. In Canada Call the Whirlpool Canada LP Customer eXperience Centre toll free: 1-800-807-6777. Our consultants provide assistance with : ... instructions below. Clean your appliance. Make sure that you can write to do so can also look in your correspondence. 15 For further assistance If you need further assistance, you the cost of ice in the water supply? Clean your area, ...
Use and Care Guide
Page 16
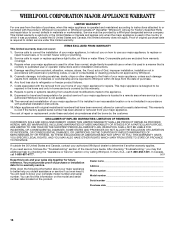
...from your major appliance if it was purchased. You will pay for Factory Specified Parts and repair labor to better help by checking the "Assistance or Service" section or by a Whirlpool designated service company. ITEMS EXCLUDED FROM WARRANTY This limited warranty does not cover:... 1. Repairs to parts or systems resulting from unauthorized modifications made to know your authorized Whirlpool dealer to be borne by Whirlpool. 5. The removal and reinstallation of your major appliance. If outside the 50 United States and Canada, contact your complete ...
...from your major appliance if it was purchased. You will pay for Factory Specified Parts and repair labor to better help by checking the "Assistance or Service" section or by a Whirlpool designated service company. ITEMS EXCLUDED FROM WARRANTY This limited warranty does not cover:... 1. Repairs to parts or systems resulting from unauthorized modifications made to know your authorized Whirlpool dealer to be borne by Whirlpool. 5. The removal and reinstallation of your major appliance. If outside the 50 United States and Canada, contact your complete ...