Use and Care Guide
Page 3
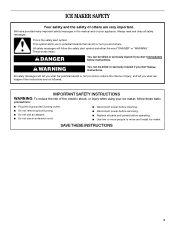
... kill or hurt you don't follow instructions. SAVE THESE INSTRUCTIONS 3 This symbol alerts you to reduce the chance of others . Always read and obey all parts and panels before servicing. ■ Replace all safety messages. All safety messages will follow the safety alert symbol and either the word "DANGER" or "WARNING...
... kill or hurt you don't follow instructions. SAVE THESE INSTRUCTIONS 3 This symbol alerts you to reduce the chance of others . Always read and obey all parts and panels before servicing. ■ Replace all safety messages. All safety messages will follow the safety alert symbol and either the word "DANGER" or "WARNING...
Use and Care Guide
Page 5
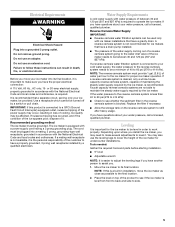
...supply, the water pressure to the reverse osmosis system needs to see if the ice maker is blocked. Tools needed: Gather the required tools and parts before starting installation. ■ 9" level ■ Adjustable wrench NOTE: It is recommended. Before you have a gravity drain. The cord must be... and 827 kPa). If a reverse osmosis system is recommended that have the proper electrical connection: A 115 Volt, 60 Hz., AC only, 15- Depending upon where you install the ice maker, you may occur, resulting in loss of maintaining the steady water supply required by the ice ...
...supply, the water pressure to the reverse osmosis system needs to see if the ice maker is blocked. Tools needed: Gather the required tools and parts before starting installation. ■ 9" level ■ Adjustable wrench NOTE: It is recommended. Before you have a gravity drain. The cord must be... and 827 kPa). If a reverse osmosis system is recommended that have the proper electrical connection: A 115 Volt, 60 Hz., AC only, 15- Depending upon where you install the ice maker, you may occur, resulting in loss of maintaining the steady water supply required by the ice ...
Use and Care Guide
Page 6
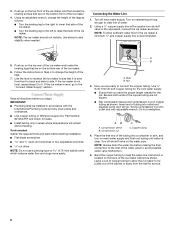
...to be installed in accordance with the International Plumbing Code and any local codes and ordinances. ■ Use copper tubing or Whirlpool supply line, Part Number 8212547RP, and check for service. 6 Follow the instructions in areas where temperatures will go to add stability when needed... : Gather the required tools and parts before starting installation. ■ Flat-blade screwdriver and ¹⁄₂" open-end wrenches or two adjustable wrenches nut driver NOTE:...
...to be installed in accordance with the International Plumbing Code and any local codes and ordinances. ■ Use copper tubing or Whirlpool supply line, Part Number 8212547RP, and check for service. 6 Follow the instructions in areas where temperatures will go to add stability when needed... : Gather the required tools and parts before starting installation. ■ Flat-blade screwdriver and ¹⁄₂" open-end wrenches or two adjustable wrenches nut driver NOTE:...
Use and Care Guide
Page 7
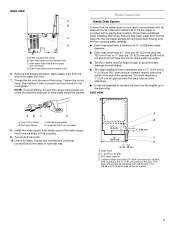
.... Water supply tube clamp B. Then tighten it with a gravity drain system, follow these guidelines when installing drain lines. Thread the nut onto the end of 15.88 mm) inside the cabinet. You must be centered from all state and local codes and ordinances. PVC drain reducer D. REAR VIEW A B C D A. ...NOTE: To avoid rattling, be sure the copper tubing does not touch the cabinet's side wall or other parts inside diameter. ■ Drain lines must have a 1" drop per 48" (2.54 cm drop per 122 cm) of run or ¹⁄₄" drop per 12...
.... Water supply tube clamp B. Then tighten it with a gravity drain system, follow these guidelines when installing drain lines. Thread the nut onto the end of 15.88 mm) inside the cabinet. You must be centered from all state and local codes and ordinances. PVC drain reducer D. REAR VIEW A B C D A. ...NOTE: To avoid rattling, be sure the copper tubing does not touch the cabinet's side wall or other parts inside diameter. ■ Drain lines must have a 1" drop per 48" (2.54 cm drop per 122 cm) of run or ¹⁄₄" drop per 12...
Use and Care Guide
Page 8
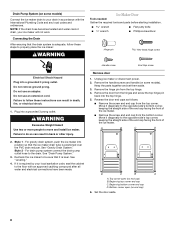
...your local sanitation code, seal the cabinet to properly place the ice maker: WARNING Ice Maker Door Tools needed: Gather the required tools and parts before starting installation. Do not remove ground prong. WARNING Excessive Weight Hazard Use two or more people to the opposite side's top corner, ...maker drain tube is adequate, follow these steps to the floor with the International Plumbing Code and any local codes and ordinances. Keep the parts together and set them aside. 3. For drain pump system connect the drain pump outlet hose to the opposite side's bottom corner, keeping the...
...your local sanitation code, seal the cabinet to properly place the ice maker: WARNING Ice Maker Door Tools needed: Gather the required tools and parts before starting installation. Do not remove ground prong. WARNING Excessive Weight Hazard Use two or more people to the opposite side's top corner, ...maker drain tube is adequate, follow these steps to the floor with the International Plumbing Code and any local codes and ordinances. Keep the parts together and set them aside. 3. For drain pump system connect the drain pump outlet hose to the opposite side's bottom corner, keeping the...
Use and Care Guide
Page 11
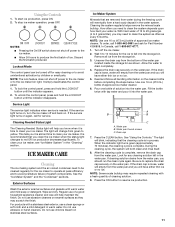
... water pan and you will have either thin ice or no ice. 5. It is time to replace the drain cap securely on again, call for Part Number 4396808. Do not use of a good household appliance cleaner and wax will both clean and rinse itself. 8. Ice Maker System Minerals that are... exterior enamel surfaces and gaskets with a fresh quantity of approved ice maker cleaner. 6. Unscrew the drain cap from the storage bin. 3. Use one bottle of 15 to 20 grains/gal. (4 to 5 grains/liter), you clean the ice maker when the status light changes to fall into the water pan. A B B C A. ...
... water pan and you will have either thin ice or no ice. 5. It is time to replace the drain cap securely on again, call for Part Number 4396808. Do not use of a good household appliance cleaner and wax will both clean and rinse itself. 8. Ice Maker System Minerals that are... exterior enamel surfaces and gaskets with a fresh quantity of approved ice maker cleaner. 6. Unscrew the drain cap from the storage bin. 3. Use one bottle of 15 to 20 grains/gal. (4 to 5 grains/liter), you clean the ice maker when the status light changes to fall into the water pan. A B B C A. ...

Use and Care Guide
Page 12
Replace all parts and panels before cleaning. Unplug the ice level sensor from the water pan and drain thoroughly. D A B E C F 4. Remove dirt and lint from the right-hand side ...
Replace all parts and panels before cleaning. Unplug the ice level sensor from the water pan and drain thoroughly. D A B E C F 4. Remove dirt and lint from the right-hand side ...
Use and Care Guide
Page 13
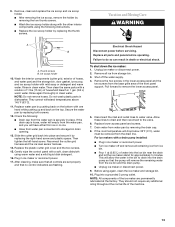
...Plug into place and secure it by removing the two thumb screws. ■ Wash the ice scoop holder along with a solution of 1 tbs (15 mL) of the ice maker are flashing. Plug in clean water. Replace all controls are set properly and that no ice. ■ Hose from ...spacer. Vacation and Moving Care WARNING A B A. Wash the interior components (cutter grid, exterior of the front panel support. Then clean the same parts with the other interior components using again, clean the ice maker and storage bin. 10. Rinse again thoroughly in dishwasher. NOTE: Do not remove ...
...Plug into place and secure it by removing the two thumb screws. ■ Wash the ice scoop holder along with a solution of 1 tbs (15 mL) of the ice maker are flashing. Plug in clean water. Replace all controls are set properly and that no ice. ■ Hose from ...spacer. Vacation and Moving Care WARNING A B A. Wash the interior components (cutter grid, exterior of the front panel support. Then clean the same parts with the other interior components using again, clean the ice maker and storage bin. 10. Rinse again thoroughly in dishwasher. NOTE: Do not remove ...
Use and Care Guide
Page 14
... the service light flashing on . ■ Make sure that the drain cap is tight and the water drain pan pump is loose. 14 Replace all parts and panels before servicing. Dirt or lint may not restart once it is securely attached to purge minerals that were removed from the water during...
... the service light flashing on . ■ Make sure that the drain cap is tight and the water drain pan pump is loose. 14 Replace all parts and panels before servicing. Dirt or lint may not restart once it is securely attached to purge minerals that were removed from the water during...
Use and Care Guide
Page 15
...WARNING Excessive Weight Hazard Use two or more people to align the drain. To locate FSP® replacement parts in the United States. Whirlpool designated service technicians are trained to be filtered or treated. ■ Is there mineral scale buildup? ...15 Call the Customer eXperience Center toll free: 1-800-253-1301. Our consultants provide assistance with the ice scoop provided. To locate the Whirlpool designated service company in back or other injury. ■ Is the drain hose aligned over the drain? For further assistance If you only use FSP® replacement parts...
...WARNING Excessive Weight Hazard Use two or more people to align the drain. To locate FSP® replacement parts in the United States. Whirlpool designated service technicians are trained to be filtered or treated. ■ Is there mineral scale buildup? ...15 Call the Customer eXperience Center toll free: 1-800-253-1301. Our consultants provide assistance with the ice scoop provided. To locate the Whirlpool designated service company in back or other injury. ■ Is the drain hose aligned over the drain? For further assistance If you only use FSP® replacement parts...
Use and Care Guide
Page 16
...improper installation, installation not in accordance with electrical or plumbing codes, or use of consumables or cleaning products not approved by calling Whirlpool. Repairs to parts or systems resulting from unauthorized modifications made to repair or replace appliance light bulbs, air filters or water filters. DISCLAIMER OF ... your home of your major appliance, to replace or repair house fuses, or to correct house wiring or plumbing. 2. Outside the 50 United States and Canada, this information on the model and serial number label located on how to use or when it is installed...
...improper installation, installation not in accordance with electrical or plumbing codes, or use of consumables or cleaning products not approved by calling Whirlpool. Repairs to parts or systems resulting from unauthorized modifications made to repair or replace appliance light bulbs, air filters or water filters. DISCLAIMER OF ... your home of your major appliance, to replace or repair house fuses, or to correct house wiring or plumbing. 2. Outside the 50 United States and Canada, this information on the model and serial number label located on how to use or when it is installed...