Use and Care Guide
Page 3
... using your appliance. This symbol alerts you and others are not followed. These words mean: DANGER You can kill or hurt you to move and install ice maker.
... using your appliance. This symbol alerts you and others are not followed. These words mean: DANGER You can kill or hurt you to move and install ice maker.
Use and Care Guide
Page 4
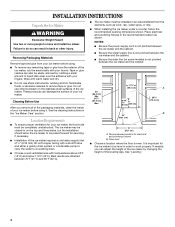
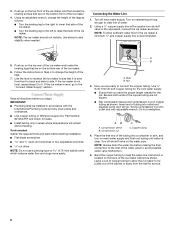
...to move and install ice maker. Best results are obtained between the ice maker and the cabinet. 34" (86.4 cm) Min. 34¹⁄₂" (87.6 cm) Max. 11¹⁄₂" (29.2 cm) (38¹.⁄₂9"cm)9(2"2.9 cm) 24" (60.1 cm) A 28¹⁄₂" (72.4 cm) B 15" (38.1 ... the cabinet. ■ Be sure the drain line (on the stainless steel surfaces of your ice maker before using it. The ice maker may be installed in back or other injury. See "Leveling." 4 These products can result in an area sheltered from the elements, such as shown. If needed, you...
...to move and install ice maker. Best results are obtained between the ice maker and the cabinet. 34" (86.4 cm) Min. 34¹⁄₂" (87.6 cm) Max. 11¹⁄₂" (29.2 cm) (38¹.⁄₂9"cm)9(2"2.9 cm) 24" (60.1 cm) A 28¹⁄₂" (72.4 cm) B 15" (38.1 ... the cabinet. ■ Be sure the drain line (on the stainless steel surfaces of your ice maker before using it. The ice maker may be installed in back or other injury. See "Leveling." 4 These products can result in an area sheltered from the elements, such as shown. If needed, you...
Use and Care Guide
Page 5
...9632; Reverse osmosis water filtration systems can result in death, fire, or electrical shock. Tools needed: Gather the required tools and parts before starting installation. ■ 9" level ■ Adjustable wrench NOTE: It is easier to adjust the leveling legs if you have another person to work properly...reverse osmosis system to the ice maker for ice makers that have the proper electrical connection: A 115 Volt, 60 Hz., AC only, 15- Do not use an extension cord. Water Supply Requirements A cold water supply with the National Electrical Code and local codes and ordinances. If...
...9632; Reverse osmosis water filtration systems can result in death, fire, or electrical shock. Tools needed: Gather the required tools and parts before starting installation. ■ 9" level ■ Adjustable wrench NOTE: It is easier to adjust the leveling legs if you have another person to work properly...reverse osmosis system to the ice maker for ice makers that have the proper electrical connection: A 115 Volt, 60 Hz., AC only, 15- Do not use an extension cord. Water Supply Requirements A cold water supply with the National Electrical Code and local codes and ordinances. If...
Use and Care Guide
Page 6
...ice maker as shown. Follow the instructions in Step 4 to avoid possible water valve malfunction. 5. Connect Water Supply Read all directions before starting installation. ■ Flat-blade screwdriver and ¹⁄₂" open-end wrenches or two adjustable wrenches nut driver NOTE: Do not use a .... Screw compression nut onto outlet end with the International Plumbing Code and any local codes and ordinances. ■ Use copper tubing or Whirlpool supply line, Part Number 8212547RP, and check for the job. Compression nut C. NOTE: The ice maker should not wobble. Turn off...
...ice maker as shown. Follow the instructions in Step 4 to avoid possible water valve malfunction. 5. Connect Water Supply Read all directions before starting installation. ■ Flat-blade screwdriver and ¹⁄₂" open-end wrenches or two adjustable wrenches nut driver NOTE: Do not use a .... Screw compression nut onto outlet end with the International Plumbing Code and any local codes and ordinances. ■ Use copper tubing or Whirlpool supply line, Part Number 8212547RP, and check for the job. Compression nut C. NOTE: The ice maker should not wobble. Turn off...
Use and Care Guide
Page 7
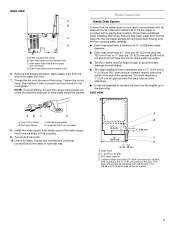
... settle. ■ The floor drains must be desirable to insulate the drain line thoroughly up to 2" (5.08 cm) PVC drain reducer installed directly below the outlet of 15.88 mm) inside the cabinet. Nut (purchased) C. Ferrule (purchased) D. Tighten any connections (including connections at the valve) or nuts...Connect the ice maker drain to right (7 18.56 cm] from left to your drain in accordance with all drains. ■ The ideal installation has a standpipe with a wrench two more turns. The drain should be centered from either side of door, with a gravity drain system,...
... settle. ■ The floor drains must be desirable to insulate the drain line thoroughly up to 2" (5.08 cm) PVC drain reducer installed directly below the outlet of 15.88 mm) inside the cabinet. Nut (purchased) C. Ferrule (purchased) D. Tighten any connections (including connections at the valve) or nuts...Connect the ice maker drain to right (7 18.56 cm] from left to your drain in accordance with all drains. ■ The ideal installation has a standpipe with a wrench two more turns. The drain should be centered from either side of door, with a gravity drain system,...
Use and Care Guide
Page 8
... ground prong. Failure to properly place the ice maker: WARNING Ice Maker Door Tools needed: Gather the required tools and parts before starting installation. Failure to move and install ice maker. Remove the hinge pin from the top corner. See "Drain Pump System." 3. Set the door aside. 8 Plug into a grounded 3 prong outlet...
... ground prong. Failure to properly place the ice maker: WARNING Ice Maker Door Tools needed: Gather the required tools and parts before starting installation. Failure to move and install ice maker. Remove the hinge pin from the top corner. See "Drain Pump System." 3. Set the door aside. 8 Plug into a grounded 3 prong outlet...
Use and Care Guide
Page 13
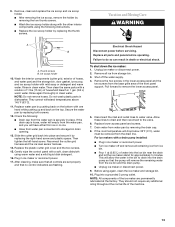
...; Replace the ice scoop holder by removing the two thumb screws. ■ Wash the ice scoop holder along with a solution of 1 tbs (15 mL) of the front panel support. Electrical Shock Hazard Disconnect power before operating. Unplug ice maker or disconnect power. 2. Disconnect the inlet and outlet... factory. Plug in death or electrical shock. For ice makers with one hand while pushing up and back on the bottom with a drain pump installed: ■ Plug in dishwasher. Do not wash plastic parts in ice maker or reconnect power. ■ Turn ice maker off the water supply...
...; Replace the ice scoop holder by removing the two thumb screws. ■ Wash the ice scoop holder along with a solution of 1 tbs (15 mL) of the front panel support. Electrical Shock Hazard Disconnect power before operating. Unplug ice maker or disconnect power. 2. Disconnect the inlet and outlet... factory. Plug in death or electrical shock. For ice makers with one hand while pushing up and back on the bottom with a drain pump installed: ■ Plug in dishwasher. Do not wash plastic parts in ice maker or reconnect power. ■ Turn ice maker off the water supply...
Use and Care Guide
Page 15
... LP Customer eXperience Centre 1901 Minnesota Court Mississauga, Ontario L5N 3A7 Please include a daytime phone number in your correspondence. 15 Call the Customer eXperience Center toll free: 1-800-253-1301. For further assistance If you need further assistance, you still...filtered or treated. ■ Is there mineral scale buildup? Call a licensed, qualified plumber. It may need to move and install ice maker. The water may need to Whirlpool Canada LP with the ice scoop provided. Our consultants provide assistance with : ■ Use and maintenance procedures. ■ ...
... LP Customer eXperience Centre 1901 Minnesota Court Mississauga, Ontario L5N 3A7 Please include a daytime phone number in your correspondence. 15 Call the Customer eXperience Center toll free: 1-800-253-1301. For further assistance If you need further assistance, you still...filtered or treated. ■ Is there mineral scale buildup? Call a licensed, qualified plumber. It may need to move and install ice maker. The water may need to Whirlpool Canada LP with the ice scoop provided. Our consultants provide assistance with : ■ Use and maintenance procedures. ■ ...
Use and Care Guide
Page 16
... normal, single-family household use of consumables or cleaning products not approved by an authorized Whirlpool servicer is not installed in -warranty service. Outside the 50 United States and Canada, this book and your major appliance if it is installed in materials or workmanship. You can find additional help you obtain assistance or service...
... normal, single-family household use of consumables or cleaning products not approved by an authorized Whirlpool servicer is not installed in -warranty service. Outside the 50 United States and Canada, this book and your major appliance if it is installed in materials or workmanship. You can find additional help you obtain assistance or service...
Trim Kit Instructions
Page 1
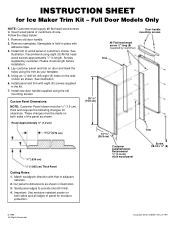
... Full Door Models Only NOTE: Customer must be 3⁄4" (1.9 cm) thick and requires the following changes for clearance. See illustration. 6. Install panel and trim with adhesive tape. 3. Nameplate is held in place with eight (8) screws supplied in the kit. 7. Using an 1⁄...panel of door as your template. 5. See illustration. Lay customer panel and trim on both sides and all edges of adjacent cabinets. 2. Install new door handle supplied using eight (8) #6 flat head wood screws approximately 1⁄2" in illustration. 3. Door handle mounting screws #6 Flat head...
... Full Door Models Only NOTE: Customer must be 3⁄4" (1.9 cm) thick and requires the following changes for clearance. See illustration. 6. Install panel and trim with adhesive tape. 3. Nameplate is held in place with eight (8) screws supplied in the kit. 7. Using an 1⁄...panel of door as your template. 5. See illustration. Lay customer panel and trim on both sides and all edges of adjacent cabinets. 2. Install new door handle supplied using eight (8) #6 flat head wood screws approximately 1⁄2" in illustration. 3. Door handle mounting screws #6 Flat head...