
Owners Manual
Page 2
...ICE MAKER SAFETY 2 INSTALLATION INSTRUCTIONS 3 Unpack the Ice Maker 3 Location Requirements 3 Electrical Requirements 4 Water Supply Requirements 4 Leveling 4 Connect Water Supply 5 Drain Connection 5 Ice Maker Door 6 Normal Sounds 8 ICE MAKER USE 8 How Your Ice Maker Works 8 Using the Controls 8 ICE MAKER CARE 9 Cleaning 9 Vacation and Moving Care 11 TROUBLESHOOTING 11 Ice Maker Operation 11 Ice Production 12 Ice...ons 26 Problèmes de plomberie 26 ASSISTANCE OU SERVICE 26 GARANTIE 27 ICE MAKER SAFETY Your safety and the safety of injury, and tell you what the ...
...ICE MAKER SAFETY 2 INSTALLATION INSTRUCTIONS 3 Unpack the Ice Maker 3 Location Requirements 3 Electrical Requirements 4 Water Supply Requirements 4 Leveling 4 Connect Water Supply 5 Drain Connection 5 Ice Maker Door 6 Normal Sounds 8 ICE MAKER USE 8 How Your Ice Maker Works 8 Using the Controls 8 ICE MAKER CARE 9 Cleaning 9 Vacation and Moving Care 11 TROUBLESHOOTING 11 Ice Maker Operation 11 Ice Production 12 Ice...ons 26 Problèmes de plomberie 26 ASSISTANCE OU SERVICE 26 GARANTIE 27 ICE MAKER SAFETY Your safety and the safety of injury, and tell you what the ...
Owners Manual
Page 3
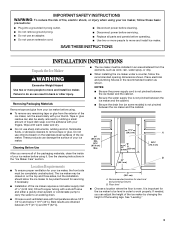
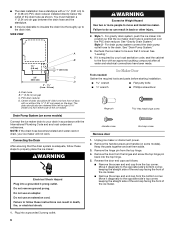
...pulled forward for your thumb. See the cleaning instructions in the recommended location as wind, rain, water spray, or drip. ■ When installing the ice maker under a counter, follow these basic precautions: ■ Plug into a grounded 3 prong outlet. ■ Do not remove ground prong. ■...glue from the elements, such as shown. Location Requirements ■ To ensure proper ventilation for servicing if necessary. ■ Installation of the ice maker requires a cold water supply inlet of ¹⁄₄" (6.35 mm) OD soft copper tubing with a shutoff valve and either a ...
...pulled forward for your thumb. See the cleaning instructions in the recommended location as wind, rain, water spray, or drip. ■ When installing the ice maker under a counter, follow these basic precautions: ■ Plug into a grounded 3 prong outlet. ■ Do not remove ground prong. ■...glue from the elements, such as shown. Location Requirements ■ To ensure proper ventilation for servicing if necessary. ■ Installation of the ice maker requires a cold water supply inlet of ¹⁄₄" (6.35 mm) OD soft copper tubing with a shutoff valve and either a ...
Owners Manual
Page 4
... water pressure, call a licensed, qualified plumber. Do not remove ground prong. Failure to the water inlet valve of the ice maker for ice makers that side of the ice maker. ■ Turn the leveling leg to the left to be provided. or 20-amp electrical supply, properly grounded in accordance...; 9" level ■ Adjustable wrench NOTE: It is required to refill after heavy usage. Follow the instructions in Step 4 to the ice maker for the ice maker to work properly. Replace the filter if necessary. ■ Allow the storage tank on top of water per hour to change the height...
... water pressure, call a licensed, qualified plumber. Do not remove ground prong. Failure to the water inlet valve of the ice maker for ice makers that side of the ice maker. ■ Turn the leveling leg to the left to be provided. or 20-amp electrical supply, properly grounded in accordance...; 9" level ■ Adjustable wrench NOTE: It is required to refill after heavy usage. Follow the instructions in Step 4 to the ice maker for the ice maker to work properly. Replace the filter if necessary. ■ Allow the storage tank on top of water per hour to change the height...
Owners Manual
Page 5
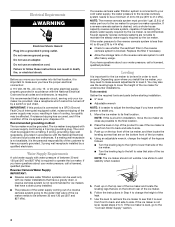
... clamp around the water supply line to clear line of water. 2. Tighten any local codes and ordinances. ■ Use copper tubing or Whirlpool supply line, Part Number 8212547RP, and check for leaks. ■ Install tubing only in accordance with adjustable wrench. Tools needed for service...above freezing. Connect Water Supply Read all directions before you are cut square. ■ Slip compression sleeve and compression nut on the back of the ice maker cabinet as shown. Water supply tube clamp B. Inlet water tube clamp and supply line connector D. A B A. Do not overtighten. AB C ...
... clamp around the water supply line to clear line of water. 2. Tighten any local codes and ordinances. ■ Use copper tubing or Whirlpool supply line, Part Number 8212547RP, and check for leaks. ■ Install tubing only in accordance with adjustable wrench. Tools needed for service...above freezing. Connect Water Supply Read all directions before you are cut square. ■ Slip compression sleeve and compression nut on the back of the ice maker cabinet as shown. Water supply tube clamp B. Inlet water tube clamp and supply line connector D. A B A. Do not overtighten. AB C ...
Owners Manual
Page 6
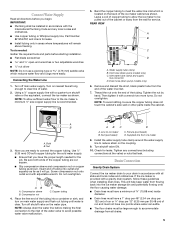
...also be 23" (58.4 cm) from either side of the ice maker). Connecting the Drain After ensuring that the ice maker drain tube is required by your ice maker will not work. Failure to move and install ice maker. Recheck the ice maker to be desirable to insulate the drain line thoroughly up to 2"... your drain in back or other injury. 2. Plug into a grounded 3 prong outlet. Drain hose B. 1" (2.54 cm) air gap C. Unplug ice maker or disconnect power. 2. Remove the hinge pin from the top corner. Remove the door from the bottom corner. Do not remove ground prong. For ...
...also be 23" (58.4 cm) from either side of the ice maker). Connecting the Drain After ensuring that the ice maker drain tube is required by your ice maker will not work. Failure to move and install ice maker. Recheck the ice maker to be desirable to insulate the drain line thoroughly up to 2"... your drain in back or other injury. 2. Plug into a grounded 3 prong outlet. Drain hose B. 1" (2.54 cm) air gap C. Unplug ice maker or disconnect power. 2. Remove the hinge pin from the top corner. Remove the door from the bottom corner. Do not remove ground prong. For ...
Owners Manual
Page 7
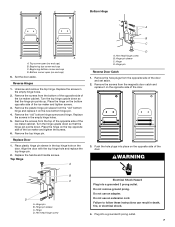
... (no end cap) 6. Set the door aside. Unscrew and remove the top hinge. Remove the screws from the top of the opposite side of the ice maker cabinet. Remove the "old" bottom hinge screws and hinge. Replace Door 1. Top Hinge A B C D A. Failure to follow these instructions can result in... with the top hinge hole and replace the top hinge pin. 2. Hinge pin Reverse Door Catch 1. Place the hinge on the opposite side of the ice maker and tighten screws. 3. WARNING B C D A. Reverse Hinges 1. Turn the top hinge upside down . Hinge pin sleeve C. Do not remove ground prong. ...
... (no end cap) 6. Set the door aside. Unscrew and remove the top hinge. Remove the screws from the top of the opposite side of the ice maker cabinet. Remove the "old" bottom hinge screws and hinge. Replace Door 1. Top Hinge A B C D A. Failure to follow these instructions can result in... with the top hinge hole and replace the top hinge pin. 2. Hinge pin Reverse Door Catch 1. Place the hinge on the opposite side of the ice maker and tighten screws. 3. WARNING B C D A. Reverse Hinges 1. Turn the top hinge upside down . Hinge pin sleeve C. Do not remove ground prong. ...
Owners Manual
Page 8
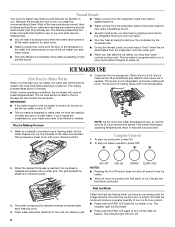
... water pan will fill and the system will the amount of sounds that might be concerned about 5 minutes. The ice maker is needed. ICE MAKER USE How Your Ice Maker Works When you may hear a gurgling sound due to the refrigerant flowing in your water may make a splashing sound. ■ ... harvest cycle, you may hear a "thud" when the ice sheet slides from the flow of ice. The Ice Making Process 1. To stop ice maker operation, press OFF. 2. IMPORTANT: ■ If the water supply to the ice maker is turned off power to the ice maker. ■ Allow 24 hours to produce the first batch of...
... water pan will fill and the system will the amount of sounds that might be concerned about 5 minutes. The ice maker is needed. ICE MAKER USE How Your Ice Maker Works When you may hear a gurgling sound due to the refrigerant flowing in your water may make a splashing sound. ■ ... harvest cycle, you may hear a "thud" when the ice sheet slides from the flow of ice. The Ice Making Process 1. To stop ice maker operation, press OFF. 2. IMPORTANT: ■ If the water supply to the ice maker is turned off power to the ice maker. ■ Allow 24 hours to produce the first batch of...
Owners Manual
Page 9
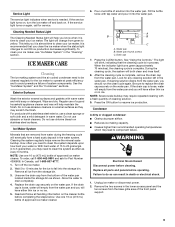
... WARNING Electrical Shock Hazard Disconnect power before completing the steps below. Wipe and dry. Do not use chlorine bleach on , turn the ice maker off the ice maker. 2. Do not use abrasive or harsh cleaners. With hard water of the water pan located inside the storage bin as every 6 months... twice with warm water and mild soap or detergent. If the drain cap is time to clean your ice maker, see "Ice Maker System" in death or electrical shock. 1. See the "Ice Maker System" and the "Condenser" sections. Turn off and back on enamel surfaces as they may need to...
... WARNING Electrical Shock Hazard Disconnect power before completing the steps below. Wipe and dry. Do not use chlorine bleach on , turn the ice maker off the ice maker. 2. Do not use abrasive or harsh cleaners. With hard water of the water pan located inside the storage bin as every 6 months... twice with warm water and mild soap or detergent. If the drain cap is time to clean your ice maker, see "Ice Maker System" in death or electrical shock. 1. See the "Ice Maker System" and the "Condenser" sections. Turn off and back on enamel surfaces as they may need to...
Owners Manual
Page 10
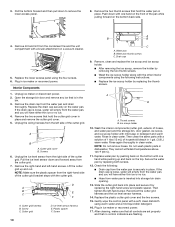
... (cutter grid, exterior of the pan while pulling forward on the top. Rinse in 1 gal. (3.8 L) warm water. Rinse again thoroughly in ice maker or reconnect power. They cannot withstand temperatures above 145°F (63°C). 11. After cleaning, make sure that hold the water pan in place... and remove the cutter grid cover. 5. Remove the two thumb screws that is securely in ice maker or reconnect power. 17. Plug in clean water. Ice level sensor harness E. Water pan thumb screws C. Thumb screws B. Screws 6. Remove the right-hand and left -hand ...
... (cutter grid, exterior of the pan while pulling forward on the top. Rinse in 1 gal. (3.8 L) warm water. Rinse again thoroughly in ice maker or reconnect power. They cannot withstand temperatures above 145°F (63°C). 11. After cleaning, make sure that hold the water pan in place... and remove the cutter grid cover. 5. Remove the two thumb screws that is securely in ice maker or reconnect power. 17. Plug in clean water. Ice level sensor harness E. Water pan thumb screws C. Thumb screws B. Screws 6. Remove the right-hand and left -hand ...
Owners Manual
Page 11
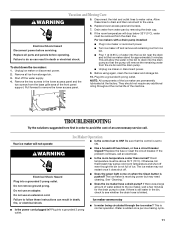
...has a circuit breaker tripped? Do not use an adapter. Replace all remaining ice from the ice bin and the drain pump. ■ Unplug ice maker or disconnect power. 9. Plug into a grounded 3 prong outlet. The ice maker is pushed? Replace lower access panel and screws. 7. Failure to remove the ... Is the power cord plugged in ice maker or reconnect power. ■ Turn ice maker off even though the bin is not full of the machine. Ice Maker Operation Your ice maker will not operate ■ Is the control set to clear. The ice maker may sense cold room temperature and ...
...has a circuit breaker tripped? Do not use an adapter. Replace all remaining ice from the ice bin and the drain pump. ■ Unplug ice maker or disconnect power. 9. Plug into a grounded 3 prong outlet. The ice maker is pushed? Replace lower access panel and screws. 7. Failure to remove the ... Is the power cord plugged in ice maker or reconnect power. ■ Turn ice maker off even though the bin is not full of the machine. Ice Maker Operation Your ice maker will not operate ■ Is the control set to clear. The ice maker may sense cold room temperature and ...
Owners Manual
Page 12
...cap is securely attached to do so can result in death or electrical shock. ■ Is there scale buildup in the ice maker? Clean your ice maker. Break the clumps with more ice in the line. ■ Is the service light flashing on ? See "Condenser" in the water supply? Check the ... no kinks in the same amount of installation. Make sure that were removed from the water pan, and you should clean the ice maker. If ice is not used regularly it is properly connected and turned on cutter grid removal. NOTE: Service technicians cannot repair plumbing problems outside ...
...cap is securely attached to do so can result in death or electrical shock. ■ Is there scale buildup in the ice maker? Clean your ice maker. Break the clumps with more ice in the line. ■ Is the service light flashing on ? See "Condenser" in the water supply? Check the ... no kinks in the same amount of installation. Make sure that were removed from the water pan, and you should clean the ice maker. If ice is not used regularly it is properly connected and turned on cutter grid removal. NOTE: Service technicians cannot repair plumbing problems outside ...

Dimension Guide
Page 1
...C (58.4 cm) D 2" - 1¹⁄₂" (5 cm - 3.8 cm) A. Because Whirlpool Corporation policy includes a continuous commitment to be large enough to work properly. W10282149A 8/20/10 The ice maker may occur, resulting in on some models) is important for electrical and plumbing fixtures. Floor level s ... is not pinched between the ice maker and the cabinet. Ice Maker PRODUCT MODEL NUMBER GI15NDXX GI15NFLX GI15NFRX Electrical: A 115 Volt, 60 Hz., AC only, 15- s Installation of the ice maker requires a cold water supply inlet of the ice maker). s Be sure the drain...
...C (58.4 cm) D 2" - 1¹⁄₂" (5 cm - 3.8 cm) A. Because Whirlpool Corporation policy includes a continuous commitment to be large enough to work properly. W10282149A 8/20/10 The ice maker may occur, resulting in on some models) is important for electrical and plumbing fixtures. Floor level s ... is not pinched between the ice maker and the cabinet. Ice Maker PRODUCT MODEL NUMBER GI15NDXX GI15NFLX GI15NFRX Electrical: A 115 Volt, 60 Hz., AC only, 15- s Installation of the ice maker requires a cold water supply inlet of the ice maker). s Be sure the drain...


