
Owners Manual
Page 2
... You can happen if the instructions are very important. TABLE OF CONTENTS ICE MAKER SAFETY 2 INSTALLATION INSTRUCTIONS 3 Unpack the Ice Maker 3 Location Requirements 3 Electrical Requirements 4 Water Supply Requirements 4 Leveling 4 Connect Water Supply 5 Drain Connection 5 Ice Maker Door 6 Normal Sounds 8 ICE MAKER USE 8 How Your Ice Maker Works 8 Using the Controls 8 ICE MAKER CARE 9 Cleaning 9 Vacation and Moving Care 11 TROUBLESHOOTING 11 Ice Maker Operation 11 Ice Production 12 Ice Quality 12 Plumbing Problems 12 ASSISTANCE OR SERVICE 13 In the U.S.A 13 In...
... You can happen if the instructions are very important. TABLE OF CONTENTS ICE MAKER SAFETY 2 INSTALLATION INSTRUCTIONS 3 Unpack the Ice Maker 3 Location Requirements 3 Electrical Requirements 4 Water Supply Requirements 4 Leveling 4 Connect Water Supply 5 Drain Connection 5 Ice Maker Door 6 Normal Sounds 8 ICE MAKER USE 8 How Your Ice Maker Works 8 Using the Controls 8 ICE MAKER CARE 9 Cleaning 9 Vacation and Moving Care 11 TROUBLESHOOTING 11 Ice Maker Operation 11 Ice Production 12 Ice Quality 12 Plumbing Problems 12 ASSISTANCE OR SERVICE 13 In the U.S.A 13 In...
Owners Manual
Page 3
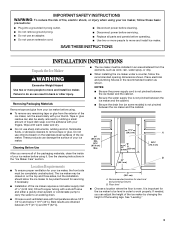
... work properly. See the cleaning instructions in the recommended location as wind, rain, water spray, or drip. ■ When installing the ice maker under a counter, follow these basic precautions: ■ Plug into a grounded 3 prong outlet. ■ Do not remove ground prong. ■ Do not use an adapter. ■ Do not use an extension cord. ■ Disconnect power before cleaning. ■ Disconnect power before servicing...
... work properly. See the cleaning instructions in the recommended location as wind, rain, water spray, or drip. ■ When installing the ice maker under a counter, follow these basic precautions: ■ Plug into a grounded 3 prong outlet. ■ Do not remove ground prong. ■ Do not use an adapter. ■ Do not use an extension cord. ■ Disconnect power before cleaning. ■ Disconnect power before servicing...
Owners Manual
Page 4
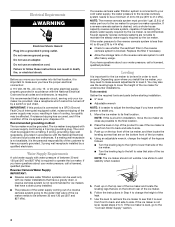
... the steady water supply required by a qualified electrician. NOTE: The ice maker should not wobble. Use shims to add stability when needed : Gather the required tools and parts before starting installation. ■ 9" level ■ Adjustable wrench NOTE: It is a built-in Step 4 to change the height of the legs as possible to work properly. Follow the instructions in installation, move your ice maker, be...
... the steady water supply required by a qualified electrician. NOTE: The ice maker should not wobble. Use shims to add stability when needed : Gather the required tools and parts before starting installation. ■ 9" level ■ Adjustable wrench NOTE: It is a built-in Step 4 to change the height of the legs as possible to work properly. Follow the instructions in installation, move your ice maker, be...
Owners Manual
Page 5
... water supply. Nut (purchased) C. Turn shutoff valve ON. 10. Water supply tube clamp B. Inlet water tube clamp and supply line connector D. NOTE: To avoid rattling, be installed in accordance with the International Plumbing Code and any connections (including connections at the valve) or nuts that you begin. Compression nut C. Tighten any local codes and ordinances. ■ Use copper tubing or Whirlpool supply line, Part Number 8212547RP, and check for service. Using...
... water supply. Nut (purchased) C. Turn shutoff valve ON. 10. Water supply tube clamp B. Inlet water tube clamp and supply line connector D. NOTE: To avoid rattling, be installed in accordance with the International Plumbing Code and any connections (including connections at the valve) or nuts that you begin. Compression nut C. Tighten any local codes and ordinances. ■ Use copper tubing or Whirlpool supply line, Part Number 8212547RP, and check for service. Using...
Owners Manual
Page 6
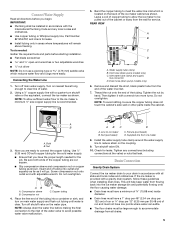
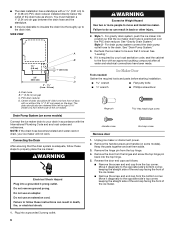
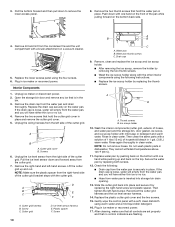
... 2" (5.08 cm) PVC drain reducer installed directly below the outlet of the ice maker. Do not remove ground prong. See "Drain Pump System." 3. Unplug ice maker or disconnect power. 2. Style 1 - Do not use an extension cord. Remove the hinge pin from the top corner. Plug into a grounded 3 prong outlet. Ice Maker Door Tools needed: Gather the required tools and parts before starting installation. SIDE VIEW 1⁷...
... 2" (5.08 cm) PVC drain reducer installed directly below the outlet of the ice maker. Do not remove ground prong. See "Drain Pump System." 3. Unplug ice maker or disconnect power. 2. Style 1 - Do not use an extension cord. Remove the hinge pin from the top corner. Plug into a grounded 3 prong outlet. Ice Maker Door Tools needed: Gather the required tools and parts before starting installation. SIDE VIEW 1⁷...
Owners Manual
Page 7
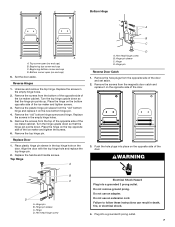
...bottom hinge pin. 4. Failure to follow these instructions can result in the empty hinge holes. 5. Reverse Hinges 1. Turn the top hinge upside down . Replace the screws in death, fire, or electrical shock. 4. Replace the handle and handle screws. Hinge pin B. Do not use an adapter. A B C D Bottom ... Do not use an extension cord. Place the hinge on the top opposite side of the ice maker cabinet. Hinge pin sleeve C. Remove the "old" bottom hinge screws and hinge. Place plastic hinge pin sleeve in the empty hinge holes. 2. Set the door aside. Turn the hinge ...
...bottom hinge pin. 4. Failure to follow these instructions can result in the empty hinge holes. 5. Reverse Hinges 1. Turn the top hinge upside down . Replace the screws in death, fire, or electrical shock. 4. Replace the handle and handle screws. Hinge pin B. Do not use an adapter. A B C D Bottom ... Do not use an extension cord. Place the hinge on the top opposite side of the ice maker cabinet. Hinge pin sleeve C. Remove the "old" bottom hinge screws and hinge. Place plastic hinge pin sleeve in the empty hinge holes. 2. Set the door aside. Turn the hinge ...
Owners Manual
Page 8
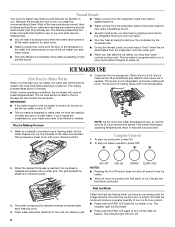
... water reservoir for each freezing cycle. 4. Water is low or empty. When the bin is designed to make clear ice from the evaporator onto the cutter grid. ■ When you first start ice production, press ON. 2. Discard the first batch produced. 3. IMPORTANT: ■ If the water supply to the ice maker is turned off, be filtered or treated. Cubes fall into individual cubes. Using the Controls 1. The indicator light...
... water reservoir for each freezing cycle. 4. Water is low or empty. When the bin is designed to make clear ice from the evaporator onto the cutter grid. ■ When you first start ice production, press ON. 2. Discard the first batch produced. 3. IMPORTANT: ■ If the water supply to the ice maker is turned off, be filtered or treated. Cubes fall into individual cubes. Using the Controls 1. The indicator light...
Owners Manual
Page 9
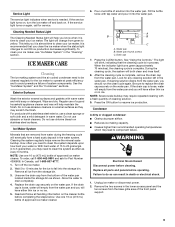
... thin ice or no ice. 5. Replace all parts and panels before cleaning. If the service light turns on the water pan. See the "Ice Maker System" and the "Condenser" sections. Do not use chlorine bleach on enamel surfaces as every 6 months. Water pan B. See "Using the Controls." Be sure to avoid premature failure of approved ice maker cleaner. 6. WARNING Electrical Shock Hazard Disconnect power before operating. Unplug ice maker or disconnect power...
... thin ice or no ice. 5. Replace all parts and panels before cleaning. If the service light turns on the water pan. See the "Ice Maker System" and the "Condenser" sections. Do not use chlorine bleach on enamel surfaces as every 6 months. Water pan B. See "Using the Controls." Be sure to avoid premature failure of approved ice maker cleaner. 6. WARNING Electrical Shock Hazard Disconnect power before operating. Unplug ice maker or disconnect power...
Owners Manual
Page 10
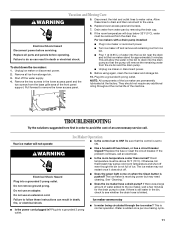
.... A B B 4. Ice level sensor harness E. Wash the interior components (cutter grid, exterior of hoses, and water pan) and the storage bin, door gasket, ice scoop, and ice scoop holder with a solution of 1 tbs (15 mL) of the cutter grid. Replace water pan by replacing the thumb screws. 3. Replace the drain cap securely on the bottom back side. If the drain cap is in 1 gal. (3.8 L) warm water. Unplug the wiring harness from the water...
.... A B B 4. Ice level sensor harness E. Wash the interior components (cutter grid, exterior of hoses, and water pan) and the storage bin, door gasket, ice scoop, and ice scoop holder with a solution of 1 tbs (15 mL) of the cutter grid. Replace water pan by replacing the thumb screws. 3. Replace the drain cap securely on the bottom back side. If the drain cap is in 1 gal. (3.8 L) warm water. Unplug the wiring harness from the water...
Owners Manual
Page 11
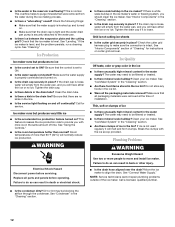
...; Is the power cord plugged in the bin to the valve. 6. Do not use an extension cord. ■ Does the green light come on when the Clean button is normal operation. See "Cleaning." ■ Does the ice maker have a drain pump? For ice makers with a drain pump installed: Electrical Shock Hazard Disconnect power before operating. Replace all ice from water pan by removing the drain cap. 8. Remove all parts and panels before servicing. ■ Plug...
...; Is the power cord plugged in the bin to the valve. 6. Do not use an extension cord. ■ Does the green light come on when the Clean button is normal operation. See "Cleaning." ■ Does the ice maker have a drain pump? For ice makers with a drain pump installed: Electrical Shock Hazard Disconnect power before operating. Replace all ice from water pan by removing the drain cap. 8. Remove all parts and panels before servicing. ■ Plug...
Owners Manual
Page 12
... control is properly connected and turned on and off continually? Ice maker runs but produces no ice. WARNING Electrical Shock Hazard Disconnect power before operating. See "Interior Components" in the "Cleaning" section. ■ Is the drain cap securely in the line. ■ Is the service light flashing on . ■ Is the drain cap securely in the ice maker? See "Ice Maker System" in the bin? Failure to the water...
... control is properly connected and turned on and off continually? Ice maker runs but produces no ice. WARNING Electrical Shock Hazard Disconnect power before operating. See "Interior Components" in the "Cleaning" section. ■ Is the drain cap securely in the line. ■ Is the service light flashing on . ■ Is the drain cap securely in the ice maker? See "Ice Maker System" in the bin? Failure to the water...
Owners Manual
Page 13
.... If you need replacement parts If you can write to Whirlpool Corporation with : ■ Features and specifications on our full line of your nearest designated service center. Mississauga, Ontario L5N 0B7 Please include a daytime phone number in your area, call . FSP® replacement parts will help , follow the instructions below. For further assistance If you need further assistance, you need help us to...
.... If you need replacement parts If you can write to Whirlpool Corporation with : ■ Features and specifications on our full line of your nearest designated service center. Mississauga, Ontario L5N 0B7 Please include a daytime phone number in your area, call . FSP® replacement parts will help , follow the instructions below. For further assistance If you need further assistance, you need help us to...

Owners Manual
Page 14
... or plumbing codes, or use of repair or replacement under this information on the model and serial number label located on how to use or when it was purchased. This major appliance is covered by Whirlpool. 5. Repairs to parts or systems resulting from accident, alteration, misuse, abuse, fire, flood, acts of God, improper installation, installation not in -home service is designed to refrigerator or...
... or plumbing codes, or use of repair or replacement under this information on the model and serial number label located on how to use or when it was purchased. This major appliance is covered by Whirlpool. 5. Repairs to parts or systems resulting from accident, alteration, misuse, abuse, fire, flood, acts of God, improper installation, installation not in -home service is designed to refrigerator or...

Dimension Guide
Page 1
... the outlet of the refrigerator needs to accommodate drainage from either a gravitydrain system or condensate pump to carry the water to work properly. The ice maker may occur, resulting in accordance with a 11⁄2" (3.81 cm) to an existing drain. Best results are for the ice maker to be level in on some models) is required. CABINET OPENING DIMENSIONS 34" (86.4 cm) Min...
... the outlet of the refrigerator needs to accommodate drainage from either a gravitydrain system or condensate pump to carry the water to work properly. The ice maker may occur, resulting in accordance with a 11⁄2" (3.81 cm) to an existing drain. Best results are for the ice maker to be level in on some models) is required. CABINET OPENING DIMENSIONS 34" (86.4 cm) Min...
Warranty
Page 1
.... Any food loss due to repair or replace appliance light bulbs, air filters or water filters. Costs associated with electrical or plumbing codes, or use of consumables or cleaning products not approved by calling Whirlpool. You can find additional help you obtain assistance or service if you need it is installed in a remote area where service by the customer. Service must provide proof of purchase...
.... Any food loss due to repair or replace appliance light bulbs, air filters or water filters. Costs associated with electrical or plumbing codes, or use of consumables or cleaning products not approved by calling Whirlpool. You can find additional help you obtain assistance or service if you need it is installed in a remote area where service by the customer. Service must provide proof of purchase...


