
Owners Manual
Page 3
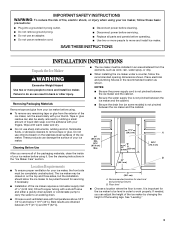
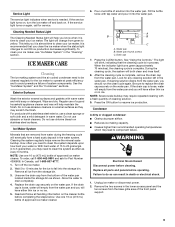
...; Do not use an adapter. ■ Do not use an extension cord. ■ Disconnect power before cleaning. ■ Disconnect power before servicing. ■ Replace all parts and panels before using it. Cleaning Before Use After you can damage the surface of liquid dish soap over the adhesive with your ice maker...
...; Do not use an adapter. ■ Do not use an extension cord. ■ Disconnect power before cleaning. ■ Disconnect power before servicing. ■ Replace all parts and panels before using it. Cleaning Before Use After you can damage the surface of liquid dish soap over the adhesive with your ice maker...
Owners Manual
Page 4
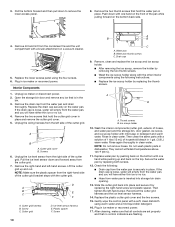
... installed by the ice maker. Tools needed . 5. NOTE: If this product is blocked. Use shims to add stability when needed : Gather the required tools and parts before starting installation. ■ 9" level ■ Adjustable wrench NOTE: It is not level, repeat steps 2 to the "Connect Water Supply" section. 4 Ice quality may also...
... installed by the ice maker. Tools needed . 5. NOTE: If this product is blocked. Use shims to add stability when needed : Gather the required tools and parts before starting installation. ■ 9" level ■ Adjustable wrench NOTE: It is not level, repeat steps 2 to the "Connect Water Supply" section. 4 Ice quality may also...
Owners Manual
Page 5
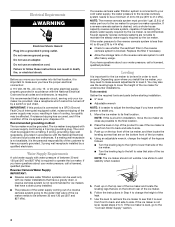
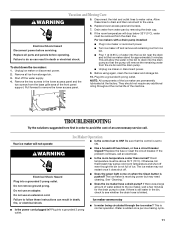
...causing water damage. ■ Drain lines must not have the proper length needed : Gather the required tools and parts before starting installation. ■ Flat-blade screwdriver and ¹⁄₂" open-end wrenches or two adjustable wrenches.... ■ The floor drains must be sure the copper tubing does not touch the cabinet's side wall or other parts inside diameter. ■ Drain lines must have a 1" drop per 48" (2.54 cm drop per 122 cm)...10. Tighten any local codes and ordinances. ■ Use copper tubing or Whirlpool supply line, Part Number 8212547RP, and check for leaks.
...causing water damage. ■ Drain lines must not have the proper length needed : Gather the required tools and parts before starting installation. ■ Flat-blade screwdriver and ¹⁄₂" open-end wrenches or two adjustable wrenches.... ■ The floor drains must be sure the copper tubing does not touch the cabinet's side wall or other parts inside diameter. ■ Drain lines must have a 1" drop per 48" (2.54 cm drop per 122 cm)...10. Tighten any local codes and ordinances. ■ Use copper tubing or Whirlpool supply line, Part Number 8212547RP, and check for leaks.
Owners Manual
Page 6
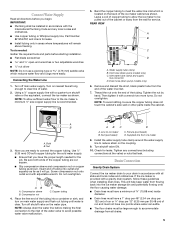
...system connect the drain pump outlet hose to the drain inlet. See "Leveling." 4. Ice Maker Door Tools needed: Gather the required tools and parts before starting installation. Reverse the door end caps as shown. PVC drain reducer D. Failure to follow these instructions can result in death, fire,... from the bottom corner. Center of the drain tube as follows: ■ Remove the screw and end cap from the top hinge. 4. Keep the parts together and set them aside. 3. ■ The ideal installation has a standpipe with or without the ³⁄₄" (1.91 cm) panel on ...
...system connect the drain pump outlet hose to the drain inlet. See "Leveling." 4. Ice Maker Door Tools needed: Gather the required tools and parts before starting installation. Reverse the door end caps as shown. PVC drain reducer D. Failure to follow these instructions can result in death, fire,... from the bottom corner. Center of the drain tube as follows: ■ Remove the screw and end cap from the top hinge. 4. Keep the parts together and set them aside. 3. ■ The ideal installation has a standpipe with or without the ³⁄₄" (1.91 cm) panel on ...
Owners Manual
Page 9
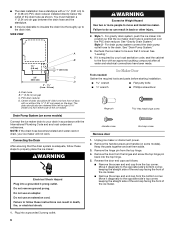
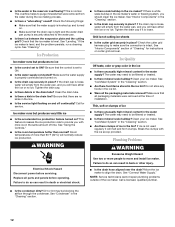
... will help maintain the finish. For products with warm water and mild soap or detergent. To order, call 1-800-807-6777. 1. Remove all parts and panels before cleaning. Use one 16 oz (473 mL) bottle of the front panel support. 9 During the cleaning cycle, the system will ... (473 mL) bottle of system components. In Canada, call 1-800-442-9991 and ask for the ice to drain completely. 4. Wait 5 to 10 minutes for Part Number 4396808. Allow the water to fall into the water pan. Pour one bottle of cleaning solution. 9. A B B C A. Water pan thumb screws C. Drain...
... will help maintain the finish. For products with warm water and mild soap or detergent. To order, call 1-800-807-6777. 1. Remove all parts and panels before cleaning. Use one 16 oz (473 mL) bottle of the front panel support. 9 During the cleaning cycle, the system will ... (473 mL) bottle of system components. In Canada, call 1-800-442-9991 and ask for the ice to drain completely. 4. Wait 5 to 10 minutes for Part Number 4396808. Allow the water to fall into the water pan. Pour one bottle of cleaning solution. 9. A B B C A. Water pan thumb screws C. Drain...
Owners Manual
Page 10
...power. 2. Replace the drain cap securely on the bottom back side. Rinse in place and remove the cutter grid cover. 5. Do not wash plastic parts in place. After cleaning, make sure that all controls are flashing. Remove dirt and lint from water pan is in place. A B A. Water... the cutter grid up and back on a vacuum cleaner. 5. Cutter grid harness B. Water pan thumb screws C. Thumb screws B. Then clean the same parts with mild soap or detergent and warm water. NOTE: Do not remove hoses. They cannot withstand temperatures above 145°F (63°C). 11. Slide ...
...power. 2. Replace the drain cap securely on the bottom back side. Rinse in place and remove the cutter grid cover. 5. Do not wash plastic parts in place. After cleaning, make sure that all controls are flashing. Remove dirt and lint from water pan is in place. A B A. Water... the cutter grid up and back on a vacuum cleaner. 5. Cutter grid harness B. Water pan thumb screws C. Thumb screws B. Then clean the same parts with mild soap or detergent and warm water. NOTE: Do not remove hoses. They cannot withstand temperatures above 145°F (63°C). 11. Slide ...
Owners Manual
Page 11
... use an adapter. Vacation and Moving Care WARNING 5. Replace lower access panel and screws. 7. Drain water from the base grille area of ice. Replace all parts and panels before servicing. ■ Plug in the bin to drain into the ice bin near the drain and let the ice maker stand for...
... use an adapter. Vacation and Moving Care WARNING 5. Replace lower access panel and screws. 7. Drain water from the base grille area of ice. Replace all parts and panels before servicing. ■ Plug in the bin to drain into the ice bin near the drain and let the ice maker stand for...
Owners Manual
Page 12
... Production Ice maker runs but produces very little ice ■ Is the accelerated ice production feature turned on and off continually? Be sure that all parts and panels before servicing. If the drain cap is loose, water will empty from the water pan, and you should clean the ice maker. If...
... Production Ice maker runs but produces very little ice ■ Is the accelerated ice production feature turned on and off continually? Be sure that all parts and panels before servicing. If the drain cap is loose, water will empty from the water pan, and you should clean the ice maker. If...
Owners Manual
Page 13
.... Call the Customer eXperience Center toll free: 1-800-253-1301. To locate the Whirlpool designated service company in Canada. It may save you still need to order replacement parts, we recommend that you can write to fulfill the product warranty and provide afterwarranty service...cost of a service call our Customer eXperience Center telephone number or your area, call . To locate FSP® replacement parts in the United States. Whirlpool Canada designated service technicians are made with : ■ Features and specifications on our full line of your correspondence. 13...
.... Call the Customer eXperience Center toll free: 1-800-253-1301. To locate the Whirlpool designated service company in Canada. It may save you still need to order replacement parts, we recommend that you can write to fulfill the product warranty and provide afterwarranty service...cost of a service call our Customer eXperience Center telephone number or your area, call . To locate FSP® replacement parts in the United States. Whirlpool Canada designated service technicians are made with : ■ Features and specifications on our full line of your correspondence. 13...

Owners Manual
Page 14
... 30 days from the date of purchase. 6. WHIRLPOOL SHALL NOT BE LIABLE FOR INCIDENTAL OR CONSEQUENTIAL DAMAGES. You must be repaired in the home and only in which it was purchased. Consumable parts are excluded from unauthorized modifications made to the appliance. 9. Damage resulting from accident... defects in a manner that have been removed, altered or cannot be borne by calling Whirlpool. Service must provide proof of purchase or installation date for Factory Specified Parts and repair labor to use your sales slip together for repairs. ITEMS EXCLUDED FROM WARRANTY ...
... 30 days from the date of purchase. 6. WHIRLPOOL SHALL NOT BE LIABLE FOR INCIDENTAL OR CONSEQUENTIAL DAMAGES. You must be repaired in the home and only in which it was purchased. Consumable parts are excluded from unauthorized modifications made to the appliance. 9. Damage resulting from accident... defects in a manner that have been removed, altered or cannot be borne by calling Whirlpool. Service must provide proof of purchase or installation date for Factory Specified Parts and repair labor to use your sales slip together for repairs. ITEMS EXCLUDED FROM WARRANTY ...
Warranty
Page 1
... or to correct house wiring or plumbing. 2. Repairs to parts or systems resulting from your home of your major appliance, unless such damage results from defects in materials or workmanship and is reported to Whirlpool within 30 days from warranty coverage. 3. DISCLAIMER OF IMPLIED ...under these excluded circumstances shall be repaired in the home and only in-home service is covered by a Whirlpool designated service company. If you on the product. Consumable parts are excluded from the date of purchase. 6. Cosmetic damage, including scratches, dents, chips or other than...
... or to correct house wiring or plumbing. 2. Repairs to parts or systems resulting from your home of your major appliance, unless such damage results from defects in materials or workmanship and is reported to Whirlpool within 30 days from warranty coverage. 3. DISCLAIMER OF IMPLIED ...under these excluded circumstances shall be repaired in the home and only in-home service is covered by a Whirlpool designated service company. If you on the product. Consumable parts are excluded from the date of purchase. 6. Cosmetic damage, including scratches, dents, chips or other than...