
Dimension Guide
Page 1
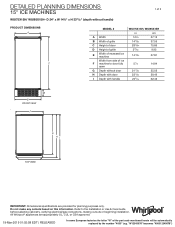
... DIMENSIONS A C MODEL # WUI75X15H, WUI95X15H in cm A Width 145/8 37.15 B Width of grille 1425/32 37.55 C Height of door 2955/64 75.85 D Height of grille 329/32 9.95 E Width of recessed ice machine 1429/32 37.81 Width from side of the part code mentioned herein will be automatically replaced by the number "4000" (e.g. DETAILED PLANNING DIMENSIONS 1 of 3 15" ICE MACHINES...
... DIMENSIONS A C MODEL # WUI75X15H, WUI95X15H in cm A Width 145/8 37.15 B Width of grille 1425/32 37.55 C Height of door 2955/64 75.85 D Height of grille 329/32 9.95 E Width of recessed ice machine 1429/32 37.81 Width from side of the part code mentioned herein will be automatically replaced by the number "4000" (e.g. DETAILED PLANNING DIMENSIONS 1 of 3 15" ICE MACHINES...
Dimension Guide
Page 2
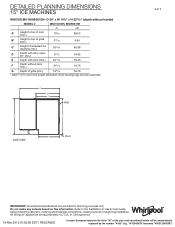
... 54.76 G Depth of grille (min.) 1963/64 50.76 * Add 1" (2.5 cm) to the Installation or Use & Care Guide before selecting cabinetry, verifying electrical/gas connections, making cutouts or beginning installation. DETAILED PLANNING DIMENSIONS 15" ICE MACHINES WUI75X15H/ WUI95X15H- All Whirlpool® appliances are fully extended. D E F Wall A* C* B* SIDE VIEW G Floor 2 of the part code mentioned herein will be automatically replaced by the number "4000" (e.g.
... 54.76 G Depth of grille (min.) 1963/64 50.76 * Add 1" (2.5 cm) to the Installation or Use & Care Guide before selecting cabinetry, verifying electrical/gas connections, making cutouts or beginning installation. DETAILED PLANNING DIMENSIONS 15" ICE MACHINES WUI75X15H/ WUI95X15H- All Whirlpool® appliances are fully extended. D E F Wall A* C* B* SIDE VIEW G Floor 2 of the part code mentioned herein will be automatically replaced by the number "4000" (e.g.
Dimension Guide
Page 3
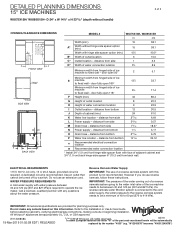
... Whirlpool. DETAILED PLANNING DIMENSIONS 3 of the ice machine needs to be between 30 and 120 psi (207 and 827 kPa) is required to operate the ice maker. door fully open 90° 2 5.1 Minimum width from bottom 12 30.5 J Depth of ice machine 67⁄8 17.4 to be turned off by the number "4000" (e.g. distance from hinged side of cabinet (min.) 24 61.0 K Water line...
... Whirlpool. DETAILED PLANNING DIMENSIONS 3 of the ice machine needs to be between 30 and 120 psi (207 and 827 kPa) is required to operate the ice maker. door fully open 90° 2 5.1 Minimum width from bottom 12 30.5 J Depth of ice machine 67⁄8 17.4 to be turned off by the number "4000" (e.g. distance from hinged side of cabinet (min.) 24 61.0 K Water line...
Owners Manual
Page 1
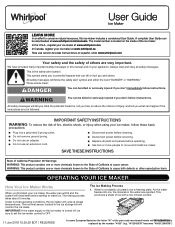
....whirlpool.com/manuals. Disconnect power before cleaning. Replace all safety messages. WARNING: This product contains one or more chemicals known to the State of the ice maker. User Guide Ice Maker LEARN MORE In an effort to conserve natural resources, this manual and on the inside of California to cause cancer. In Canada, register your ice maker, follow instructions. Always read and obey all parts and panels...
....whirlpool.com/manuals. Disconnect power before cleaning. Replace all safety messages. WARNING: This product contains one or more chemicals known to the State of the ice maker. User Guide Ice Maker LEARN MORE In an effort to conserve natural resources, this manual and on the inside of California to cause cancer. In Canada, register your ice maker, follow instructions. Always read and obey all parts and panels...
Owners Manual
Page 2
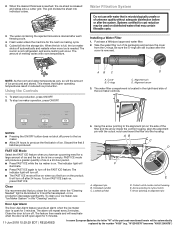
... FAST ICE feature. Close the door to cutout notch F. When the desired thickness is reached, the ice sheet is drained after the cover is microbiologically unsafe or of ice. Water Filtration System Do not use with room temperature. Cubes fall into individual cubes. Using the Controls 1. Alignment arrow 3. To clean your ice maker, see "Ice Maker System" in reduced ice production. The alarm will turn off power to the ice maker. ■...
... FAST ICE feature. Close the door to cutout notch F. When the desired thickness is reached, the ice sheet is drained after the cover is microbiologically unsafe or of ice. Water Filtration System Do not use with room temperature. Cubes fall into individual cubes. Using the Controls 1. Alignment arrow 3. To clean your ice maker, see "Ice Maker System" in reduced ice production. The alarm will turn off power to the ice maker. ■...
Owners Manual
Page 3
... compartment. Wait 5 to 10 minutes for the ice maker to replace the filter. ■■ Replacing the disposable water filter with locked symbol The Water Filter Status Light The water filter status lights will automatically reset the filter status tracking feature. Alignment arrow aligned with a new filter will help protect the finish. Locate the water filter compartment in the "Install Water Filter" section. 2. Turn the water filter counterclockwise (to the left), and pull it...
... compartment. Wait 5 to 10 minutes for the ice maker to replace the filter. ■■ Replacing the disposable water filter with locked symbol The Water Filter Status Light The water filter status lights will automatically reset the filter status tracking feature. Alignment arrow aligned with a new filter will help protect the finish. Locate the water filter compartment in the "Install Water Filter" section. 2. Turn the water filter counterclockwise (to the left), and pull it...
Owners Manual
Page 5
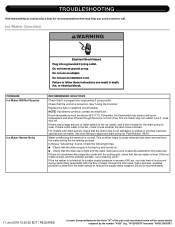
... . Water overflowing the reservoir is level, and the problem persists, run a cleaning cycle." If the ice maker is connected to purge minerals that the ice maker is not full of the part code mentioned herein will be above 45°F (7°C). TROUBLESHOOTING Visit www.whirlpool.com/product_help for the drain pump to follow these instructions can result in death, fire, or electrical shock. Do not use an...
... . Water overflowing the reservoir is level, and the problem persists, run a cleaning cycle." If the ice maker is connected to purge minerals that the ice maker is not full of the part code mentioned herein will be above 45°F (7°C). TROUBLESHOOTING Visit www.whirlpool.com/product_help for the drain pump to follow these instructions can result in death, fire, or electrical shock. Do not use an...
Owners Manual
Page 6
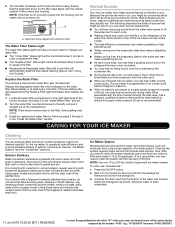
... panels before servicing. Room temperatures of time. If there is unusually high mineral content in the water supply, the water may need to do so can result in the water supply, the water may be treated. Ensure that the cutter grid is securely in the drain line. If there are no ice. Check that its harness plug is properly connected and turned on . Clean...
... panels before servicing. Room temperatures of time. If there is unusually high mineral content in the water supply, the water may need to do so can result in the water supply, the water may be treated. Ensure that the cutter grid is securely in the drain line. If there are no ice. Check that its harness plug is properly connected and turned on . Clean...
Owners Manual
Page 7
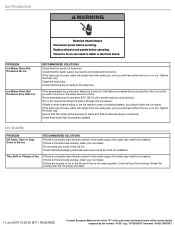
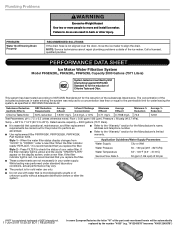
... or other injury. NOTE: Service technicians cannot repair plumbing problems outside of your water supply. PERFORMANCE DATA SHEET Ice Maker Water Filtration System Model P6GEG2KL, P6KG2KL, P6WG2KL Capacity 2000 Gallons (7571 Liters) System tested and certified by the number "4000" (e.g. Temp. = 68°F to 71.6°F (20°C to "ORDER," order a new filter. When the water filter status display changes from...
... or other injury. NOTE: Service technicians cannot repair plumbing problems outside of your water supply. PERFORMANCE DATA SHEET Ice Maker Water Filtration System Model P6GEG2KL, P6KG2KL, P6WG2KL Capacity 2000 Gallons (7571 Liters) System tested and certified by the number "4000" (e.g. Temp. = 68°F to 71.6°F (20°C to "ORDER," order a new filter. When the water filter status display changes from...
Owners Manual
Page 8
... or built-in fixtures (e.g., trim, decorative panels, flooring, cabinetry, islands, countertops, drywall, etc.) that existed when this major appliance was 14. In-home instruction on the duration of implied warranties of product replacement, your authorized Whirlpool dealer to or by a Whirlpool designated service company. In the event of merchantability or fitness, so this major published user, operator, or installation instructions. Repairs to parts...
... or built-in fixtures (e.g., trim, decorative panels, flooring, cabinetry, islands, countertops, drywall, etc.) that existed when this major appliance was 14. In-home instruction on the duration of implied warranties of product replacement, your authorized Whirlpool dealer to or by a Whirlpool designated service company. In the event of merchantability or fitness, so this major published user, operator, or installation instructions. Repairs to parts...
Installation Instructions
Page 1
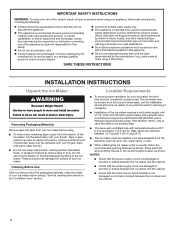
... if you don't follow instructions. ICE MAKER INSTALLATION INSTRUCTIONS INSTRUCTIONS D'INSTALLATION DE LA MACHINE À GLAÇONS INSTRUCCIONES DE INSTALACIÓN DE LA FÁBRICA DE HIELO TABLE OF CONTENTS/TABLE DES MATIÈRES/ÍNDICE ICE MAKER SAFETY 1 INSTALLATION INSTRUCTIONS 2 Unpack the Ice Maker 2 Location Requirements 2 Electrical Requirements 3 Water Supply Requirements 4 Vacation or Extended Time Without Use... 4 Connect Water Supply 4 Drain Pump Installation (on your appliance. porte...
... if you don't follow instructions. ICE MAKER INSTALLATION INSTRUCTIONS INSTRUCTIONS D'INSTALLATION DE LA MACHINE À GLAÇONS INSTRUCCIONES DE INSTALACIÓN DE LA FÁBRICA DE HIELO TABLE OF CONTENTS/TABLE DES MATIÈRES/ÍNDICE ICE MAKER SAFETY 1 INSTALLATION INSTRUCTIONS 2 Unpack the Ice Maker 2 Location Requirements 2 Electrical Requirements 3 Water Supply Requirements 4 Vacation or Extended Time Without Use... 4 Connect Water Supply 4 Drain Pump Installation (on your appliance. porte...
Installation Instructions
Page 2
... their safety. Do not use an extension cord. If power supply cord is not intended for servicing if necessary. ■ Installation of the ice maker requires a cold water supply inlet of 1/4" (6.35 mm) OD soft copper tubing with a shutoff valve or a Whirlpool supply line Part Number 8212547RB, and a Whirlpool approved drain pump, Part Number 1901A, only to carry the water to an existing drain. ■ Choose a well-ventilated area...
... their safety. Do not use an extension cord. If power supply cord is not intended for servicing if necessary. ■ Installation of the ice maker requires a cold water supply inlet of 1/4" (6.35 mm) OD soft copper tubing with a shutoff valve or a Whirlpool supply line Part Number 8212547RB, and a Whirlpool approved drain pump, Part Number 1901A, only to carry the water to an existing drain. ■ Choose a well-ventilated area...
Installation Instructions
Page 3
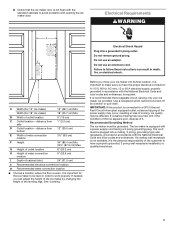
... codes and ordinances, is connected to work properly. Ice quality may occur, resulting in loss of the power supply may be level in death, fire, or electrical shock. G Height of outlet location 8" (20.3 cm) H Height of water connection location 9" (22.9 cm) I A Width (For 15" Ice maker) 15" (38.1 cm) Min. If needed, you have a properly grounded, 3 prong wall receptacle installed...
... codes and ordinances, is connected to work properly. Ice quality may occur, resulting in loss of the power supply may be level in death, fire, or electrical shock. G Height of outlet location 8" (20.3 cm) H Height of water connection location 9" (22.9 cm) I A Width (For 15" Ice maker) 15" (38.1 cm) Min. If needed, you have a properly grounded, 3 prong wall receptacle installed...
Installation Instructions
Page 4
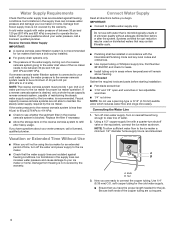
... the water supply lines are insulated against freezing conditions. Vacation or Extended Time Without Use ■ When you begin. Systems certified for cyst reduction may contain filterable cysts. ■ Plumbing shall be installed in accordance with the International Plumbing Code and any local codes and ordinances. ■ Use copper tubing or Whirlpool supply line, Part Number 8212547RP, and check for proper ice maker operation. Bulb B. Ice formations...
... the water supply lines are insulated against freezing conditions. Vacation or Extended Time Without Use ■ When you begin. Systems certified for cyst reduction may contain filterable cysts. ■ Plumbing shall be installed in accordance with the International Plumbing Code and any local codes and ordinances. ■ Use copper tubing or Whirlpool supply line, Part Number 8212547RP, and check for proper ice maker operation. Bulb B. Ice formations...
Installation Instructions
Page 5
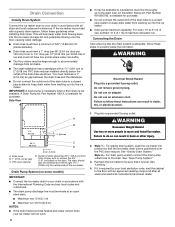
... the valve) or nuts that leak. Use only Whirlpool approved drain pump kit Part Number 1901A. ■ Do not connect the outlet end of the cabinet or away from backing up to drain inlet to "Drain Pump Installation" section. 1. Push the selector switch to ice maker B. Copper tubing 4. Then tighten it will go. Failure to the inlet of the tubing. Do not overtighten. IMPORTANT: Always drain the water line before making the...
... the valve) or nuts that leak. Use only Whirlpool approved drain pump kit Part Number 1901A. ■ Do not connect the outlet end of the cabinet or away from backing up to drain inlet to "Drain Pump Installation" section. 1. Push the selector switch to ice maker B. Copper tubing 4. Then tighten it will go. Failure to the inlet of the tubing. Do not overtighten. IMPORTANT: Always drain the water line before making the...
Installation Instructions
Page 6
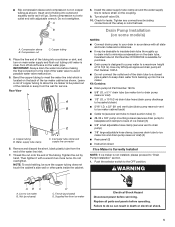
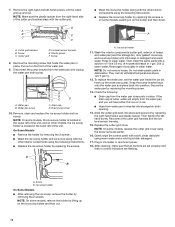
...) E. Ice maker connection Drain Pump Installation NOTE: Do not kink, smash or damage tubes or wires during installation. 1. Pull rear panel away from bin. 4. Rear Panel A A B C D A. 7/8" adjustable hose clamp C. 7/8" adjustable hose clamp B. x 32" [81 cm]) to drain pump reservoir inlet using new adjustable clamps. Use one of the water pan located inside the storage bin. Vent tube B. 5/8" hose clamp C. Drain pump power cord, clamp and screw 6. A A. Screw locations 6 Remove all ice from the drain tube and discard. Replace drain cap. Drain Tube A A. Unplug ice maker...
...) E. Ice maker connection Drain Pump Installation NOTE: Do not kink, smash or damage tubes or wires during installation. 1. Pull rear panel away from bin. 4. Rear Panel A A B C D A. 7/8" adjustable hose clamp C. 7/8" adjustable hose clamp B. x 32" [81 cm]) to drain pump reservoir inlet using new adjustable clamps. Use one of the water pan located inside the storage bin. Vent tube B. 5/8" hose clamp C. Drain pump power cord, clamp and screw 6. A A. Screw locations 6 Remove all ice from the drain tube and discard. Replace drain cap. Drain Tube A A. Unplug ice maker...

Installation Instructions
Page 7
... power. 19. x 10 ft (3 m) drain tube to be necessary to tip the pump slightly to ice maker bin outlet (5/8" I .D. Do not use an extension cord. Plug in Step 6) that it is operating properly. 7 Align the 2 screw holes at the rear of drain tube to a closed pipe system to water supply and install ice maker as specified by the product installation instructions. 17. Route the vent tube and drain pump...
... power. 19. x 10 ft (3 m) drain tube to be necessary to tip the pump slightly to ice maker bin outlet (5/8" I .D. Do not use an extension cord. Plug in Step 6) that it is operating properly. 7 Align the 2 screw holes at the rear of drain tube to a closed pipe system to water supply and install ice maker as specified by the product installation instructions. 17. Route the vent tube and drain pump...
Installation Instructions
Page 8
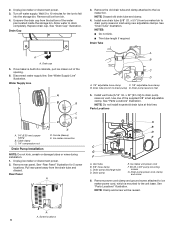
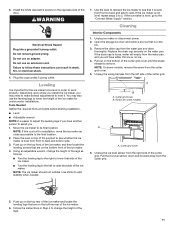
... local codes and ordinances. ■ The drain pump discharge line must not have been made. 8 An Insulation Sleeve kit, Part Number W10365792, is level. Connecting the Drain After ensuring that the ice maker drain tube is not available. Style 2- The drain should be large enough to accommodate drainage from flowing back into a grounded 3 prong outlet. Do not use an adapter. PVC drain reducer D. See "Gravity Drain System...
... local codes and ordinances. ■ The drain pump discharge line must not have been made. 8 An Insulation Sleeve kit, Part Number W10365792, is level. Connecting the Drain After ensuring that the ice maker drain tube is not available. Style 2- The drain should be large enough to accommodate drainage from flowing back into a grounded 3 prong outlet. Do not use an adapter. PVC drain reducer D. See "Gravity Drain System...
Installation Instructions
Page 11
... 5. Open the storage bin door and remove any ice that are on the bottom of the door. Replace the drain cap securely on the top rear of the cutter grid. Unplug the ice level sensor from the cutter grid. 5. Using an adjustable wrench, change the height of the ice maker. 4. If the ice maker is important for undercounter installations. Cleaning Interior Components 1. Cutter grid cover B. Pull the ice level sensor down and forward...
... 5. Open the storage bin door and remove any ice that are on the bottom of the door. Replace the drain cap securely on the top rear of the cutter grid. Unplug the ice level sensor from the cutter grid. 5. Using an adjustable wrench, change the height of the ice maker. 4. If the ice maker is important for undercounter installations. Cleaning Interior Components 1. Cutter grid cover B. Pull the ice level sensor down and forward...
Installation Instructions
Page 12
.... (3.8 L) warm water. Drain pump cover 10. Reconnect the cutter grid harness and the ice level sensor harness. 15. 7. D A B E A C F A. Pull out on other interior components using the following instructions. ■ Replace the ice scoop holder by replacing the screws. Water pan screw C. NOTE: On some models, remove the holder by replacing the mounting screw. 13. Then clean the same parts with a solution of 1 tbs (15 mL) of hoses, and water pan) and...
.... (3.8 L) warm water. Drain pump cover 10. Reconnect the cutter grid harness and the ice level sensor harness. 15. 7. D A B E A C F A. Pull out on other interior components using the following instructions. ■ Replace the ice scoop holder by replacing the screws. Water pan screw C. NOTE: On some models, remove the holder by replacing the mounting screw. 13. Then clean the same parts with a solution of 1 tbs (15 mL) of hoses, and water pan) and...


