
Dimension Guide
Page 1
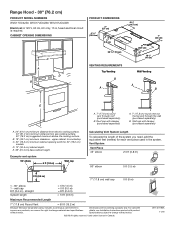
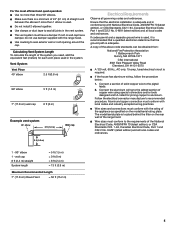
... (0.0 m) = 8 ft (2.4 m) = 13 ft (3.9 m) Maximum Recommended Length 7" (17.8 cm) Round Vent = 50 ft (15.2 m) Because Whirlpool Corporation policy includes a continuous commitment to improve our products, we reserve the right to countertop. Dimensions are for 30" (76.2 cm) models. Range Hood - 30" (76.2 cm) PRODUCT MODEL NUMBERS WVU17UC0JS0, WVU17UC0JB0, WVU17UC0JW0 Electrical: A 120 V, 60 Hz, AC...
... (0.0 m) = 8 ft (2.4 m) = 13 ft (3.9 m) Maximum Recommended Length 7" (17.8 cm) Round Vent = 50 ft (15.2 m) Because Whirlpool Corporation policy includes a continuous commitment to improve our products, we reserve the right to countertop. Dimensions are for 30" (76.2 cm) models. Range Hood - 30" (76.2 cm) PRODUCT MODEL NUMBERS WVU17UC0JS0, WVU17UC0JB0, WVU17UC0JW0 Electrical: A 120 V, 60 Hz, AC...
Owners Manual
Page 1
...(76.2 CM) RANGE HOOD Installation Instructions and Use & Care Guide For questions about features, operation/performance, parts, accessories or service, call: 1-800-253-1301 or visit our website at www.whirlpool.com In Canada, call 1-800-807-6777 or visit our website at www.whirlpool.ca HOTTE D'ASPIRATION ... LIB0159236A/W11367653B This symbol alerts you to reduce the chance of Contents/Table des matières 2 Models/Modèles: WVU17UC0JS , WVU17UC0JB, WVU17UC0JW IMPORTANT: READ AND SAVE THESE INSTRUCTIONS. All safety messages will tell you what can happen if the instructions are...
...(76.2 CM) RANGE HOOD Installation Instructions and Use & Care Guide For questions about features, operation/performance, parts, accessories or service, call: 1-800-253-1301 or visit our website at www.whirlpool.com In Canada, call 1-800-807-6777 or visit our website at www.whirlpool.ca HOTTE D'ASPIRATION ... LIB0159236A/W11367653B This symbol alerts you to reduce the chance of Contents/Table des matières 2 Models/Modèles: WVU17UC0JS , WVU17UC0JB, WVU17UC0JW IMPORTANT: READ AND SAVE THESE INSTRUCTIONS. All safety messages will tell you what can happen if the instructions are...
Owners Manual
Page 2
... WARNING: TO REDUCE THE RISK OF FIRE, USE ONLY - READ AND SAVE THESE INSTRUCTIONS TABLE OF CONTENTS RANGE HOOD SAFETY 1 INSTALLATION REQUIREMENTS 3 INSTALLATION INSTRUCTIONS 6 RANGE HOOD USE 10 RANGE HOOD CARE 10 WIRING DIAGRAM 11 ASSISTANCE OR SERVICE 12 WARRANTY 13 TABLE DES MATIÈRES SÉCURITÉ...: TO REDUCE THE RISK OF FIRE, ELECTRIC SHOCK, OR INJURY TO PERSONS, OBSERVE THE WARNING: TO REDUCE THE RISK OF A RANGE TOP GREASE FIRE: FOLLOWING: Never leave surface units unattended at service panel and lock the service disconnecting means to flambeing food (i.e. Use...
... WARNING: TO REDUCE THE RISK OF FIRE, USE ONLY - READ AND SAVE THESE INSTRUCTIONS TABLE OF CONTENTS RANGE HOOD SAFETY 1 INSTALLATION REQUIREMENTS 3 INSTALLATION INSTRUCTIONS 6 RANGE HOOD USE 10 RANGE HOOD CARE 10 WIRING DIAGRAM 11 ASSISTANCE OR SERVICE 12 WARRANTY 13 TABLE DES MATIÈRES SÉCURITÉ...: TO REDUCE THE RISK OF FIRE, ELECTRIC SHOCK, OR INJURY TO PERSONS, OBSERVE THE WARNING: TO REDUCE THE RISK OF A RANGE TOP GREASE FIRE: FOLLOWING: Never leave surface units unattended at service panel and lock the service disconnecting means to flambeing food (i.e. Use...
Owners Manual
Page 3
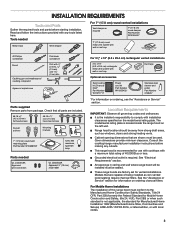
... Parts supplied Remove parts from strong draft areas, such as windows, doors and strong heating vents. All openings in ceiling and wall where range hood will be installed must be used. The model/serial rating plate is required. Cabinet opening dimensions that are included. #8-18 x 1" ...Part Number W10355452* Stainless steel cleaner and polish Part Number 31462A* *For information on the left wall. These range hoods are capable of this range hood must conform to comply with local codes. 3 Given dimensions provide minimum clearance. INSTALLATION REQUIREMENTS Tools and Parts ...
... Parts supplied Remove parts from strong draft areas, such as windows, doors and strong heating vents. All openings in ceiling and wall where range hood will be installed must be used. The model/serial rating plate is required. Cabinet opening dimensions that are included. #8-18 x 1" ...Part Number W10355452* Stainless steel cleaner and polish Part Number 31462A* *For information on the left wall. These range hoods are capable of this range hood must conform to comply with local codes. 3 Given dimensions provide minimum clearance. INSTALLATION REQUIREMENTS Tools and Parts ...
Owners Manual
Page 5
... or CSA Standards C22.1-94, Canadian Electrical Code, Part 1 and C22.2 No. 0-M91 (latest edition) and all joints in conformance with the range hood. Ensure that the ground path is required. Aluminum/copper connection must conform to the pigtail leads. 2. The model/serial plate is located behind the ... vent system 90˚ elbow 6 ft (1.8 m) Wall cap 2 ft (0.6 m) Electrical Requirements Observe all local codes and ordinances. 1 - 90° elbow 1 - A copy of the range hood. If the house has aluminum wiring, follow the procedure below: 1. Do not install 2 elbows together.
... or CSA Standards C22.1-94, Canadian Electrical Code, Part 1 and C22.2 No. 0-M91 (latest edition) and all joints in conformance with the range hood. Ensure that the ground path is required. Aluminum/copper connection must conform to the pigtail leads. 2. The model/serial plate is located behind the ... vent system 90˚ elbow 6 ft (1.8 m) Wall cap 2 ft (0.6 m) Electrical Requirements Observe all local codes and ordinances. 1 - 90° elbow 1 - A copy of the range hood. If the house has aluminum wiring, follow the procedure below: 1. Do not install 2 elbows together.
Owners Manual
Page 6
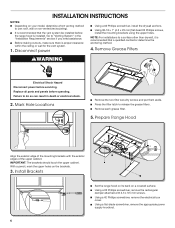
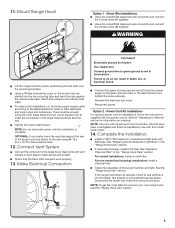
.... Replace all parts and panels before servicing. Failure to a surface other than drywall, it is recommended that the vent system be installed before the range hood is installed. Using a #2 Phillips screwdriver, remove the electrical box cover. It is proper clearance within the ceiling or wall for the vent system.... Hazard Disconnect power before operating. INSTALLATION INSTRUCTIONS NOTES: Depending on the brackets. 3. IMPORTANT: The brackets should touch the upper cabinet. Prepare Range Hood Align the exterior edge of the upper cabinet. Install Brackets Set the...
.... Replace all parts and panels before servicing. Failure to a surface other than drywall, it is recommended that the vent system be installed before the range hood is installed. Using a #2 Phillips screwdriver, remove the electrical box cover. It is proper clearance within the ceiling or wall for the vent system.... Hazard Disconnect power before operating. INSTALLATION INSTRUCTIONS NOTES: Depending on the brackets. 3. IMPORTANT: The brackets should touch the upper cabinet. Prepare Range Hood Align the exterior edge of the upper cabinet. Install Brackets Set the...
Owners Manual
Page 7
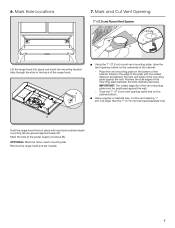
...7" (17.8 cm) vent opening (solid line) on the bottom of the vent mounting plate must be positioned against the wall. Remove the range hood and set it aside. 7 Mark Hole Locations 7. Mark and Cut Vent Opening 7" (17.8 cm) Round Vent System 1" (2.5 cm) A Lift the...(A) of the cabinet. Mark the hole at the power supply knockout (B). 6. Position the side edges of the range hood. Place the vent mounting plate on the cabinet bottom. B Hold the range hood firmly in each mounting tab (A) upward approximately 90°. OPTIONAL: Mark the hole in place with the widest distance...
...7" (17.8 cm) vent opening (solid line) on the bottom of the vent mounting plate must be positioned against the wall. Remove the range hood and set it aside. 7 Mark Hole Locations 7. Mark and Cut Vent Opening 7" (17.8 cm) Round Vent System 1" (2.5 cm) A Lift the...(A) of the cabinet. Mark the hole at the power supply knockout (B). 6. Position the side edges of the range hood. Place the vent mounting plate on the cabinet bottom. B Hold the range hood firmly in each mounting tab (A) upward approximately 90°. OPTIONAL: Mark the hole in place with the widest distance...
Owners Manual
Page 8
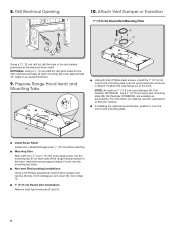
OPTIONAL: Using a " (3 mm) drill bit, drill pilot holes for the dots marked previously at each side of the range hood as accessories. Non-vent (Recirculating) Installations Using a #2 Phillips screwdriver remove the 2 screws and remove the top, front rectangular vent cover (E). ... B Using a 1 " (3 cm) drill bit, drill the hole in the dot marked previously at an approximate 45° angle in an upward direction. 9. Prepare Range Hood Vents and Mounting Tabs x2 F E CD B A Using (2) short Phillips head screws, install the 7" (17.8 cm) round vent mounting plate over the round vent...
OPTIONAL: Using a " (3 mm) drill bit, drill pilot holes for the dots marked previously at each side of the range hood as accessories. Non-vent (Recirculating) Installations Using a #2 Phillips screwdriver remove the 2 screws and remove the top, front rectangular vent cover (E). ... B Using a 1 " (3 cm) drill bit, drill the hole in the dot marked previously at an approximate 45° angle in an upward direction. 9. Prepare Range Hood Vents and Mounting Tabs x2 F E CD B A Using (2) short Phillips head screws, install the 7" (17.8 cm) round vent mounting plate over the round vent...
Owners Manual
Page 9
... relief screws. Seal joints with vent clamps or duct tape to the cabinet side walls. Reconnect power. See the "Range Hood Use" section. Mount Range Hood Option 1 - For direct wire installations, run the home power supply cable according to make secure and airtight. There ...the 2 white wires (A) together. Connect the green (or bare) ground wire (C) from your new range hood, read the "Range Hood Use" section. See "Replacing the Incandescent Light Bulb" in the "Range Hood Care" section. C 9 Use copper wire. Check that have been investigated and found acceptable for ...
... relief screws. Seal joints with vent clamps or duct tape to the cabinet side walls. Reconnect power. See the "Range Hood Use" section. Mount Range Hood Option 1 - For direct wire installations, run the home power supply cable according to make secure and airtight. There ...the 2 white wires (A) together. Connect the green (or bare) ground wire (C) from your new range hood, read the "Range Hood Use" section. See "Replacing the Incandescent Light Bulb" in the "Range Hood Care" section. C 9 Use copper wire. Check that have been investigated and found acceptable for ...
Owners Manual
Page 10
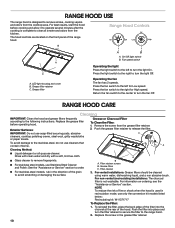
... designed to clear all -purpose cleaner: Rinse with clean water and dry with a soft, lint-free cloth. For best results, start the hood before operating hood. Range Hood Controls Off On Off Low High B A C A. On/Off light switch B. Press the fan switch to the stainless steel, do not use ...: 1. A B A. Push the filter into the channel at the rear of the grain to turn the light Off. Glass cleaner to the range hood. 2. The hood controls are located on ordering, see the "Assistance or Service" section. Fan speed switch Operating the light Press the light switch to the left...
... designed to clear all -purpose cleaner: Rinse with clean water and dry with a soft, lint-free cloth. For best results, start the hood before operating hood. Range Hood Controls Off On Off Low High B A C A. On/Off light switch B. Press the fan switch to the stainless steel, do not use ...: 1. A B A. Push the filter into the channel at the rear of the grain to turn the light Off. Glass cleaner to the range hood. 2. The hood controls are located on ordering, see the "Assistance or Service" section. Fan speed switch Operating the light Press the light switch to the left...
Owners Manual
Page 11
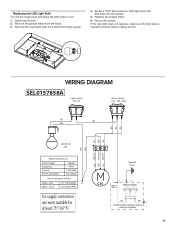
...;10%A 73±10% W Motor resistance (ohms) White - Reconnect power. Off - Remove the fused light bulb from the hood. 3. Red White - On Motor Switch Low - Replacing the LED Light Bulb Turn off the range hood and allow the light bulb to cool. 1. Disconnect power. 2. Replace the grease filters. 6. If the new light does...
...;10%A 73±10% W Motor resistance (ohms) White - Reconnect power. Off - Remove the fused light bulb from the hood. 3. Red White - On Motor Switch Low - Replacing the LED Light Bulb Turn off the range hood and allow the light bulb to cool. 1. Disconnect power. 2. Replace the grease filters. 6. If the new light does...


