Spec Sheet I2757FH
Page 1
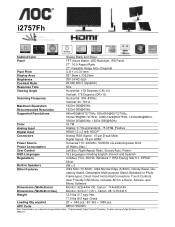
..., 1920x1080@60Hz Color 16.7M Analog Input Analog: 0.7Vp-p(standard), 75 OHM, Positive Digital Input HDMI 1.3 x 2 with HDCP* Connectors Analog RGB Signal: 15-pin D-sub Male Digital Signal: 18-pin HDMI Power Source Universal 110~240VAC, 50/60Hz via external power brick Power Consumption 45 Watts (Max.) User Control Left/Eco, Right/Aspect Ratio, Source/Auto, Power OSD Languages 16 Languages including English, French and Spanish Regulations cCSAus, FCC, ROHS, Windows 7, EPA Energy Star 5.1, EPEAT Silver Built-in Speakers 2W...
..., 1920x1080@60Hz Color 16.7M Analog Input Analog: 0.7Vp-p(standard), 75 OHM, Positive Digital Input HDMI 1.3 x 2 with HDCP* Connectors Analog RGB Signal: 15-pin D-sub Male Digital Signal: 18-pin HDMI Power Source Universal 110~240VAC, 50/60Hz via external power brick Power Consumption 45 Watts (Max.) User Control Left/Eco, Right/Aspect Ratio, Source/Auto, Power OSD Languages 16 Languages including English, French and Spanish Regulations cCSAus, FCC, ROHS, Windows 7, EPA Energy Star 5.1, EPEAT Silver Built-in Speakers 2W...
User Manual_I2757Fh
Page 2
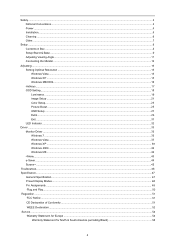
... Setup Stand & Base ...9 Adjusting Viewing Angle...11 Connecting the Monitor...12 Adjusting ...13 Setting Optimal Resolution ...13 Windows Vista ...13 Windows XP ...15 Windows ME/2000...16 Hotkeys ...17 OSD Setting...18 Luminance ...19 Image Setup ...21 Color Setup...23 Picture Boost ...25 OSD Setup ...27 Extra ...29 Exit...31 LED Indicator ...32 Driver ...33 Monitor Driver ...33 Windows 7 ...33 Windows Vista ...37 Windows XP ...39 Windows 2000 ...42 Windows ME...42 i-Menu ...43 e-Saver ...44 Screen+ ...45 Troubleshoot ...46 Specification...47 General Specification...47 Preset Display Modes...
... Setup Stand & Base ...9 Adjusting Viewing Angle...11 Connecting the Monitor...12 Adjusting ...13 Setting Optimal Resolution ...13 Windows Vista ...13 Windows XP ...15 Windows ME/2000...16 Hotkeys ...17 OSD Setting...18 Luminance ...19 Image Setup ...21 Color Setup...23 Picture Boost ...25 OSD Setup ...27 Extra ...29 Exit...31 LED Indicator ...32 Driver ...33 Monitor Driver ...33 Windows 7 ...33 Windows Vista ...37 Windows XP ...39 Windows 2000 ...42 Windows ME...42 i-Menu ...43 e-Saver ...44 Screen+ ...45 Troubleshoot ...46 Specification...47 General Specification...47 Preset Display Modes...

User Manual_I2757Fh
Page 4
... electrician install the correct outlet, or use only with the attached power adapter (Output 12Vdc) which have UL,CSA listed license (Only for long periods of power source indicated on the label. Overloading can result in fire or electric shock. This plug will protect the monitor from the type of time. Do not defeat the safety purpose of power supplied...
... electrician install the correct outlet, or use only with the attached power adapter (Output 12Vdc) which have UL,CSA listed license (Only for long periods of power source indicated on the label. Overloading can result in fire or electric shock. This plug will protect the monitor from the type of time. Do not defeat the safety purpose of power supplied...
User Manual_I2757Fh
Page 12
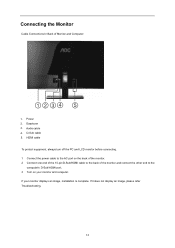
... refer Troubleshooting. 12 Connecting the Monitor Cable Connections In Back of the monitor and connect the other end to the back of Monitor and Computer: 1234 5 1. Power 2. HDMI cable To protect equipment, always turn off the PC and LCD monitor before connecting. 1 Connect the power cable to the AC port on the back of the monitor. 2 Connect one end of the 15-pin D-Sub/HDMI cable to the computer's D-Sub/HDMI port. 3 Turn on your monitor displays an image, installation...
... refer Troubleshooting. 12 Connecting the Monitor Cable Connections In Back of the monitor and connect the other end to the back of Monitor and Computer: 1234 5 1. Power 2. HDMI cable To protect equipment, always turn off the PC and LCD monitor before connecting. 1 Connect the power cable to the AC port on the back of the monitor. 2 Connect one end of the 15-pin D-Sub/HDMI cable to the computer's D-Sub/HDMI port. 3 Turn on your monitor displays an image, installation...
User Manual_I2757Fh
Page 17
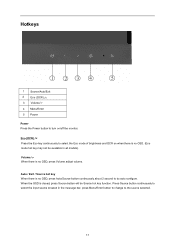
When the OSD is no OSD, press Auto/Source button continuously about 2 second to do auto configure. Volume / > When there is no OSD, press Volume adjust volume. Press Source button continuously to select the input source showed in all models). Eco (DCR) /< Press the Eco key continuously to select the Eco mode of brightness and DCR on /off the monitor. Hotkeys 1 23 4 5 1 Source/Auto/Exit 2 Eco (DCR) /< 3 Volume/ > 4 Menu/Enter 5 Power Power Press the Power button to turn on...
When the OSD is no OSD, press Auto/Source button continuously about 2 second to do auto configure. Volume / > When there is no OSD, press Volume adjust volume. Press Source button continuously to select the input source showed in all models). Eco (DCR) /< Press the Eco key continuously to select the Eco mode of brightness and DCR on /off the monitor. Hotkeys 1 23 4 5 1 Source/Auto/Exit 2 Eco (DCR) /< 3 Volume/ > 4 Menu/Enter 5 Power Power Press the Power button to turn on...

User Manual_I2757Fh
Page 18
... "Input Select" is disable to adjust. 2) If the product screen size is 4:3 or input signal resolution is wide format, the item of "Image Ratio" is disable to adjust. 3) One of non-standard ECO, DCR , DCB, Picture Boost is activated , the other function, repeat steps 2-3. 4) OSD Lock Function: To lock the OSD, press and hold the MENU button while the monitor is highlighted, press the MENU-button to activate it . 3) Press < or > to change...
... "Input Select" is disable to adjust. 2) If the product screen size is 4:3 or input signal resolution is wide format, the item of "Image Ratio" is disable to adjust. 3) One of non-standard ECO, DCR , DCB, Picture Boost is activated , the other function, repeat steps 2-3. 4) OSD Lock Function: To lock the OSD, press and hold the MENU button while the monitor is highlighted, press the MENU-button to activate it . 3) Press < or > to change...

User Manual_I2757Fh
Page 30
Press AUTO to turn off the monitor. 4. Show the information of the main image and sub-image source 30 Input Select Auto Config Image Ratio DDC-CI Reset Off Timer Information Auto D-SUB HDMI 1 HDMI 2 yes or no wide or 4:3 yes or no yes or no 0~24hours Select to Auto Detect input signal Select D-SUB Signal Source as Input Select HDMI1 Source as Input Select HDMI 2 Source as Input Auto adjust the picture to default Select wide or 4:3 format for display Turn ON/OFF DDC-CI Support Reset the menu to default Select timing to exit. Press < or > to adjust. 5.
Press AUTO to turn off the monitor. 4. Show the information of the main image and sub-image source 30 Input Select Auto Config Image Ratio DDC-CI Reset Off Timer Information Auto D-SUB HDMI 1 HDMI 2 yes or no wide or 4:3 yes or no yes or no 0~24hours Select to Auto Detect input signal Select D-SUB Signal Source as Input Select HDMI1 Source as Input Select HDMI 2 Source as Input Auto adjust the picture to default Select wide or 4:3 format for display Turn ON/OFF DDC-CI Support Reset the menu to default Select timing to exit. Press < or > to adjust. 5.

User Manual_I2757Fh
Page 31
Exit Exit the main OSD 31 Press < or > to select (Exit), and press MENU or AUTO to display menu. 2. Press MENU (Menu) to exit. Exit 1.
Exit Exit the main OSD 31 Press < or > to select (Exit), and press MENU or AUTO to display menu. 2. Press MENU (Menu) to exit. Exit 1.

User Manual_I2757Fh
Page 33
Click on 'Control Panel'. 3. Driver Monitor Driver Windows 7 1.Start Windows® 7 2.Click on the 'Start' button and then click on the 'Display' icon. 33
Click on 'Control Panel'. 3. Driver Monitor Driver Windows 7 1.Start Windows® 7 2.Click on the 'Start' button and then click on the 'Display' icon. 33

User Manual_I2757Fh
Page 38
... "Windows needs..." Click "Update Driver..." Click on the following screens displayed in the figure below, click "Continue". 5. button and then select the appropriate drive F:\Driver (CD-ROM Drive). 8. Check the "Browse my computer for your monitor model and click on the 'Next' button. 9. Click "Close" → "Close" → "OK" → "OK" on the 'Have disk...' in the "Monitor" tab. The monitor can be used as...
... "Windows needs..." Click "Update Driver..." Click on the following screens displayed in the figure below, click "Continue". 5. button and then select the appropriate drive F:\Driver (CD-ROM Drive). 8. Check the "Browse my computer for your monitor model and click on the 'Next' button. 9. Click "Close" → "Close" → "OK" → "OK" on the 'Have disk...' in the "Monitor" tab. The monitor can be used as...
User Manual_I2757Fh
Page 40
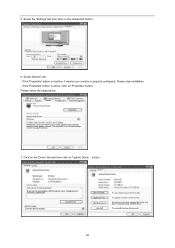
Select 'Monitor' tab - Please follow the steps below. 7. Please stop installation. - If the 'Properties' button is properly configured. button. 40 Click on the 'Driver' tab and then click on 'Properties' button. Select the 'Settings' tab then click on the 'Advanced' button. 6. 5. If the 'Properties' button is inactive, it means your monitor is active, click on 'Update Driver...'
Select 'Monitor' tab - Please follow the steps below. 7. Please stop installation. - If the 'Properties' button is properly configured. button. 40 Click on the 'Driver' tab and then click on 'Properties' button. Select the 'Settings' tab then click on the 'Advanced' button. 6. 5. If the 'Properties' button is inactive, it means your monitor is active, click on 'Update Driver...'

User Manual_I2757Fh
Page 42
... 'Start' button, point to 'Settings', and then click on 'Control Panel'. 3. Select 'Display a list of all the drivers in a specific location, so you can choose the driver you can choose a specific driver', then click on 'Next' and then click on the 'Finish' button then the 'Close' button. Click on 'Have disk...'. 8. Double click on 'Change...' Select the 'Monitor' button, then click on the 'Display' Icon. 4. Select 'Monitor' - Click...
... 'Start' button, point to 'Settings', and then click on 'Control Panel'. 3. Select 'Display a list of all the drivers in a specific location, so you can choose the driver you can choose a specific driver', then click on 'Next' and then click on the 'Finish' button then the 'Close' button. Click on 'Have disk...'. 8. Double click on 'Change...' Select the 'Monitor' button, then click on the 'Display' Icon. 4. Select 'Monitor' - Click...

User Manual_I2757Fh
Page 44
..., Off, Sleep or Screen Saver); the actual shutdown time depends on "driver/e-Saver/setup.exe" to start installing the e-Saver software, follow the install wizard to its default settings like below ). e-Saver Welcome to automatically shutdown. The example above illustrated: 1) The monitor will never shutdown when the PC is powered on. 2) The monitor will automatically shutdown 5 minutes after the screen saver appears. The AOC e-Saver...
..., Off, Sleep or Screen Saver); the actual shutdown time depends on "driver/e-Saver/setup.exe" to start installing the e-Saver software, follow the install wizard to its default settings like below ). e-Saver Welcome to automatically shutdown. The example above illustrated: 1) The monitor will never shutdown when the PC is powered on. 2) The monitor will automatically shutdown 5 minutes after the screen saver appears. The AOC e-Saver...

User Manual_I2757Fh
Page 46
... maximum refresh rate your monitor is capable of the primary colors (RED, GREEN, or BLUE) Screen image is on, reboot the computer to see "Input Not Supported" on the back . Adjust H-Position and V-Position or press hot-key (AUTO). Make sure the monitor's video cable is properly connected to a grounded power outlet and to auto adjust. Adjust RGB color or select desired color temperature. Is the cable connected correctly? (Connected using the D-sub cable) Check the DB-15 cable connection. (Connected using an extension cable or switch box. The LED...
... maximum refresh rate your monitor is capable of the primary colors (RED, GREEN, or BLUE) Screen image is on, reboot the computer to see "Input Not Supported" on the back . Adjust H-Position and V-Position or press hot-key (AUTO). Make sure the monitor's video cable is properly connected to a grounded power outlet and to auto adjust. Adjust RGB color or select desired color temperature. Is the cable connected correctly? (Connected using the D-sub cable) Check the DB-15 cable connection. (Connected using an extension cable or switch box. The LED...
User Manual_I2757Fh
Page 47
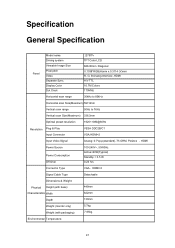
... G, B Analog lnterface ,HDMI H/V TTL 16.7M Colors 170MHz Horizontal scan range 30kHz to 83kHz Horizontal scan Size(Maximum) 597.8mm Vertical scan range 50Hz to 76Hz Vertical scan Size(Maximum) 336.3mm Optimal preset resolution 1920×1080@60Hz Resolution Plug & Play Input Connector VESA DDC2B/C1 VGA,HDMI×2 Input Video Signal Analog: 0.7Vp-p(standard), 75 OHM, Positive 、HDMI Power Source Power Consumption Off timer 100-240V~, 50/60Hz Active Specification General Specification Panel Model name Driving system Viewable Image Size Pixel pitch Video Separate Sync.
... G, B Analog lnterface ,HDMI H/V TTL 16.7M Colors 170MHz Horizontal scan range 30kHz to 83kHz Horizontal scan Size(Maximum) 597.8mm Vertical scan range 50Hz to 76Hz Vertical scan Size(Maximum) 336.3mm Optimal preset resolution 1920×1080@60Hz Resolution Plug & Play Input Connector VESA DDC2B/C1 VGA,HDMI×2 Input Video Signal Analog: 0.7Vp-p(standard), 75 OHM, Positive 、HDMI Power Source Power Consumption Off timer 100-240V~, 50/60Hz Active Specification General Specification Panel Model name Driving system Viewable Image Size Pixel pitch Video Separate Sync.

User Manual_I2757Fh
Page 48
... Display Modes STAND VGA SVGA XGA SXGA WXGA+ WSXGA HD *** IBM MODE DOS MAC MODE VGA Resolution 640x480@60Hz 640x480@72Hz 640x480@75Hz 800x600@56Hz 800x600@60Hz 800x600@72Hz 800x600@75Hz 1024x768@60Hz 1024x768@70Hz 1024x768@75Hz 1280x1024@60Hz 1280x1024@75Hz 1440x900@60Hz 1680x1050@60Hz 1920x1080@60Hz 1280x960@60HZ 640x350@70Hz 720x400@70Hz 640x480@67Hz HORIZONTAL FREQUENCY(kHZ...) 31.469 37.861 37.500 35.156 37.879 48.077 46.875 48.363 56.476 60.023 63.981 79.976 55.935 65.290 67.500 60.000 31.469 31.469 VERTICAL FREQUENCY(Hz) 59.940 72...
... Display Modes STAND VGA SVGA XGA SXGA WXGA+ WSXGA HD *** IBM MODE DOS MAC MODE VGA Resolution 640x480@60Hz 640x480@72Hz 640x480@75Hz 800x600@56Hz 800x600@60Hz 800x600@72Hz 800x600@75Hz 1024x768@60Hz 1024x768@70Hz 1024x768@75Hz 1280x1024@60Hz 1280x1024@75Hz 1440x900@60Hz 1680x1050@60Hz 1920x1080@60Hz 1280x960@60HZ 640x350@70Hz 720x400@70Hz 640x480@67Hz HORIZONTAL FREQUENCY(kHZ...) 31.469 37.861 37.500 35.156 37.879 48.077 46.875 48.363 56.476 60.023 63.981 79.976 55.935 65.290 67.500 60.000 31.469 31.469 VERTICAL FREQUENCY(Hz) 59.940 72...
User Manual_I2757Fh
Page 51
... frequency energy, and if not installed and used in accordance with the instructions, may cause harmful interference to this equipment. Consult the dealer or an experienced radio/TV technician for Standby and Off mode power consumption) and is connected. This equipment generates, uses and can be used in order to comply with the limits for a Class B digital device, pursuant to Part...
... frequency energy, and if not installed and used in accordance with the instructions, may cause harmful interference to this equipment. Consult the dealer or an experienced radio/TV technician for Standby and Off mode power consumption) and is connected. This equipment generates, uses and can be used in order to comply with the limits for a Class B digital device, pursuant to Part...
User Manual_I2757Fh
Page 54
... application Adjustment by non-authorized source Repair, modification, or installation of options or parts by anyone other than an AOC Authorized Service Center Improper environment Excessive or inadequate heating or air conditioning or electrical powers failures, surges, or other irregularities This limited warranty does not cover any third party have 54 If you or any of the product firmware or...
... application Adjustment by non-authorized source Repair, modification, or installation of options or parts by anyone other than an AOC Authorized Service Center Improper environment Excessive or inadequate heating or air conditioning or electrical powers failures, surges, or other irregularities This limited warranty does not cover any third party have 54 If you or any of the product firmware or...

User Manual_I2757Fh
Page 56
... (excluding Brazil) WARRANTY STATEMENT for AOC Color Monitors Including those Sold within North America as a result of: Shipping or improper installation or maintenance Misuse Neglect Any cause other than ordinary commercial or industrial application Adjustment by non-authorized source Repair, modification, or installation of options or parts by anyone other than an EPI Authorized Service Center Improper environment Excessive or...
... (excluding Brazil) WARRANTY STATEMENT for AOC Color Monitors Including those Sold within North America as a result of: Shipping or improper installation or maintenance Misuse Neglect Any cause other than ordinary commercial or industrial application Adjustment by non-authorized source Repair, modification, or installation of options or parts by anyone other than an EPI Authorized Service Center Improper environment Excessive or...

User Manual_I2757Fh
Page 58
... Parts & Labor Including CRT Tube & LCD Panel - None* - If your monitor qualifies for freight both ways. If your monitor malfunctions at AOC's service center. Call tag dispatched and return freight charges via UPS - UPS Return Freight to your EASE program qualifications. Step 5: We will pay for the EASE program, AOC will issue a UPS Call Tag to supply a credit card, AOC will provide a replacement monitor...
... Parts & Labor Including CRT Tube & LCD Panel - None* - If your monitor qualifies for freight both ways. If your monitor malfunctions at AOC's service center. Call tag dispatched and return freight charges via UPS - UPS Return Freight to your EASE program qualifications. Step 5: We will pay for the EASE program, AOC will issue a UPS Call Tag to supply a credit card, AOC will provide a replacement monitor...


