
User Guide
Page 2
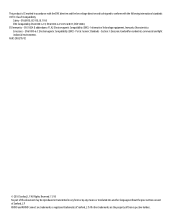
Tape Exit Backlight Power Cut/Feed Hot Keys Barcode Symbol Size/CAPS Save/Insert Recall/Remove LCD display Print/# of copies Library Escape Clear Navigation keys OK Serialization Settings Backspace Enter Shift USB connector Space bar Power connector Figure 1 RHINO 6000 LabelPrinter
Tape Exit Backlight Power Cut/Feed Hot Keys Barcode Symbol Size/CAPS Save/Insert Recall/Remove LCD display Print/# of copies Library Escape Clear Navigation keys OK Serialization Settings Backspace Enter Shift USB connector Space bar Power connector Figure 1 RHINO 6000 LabelPrinter

User Guide
Page 5
Using Simultaneous Serialization 13 Using Advanced Serialization 13 Printing Options 14 Printing Multiple Copies 14 Collating Multiple Copies 14 Pausing between Labels 14 Advancing the Label Tape 14 Adjusting Print Contrast 14 Using Printer Memory 15 Saving a Label File 15 Recalling a Label File from Memory 15 Deleting a Label File from Memory 15 Cleaning Your Printer 15 Using RHINO Connect Software 16 Connecting to your Computer 16 Symbols 17 Library Text 18 Troubleshooting 20 Contacting Customer Support 25
Using Simultaneous Serialization 13 Using Advanced Serialization 13 Printing Options 14 Printing Multiple Copies 14 Collating Multiple Copies 14 Pausing between Labels 14 Advancing the Label Tape 14 Adjusting Print Contrast 14 Using Printer Memory 15 Saving a Label File 15 Recalling a Label File from Memory 15 Deleting a Label File from Memory 15 Cleaning Your Printer 15 Using RHINO Connect Software 16 Connecting to your Computer 16 Symbols 17 Library Text 18 Troubleshooting 20 Contacting Customer Support 25
User Guide
Page 7
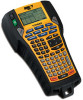
About Your New Printer With your new RHINO label printer, you can create a wide variety of labels and accessories for your printer. Visit www.dymo.com for information on the back of time. 1 A power adapter and a rechargeable battery pack is included with your printer for power; however, alkaline batteries should ...into the power connector on battery or AC power. See Figure 3. Plug the other end of the printer. The printer uses RHINO Industrial label tape cassettes in many different sizes, and styles. Replace the battery compartment cover. Connecting the Power Adapter The...
About Your New Printer With your new RHINO label printer, you can create a wide variety of labels and accessories for your printer. Visit www.dymo.com for information on the back of time. 1 A power adapter and a rechargeable battery pack is included with your printer for power; however, alkaline batteries should ...into the power connector on battery or AC power. See Figure 3. Plug the other end of the printer. The printer uses RHINO Industrial label tape cassettes in many different sizes, and styles. Replace the battery compartment cover. Connecting the Power Adapter The...
User Guide
Page 13
...sizes. To create multiple labels quickly, see Creating a Series of the tape. Creating Flag Labels Flag labels wrap around the cable. For example, if you can be used with RHINO Self-Laminating Labels (part number 1734821). Enter the diameter of Labels on page 12. The label text is applied to... back leaving a tail or flag. To create multiple labels quickly, see Creating a Series of the cable and press OK...
...sizes. To create multiple labels quickly, see Creating a Series of the tape. Creating Flag Labels Flag labels wrap around the cable. For example, if you can be used with RHINO Self-Laminating Labels (part number 1734821). Enter the diameter of Labels on page 12. The label text is applied to... back leaving a tail or flag. To create multiple labels quickly, see Creating a Series of the cable and press OK...
User Guide
Page 17
...: Electrical Brackets Voice/Data Arrows Audio/Video Numbers Warning Currency Punctuation A complete list of symbols. 4. Press SETTINGS. 2. Adding Symbols Your printer includes a set of default symbols to find the symbol you want . 4. Press OK and then select Done (ESC). Select a category...from the Library menu. Press SYMBOL. 2. Select Barcode HR and press OK. 3. See Using RHINO Connect Software on page 16 for more information. Hiding Barcode Text You can choose to a label can be found beginning on page 17. Select Default, if necessary. 3. Select User. 3. ...
...: Electrical Brackets Voice/Data Arrows Audio/Video Numbers Warning Currency Punctuation A complete list of symbols. 4. Press SETTINGS. 2. Adding Symbols Your printer includes a set of default symbols to find the symbol you want . 4. Press OK and then select Done (ESC). Select a category...from the Library menu. Press SYMBOL. 2. Select Barcode HR and press OK. 3. See Using RHINO Connect Software on page 16 for more information. Hiding Barcode Text You can choose to a label can be found beginning on page 17. Select Default, if necessary. 3. Select User. 3. ...

User Guide
Page 18
... be incremented, such as the number 2 in 123 or the letter B in ABC. Press the first letter of Labels You can download custom text from the printer. To add a graphic 1. You create a starting pattern, and then set the increment and count for more information. The cursor jumps .... 12 Creating a Series of the text string you can add custom text to the library directly from RHINO Connect Software or you wish to the first text string that begins with a certain label, a warning appears on the display. Letters can apply these graphic files to select My Library. 3. Press...
... be incremented, such as the number 2 in 123 or the letter B in ABC. Press the first letter of Labels You can download custom text from the printer. To add a graphic 1. You create a starting pattern, and then set the increment and count for more information. The cursor jumps .... 12 Creating a Series of the text string you can add custom text to the library directly from RHINO Connect Software or you wish to the first text string that begins with a certain label, a warning appears on the display. Letters can apply these graphic files to select My Library. 3. Press...

User Guide
Page 22
..., and industry terms • Import data from any of the printer. Refer to your RHINO printer from your computer, PC Connected... In addition, you can download a free Windows printer driver so you cannot use any Windows program • Create labels using the step-by-step wizard • Print labels directly from RHINO Connect Software Visit www.dymo.com for...
..., and industry terms • Import data from any of the printer. Refer to your RHINO printer from your computer, PC Connected... In addition, you can download a free Windows printer driver so you cannot use any Windows program • Create labels using the step-by-step wizard • Print labels directly from RHINO Connect Software Visit www.dymo.com for...
User Guide
Page 32
...EN 61000-6-3: Electromagnetic Compatibility (EMC) - All other trademarks are trademarks or registered trademarks of Sanford, L.P. Section 3: Emission standard for residential, commercial and light industrial environments. ENV 50204; EN 60950, IEC 950, UL 1950 EMC Compatibility EN 61000 3-2/3; EN 61000 4-2/3/4/5/6/8/11; Information Technology equipment, Immunity Characteristics Emissions - This...in any form or by any means or translated into another language without the prior written consent of Sanford, L.P RHINO and RHINO Connect are the property of their respective holders.
...EN 61000-6-3: Electromagnetic Compatibility (EMC) - All other trademarks are trademarks or registered trademarks of Sanford, L.P. Section 3: Emission standard for residential, commercial and light industrial environments. ENV 50204; EN 60950, IEC 950, UL 1950 EMC Compatibility EN 61000 3-2/3; EN 61000 4-2/3/4/5/6/8/11; Information Technology equipment, Immunity Characteristics Emissions - This...in any form or by any means or translated into another language without the prior written consent of Sanford, L.P RHINO and RHINO Connect are the property of their respective holders.

Quick Start Guide
Page 3
Quick Start and Quick Reference Guides USB cable Two RHINO label cassettes Power adapter CD-ROM Battery pack RHINO 6000 label printer Figure 1 1 Make sure you have all the items shown in Figure 1. Unpacking your printer NOTE Do not plug the printer into your label printer and save the packing materials. 2. Unpack your computer until asked to install your RHINO 6000 label printer and software, and print your first label. 1. English Quick Start Guide Follow these steps to do so during the software installation. 1.
Quick Start and Quick Reference Guides USB cable Two RHINO label cassettes Power adapter CD-ROM Battery pack RHINO 6000 label printer Figure 1 1 Make sure you have all the items shown in Figure 1. Unpacking your printer NOTE Do not plug the printer into your label printer and save the packing materials. 2. Unpack your computer until asked to install your RHINO 6000 label printer and software, and print your first label. 1. English Quick Start Guide Follow these steps to do so during the software installation. 1.

Quick Start Guide
Page 5
... until the cassette is automatically lifted. 3. Lift the label cassette cover to open the label cassette compartment. 2. Press the Eject button. Replace the cassette as described above. 3 Inserting the label cassette Your printer comes with two RHINO label cassettes. See Figure 4. 2. If necessary, turn the spool clockwise to the label on the cassette. 5. Refer to tighten the...
... until the cassette is automatically lifted. 3. Lift the label cassette cover to open the label cassette compartment. 2. Press the Eject button. Replace the cassette as described above. 3 Inserting the label cassette Your printer comes with two RHINO label cassettes. See Figure 4. 2. If necessary, turn the spool clockwise to the label on the cassette. 5. Refer to tighten the...
Quick Start Guide
Page 6
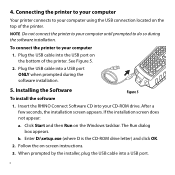
Connecting the printer to your computer Your printer connects to your CD-ROM drive. Insert the RHINO Connect Software CD into a USB port. 4 Follow the on the Windows taskbar. When prompted by the installer, plug the USB cable into your computer 1. ...drive letter) and click OK. 2. Plug the USB cable into the USB port on the top of the printer. The Run dialog box appears. If the installation screen does not appear: a. To connect the printer to your computer until prompted to do so during the software installation. 5. 4. Installing the Software Figure 5 ...
Connecting the printer to your computer Your printer connects to your CD-ROM drive. Insert the RHINO Connect Software CD into a USB port. 4 Follow the on the Windows taskbar. When prompted by the installer, plug the USB cable into your computer 1. ...drive letter) and click OK. 2. Plug the USB cable into the USB port on the top of the printer. The Run dialog box appears. If the installation screen does not appear: a. To connect the printer to your computer until prompted to do so during the software installation. 5. 4. Installing the Software Figure 5 ...

Quick Start Guide
Page 8
... RHINO printer. 7. Use the Data Editor to enter label text and add labels to a RHINO printer. For complete details on the fly. Work in RHINO Connect Software. Set label properties to your labels. Quickly create a series of the many features available in two modes: Create labels and print directly to the printer, or create labels for transfer to the label file. Preview your labels...
... RHINO printer. 7. Use the Data Editor to enter label text and add labels to a RHINO printer. For complete details on the fly. Work in RHINO Connect Software. Set label properties to your labels. Quickly create a series of the many features available in two modes: Create labels and print directly to the printer, or create labels for transfer to the label file. Preview your labels...


