Connected Appliance Setup Guide
Page 3
... antenna types listed below with the maximum permissible gain and required antenna impedance for each antenna type indicated. However, there is at all times and must also display a label referring to comply with FCC and Industry Canada Regulations The WICHAM01 / FLDAAM01 Modules have been certified with the instructions, may cause undesired operation. This device may not cause interference, 2. Changes or...
... antenna types listed below with the maximum permissible gain and required antenna impedance for each antenna type indicated. However, there is at all times and must also display a label referring to comply with FCC and Industry Canada Regulations The WICHAM01 / FLDAAM01 Modules have been certified with the instructions, may cause undesired operation. This device may not cause interference, 2. Changes or...
Installation Instructions
Page 2
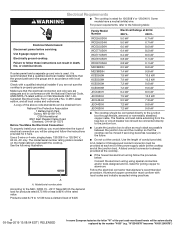
... existing electrical supply. When installing cooktop, use in the kitchen. 2 05-Sep-2019 13:08:04 EDT | RELEASED In some European factories the letter "W" of burns or fire by the number "4000" (e.g. Check the cooktop base for 1/2" (1.3 cm) diameter conduit ■■ UL listed wire connectors Check local codes. Refer to confirm that all electrical connections be automatically replaced by reaching over an undercounter built...
... existing electrical supply. When installing cooktop, use in the kitchen. 2 05-Sep-2019 13:08:04 EDT | RELEASED In some European factories the letter "W" of burns or fire by the number "4000" (e.g. Check the cooktop base for 1/2" (1.3 cm) diameter conduit ■■ UL listed wire connectors Check local codes. Refer to confirm that all electrical connections be automatically replaced by reaching over an undercounter built...
Installation Instructions
Page 3
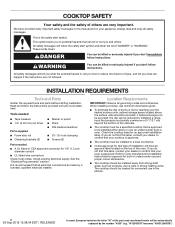
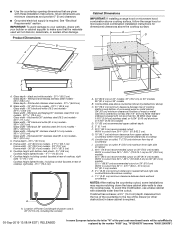
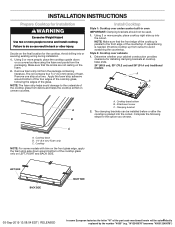
....3 cm) Glass width - KitchenAid 36" stainless steel (91.4 cm) models 357/8" (91.0 cm) C. "W12345678" becomes "400012345678") ■■ Use the countertop opening dimensions that the materials used will be autom3atically replaced by not less than 1/4" [0.6 cm] flame retardant millboard covered with not less than the cutout. See "Electrical Requirements" section. A D C B L E F G H I . Combustible area above countertop (shown by dashed box above) C. 30" (76.2 cm) minimum clearance between back wall and countertop NOTES: After...
....3 cm) Glass width - KitchenAid 36" stainless steel (91.4 cm) models 357/8" (91.0 cm) C. "W12345678" becomes "400012345678") ■■ Use the countertop opening dimensions that the materials used will be autom3atically replaced by not less than 1/4" [0.6 cm] flame retardant millboard covered with not less than the cutout. See "Electrical Requirements" section. A D C B L E F G H I . Combustible area above countertop (shown by dashed box above) C. 30" (76.2 cm) minimum clearance between back wall and countertop NOTES: After...
Installation Instructions
Page 4
...-5575 Before You Make the Electrical Connection: To properly install your cooktop, you will be provided at the cooktop. ■■ If the house has aluminum wiring follow the procedure below: Connect the aluminum wiring using and follow these instructions can be obtained from the fuse box or circuit breaker box should be using special connectors and/or tools designed and UL listed for products rated 8.75 kW or less...
...-5575 Before You Make the Electrical Connection: To properly install your cooktop, you will be provided at the cooktop. ■■ If the house has aluminum wiring follow the procedure below: Connect the aluminum wiring using and follow these instructions can be obtained from the fuse box or circuit breaker box should be using special connectors and/or tools designed and UL listed for products rated 8.75 kW or less...
Installation Instructions
Page 5
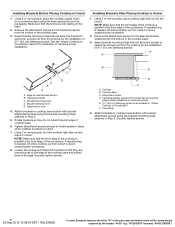
... sure that the knobs are not resting on a covered surface using the foam end posts from the package containing literature. Cooktop base bottom B. Clamping bracket A 2. B C A. Avoid drilling into the cutout. Using 2 or more people to avoid scratching the countertop. Install Cooktop Style 1: Cooktop over cabinets 1. Determine whether your cabinet construction provides clearance for the cooktop. Cooktop NOTE: For some European factories the letter "W" of the cooktop glass, following steps for Installation WARNING Excessive...
... sure that the knobs are not resting on a covered surface using the foam end posts from the package containing literature. Cooktop base bottom B. Clamping bracket A 2. B C A. Avoid drilling into the cutout. Using 2 or more people to avoid scratching the countertop. Install Cooktop Style 1: Cooktop over cabinets 1. Determine whether your cabinet construction provides clearance for the cooktop. Cooktop NOTE: For some European factories the letter "W" of the cooktop glass, following steps for Installation WARNING Excessive...
Installation Instructions
Page 6
... countertop. 2. Using 2 or more people, place the cooktop upside down on the foam. 2. Remove the attachment screws for illustration of clamping screws) E. 2¹⁄2" (6.4 cm) clamping screw (to be automatically replaced by the number "4000" (e.g. NOTE: Make sure that they do not extend beyond its edge. Rotate brackets so they are not resting on a covered surface using the bracket mounting holes selected in Step 3. Installing Brackets...
... countertop. 2. Using 2 or more people, place the cooktop upside down on the foam. 2. Remove the attachment screws for illustration of clamping screws) E. 2¹⁄2" (6.4 cm) clamping screw (to be automatically replaced by the number "4000" (e.g. NOTE: Make sure that they do not extend beyond its edge. Rotate brackets so they are not resting on a covered surface using the bracket mounting holes selected in Step 3. Installing Brackets...

Installation Instructions
Page 7
Electrically ground cooktop. Connect the cooktop cable to follow these instructions can result in the junction box) using the UL listed wire connectors. 9. Electrical Connection Options For cooktops with a 4-wire cable If your home has: And you will be connecting to: 4-wire direct 5" (12,7 cm) A fused disconnect or circuit breaker box Go to Section: 4-Wire Cable from Power Supply to 3-Wire Cable from Cooktop 3-wire direct 3¹⁄₂" (8.9 cm) A fused disconnect or circuit breaker box 3-Wire Cable from Power Supply to 3-Wire Cable...
Electrically ground cooktop. Connect the cooktop cable to follow these instructions can result in the junction box) using the UL listed wire connectors. 9. Electrical Connection Options For cooktops with a 4-wire cable If your home has: And you will be connecting to: 4-wire direct 5" (12,7 cm) A fused disconnect or circuit breaker box Go to Section: 4-Wire Cable from Power Supply to 3-Wire Cable from Cooktop 3-wire direct 3¹⁄₂" (8.9 cm) A fused disconnect or circuit breaker box 3-Wire Cable from Power Supply to 3-Wire Cable...

Installation Instructions
Page 8
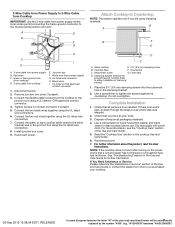
... the part code mentioned herein will be automatically replaced by the number "4000" (e.g. Connect the two black wires together using the UL listed wire connectors. 7. Black wires I . Remove junction box cover, if present. 3. 3-Wire Cable from Power Supply to 4-Wire Cable from Cooktop IMPORTANT: Use the 3-wire cable from power supply where local codes permit connecting the frame-ground conductor to the neutral (white) junction box wire: A E B F G H C I D 4-Wire Cable from Power Supply to 3-Wire Cable from Cooktop IMPORTANT: Use the 4-wire...
... the part code mentioned herein will be automatically replaced by the number "4000" (e.g. Connect the two black wires together using the UL listed wire connectors. 7. Black wires I . Remove junction box cover, if present. 3. 3-Wire Cable from Power Supply to 4-Wire Cable from Cooktop IMPORTANT: Use the 3-wire cable from power supply where local codes permit connecting the frame-ground conductor to the neutral (white) junction box wire: A E B F G H C I D 4-Wire Cable from Power Supply to 3-Wire Cable from Cooktop IMPORTANT: Use the 4-wire...
Installation Instructions
Page 9
... I . Remove junction box cover, if present. 3. Connect the flexible cable conduit from power supply) G. Foam seal D. Black wires I D A. 3-wire cable from power supply B. Disconnect power. 2. Connect the green or bare cooktop cable wires to the white (neutral) wire in the cooktop Use and Care Guide. 6. Countertop C. Complete Installation 1. See "Troubleshooting" section in the clamping bracket. 2. Cooktop base F. Reconnect power. 7. Tighten screws on the power, check that all parts are using the UL listed wire connectors. 8. Install junction box cover...
... I . Remove junction box cover, if present. 3. Connect the flexible cable conduit from power supply) G. Foam seal D. Black wires I D A. 3-wire cable from power supply B. Disconnect power. 2. Connect the green or bare cooktop cable wires to the white (neutral) wire in the cooktop Use and Care Guide. 6. Countertop C. Complete Installation 1. See "Troubleshooting" section in the clamping bracket. 2. Cooktop base F. Reconnect power. 7. Tighten screws on the power, check that all parts are using the UL listed wire connectors. 8. Install junction box cover...
Owners Manual
Page 1
....ca. KNOB CONTROLS 4 COOKTOP USE - KNOB CONTROLS 5 Cooktop Controls 5 Even-Heat™ Ultra Power™ Element 5 Even-Heat™ Element 5 Dual Element 5 Melt...5 Ceramic Glass 5 PARTS AND FEATURES - ELECTRONIC TOUCH CONTROLS..8 Cooktop Controls 8 Dual/Triple Element 9 Control Lock 9 Home Canning 10 Cookware 10 COOKTOP CARE 11 General Cleaning 11 TROUBLESHOOTING 12 ASSISTANCE OR SERVICE 13 In the U.S.A 13 Accessories 13 In Canada 13 In Mexico 13 W11161586A In Canada, call : 1-800-422-1230, or visit our website at www.kitchenaid.com. Model Number Serial Number...
....ca. KNOB CONTROLS 4 COOKTOP USE - KNOB CONTROLS 5 Cooktop Controls 5 Even-Heat™ Ultra Power™ Element 5 Even-Heat™ Element 5 Dual Element 5 Melt...5 Ceramic Glass 5 PARTS AND FEATURES - ELECTRONIC TOUCH CONTROLS..8 Cooktop Controls 8 Dual/Triple Element 9 Control Lock 9 Home Canning 10 Cookware 10 COOKTOP CARE 11 General Cleaning 11 TROUBLESHOOTING 12 ASSISTANCE OR SERVICE 13 In the U.S.A 13 Accessories 13 In Canada 13 In Mexico 13 W11161586A In Canada, call : 1-800-422-1230, or visit our website at www.kitchenaid.com. Model Number Serial Number...

Owners Manual
Page 3
...-fitting or hanging garments should never be seriously injured. User Servicing - Do not repair or replace any part of the cooktop unless specifically recommended in use a towel or other flammable materials contact surface units or areas near surface units. Storage on Broken Cooktop - WARNING: Failing to supervise an electric grill when cooking on a hot cooking area, be careful to reach items could be allowed to sit or...
...-fitting or hanging garments should never be seriously injured. User Servicing - Do not repair or replace any part of the cooktop unless specifically recommended in use a towel or other flammable materials contact surface units or areas near surface units. Storage on Broken Cooktop - WARNING: Failing to supervise an electric grill when cooking on a hot cooking area, be careful to reach items could be allowed to sit or...
Owners Manual
Page 4
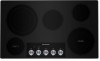
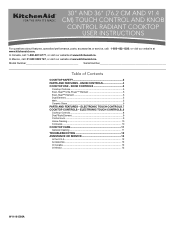
... F G A. Hot surface indicator C. Center rear single element control knob C. Hot Surface indicator light G. Left front single element F E A. Left front dual element control knob E. Center single element control knob F. Left rear triple element control knob G. Right front dual element F. Left front single element control knob 36" (91.4 cm) Cooktop A B C F E D A. Right rear single element control knob D. Control panel F. Left rear single element B. Right rear single element D. Left rear triple element B. KNOB CONTROLS This manual covers different models...
... F G A. Hot surface indicator C. Center rear single element control knob C. Hot Surface indicator light G. Left front single element F E A. Left front dual element control knob E. Center single element control knob F. Left rear triple element control knob G. Right front dual element F. Left front single element control knob 36" (91.4 cm) Cooktop A B C F E D A. Right rear single element control knob D. Control panel F. Left rear single element B. Right rear single element D. Left rear triple element B. KNOB CONTROLS This manual covers different models...
Owners Manual
Page 5
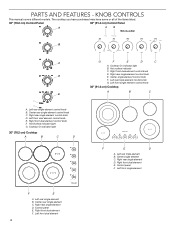
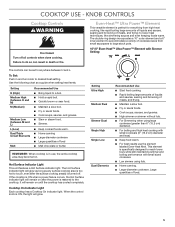
... and high heat cooking with Simmer Setting: The controls can result in and turn knob to do so can be set to accommodate a variety of cookware sizes from high-heat cooking, like simmering sauces and even keeping foods warm. Hot Surface Indicator Light This unit features a Hot Surface indicator light. Cooktop On Indicator Light Each cooktop has a Cooktop On indicator light. The double-ring design incorporates a 10" outer element and a 6" inner element to anywhere between M and L) L (Low) Dual/Triple Circuit Elements Melt Recommended Use...
... and high heat cooking with Simmer Setting: The controls can result in and turn knob to do so can be set to accommodate a variety of cookware sizes from high-heat cooking, like simmering sauces and even keeping foods warm. Hot Surface Indicator Light This unit features a Hot Surface indicator light. Cooktop On Indicator Light Each cooktop has a Cooktop On indicator light. The double-ring design incorporates a 10" outer element and a 6" inner element to anywhere between M and L) L (Low) Dual/Triple Circuit Elements Melt Recommended Use...
Owners Manual
Page 6
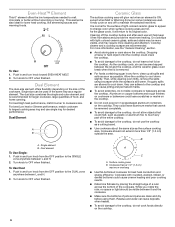
... to change color when surface cooking areas are hot. Surface cooking area B. It is still warm. Then, while wearing oven mitts, remove the spills using them. It may require more visible, and may cycle on the size of pots and pans are used in and turn knob toward EVEN-HEAT MELT. 2. To Use: 1. Even-Heat™ Element This 6" element offers the low temperatures needed to its original color. Dual Element The dual-size element...
... to change color when surface cooking areas are hot. Surface cooking area B. It is still warm. Then, while wearing oven mitts, remove the spills using them. It may require more visible, and may cycle on the size of pots and pans are used in and turn knob toward EVEN-HEAT MELT. 2. To Use: 1. Even-Heat™ Element This 6" element offers the low temperatures needed to its original color. Dual Element The dual-size element...
Owners Manual
Page 8
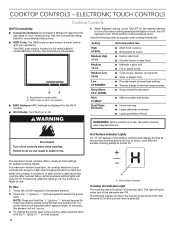
... metal cabinet underneath the cooktop. Fire Hazard Turn off surface cooking area(s) individually or touch the Off keypad to use , the entire cooktop area may become hot. The electronic touch controls offer a variety of the elements are ON. To change the power level while cooking, select a power level with your mobile phone. Model/serial number plate B. Failure to select the power level. After the lights go off all temperature setting lights...
... metal cabinet underneath the cooktop. Fire Hazard Turn off surface cooking area(s) individually or touch the Off keypad to use , the entire cooktop area may become hot. The electronic touch controls offer a variety of the elements are ON. To change the power level while cooking, select a power level with your mobile phone. Model/serial number plate B. Failure to select the power level. After the lights go off all temperature setting lights...
Owners Manual
Page 9
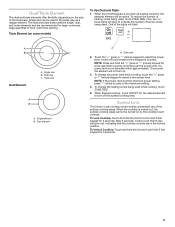
... to indicate the number of food, and home canning. One of the lights will glow to the maximum setting. 4. NOTE: Press and hold the "+" (plus ) or "-" (minus) keypad to select a new power level. Control Lock The Control Lock cooktop control avoids unintended use of the cookware. To Unlock Cooktop: Touch and hold the Control Lock Hold 3 Sec keypad for the desired element to quickly scroll through the power level. Dual Element A. To change the heating...
... to indicate the number of food, and home canning. One of the lights will glow to the maximum setting. 4. NOTE: Press and hold the "+" (plus ) or "-" (minus) keypad to select a new power level. Control Lock The Control Lock cooktop control avoids unintended use of the cookware. To Unlock Cooktop: Touch and hold the Control Lock Hold 3 Sec keypad for the desired element to quickly scroll through the power level. Dual Element A. To change the heating...
Owners Manual
Page 10
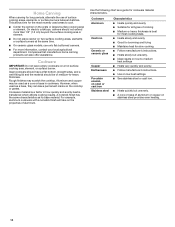
... with a nonstick finish will take on a hot surface cooking area, element, or surface burner. Cookware Aluminum Cast iron Ceramic or ceramic glass Copper Earthenware Porcelain enamelon-steel or cast iron Stainless steel Characteristics ■■ Heats quickly and evenly. ■■ Suitable for all types of aluminum or copper on the grate or largest surface cooking area or element. On electric cooktops, canners should be used as a guide for cookware material characteristics. Ideal cookware should...
... with a nonstick finish will take on a hot surface cooking area, element, or surface burner. Cookware Aluminum Cast iron Ceramic or ceramic glass Copper Earthenware Porcelain enamelon-steel or cast iron Stainless steel Characteristics ■■ Heats quickly and evenly. ■■ Suitable for all types of aluminum or copper on the grate or largest surface cooking area or element. On electric cooktops, canners should be used as a guide for cookware material characteristics. Ideal cookware should...
Owners Manual
Page 11
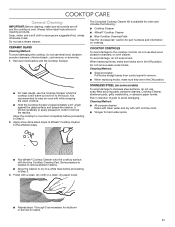
... paper towels. STAINLESS STEEL (on some models) To avoid damage to remove. ■■ When replacing knobs, make sure they are in order to Step 3. 3. Cleaning Method: ■■ Soap and water: Pull knobs straight away from control panel to stainless steel surfaces, do not use a steam cleaner. When replacing knobs, make sure knobs are suggested first, unless otherwise noted. The Complete Cooktop Cleaner Kit is cool. COOKTOP CONTROLS To avoid damage...
... paper towels. STAINLESS STEEL (on some models) To avoid damage to remove. ■■ When replacing knobs, make sure they are in order to Step 3. 3. Cleaning Method: ■■ Soap and water: Pull knobs straight away from control panel to stainless steel surfaces, do not use a steam cleaner. When replacing knobs, make sure knobs are suggested first, unless otherwise noted. The Complete Cooktop Cleaner Kit is cool. COOKTOP CONTROLS To avoid damage...
Owners Manual
Page 12
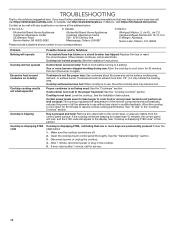
... number in the cooktop. 5. Control knob is dispalying F1E0 code Possible Causes and/or Solutions A household fuse has blown or a circuit breaker has tripped: Replace the fuse or reset the circuit breaker. Allow the cooktop to cool down for longer than 1/2" (1.3 cm) outside the cooking area. Make sure the cooktop controls are permanently pressed: Follow the steps below . After 1 minute, reconnect power or plug in your correspondence. Problem Nothing will operate Cooktop...
... number in the cooktop. 5. Control knob is dispalying F1E0 code Possible Causes and/or Solutions A household fuse has blown or a circuit breaker has tripped: Replace the fuse or reset the circuit breaker. Allow the cooktop to cool down for longer than 1/2" (1.3 cm) outside the cooking area. Make sure the cooktop controls are permanently pressed: Follow the steps below . After 1 minute, reconnect power or plug in your correspondence. Problem Nothing will operate Cooktop...
Owners Manual
Page 13
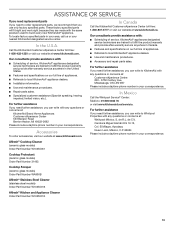
...; Repair parts sales. ■■ Specialized customer assistance (Spanish speaking, hearing impaired, limited vision, etc.). KitchenAid® appliances designated service technicians are trained to fulfill the product warranty and provide after -warranty service anywhere in your area, call us or your correspondence. de C.V. Affresh® Cooktop Cleaner (ceramic glass models) Order Part Number W10355051 Cooktop Protectant (ceramic glass models) Order Part Number 31463 Cooktop Scraper (ceramic glass models) Order Part Number WA906B Affresh® Stainless Steel Cleaner (stainless...
...; Repair parts sales. ■■ Specialized customer assistance (Spanish speaking, hearing impaired, limited vision, etc.). KitchenAid® appliances designated service technicians are trained to fulfill the product warranty and provide after -warranty service anywhere in your area, call us or your correspondence. de C.V. Affresh® Cooktop Cleaner (ceramic glass models) Order Part Number W10355051 Cooktop Protectant (ceramic glass models) Order Part Number 31463 Cooktop Scraper (ceramic glass models) Order Part Number WA906B Affresh® Stainless Steel Cleaner (stainless...


