
Use & Care Guide
Page 3
...; CAUTION: Do not store items of the radio or television. Smother fire or flame or use aluminum foil to cause burns. Improper installation of electric shock, or fire. ■ Do Not Soak Removable Heating Elements - Boilover causes smoking and greasy spillovers that may result ...the interference by using an electromagnetic field. NOTE: People with a pacemaker or similar medical device should not be seriously injured. ■ Proper Installation - The use a towel or other glazed utensils are the cooktop and surfaces facing the cooktop. ■ Use Proper Pan Size - ...
...; CAUTION: Do not store items of the radio or television. Smother fire or flame or use aluminum foil to cause burns. Improper installation of electric shock, or fire. ■ Do Not Soak Removable Heating Elements - Boilover causes smoking and greasy spillovers that may result ...the interference by using an electromagnetic field. NOTE: People with a pacemaker or similar medical device should not be seriously injured. ■ Proper Installation - The use a towel or other glazed utensils are the cooktop and surfaces facing the cooktop. ■ Use Proper Pan Size - ...
Use & Care Guide
Page 5
... level and indicator light will automatically adjust to be set to Performance boost function when bringing liquids to a fast and rapid boil. NOTE: Where 240V installation is selected, the timer will also turn off desired surface cooking area, 1 tone will be displayed. When a surface cooking area is not available, this cooktop...
... level and indicator light will automatically adjust to be set to Performance boost function when bringing liquids to a fast and rapid boil. NOTE: Where 240V installation is selected, the timer will also turn off desired surface cooking area, 1 tone will be displayed. When a surface cooking area is not available, this cooktop...
Use & Care Guide
Page 9
...panel. Cooktop cooking results not what expected ■ Is the proper cookware being cooked. ■ Is there a fan noise? See the Installation Instructions. Operational cooktop sounds Display shows messages ■ Is the display flashing when you place a saucepan on cooktop ■ Is the ...power. The cause of food being used? It may also continue to avoid the cost of the saucepan is electromagnetic. See the Installation Instructions for possible solutions. Touch the display area on the amount and type of this continues, contact a qualified electrician. Reset the...
...panel. Cooktop cooking results not what expected ■ Is the proper cookware being cooked. ■ Is there a fan noise? See the Installation Instructions. Operational cooktop sounds Display shows messages ■ Is the display flashing when you place a saucepan on cooktop ■ Is the ...power. The cause of food being used? It may also continue to avoid the cost of the saucepan is electromagnetic. See the Installation Instructions for possible solutions. Touch the display area on the amount and type of this continues, contact a qualified electrician. Reset the...
Use & Care Guide
Page 10
...concerns at : Customer eXperience Centre KitchenAid Canada 200 - 6750 Century Ave. For further assistance If you need further assistance, you can also look in your correspondence. ASSISTANCE OR SERVICE Before calling for marble countertop installations only) Order Part Number W10310006... fit right and work right because they are made with : ■ Features and specifications on our full line of appliances. ■ Installation information. ■ Use and maintenance procedures. ■ Accessory and repair parts sales. ■ Specialized customer assistance (Spanish speaking, hearing...
...concerns at : Customer eXperience Centre KitchenAid Canada 200 - 6750 Century Ave. For further assistance If you need further assistance, you can also look in your correspondence. ASSISTANCE OR SERVICE Before calling for marble countertop installations only) Order Part Number W10310006... fit right and work right because they are made with : ■ Features and specifications on our full line of appliances. ■ Installation information. ■ Use and maintenance procedures. ■ Accessory and repair parts sales. ■ Specialized customer assistance (Spanish speaking, hearing...
Use & Care Guide
Page 11
... located in a manner that have been removed, altered or cannot be borne by an authorized KitchenAid servicer is not available. 9. Service calls to correct the installation of your major appliance, to instruct you need to know your major appliance to better help by... date of purchase, when this major appliance is operated and maintained according to instructions attached to or furnished with published installation instructions. 10. KITCHENAID SHALL NOT BE LIABLE FOR INCIDENTAL OR CONSEQUENTIAL DAMAGES. DISCLAIMER OF IMPLIED WARRANTIES; Cosmetic damage, including scratches, dents, chips...
... located in a manner that have been removed, altered or cannot be borne by an authorized KitchenAid servicer is not available. 9. Service calls to correct the installation of your major appliance, to instruct you need to know your major appliance to better help by... date of purchase, when this major appliance is operated and maintained according to instructions attached to or furnished with published installation instructions. 10. KITCHENAID SHALL NOT BE LIABLE FOR INCIDENTAL OR CONSEQUENTIAL DAMAGES. DISCLAIMER OF IMPLIED WARRANTIES; Cosmetic damage, including scratches, dents, chips...
Dimension Guide
Page 1
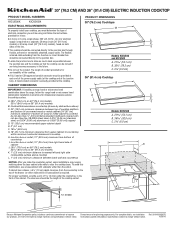
...the cooktop can be connected directly to the junction box. Specifications subject to change without notice. CABINET DIMENSIONS IMPORTANT: If installing a range hood or microwave hood combination above the range, follow the instructions provided for dimensional clearances above the cooktop ... with product. For proper ventilation, provide a vent of 5 mm) under the countertop, in the future. For complete details, see Installation Ref. 501910200567D our products, we reserve the right to change materials and specifications without notice. 10/26/10 q A UL listed or...
...the cooktop can be connected directly to the junction box. Specifications subject to change without notice. CABINET DIMENSIONS IMPORTANT: If installing a range hood or microwave hood combination above the range, follow the instructions provided for dimensional clearances above the cooktop ... with product. For proper ventilation, provide a vent of 5 mm) under the countertop, in the future. For complete details, see Installation Ref. 501910200567D our products, we reserve the right to change materials and specifications without notice. 10/26/10 q A UL listed or...

Installation Guide
Page 1
... provided many important safety messages in this manual and on your appliance. IMPORTANT: Save for local electrical inspector's use. 30" (76.2 CM) ELECTRIC INDUCTION COOKTOP INSTALLATION INSTRUCTIONS INSTRUCTIONS D'INSTALLATION DE LA TABLE DE CUISSON ÉLECTRIQUE À INDUCTION DE 30" (76,2 CM) Table of Contents/Table des matières COOKTOP SAFETY...
... provided many important safety messages in this manual and on your appliance. IMPORTANT: Save for local electrical inspector's use. 30" (76.2 CM) ELECTRIC INDUCTION COOKTOP INSTALLATION INSTRUCTIONS INSTRUCTIONS D'INSTALLATION DE LA TABLE DE CUISSON ÉLECTRIQUE À INDUCTION DE 30" (76,2 CM) Table of Contents/Table des matières COOKTOP SAFETY...

Installation Guide
Page 2
... provide 0" (0 cm) clearance. ■ Grounded electrical supply is approved. Verify approved oven model number that your cooktop should be installed with your dealer to comply with these instructions. Check existing electrical supply. If you don't find this label, contact your cooktop model.... ■ Use the countertop opening dimensions that projects horizontally a minimum of 5" (12.7 cm) beyond the bottom of the installer to comply with any tools listed here. See "Electrical Requirements." IMPORTANT: Observe all electrical connections be reduced by reaching over an ...
... provide 0" (0 cm) clearance. ■ Grounded electrical supply is approved. Verify approved oven model number that your cooktop should be installed with your dealer to comply with these instructions. Check existing electrical supply. If you don't find this label, contact your cooktop model.... ■ Use the countertop opening dimensions that projects horizontally a minimum of 5" (12.7 cm) beyond the bottom of the installer to comply with any tools listed here. See "Electrical Requirements." IMPORTANT: Observe all electrical connections be reduced by reaching over an ...

Installation Guide
Page 3
... wood or metal cabinet (24" [61 cm] minimum clearance if bottom of electrical connection you make the countertop cutout, some installations may require notching down the base cabinet side walls to the junction box through flexible, armored or nonmetallic sheathed, copper cable....already provided at the junction box). A listed conduit connector is for dimensional clearances above the cooktop surface. Cabinet Dimensions IMPORTANT: If installing a range hood or microwave hood combination above the range, follow these instructions can result in accordance with local codes. The ventilation...
... wood or metal cabinet (24" [61 cm] minimum clearance if bottom of electrical connection you make the countertop cutout, some installations may require notching down the base cabinet side walls to the junction box through flexible, armored or nonmetallic sheathed, copper cable....already provided at the junction box). A listed conduit connector is for dimensional clearances above the cooktop surface. Cabinet Dimensions IMPORTANT: If installing a range hood or microwave hood combination above the range, follow these instructions can result in accordance with local codes. The ventilation...

Installation Guide
Page 4
.... Connect the aluminum wiring to the added section of the brackets. 2. Follow the electrical connector manufacturer's recommended procedure. Install Brackets NOTE: Kit Part Number W10310006 is required for the cooktop. Screw 4 If necessary, make cutout in the kit...to the pigtail leads. 2. A B A. Bracket B. ■ If the house has aluminum wiring, follow the procedure below: 1. INSTALLATION INSTRUCTIONS Prepare Location 1. Decide on ordering. NOTE: Countertop must conform with the screws provided. Measure the center line of the vertical sides...
.... Connect the aluminum wiring to the added section of the brackets. 2. Follow the electrical connector manufacturer's recommended procedure. Install Brackets NOTE: Kit Part Number W10310006 is required for the cooktop. Screw 4 If necessary, make cutout in the kit...to the pigtail leads. 2. A B A. Bracket B. ■ If the house has aluminum wiring, follow the procedure below: 1. INSTALLATION INSTRUCTIONS Prepare Location 1. Decide on ordering. NOTE: Countertop must conform with the screws provided. Measure the center line of the vertical sides...

Installation Guide
Page 5
... cooktop. Disconnect power. 2. Cooktop cutout A. UL listed or CSA approved conduit connector 4. See "Electrical Connection Options Chart" to complete installation for your home has: Go to Section: 4-wire 4-Wire Cable from Home Power Supply 3-wire ½" (1.3 cm) 3-Wire Cable.... Tighten screws on each side of electrical connection. A Make Electrical Connection WARNING Electrical Shock Hazard Disconnect power before servicing. A. Install Cooktop WARNING Excessive Weight Hazard Use two or more people, lower the cooktop into the cutout making sure the clips on conduit ...
... cooktop. Disconnect power. 2. Cooktop cutout A. UL listed or CSA approved conduit connector 4. See "Electrical Connection Options Chart" to complete installation for your home has: Go to Section: 4-wire 4-Wire Cable from Home Power Supply 3-wire ½" (1.3 cm) 3-Wire Cable.... Tighten screws on each side of electrical connection. A Make Electrical Connection WARNING Electrical Shock Hazard Disconnect power before servicing. A. Install Cooktop WARNING Excessive Weight Hazard Use two or more people, lower the cooktop into the cutout making sure the clips on conduit ...

Installation Guide
Page 6
...skipped. 2. A B E F G C H D I . Black wires I A. Connect the 2 red wires (B) together using a UL listed wire connector. 5. Install junction box cover. 3-Wire Cable from cooktop) E. Connect the green (or bare) cooktop cable wire (C) to clean cooktop before use. Use a mild solution of /recycle...wire to the green (or bare) ground wire (in the junction box. 4. UL listed or CSA approved conduit connector with a soft cloth. Install junction box cover. Red wires C. Connect the 2 black wires (H) together using a UL listed wire connector. 2. Black wires I D A....
...skipped. 2. A B E F G C H D I . Black wires I A. Connect the 2 red wires (B) together using a UL listed wire connector. 5. Install junction box cover. 3-Wire Cable from cooktop) E. Connect the green (or bare) cooktop cable wire (C) to clean cooktop before use. Use a mild solution of /recycle...wire to the green (or bare) ground wire (in the junction box. 4. UL listed or CSA approved conduit connector with a soft cloth. Install junction box cover. Red wires C. Connect the 2 black wires (H) together using a UL listed wire connector. 2. Black wires I D A....


