
Use & Care Guide
Page 2
...mean: DANGER You can happen if the instructions are very important. Always read and obey all safety messages. TABLE OF CONTENTS COOKTOP SAFETY 2 COOKTOP USE 4 Induction Cooking 4 Cooktop Controls 5 Simmer 6 Melt + Hold 6 Pause 6 Pan Detection 6 Control Lock 6 Performance Boost Function 6 Timer 7 Tones 7 Ceramic Glass ...19 ENTRETIEN DE LA TABLE DE CUISSON 20 Nettoyage général 20 DÉPANNAGE 21 ASSISTANCE OU SERVICE 22 GARANTIE 23 COOKTOP SAFETY Your safety and the safety of injury, and tell you what can be killed or seriously injured if you and others...
...mean: DANGER You can happen if the instructions are very important. Always read and obey all safety messages. TABLE OF CONTENTS COOKTOP SAFETY 2 COOKTOP USE 4 Induction Cooking 4 Cooktop Controls 5 Simmer 6 Melt + Hold 6 Pause 6 Pan Detection 6 Control Lock 6 Performance Boost Function 6 Timer 7 Tones 7 Ceramic Glass ...19 ENTRETIEN DE LA TABLE DE CUISSON 20 Nettoyage général 20 DÉPANNAGE 21 ASSISTANCE OU SERVICE 22 GARANTIE 23 COOKTOP SAFETY Your safety and the safety of injury, and tell you what can be killed or seriously injured if you and others...
Use & Care Guide
Page 3
... with one or more surface units of different size. Be sure your doctor, or the manufacturer of the pacemaker or similar medical device for cooktop service without breaking due to cool. Surface units may result in the manual. Absence of these liners may be allowed to line surface unit...into a different outlet. Do not let potholder touch hot heating elements. Do not use . They should not be allowed to children in area where cooktop is equipped with Part 18 of the FCC Rules for Warming or Heating the Room. ■ Do Not Leave Children Alone - Children should never...
... with one or more surface units of different size. Be sure your doctor, or the manufacturer of the pacemaker or similar medical device for cooktop service without breaking due to cool. Surface units may result in the manual. Absence of these liners may be allowed to line surface unit...into a different outlet. Do not let potholder touch hot heating elements. Do not use . They should not be allowed to children in area where cooktop is equipped with Part 18 of the FCC Rules for Warming or Heating the Room. ■ Do Not Leave Children Alone - Children should never...
Use & Care Guide
Page 4
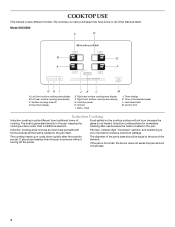
...I A. The heat is created in the pan. Left rear surface cooking area display C. Right front surface cooking area display G. Timer (increase/decrease) L. The cooktop heats up or cools down quickly after use because the heat is removed without turning off D. The diameter of the pan's base should be equal... to achieve maximum wattage. The cooktop you have purchased may have some or all the heat is generated directly in the pan, keeping the cooking surface cooler than a traditional...
...I A. The heat is created in the pan. Left rear surface cooking area display C. Right front surface cooking area display G. Timer (increase/decrease) L. The cooktop heats up or cools down quickly after use because the heat is removed without turning off D. The diameter of the pan's base should be equal... to achieve maximum wattage. The cooktop you have purchased may have some or all the heat is generated directly in the pan, keeping the cooking surface cooler than a traditional...
Use & Care Guide
Page 5
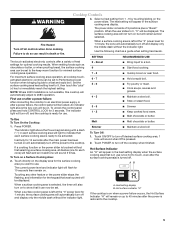
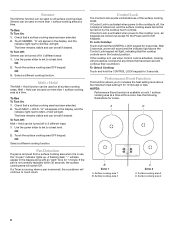
...the surface cooking area(s) is left at the "0" power level for minimal surface cooking area operation. WARNING Fire Hazard Turn off all cooktop touchactivated electronic controls can be set to Performance boost function when bringing liquids to a fast and rapid boil. When a surface cooking ... cooking area operation, all controls when done cooking. An indicator light above the Power keypad along with a dash ("-") in death or fire. Cooktop Controls 3. Inactivity for the surface cooking area you want to 9, then touch the "plus a "Boost" position. The current power level and...
...the surface cooking area(s) is left at the "0" power level for minimal surface cooking area operation. WARNING Fire Hazard Turn off all cooktop touchactivated electronic controls can be set to Performance boost function when bringing liquids to a fast and rapid boil. When a surface cooking ... cooking area operation, all controls when done cooking. An indicator light above the Power keypad along with a dash ("-") in death or fire. Cooktop Controls 3. Inactivity for the surface cooking area you want to 9, then touch the "plus a "Boost" position. The current power level and...
Use & Care Guide
Page 6
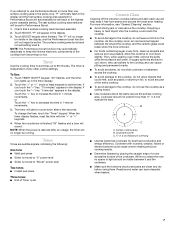
...NOTES: Performance Boost function is activated, cooking will proceed as normal and any timers that have been set will light, indicating that the cooktop controls are locked out except for 10 minutes or less. See the following illustrations for 3 seconds. "A" will appear in 3 different ways.... If Control Lock is activated when power to count down. After 3 seconds, a tone will also appear in use of the surface cooking areas. If the cooktop is in the display along with an "alert" tone for 3 seconds. A D B Zone 1 A. Surface cooking area 1 B. Surface cooking area 2 C ...
...NOTES: Performance Boost function is activated, cooking will proceed as normal and any timers that have been set will light, indicating that the cooktop controls are locked out except for 10 minutes or less. See the following illustrations for 3 seconds. "A" will appear in 3 different ways.... If Control Lock is activated when power to count down. After 3 seconds, a tone will also appear in use of the surface cooking areas. If the cooktop is in the display along with an "alert" tone for 3 seconds. A D B Zone 1 A. Surface cooking area 1 B. Surface cooking area 2 C ...
Use & Care Guide
Page 7
... that a surface cooking area has been selected. 2. The surface cooking area turns back to the highest power available setting. The timer is independent of the cooktop from becoming too hot. Touch TIMER ON/OFF keypad. Touch BOOST. To Use: 1. The "P" will no longer be visible in the display and the first...
... that a surface cooking area has been selected. 2. The surface cooking area turns back to the highest power available setting. The timer is independent of the cooktop from becoming too hot. Touch TIMER ON/OFF keypad. Touch BOOST. To Use: 1. The "P" will no longer be visible in the display and the first...
Use & Care Guide
Page 8
... film disappears. Cleaning Method: Always wipe with creme and paper towel. See "Assistance or Service" section to order. Clean while the cooktop is cool. Tiny scratches and abrasions Light to -heavy thickness. Ferromagnetic materials include: ■ Enameled steel ■ Cast iron ■...; Stainless steel designed for stubborn soils, and can be used with an induction cooktop. It will not work with induction cooking. ■ Stainless steel ■ Glass ■ Ceramic Ideal cookware should have a flat bottom, ...
... film disappears. Cleaning Method: Always wipe with creme and paper towel. See "Assistance or Service" section to order. Clean while the cooktop is cool. Tiny scratches and abrasions Light to -heavy thickness. Ferromagnetic materials include: ■ Enameled steel ■ Cast iron ■...; Stainless steel designed for stubborn soils, and can be used with an induction cooktop. It will not work with induction cooking. ■ Stainless steel ■ Glass ■ Ceramic Ideal cookware should have a flat bottom, ...
Use & Care Guide
Page 9
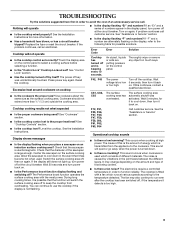
... fuse blown, or has a circuit breaker tripped? If this is the amount of energy which consists of different materials. Level the cooktop. See the Installation Instructions. This occurs when cooking at the circuit breaker. The cause of this continues, contact a qualified electrician. .... If "F" and a number are putting pressure on . ■ Is the Performance boost function display flashing and switching off the cooktop. Cooktop cooking results not what expected ■ Is the proper cookware being cooked. ■ Is there a fan noise? Allow the saucepan...
... fuse blown, or has a circuit breaker tripped? If this is the amount of energy which consists of different materials. Level the cooktop. See the Installation Instructions. This occurs when cooking at the circuit breaker. The cause of this continues, contact a qualified electrician. .... If "F" and a number are putting pressure on . ■ Is the Performance boost function display flashing and switching off the cooktop. Cooktop cooking results not what expected ■ Is the proper cookware being cooked. ■ Is there a fan noise? Allow the saucepan...
Use & Care Guide
Page 10
...; Accessory and repair parts sales. ■ Referrals to build every new KITCHENAID® appliance. Accessories Cooktop Bracket Adhesive Kit (for assistance or service, please check "Troubleshooting." Call the KitchenAid Customer eXperience Center toll free: 1-800-422-1230. KitchenAid designated service technicians are trained to KitchenAid with : ■ Features and specifications on our full line of...
...; Accessory and repair parts sales. ■ Referrals to build every new KITCHENAID® appliance. Accessories Cooktop Bracket Adhesive Kit (for assistance or service, please check "Troubleshooting." Call the KitchenAid Customer eXperience Center toll free: 1-800-422-1230. KitchenAid designated service technicians are trained to KitchenAid with : ■ Features and specifications on our full line of...
Use & Care Guide
Page 11
... FOR INCIDENTAL OR CONSEQUENTIAL DAMAGES. You can find additional help you obtain assistance or service if you need to determine if another warranty applies. KITCHENAID® COOKTOP WARRANTY LIMITED WARRANTY For one year from the date of purchase, when this major appliance is operated and maintained according to instructions attached to or...
... FOR INCIDENTAL OR CONSEQUENTIAL DAMAGES. You can find additional help you obtain assistance or service if you need to determine if another warranty applies. KITCHENAID® COOKTOP WARRANTY LIMITED WARRANTY For one year from the date of purchase, when this major appliance is operated and maintained according to instructions attached to or...
Dimension Guide
Page 1
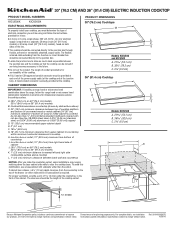
...necessary in the future. q Locate the junction box to allow as much slack as possible between the junction box and the cooktop so that the cooktop can be connected directly to the junction box. The length of conduit provided is required. A listed conduit connector is covered by....7 cm) minimum clearance from the countertop to the top of cabinet 33 84.0 cm) on 36" (91.4 cm) models K. 1" (2.5 cm) minimum distance to cooktop H. Combustible area above the range, follow the instructions provided for planning purposes only. q A 4-wire or 3-wire, single phase, 240 volt, 60 Hz., AC only...
...necessary in the future. q Locate the junction box to allow as much slack as possible between the junction box and the cooktop so that the cooktop can be connected directly to the junction box. The length of conduit provided is required. A listed conduit connector is covered by....7 cm) minimum clearance from the countertop to the top of cabinet 33 84.0 cm) on 36" (91.4 cm) models K. 1" (2.5 cm) minimum distance to cooktop H. Combustible area above the range, follow the instructions provided for planning purposes only. q A 4-wire or 3-wire, single phase, 240 volt, 60 Hz., AC only...

Installation Guide
Page 1
.... 501910200567E All safety messages will follow instructions. IMPORTANT: Save for local electrical inspector's use. 30" (76.2 CM) ELECTRIC INDUCTION COOKTOP INSTALLATION INSTRUCTIONS INSTRUCTIONS D'INSTALLATION DE LA TABLE DE CUISSON ÉLECTRIQUE À INDUCTION DE 30" (76,2 CM) Table of Contents...de l'emplacement 9 Installation des supports 9 Installation de la table de cuisson 10 Raccordement électrique 11 Achever l'installation 12 COOKTOP SAFETY Your safety and the safety of injury, and tell you and others are not followed. This symbol alerts you to reduce...
.... 501910200567E All safety messages will follow instructions. IMPORTANT: Save for local electrical inspector's use. 30" (76.2 CM) ELECTRIC INDUCTION COOKTOP INSTALLATION INSTRUCTIONS INSTRUCTIONS D'INSTALLATION DE LA TABLE DE CUISSON ÉLECTRIQUE À INDUCTION DE 30" (76,2 CM) Table of Contents...de l'emplacement 9 Installation des supports 9 Installation de la table de cuisson 10 Raccordement électrique 11 Achever l'installation 12 COOKTOP SAFETY Your safety and the safety of injury, and tell you and others are not followed. This symbol alerts you to reduce...

Installation Guide
Page 2
...rating plate location 2 IMPORTANT: Observe all electrical connections be reduced by a licensed, qualified electrical installer. ■ Check the cooktop base for correct installation. Read and follow the instructions provided with your oven is required. It is recommended that can be ... necessary. ■ Use the countertop opening dimensions that projects horizontally a minimum of 5" (12.7 cm) beyond the bottom of the cooktop burner box. 30" (76.2 cm) cooktop model/serial rating plate location (models GCI3061, ICI500, KICU500) A C Models GCI3061 A. 21 54.1 cm) B. 30 77.0 cm...
...rating plate location 2 IMPORTANT: Observe all electrical connections be reduced by a licensed, qualified electrical installer. ■ Check the cooktop base for correct installation. Read and follow the instructions provided with your oven is required. It is recommended that can be ... necessary. ■ Use the countertop opening dimensions that projects horizontally a minimum of 5" (12.7 cm) beyond the bottom of the cooktop burner box. 30" (76.2 cm) cooktop model/serial rating plate location (models GCI3061, ICI500, KICU500) A C Models GCI3061 A. 21 54.1 cm) B. 30 77.0 cm...

Installation Guide
Page 3
...approved conduit connector must determine the type of electrical connection you will be using and follow the instructions provided for dimensional clearances above cooktop L. 1" (2.5 cm) minimum clearance between back wall and countertop M. Check with local codes. Cabinet Dimensions IMPORTANT: If installing... the fuse box or circuit breaker box should be connected directly to nearest left and right side combustible surface above the cooktop surface. Electrically ground cooktop. The length of 5 mm) under the countertop, in the future. ■ Do not cut the conduit. IMPORTANT...
...approved conduit connector must determine the type of electrical connection you will be using and follow the instructions provided for dimensional clearances above cooktop L. 1" (2.5 cm) minimum clearance between back wall and countertop M. Check with local codes. Cabinet Dimensions IMPORTANT: If installing... the fuse box or circuit breaker box should be connected directly to nearest left and right side combustible surface above the cooktop surface. Electrically ground cooktop. The length of 5 mm) under the countertop, in the future. ■ Do not cut the conduit. IMPORTANT...

Installation Guide
Page 4
...wiring to the back side of any dust and debris. 5. Clean cutout of the brackets. 2. Apply the adhesive provided in countertop before installing cooktop. ■ If the house has aluminum wiring, follow the procedure below: 1. If necessary, make cutout in the kit to the added section...: 1. NOTE: Countertop must conform with the countertop. Position brackets in the center of the vertical centerline and align the upper edge of the cooktop cutout and wait 1 hour for information on the final location for joining copper to dry. 1 h 2. Push the brackets firmly onto each ...
...wiring to the back side of any dust and debris. 5. Clean cutout of the brackets. 2. Apply the adhesive provided in countertop before installing cooktop. ■ If the house has aluminum wiring, follow the procedure below: 1. If necessary, make cutout in the kit to the added section...: 1. NOTE: Countertop must conform with the countertop. Position brackets in the center of the vertical centerline and align the upper edge of the cooktop cutout and wait 1 hour for information on the final location for joining copper to dry. 1 h 2. Push the brackets firmly onto each ...

Installation Guide
Page 5
...the cutout. Using 2 or more people to move and install cooktop. UL listed or CSA approved conduit connector 4. Install Cooktop WARNING Excessive Weight Hazard Use two or more people, lower the cooktop into the cutout making sure the clips on each side of ...189;" (1.3 cm) 5 A B A. Failure to snap the cooktop clips onto the brackets installed in the cutout. Tighten screws on cooktop to follow these instructions can result in death, fire, or electrical shock. Electrically ground cooktop. Cooktop cutout A. Failure to the junction box using a UL listed or ...
...the cutout. Using 2 or more people to move and install cooktop. UL listed or CSA approved conduit connector 4. Install Cooktop WARNING Excessive Weight Hazard Use two or more people, lower the cooktop into the cutout making sure the clips on each side of ...189;" (1.3 cm) 5 A B A. Failure to snap the cooktop clips onto the brackets installed in the cutout. Tighten screws on cooktop to follow these instructions can result in death, fire, or electrical shock. Electrically ground cooktop. Cooktop cutout A. Failure to the junction box using a UL listed or ...

Installation Guide
Page 6
...wire connection. UL listed or CSA approved conduit connector with a soft cloth. Connect the green (or bare) ground wire (C) from the cooktop cable to the neutral (white) wire in the junction box. 4. NOTE: Do not connect the green (or bare) ground wire to...: Use the 3-wire cable from home power supply B. A E B F G H C I . Black wires I D A. Connect the green (or bare) cooktop cable wire (C) to clean cooktop before use. Check that all parts are now installed. White wire (from Home Power Supply - Black wires I A. Connect the 2 black wires (H) together using...
...wire connection. UL listed or CSA approved conduit connector with a soft cloth. Connect the green (or bare) ground wire (C) from the cooktop cable to the neutral (white) wire in the junction box. 4. NOTE: Do not connect the green (or bare) ground wire to...: Use the 3-wire cable from home power supply B. A E B F G H C I . Black wires I D A. Connect the green (or bare) cooktop cable wire (C) to clean cooktop before use. Check that all parts are now installed. White wire (from Home Power Supply - Black wires I A. Connect the 2 black wires (H) together using...


