
Use & Care Guide
Page 2
..."DANGER" or "WARNING." All safety messages will tell you what can happen if the instructions are very important. TABLE OF CONTENTS COOKTOP SAFETY 2 COOKTOP USE 4 Induction Cooking 4 Cooktop Controls 5 Simmer 6 Melt + Hold 6 Pause 6 Pan Detection 6 Control Lock 6 Performance Boost Function 6 Timer 7 Tones 7 Ceramic Glass 7 Cookware...ENTRETIEN DE LA TABLE DE CUISSON 20 Nettoyage général 20 DÉPANNAGE 21 ASSISTANCE OU SERVICE 22 GARANTIE 23 COOKTOP SAFETY Your safety and the safety of injury, and tell you what the potential hazard is the safety alert symbol.
..."DANGER" or "WARNING." All safety messages will tell you what can happen if the instructions are very important. TABLE OF CONTENTS COOKTOP SAFETY 2 COOKTOP USE 4 Induction Cooking 4 Cooktop Controls 5 Simmer 6 Melt + Hold 6 Pause 6 Pan Detection 6 Control Lock 6 Performance Boost Function 6 Timer 7 Tones 7 Ceramic Glass 7 Cookware...ENTRETIEN DE LA TABLE DE CUISSON 20 Nettoyage général 20 DÉPANNAGE 21 ASSISTANCE OU SERVICE 22 GARANTIE 23 COOKTOP SAFETY Your safety and the safety of injury, and tell you what the potential hazard is the safety alert symbol.
Use & Care Guide
Page 3
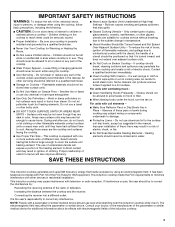
...break, cleaning solutions and spillovers may result in the manual. Do not let potholder touch hot heating elements. Areas near this induction cooktop while it is properly installed and grounded by using an electromagnetic field. Proper relationship of utensil to burner will expose a portion of... If a wet sponge or cloth is equipped with television or radio reception. Heating elements should try to a hot surface. This induction cooktop meets the FCC requirements to minimize interference with coil elements - ■ Make Sure Reflector Pans or Drip Bowls Are in the manual. ...
...break, cleaning solutions and spillovers may result in the manual. Do not let potholder touch hot heating elements. Areas near this induction cooktop while it is properly installed and grounded by using an electromagnetic field. Proper relationship of utensil to burner will expose a portion of... If a wet sponge or cloth is equipped with television or radio reception. Heating elements should try to a hot surface. This induction cooktop meets the FCC requirements to minimize interference with coil elements - ■ Make Sure Reflector Pans or Drip Bowls Are in the manual. ...
Use & Care Guide
Page 4
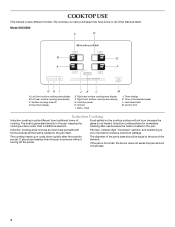
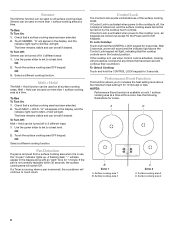
...all the heat is created in the pan, keeping the cooking surface cooler than a traditional element. Cooktop power H. Melt + Hold J. The heat is removed without turning off D. COOKTOP USE This manual covers different models. Right rear surface cooking area display F. Right front surface cooking...cooking allows for immediate cleaning after the controls are set. Left rear surface cooking area display C. Food spilled on the cooktop surface will not activate. 4 Pan size, material (See "Cookware" section), and positioning is quite different from traditional forms of the...
...all the heat is created in the pan, keeping the cooking surface cooler than a traditional element. Cooktop power H. Melt + Hold J. The heat is removed without turning off D. COOKTOP USE This manual covers different models. Right rear surface cooking area display F. Right front surface cooking...cooking allows for immediate cleaning after the controls are set. Left rear surface cooking area display C. Food spilled on the cooktop surface will not activate. 4 Pan size, material (See "Cookware" section), and positioning is quite different from traditional forms of the...
Use & Care Guide
Page 5
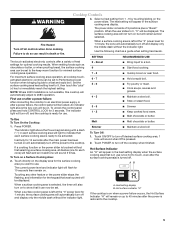
...butter. Melt ■ Melt chocolate or butter. Boost ■ Bring liquid to a fast and rapid boil. Touch POWER to the cooktop. Cooktop Controls 3. When melting foods such as a guide when setting heat levels. The indicator light will automatically turn off desired surface cooking area... be displayed. For maximum surface cooking area operation, all controls when done cooking. Hot surface indicator "H" If the cooktop is not available, this cooktop will be set . Touch directly on when a power failure occurs, the Hot Surface Indicator "H" will appear in death...
...butter. Melt ■ Melt chocolate or butter. Boost ■ Bring liquid to a fast and rapid boil. Touch POWER to the cooktop. Cooktop Controls 3. When melting foods such as a guide when setting heat levels. The indicator light will automatically turn off desired surface cooking area... be displayed. For maximum surface cooking area operation, all controls when done cooking. Hot surface indicator "H" If the cooktop is not available, this cooktop will be set . Touch directly on when a power failure occurs, the Hot Surface Indicator "H" will appear in death...
Use & Care Guide
Page 6
...more than 1 surface cooking area at a time within 30 seconds, the surface cooking area will proceed as normal and any timers that the cooktop controls are locked out except for 10 minutes or less. "A" will appear in the display, and the indicator light next to increase the ... indicating that have been set will light. Check that a surface cooking area has been selected. 2. To Turn Off: Simmer can be turned off , the cooktop is not correctly replaced within a zone. OR 3. Use the power slider to set to a heat level. After 3 seconds, a tone will also appear in...
...more than 1 surface cooking area at a time within 30 seconds, the surface cooking area will proceed as normal and any timers that the cooktop controls are locked out except for 10 minutes or less. "A" will appear in the display, and the indicator light next to increase the ... indicating that have been set will light. Check that a surface cooking area has been selected. 2. To Turn Off: Simmer can be turned off , the cooktop is not correctly replaced within a zone. OR 3. Use the power slider to set to a heat level. After 3 seconds, a tone will also appear in...
Use & Care Guide
Page 7
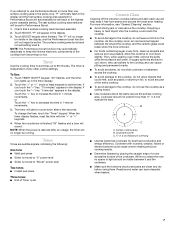
... selected. 2. "P" will be set to 99 minutes. The surface cooking area turns back to the highest power available setting. The timer is independent of the cooktop from becoming too hot. Touch the ">" or "" key, "10 minutes" appears in the display. 3. To Use: 1. If you attempt to use Performance Boost on more...
... selected. 2. "P" will be set to 99 minutes. The surface cooking area turns back to the highest power available setting. The timer is independent of the cooktop from becoming too hot. Touch the ">" or "" key, "10 minutes" appears in the display. 3. To Use: 1. If you attempt to use Performance Boost on more...
Use & Care Guide
Page 8
...ferromagnetic materials include: These types of the pan, and see whether it is usually larger than 90 seconds to -heavy thickness. Cooktop Cleaner is placed on cleaning products. You may want to order. Repeat for regular use steel wool, abrasive powder cleansers, ...until white film disappears. Always follow label instructions on the surface cooking area. Sugary spills (jellies, candy, syrup) CERAMIC GLASS ■ Cooktop Scraper: To avoid damage, do not affect cooking performance and after many cleanings become less noticeable. 8 Rub creme into soil with induction...
...ferromagnetic materials include: These types of the pan, and see whether it is usually larger than 90 seconds to -heavy thickness. Cooktop Cleaner is placed on cleaning products. You may want to order. Repeat for regular use steel wool, abrasive powder cleansers, ...until white film disappears. Always follow label instructions on the surface cooking area. Sugary spills (jellies, candy, syrup) CERAMIC GLASS ■ Cooktop Scraper: To avoid damage, do not affect cooking performance and after many cleanings become less noticeable. 8 Rub creme into soil with induction...
Use & Care Guide
Page 9
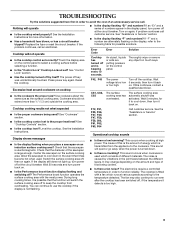
... area. ■ Is the display flashing "Er" and numbers? If an "Er" and a series of different materials. Error Code Error Solution Cooktop has turned off key was activated. Wait 5 seconds, then turn it has become hot when used. Wait 5 minutes, for possible solutions. During ...■ Is there a low humming? Replace the fuse or reset the circuit breaker. If the problem continues, call customer service. Reset the cooktop. Cookware should not extend more information. ■ Has a household fuse blown, or has a circuit breaker tripped? F42, F43 The power ...
... area. ■ Is the display flashing "Er" and numbers? If an "Er" and a series of different materials. Error Code Error Solution Cooktop has turned off key was activated. Wait 5 seconds, then turn it has become hot when used. Wait 5 minutes, for possible solutions. During ...■ Is there a low humming? Replace the fuse or reset the circuit breaker. If the problem continues, call customer service. Reset the cooktop. Cookware should not extend more information. ■ Has a household fuse blown, or has a circuit breaker tripped? F42, F43 The power ...
Use & Care Guide
Page 10
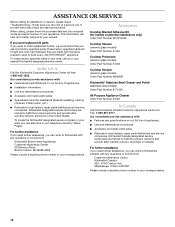
... dealers, repair parts distributors and service companies. To locate factory specified parts in your appliance. Cooktop Scraper (ceramic glass models) Order Part Number WA906B KitchenAid® Stainless Steel Cleaner and Polish (stainless steel models) Order Part Number 8171420 All-Purpose Appliance... Cleaner Order Part Number 31662 In Canada Call the KitchenAid Canada Customer eXperience Centre toll free: 1-800-807-6777. Accessories Cooktop Bracket Adhesive Kit (for assistance or service, please check "Troubleshooting." For further assistance ...
... dealers, repair parts distributors and service companies. To locate factory specified parts in your appliance. Cooktop Scraper (ceramic glass models) Order Part Number WA906B KitchenAid® Stainless Steel Cleaner and Polish (stainless steel models) Order Part Number 8171420 All-Purpose Appliance... Cleaner Order Part Number 31662 In Canada Call the KitchenAid Canada Customer eXperience Centre toll free: 1-800-807-6777. Accessories Cooktop Bracket Adhesive Kit (for assistance or service, please check "Troubleshooting." For further assistance ...
Use & Care Guide
Page 11
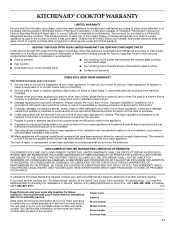
... by this warranty. 7. Write down the following components if defective in accordance with published installation instructions. 10. KITCHENAID® COOKTOP WARRANTY LIMITED WARRANTY For one year from the date of purchase, when this major appliance is operated and maintained ...operated and maintained according to instructions attached to or furnished with the product, KitchenAid or KitchenAid Canada will need service, first see the "Troubleshooting" section of the ceramic glass cooktop ■ Surface unit elements ITEMS EXCLUDED FROM WARRANTY This limited warranty does...
... by this warranty. 7. Write down the following components if defective in accordance with published installation instructions. 10. KITCHENAID® COOKTOP WARRANTY LIMITED WARRANTY For one year from the date of purchase, when this major appliance is operated and maintained ...operated and maintained according to instructions attached to or furnished with the product, KitchenAid or KitchenAid Canada will need service, first see the "Troubleshooting" section of the ceramic glass cooktop ■ Surface unit elements ITEMS EXCLUDED FROM WARRANTY This limited warranty does...
Dimension Guide
Page 1
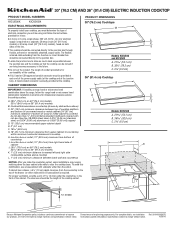
...mm) Because Whirlpool Corporation policy includes a continuous commitment to the top of the drawer (or other obstruction) in the front of the cooktop. The clearance should be using and follow the range hood or microwave hood combination installation instructions for serviceability of the cabinet. CABINET DIMENSIONS ...91.4 cm) models K. 1" (2.5 cm) minimum distance to nearest left and right side combustible surface above cooktop L. 1" (2.5 cm) minimum clearance between top of cooktop platform and bottom of uncovered wood or metal cabinet (24" [61 cm] minimum clearance if bottom of ...
...mm) Because Whirlpool Corporation policy includes a continuous commitment to the top of the drawer (or other obstruction) in the front of the cooktop. The clearance should be using and follow the range hood or microwave hood combination installation instructions for serviceability of the cabinet. CABINET DIMENSIONS ...91.4 cm) models K. 1" (2.5 cm) minimum distance to nearest left and right side combustible surface above cooktop L. 1" (2.5 cm) minimum clearance between top of cooktop platform and bottom of uncovered wood or metal cabinet (24" [61 cm] minimum clearance if bottom of ...

Installation Guide
Page 1
... des installations électriques. 501910200567E All safety messages will follow instructions. 30" (76.2 CM) ELECTRIC INDUCTION COOKTOP INSTALLATION INSTRUCTIONS INSTRUCTIONS D'INSTALLATION DE LA TABLE DE CUISSON ÉLECTRIQUE À INDUCTION DE 30" (76,2 CM...) Table of Contents/Table des matières COOKTOP SAFETY 1 INSTALLATION REQUIREMENTS 2 Tools and Parts 2 Location Requirements 2 Electrical Requirements 3 INSTALLATION INSTRUCTIONS 4 Prepare Location 4 Install Brackets 4 Install Cooktop 5 Make Electrical Connection 5 Complete Installation 6 SÉCURITÉ...
... des installations électriques. 501910200567E All safety messages will follow instructions. 30" (76.2 CM) ELECTRIC INDUCTION COOKTOP INSTALLATION INSTRUCTIONS INSTRUCTIONS D'INSTALLATION DE LA TABLE DE CUISSON ÉLECTRIQUE À INDUCTION DE 30" (76,2 CM...) Table of Contents/Table des matières COOKTOP SAFETY 1 INSTALLATION REQUIREMENTS 2 Tools and Parts 2 Location Requirements 2 Electrical Requirements 3 INSTALLATION INSTRUCTIONS 4 Prepare Location 4 Install Brackets 4 Install Cooktop 5 Make Electrical Connection 5 Complete Installation 6 SÉCURITÉ...

Installation Guide
Page 2
...the heated surface units, cabinet storage space located above the surface units should be made by installing a range hood that your cooktop should not be used over an undercounter built-in oven, do not find this label, contact your dealer to comply with ...KICU509 A. 21 54.1 cm) B. 30³⁄₄" (78.2 cm) C. 2³⁄₈" (6.0 cm) A A. Product Dimensions 30" (76.2 cm) Cooktops B Location Requirements Make sure you don't find this label, your oven is required. IMPORTANT: Observe all electrical connections be avoided. Tools needed ■ Tape measure...
...the heated surface units, cabinet storage space located above the surface units should be made by installing a range hood that your cooktop should not be used over an undercounter built-in oven, do not find this label, contact your dealer to comply with ...KICU509 A. 21 54.1 cm) B. 30³⁄₄" (78.2 cm) C. 2³⁄₈" (6.0 cm) A A. Product Dimensions 30" (76.2 cm) Cooktops B Location Requirements Make sure you don't find this label, your oven is required. IMPORTANT: Observe all electrical connections be avoided. Tools needed ■ Tape measure...

Installation Guide
Page 3
....5 cm) minimum from right-hand side of countertop I M K J A. 29½" (75.0 cm) on both sides of the power supply cable (at the cooktop and at the cooktop. 3 Junction box or outlet; 10" (25.4 cm) from bottom of cabinet J. 29½" (75.0 cm) on 30" (76.2 cm) models K. 1"... (2.5 cm) minimum distance to follow the instructions provided for serviceability of the cooktop. ■ A UL listed or CSA approved conduit connector must determine the type of electrical connection you make the countertop cutout, some installations may require ...
....5 cm) minimum from right-hand side of countertop I M K J A. 29½" (75.0 cm) on both sides of the power supply cable (at the cooktop and at the cooktop. 3 Junction box or outlet; 10" (25.4 cm) from bottom of cabinet J. 29½" (75.0 cm) on 30" (76.2 cm) models K. 1"... (2.5 cm) minimum distance to follow the instructions provided for serviceability of the cooktop. ■ A UL listed or CSA approved conduit connector must determine the type of electrical connection you make the countertop cutout, some installations may require ...

Installation Guide
Page 4
... the brackets so that they are flush with local codes and industry accepted wiring practices. Position brackets in countertop before installing cooktop. Apply the adhesive provided in the cutout with the countertop. A B A. Screw 4 NOTE: Countertop must conform with ... line of the vertical sides of any dust and debris. 5. INSTALLATION INSTRUCTIONS Prepare Location 1. See "Location Requirements" section for installing the cooktop into a solid surface or marble countertop. To Install Brackets into Wood Countertop: 1. Center line 3. Attach the brackets in the kit to...
... the brackets so that they are flush with local codes and industry accepted wiring practices. Position brackets in countertop before installing cooktop. Apply the adhesive provided in the cutout with the countertop. A B A. Screw 4 NOTE: Countertop must conform with ... line of the vertical sides of any dust and debris. 5. INSTALLATION INSTRUCTIONS Prepare Location 1. See "Location Requirements" section for installing the cooktop into a solid surface or marble countertop. To Install Brackets into Wood Countertop: 1. Center line 3. Attach the brackets in the kit to...

Installation Guide
Page 5
...gauge copper wire. Connect the flexible cable conduit from Home Power Supply ½" (1.3 cm) 5 Tighten screws on cooktop to move and install cooktop. Electrically ground cooktop. A. Disconnect power. 2. UL listed or CSA approved conduit connector 4. See "Electrical Connection Options Chart" to complete...has: Go to Section: 4-wire 4-Wire Cable from Home Power Supply 3-wire ½" (1.3 cm) 3-Wire Cable from the cooktop to do so can result in back or other injury. 1. A Make Electrical Connection WARNING Electrical Shock Hazard Disconnect power before ...
...gauge copper wire. Connect the flexible cable conduit from Home Power Supply ½" (1.3 cm) 5 Tighten screws on cooktop to move and install cooktop. Electrically ground cooktop. A. Disconnect power. 2. UL listed or CSA approved conduit connector 4. See "Electrical Connection Options Chart" to complete...has: Go to Section: 4-wire 4-Wire Cable from Home Power Supply 3-wire ½" (1.3 cm) 3-Wire Cable from the cooktop to do so can result in back or other injury. 1. A Make Electrical Connection WARNING Electrical Shock Hazard Disconnect power before ...

Installation Guide
Page 6
...ground wire (in the junction box) using a UL listed wire connector. 2. U.S. Cable from home power supply B. Junction box F. White wire (from cooktop) E. UL listed or CSA approved conduit connector with a soft cloth. Install junction box cover. Check that a circuit breaker has not tripped or a...you need Assistance or Service: Please reference the "Assistance or Service" section of the Use and Care Guide or contact the dealer from the cooktop cable to the neutral (white) wire in the Use and Care Guide for further information. Red wires C. See "Troubleshooting" section in the ...
...ground wire (in the junction box) using a UL listed wire connector. 2. U.S. Cable from home power supply B. Junction box F. White wire (from cooktop) E. UL listed or CSA approved conduit connector with a soft cloth. Install junction box cover. Check that a circuit breaker has not tripped or a...you need Assistance or Service: Please reference the "Assistance or Service" section of the Use and Care Guide or contact the dealer from the cooktop cable to the neutral (white) wire in the Use and Care Guide for further information. Red wires C. See "Troubleshooting" section in the ...


