
Quick Guide
Page 6
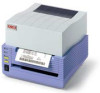
... you use a roll paper, set the paper here. This is the printing area. This is used to open the head. ■ Thermal head .... ■ Top Cover Open Thermal head Driver for darkness adjustment ... Press this part to the paper size. ■ Paper holder slide lever .. Press this lever to adjust the paper holder width. ■ Head Open this to change the print darkness. 4 Please keep this . ■ Driver for darkness adjustment Paper holder Head Sensor Paper holder slide lever Platen roller Head Open...
... you use a roll paper, set the paper here. This is the printing area. This is used to open the head. ■ Thermal head .... ■ Top Cover Open Thermal head Driver for darkness adjustment ... Press this part to the paper size. ■ Paper holder slide lever .. Press this lever to adjust the paper holder width. ■ Head Open this to change the print darkness. 4 Please keep this . ■ Driver for darkness adjustment Paper holder Head Sensor Paper holder slide lever Platen roller Head Open...
Quick Guide
Page 13
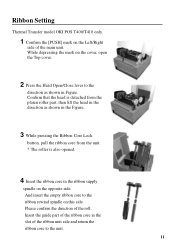
... roller is detached from the platen roller part, then lift the head in the direction as shown in the slot of the main unit. Confirm that the head is also opened. 4 Insert the ribbon core in the ribbon supply spindle on the opposite side. And insert the empty ribbon core to the ribbon rewind spindle on this side. Ribbon Setting Thermal Transfer model OKI...
... roller is detached from the platen roller part, then lift the head in the direction as shown in the slot of the main unit. Confirm that the head is also opened. 4 Insert the ribbon core in the ribbon supply spindle on the opposite side. And insert the empty ribbon core to the ribbon rewind spindle on this side. Ribbon Setting Thermal Transfer model OKI...
Quick Guide
Page 15
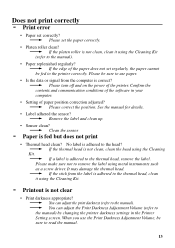
... can adjust the Print Darkness Adjustment Volume (refer to the manual) by changing the printer darkness settings in your computer. • Setting of the paper does not set the paper correctly. • Platen roller clean? ➞ If the platen roller is adhered to the thermal head, remove the label. It may damage the thermal head. ➞ If the stick from the computer is not clean, clean the head using the Cleaning Kit...
... can adjust the Print Darkness Adjustment Volume (refer to the manual) by changing the printer darkness settings in your computer. • Setting of the paper does not set the paper correctly. • Platen roller clean? ➞ If the platen roller is adhered to the thermal head, remove the label. It may damage the thermal head. ➞ If the stick from the computer is not clean, clean the head using the Cleaning Kit...

Users Guide
Page 4
... configure the printer. PREFACE OKIPOS T400/T410 USER'S GUIDE OKIPOS T400/T410 USER'S GUIDE contains basic information about the printer such as setup, installation, cleaning and maintenance. SECTION 1. It contains the commands that are used with the printer to configure the printer. It also contains complete instructions on how to unpack and set up the printer, load the labels and ribbon, and how to use the operator panel to produce labels with bar codes, alphanumeric data...
... configure the printer. PREFACE OKIPOS T400/T410 USER'S GUIDE OKIPOS T400/T410 USER'S GUIDE contains basic information about the printer such as setup, installation, cleaning and maintenance. SECTION 1. It contains the commands that are used with the printer to configure the printer. It also contains complete instructions on how to unpack and set up the printer, load the labels and ribbon, and how to use the operator panel to produce labels with bar codes, alphanumeric data...

Users Guide
Page 6
... PRINTER SPECIFICATIONS 2 CHARACTER FONTS...4 BAR CODES ...5 RHYSICAL ...6 OPTIONAL ACCESSORIES ...7 SECTION 2. CLEANING AND MAINTENANCE 31 INTRODUCTION ...31 PROCEDURES ...31 ADJUSTING THE PRINT QUALITY 31 Darkness (Print) ...31 Print Speed...32 CLEANING THE PRINT HEAD, PLATEN AND ROLLERS 32 REPLACING THE PRINT HEAD 33 CLEANING THE SENSORS ...35 Page-iii INSTALLATION AND CONFIGURATION 9 INTRODUCTION ...9 UNPACKING ...10 SETTING UP THE PRINTER...11 LOADING RIBBON (OKIPOS T4XXTT only 13 LOADING MEDIA ...15 LABEL SENSING...18 OPERATOR PANEL ...19 REAR CONNECTOR PANEL ...20 CONFIGURATION...
... PRINTER SPECIFICATIONS 2 CHARACTER FONTS...4 BAR CODES ...5 RHYSICAL ...6 OPTIONAL ACCESSORIES ...7 SECTION 2. CLEANING AND MAINTENANCE 31 INTRODUCTION ...31 PROCEDURES ...31 ADJUSTING THE PRINT QUALITY 31 Darkness (Print) ...31 Print Speed...32 CLEANING THE PRINT HEAD, PLATEN AND ROLLERS 32 REPLACING THE PRINT HEAD 33 CLEANING THE SENSORS ...35 Page-iii INSTALLATION AND CONFIGURATION 9 INTRODUCTION ...9 UNPACKING ...10 SETTING UP THE PRINTER...11 LOADING RIBBON (OKIPOS T4XXTT only 13 LOADING MEDIA ...15 LABEL SENSING...18 OPERATOR PANEL ...19 REAR CONNECTOR PANEL ...20 CONFIGURATION...

Users Guide
Page 8
Two-Dimensional Symbols...107 Data Matrix, Data Format ...108 Data Matrix, Print Data ...110 Sequential Numbering...111 Maxicode...113 PDF417 ...115 Printer Configuration Commands ...117 Eurocharacter Select...118 Printer Setting...119 Print Mode...122 Print Type ...123 Pitch Offset...124 Sensor Type ...125 Serial Interface Parameters...126 SECTION 5. TROUBLESHOOTING 144 INITIAL CHECKLIST ...144 USING THE IEEE 1284 PARALLEL INTERFACE 144 USING THE RS232C SERIAL INTERFACE 146 ERROR SIGNALS ...147 Page-v INTERFACE SPECIFICATIONS 127 INTRODUCTION ...127...
Two-Dimensional Symbols...107 Data Matrix, Data Format ...108 Data Matrix, Print Data ...110 Sequential Numbering...111 Maxicode...113 PDF417 ...115 Printer Configuration Commands ...117 Eurocharacter Select...118 Printer Setting...119 Print Mode...122 Print Type ...123 Pitch Offset...124 Sensor Type ...125 Serial Interface Parameters...126 SECTION 5. TROUBLESHOOTING 144 INITIAL CHECKLIST ...144 USING THE IEEE 1284 PARALLEL INTERFACE 144 USING THE RS232C SERIAL INTERFACE 146 ERROR SIGNALS ...147 Page-v INTERFACE SPECIFICATIONS 127 INTRODUCTION ...127...
Users Guide
Page 10
... label size is automatically compensated for by taking a label designed for a 203 dpi printer and sending the command stream to its 203 dpi head provides an economical labeling solution for the different resolution print heads. The OKIPOS T400/T410 printers use a subset of the printer such as setup, installation, configuration, cleaning and maintenance. The allowable range for each printer is presented in this section: • General Printer Specifications...
... label size is automatically compensated for by taking a label designed for a 203 dpi printer and sending the command stream to its 203 dpi head provides an economical labeling solution for the different resolution print heads. The OKIPOS T400/T410 printers use a subset of the printer such as setup, installation, configuration, cleaning and maintenance. The allowable range for each printer is presented in this section: • General Printer Specifications...

Users Guide
Page 25
... a media to swing upward on each side of the roll. Route the label material through the Paper Sensor Assembly and over the Platen. 16 come off the top of the printer. This allows the assembly to rotate upward to provide a guide when making the adjustment. With the Print Head Assembly in the OFF LINE mode and then press the FEED key. The Paper Guides...
... a media to swing upward on each side of the roll. Route the label material through the Paper Sensor Assembly and over the Platen. 16 come off the top of the printer. This allows the assembly to rotate upward to provide a guide when making the adjustment. With the Print Head Assembly in the OFF LINE mode and then press the FEED key. The Paper Guides...

Users Guide
Page 37
...) test label, press the FEED key. 4. The printer will resume. 5. PRINT TEST LABELS USER TEST PRINT The User Test Label prints the current default setting of the printer. If the FEED key is pressed a second time, printing will continuously print the USER TEST LABEL until the FEED key is pressed. Press the FEED key while simultaneously turning the POWER switch ON. 2. These settings can be changed by sending new default settings with the PG Printer Setting command. 1. To remove the printer from the Test Label mode, power the printer...
...) test label, press the FEED key. 4. The printer will resume. 5. PRINT TEST LABELS USER TEST PRINT The User Test Label prints the current default setting of the printer. If the FEED key is pressed a second time, printing will continuously print the USER TEST LABEL until the FEED key is pressed. Press the FEED key while simultaneously turning the POWER switch ON. 2. These settings can be changed by sending new default settings with the PG Printer Setting command. 1. To remove the printer from the Test Label mode, power the printer...

Users Guide
Page 38
... the print operation. Open the print head by one containing the internal printer settings. The printer will then beep3 times indicating it is in the OFF position. 29 When the printer beeps, release the LINE and FEED keys. Press the LINE and FEED keys while simultaneously turning the POWER switch to print a large (4" wide") Factory/Service Test Label. To remove the printer from the Factory/Service Print Test mode, remove power by placing the POWER switch in the Factory/Service Print Test mode. 4. Latch the Print Head in the...
... the print operation. Open the print head by one containing the internal printer settings. The printer will then beep3 times indicating it is in the OFF position. 29 When the printer beeps, release the LINE and FEED keys. Press the LINE and FEED keys while simultaneously turning the POWER switch to print a large (4" wide") Factory/Service Test Label. To remove the printer from the Factory/Service Print Test mode, remove power by placing the POWER switch in the Factory/Service Print Test mode. 4. Latch the Print Head in the...

Users Guide
Page 40
When adjusting the printer for optimum print quality, a bar code verifier system should the ink from the ribbon "bleed." The print darkness level can be set by downloading the setting using the #E Print Darkness software command (see Section 4, Programming Reference). Darkness (Print) This adjustment allows the user to make finer adjustments. 31 The #E Print Darkness command also provides for coated thermal transfer media. Setting "A" is used for Direct thermal media and "B" for darkness ranges matched to...
When adjusting the printer for optimum print quality, a bar code verifier system should the ink from the ribbon "bleed." The print darkness level can be set by downloading the setting using the #E Print Darkness software command (see Section 4, Programming Reference). Darkness (Print) This adjustment allows the user to make finer adjustments. 31 The #E Print Darkness command also provides for coated thermal transfer media. Setting "A" is used for Direct thermal media and "B" for darkness ranges matched to...

Users Guide
Page 41
... a cotton swab. 5. This adjustment is made only on the operator panel. Open the Print Head Assembly by the command code. Apply OKI Thermal Print Head Cleaner to make precise changes. Changing the print speed allows the user to control the amount of controlling print quality is by controlling the speed at which the label is printed. Turn the printer off and remove the power cable. 2. Print Speed The other method of time allowed for print element cooling before...
... a cotton swab. 5. This adjustment is made only on the operator panel. Open the Print Head Assembly by the command code. Apply OKI Thermal Print Head Cleaner to make precise changes. Changing the print speed allows the user to control the amount of controlling print quality is by controlling the speed at which the label is printed. Turn the printer off and remove the power cable. 2. Print Speed The other method of time allowed for print element cooling before...

Users Guide
Page 96
... selected, the printer will continue to control last label printing. If Tag is selected, the printer will stop printing as soon as a Label Out condition is no printer output for this command 1. To change the default setting in the printer, use the PG Printer Configuration command or the Printer Setting Utility program on liner 1 Tags Example: See above Placement: Separate data stream sent to the default value specified by...
... selected, the printer will continue to control last label printing. If Tag is selected, the printer will stop printing as soon as a Label Out condition is no printer output for this command 1. To change the default setting in the printer, use the PG Printer Configuration command or the Printer Setting Utility program on liner 1 Tags Example: See above Placement: Separate data stream sent to the default value specified by...

Users Guide
Page 101
If the number of data digits does not match those listed, the command is ignored. 2. Postnet Command Structure BPn...n n...n = 5 digits (Postnet-32 format) 6 digits (Postnet-37 format) 9 digits (Postnet-52 format) 11 digits (Postnet-62, Delivery Point format) Example: BP123456789 Placement: Immediately preceding the data to be accepted. 92 Only numeric data will be encoded Default: None Command Function Printer Input To print Postnet bar codes A H0100V0120BP94089 H0100V0160BP123456 H0100V0200BP123456789 H0100V0240BP12345678901 Q1Z Printer Output Special Notes 1.
If the number of data digits does not match those listed, the command is ignored. 2. Postnet Command Structure BPn...n n...n = 5 digits (Postnet-32 format) 6 digits (Postnet-37 format) 9 digits (Postnet-52 format) 11 digits (Postnet-62, Delivery Point format) Example: BP123456789 Placement: Immediately preceding the data to be accepted. 92 Only numeric data will be encoded Default: None Command Function Printer Input To print Postnet bar codes A H0100V0120BP94089 H0100V0160BP123456 H0100V0200BP123456789 H0100V0240BP12345678901 Q1Z Printer Output Special Notes 1.

Users Guide
Page 105
... the printer, or you must be present in every print job. If you do not have to be printed. 1. To pause during a print job, you may send the code if using the Bi-Com mode. Multi-Buffer jobs can be printed. 4. When used with the F Sequential Numbering command, the Print Quantity value should be equal to the total number of labels to be cleared with the * Clear Print Jobs and Memory...
... the printer, or you must be present in every print job. If you do not have to be printed. 1. To pause during a print job, you may send the code if using the Bi-Com mode. Multi-Buffer jobs can be printed. 4. When used with the F Sequential Numbering command, the Print Quantity value should be equal to the total number of labels to be cleared with the * Clear Print Jobs and Memory...
Users Guide
Page 123
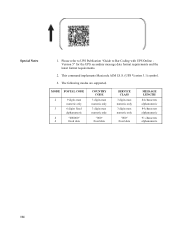
The following modes are supported. Special Notes 1. Please refer to UPS Publication "Guide to Bar Coding with UPS Online Version 5" for the UPS secondary message data format requirements and the latest format requirements. 2. MODE POSTAL CODE 2 9 digits max numeric only 3 6 digits fixed alphanumeric 4 "000000" 6 fixed data COUNTRY CODE 3 digits max numeric only 3 digits max numeric only "000" fixed data SERVICE CLASS 3 digits max numeric only 3 digits max...
The following modes are supported. Special Notes 1. Please refer to UPS Publication "Guide to Bar Coding with UPS Online Version 5" for the UPS secondary message data format requirements and the latest format requirements. 2. MODE POSTAL CODE 2 9 digits max numeric only 3 6 digits fixed alphanumeric 4 "000000" 6 fixed data COUNTRY CODE 3 digits max numeric only 3 digits max numeric only "000" fixed data SERVICE CLASS 3 digits max numeric only 3 digits max...

Users Guide
Page 137
... IEEE 1284 interface is not covered by the printer, and the order of printing cannot be configured to a single USB port. This may be changed. When using an option interface, DSW-8 on the other hosts. single Job Buffer The printer receives and prints one print job at a time. The USB interface allows the printer to be connected to accept one job at a time or multiple print jobs. THE RECEIVE BUFFER The CT...
... IEEE 1284 interface is not covered by the printer, and the order of printing cannot be configured to a single USB port. This may be changed. When using an option interface, DSW-8 on the other hosts. single Job Buffer The printer receives and prints one print job at a time. The USB interface allows the printer to be connected to accept one job at a time or multiple print jobs. THE RECEIVE BUFFER The CT...

Users Guide
Page 154
... Codes for incoming data. The Parallel port is now listening for details on the PC: a. See the beginning of the cable are allowed between the Start Command (A) and the Stop Command (Z). Check your job framed as the line wraps. A-DATA-Z b. If you send the print job to see if you have not typed a "0" (zero) for some of the reasons. 5. Verify that can analyze and troubleshoot...
... Codes for incoming data. The Parallel port is now listening for details on the PC: a. See the beginning of the cable are allowed between the Start Command (A) and the Stop Command (Z). Check your job framed as the line wraps. A-DATA-Z b. If you send the print job to see if you have not typed a "0" (zero) for some of the reasons. 5. Verify that can analyze and troubleshoot...

Users Guide
Page 155
... of the Command Code section. USING THE RS232C SERIAL INTERFACE 1. Is the RS232C Serial cable connected securely to your job to the printer, it only "beeps" and displays an error message of the current printer configuration settings. 6. This should be some inconsistencies with the A and Z commands? If after sending your serial port on the PC (DB-25S or DB-9S Male) and to print. It will list all of...
... of the Command Code section. USING THE RS232C SERIAL INTERFACE 1. Is the RS232C Serial cable connected securely to your job to the printer, it only "beeps" and displays an error message of the current printer configuration settings. 6. This should be some inconsistencies with the A and Z commands? If after sending your serial port on the PC (DB-25S or DB-9S Male) and to print. It will list all of...
Users Guide
Page 159
... dots/cell) dd = Vertical cell size (03-12 dots per cell) eee = Cells per AIM I.S.S. Prints 2-D Maxicode symbols per line. fff = Cell lines. a = Bar code option: 0 Codabar 1 Code 39 2 Interleaved 2 of 5 5 Industrial 2 of 5 6 Matrix 2 of the Data Matrix 2-D 108 eeefffghh symbology. g = Mirror image 0 Normal Print 1 Reverse Print hh = Guide cell thickness (01-15) 01 indicates normal type. Specifies the format of 5 bb...
... dots/cell) dd = Vertical cell size (03-12 dots per cell) eee = Cells per AIM I.S.S. Prints 2-D Maxicode symbols per line. fff = Cell lines. a = Bar code option: 0 Codabar 1 Code 39 2 Interleaved 2 of 5 5 Industrial 2 of 5 6 Matrix 2 of the Data Matrix 2-D 108 eeefffghh symbology. g = Mirror image 0 Normal Print 1 Reverse Print hh = Guide cell thickness (01-15) 01 indicates normal type. Specifies the format of 5 bb...


