
User's Manual
Page 1
... Off the projector 15 Warning Indicator 15 Adjusting the Projected Image 16 Adjusting the Projector's Height 16 Adjusting the Projector's Zoom / Focus 17 Adjusting Projected Image Size 17 User Controls 18 Control Panel & Remote Control 18 On-screen Display Menus 21 How to operate ...21 Menu Tree...22 Image...23 Display...28 Setup...31 Options...37 Appendices 41 Troubleshooting 41 Image Problems 41 Intermission Problems 44 Projector Status Indication 44 Remote Control Problems 46 Replacing the Lamp 47 Compatibility Modes 49 Ceiling Mount Installation 50 Optoma Global Offices...
... Off the projector 15 Warning Indicator 15 Adjusting the Projected Image 16 Adjusting the Projector's Height 16 Adjusting the Projector's Zoom / Focus 17 Adjusting Projected Image Size 17 User Controls 18 Control Panel & Remote Control 18 On-screen Display Menus 21 How to operate ...21 Menu Tree...22 Image...23 Display...28 Setup...31 Options...37 Appendices 41 Troubleshooting 41 Image Problems 41 Intermission Problems 44 Projector Status Indication 44 Remote Control Problems 46 Replacing the Lamp 47 Compatibility Modes 49 Ceiling Mount Installation 50 Optoma Global Offices...

User's Manual
Page 2
... let objects or liquids enter the projector as : Power supply cord or plug is required when the projector has been damaged in a fire or electric shock. 9. Class B emissions limits This Class B digital apparatus meets all servicing to qualified service personnel. Do not install near water or moisture. Please call Optoma to be adjusted or repaired by the manufacturer. 7. Do not block...
... let objects or liquids enter the projector as : Power supply cord or plug is required when the projector has been damaged in a fire or electric shock. 9. Class B emissions limits This Class B digital apparatus meets all servicing to qualified service personnel. Do not install near water or moisture. Please call Optoma to be adjusted or repaired by the manufacturer. 7. Do not block...

User's Manual
Page 3
... electric shock, do not open or disassemble the projector as this user's guide. ▀■ Warning- See pages 47-48. ▀■ Warning- will show on pages 47-48. ▀■ Warning- Use the "Lamp Reset" function from the on-screen display "Options|Lamp Settings" menu after replacing the lamp module (refer to rain or moisture. ▀■ Warning- Please do not expose this projector to page 40). ...
... electric shock, do not open or disassemble the projector as this user's guide. ▀■ Warning- See pages 47-48. ▀■ Warning- will show on pages 47-48. ▀■ Warning- Use the "Lamp Reset" function from the on-screen display "Options|Lamp Settings" menu after replacing the lamp module (refer to rain or moisture. ▀■ Warning- Please do not expose this projector to page 40). ...

User's Manual
Page 5
... out something on the screen. ▀■ In order to minimize the lamp power needed, use room blinds to achieve this ensures that projectors are located out of the line of light at all times. ▀■ Minimize standing facing into the projector's beam of sight from the screen to the audience; this is by ceiling-mounting the projector rather than placing it...
... out something on the screen. ▀■ In order to minimize the lamp power needed, use room blinds to achieve this ensures that projectors are located out of the line of light at all times. ▀■ Minimize standing facing into the projector's beam of sight from the screen to the audience; this is by ceiling-mounting the projector rather than placing it...

User's Manual
Page 14
... that the power cord and signal cable are securely connected. The Power LED will flash green (0.5s on the remote control to switch between inputs. Installation Powering On/Off the Projector Powering On the Projector 1. Remove the lens cap. 2. The Power LED will be flash Green (1.0s on your preferred language from quick menu after the startup screen display. 4. English 14 1 Lens Cap The first time you use the projector, you connect multiple sources at the same time, press the "Source" button on , 0.5s...
... that the power cord and signal cable are securely connected. The Power LED will flash green (0.5s on the remote control to switch between inputs. Installation Powering On/Off the Projector Powering On the Projector 1. Remove the lens cap. 2. The Power LED will be flash Green (1.0s on your preferred language from quick menu after the startup screen display. 4. English 14 1 Lens Cap The first time you use the projector, you connect multiple sources at the same time, press the "Source" button on , 0.5s...

User's Manual
Page 15
..., the projector can be switched on the projector's screen. 2. Press the " " button to turn off ), the projector has entered standby mode. Please contact your local dealer or our service center. Installation Powering off ). Once in standby mode, simply press " " button to operate for about 10 seconds for cooling cycle. Disconnect the power cord from the electrical outlet and the projector. 5. See pages 51-52. When the fan fails, the indicator flashes red...
..., the projector can be switched on the projector's screen. 2. Press the " " button to turn off ), the projector has entered standby mode. Please contact your local dealer or our service center. Installation Powering off ). Once in standby mode, simply press " " button to operate for about 10 seconds for cooling cycle. Disconnect the power cord from the electrical outlet and the projector. 5. See pages 51-52. When the fan fails, the indicator flashes red...

User's Manual
Page 18
Power LED Lamp LED Temp LED Indicate the projector's status. English 18 User Controls Control Panel & Remote Control There are two ways for you to the "Power On/Off the Projector" section on pages 14-15. Control Panel Using the Control Panel Power Refer to control the functions: Control Panel and Remote Control. Warning LED Indicate the projector's lamp/temperature status.
Power LED Lamp LED Temp LED Indicate the projector's status. English 18 User Controls Control Panel & Remote Control There are two ways for you to the "Power On/Off the Projector" section on pages 14-15. Control Panel Using the Control Panel Power Refer to control the functions: Control Panel and Remote Control. Warning LED Indicate the projector's lamp/temperature status.

User's Manual
Page 30
H Image Shift Shift the projected image position horizontally. V Keystone Press the or squarer image. Zoom Press the Press the to magnify an image on the edge of an image. to reduce the size of video source. V Image Shift Shift the projected image position vertically. to remove video encoding noise on the projection screen. Overscan the image to adjust image distortion vertically and makes a English 30 User Controls Display Overscan Overscan function removes the noise in a video image.
H Image Shift Shift the projected image position horizontally. V Keystone Press the or squarer image. Zoom Press the Press the to magnify an image on the edge of an image. to reduce the size of video source. V Image Shift Shift the projected image position vertically. to remove video encoding noise on the projection screen. Overscan the image to adjust image distortion vertically and makes a English 30 User Controls Display Overscan Overscan function removes the noise in a video image.

User's Manual
Page 34
Once this time has elapsed you will be used. Security Timer Can be select the time (Month/Day/Hour) function to set the number of hours the projector can be requested to switch on the projector. Off: Choose "Off" to be able to enter your password again. User Controls Setup | Security Security On: Choose "On" to use security verification when the turning on the projector without password verification. English 34
Once this time has elapsed you will be used. Security Timer Can be select the time (Month/Day/Hour) function to set the number of hours the projector can be requested to switch on the projector. Off: Choose "Off" to be able to enter your password again. User Controls Setup | Security Security On: Choose "On" to use security verification when the turning on the projector without password verification. English 34

User's Manual
Page 37
... turn it off . 37 English Background Color Use this function, press the " " key on High Altitude mode. Keypad Lock When the keypad lock function is on the display screen. Source Lock On: The projector will search specified connection port. Off: The projector will be locked, but the projector can still be operated by the remote control. User Controls Options Menu Location Choose the menu location on , the control panel will search for other signals if the current input signal...
... turn it off . 37 English Background Color Use this function, press the " " key on High Altitude mode. Keypad Lock When the keypad lock function is on the display screen. Source Lock On: The projector will search specified connection port. Off: The projector will be locked, but the projector can still be operated by the remote control. User Controls Options Menu Location Choose the menu location on , the control panel will search for other signals if the current input signal...

User's Manual
Page 39
The countdown timer will start, when there is supplied, without a signal input. The projector will automatically power off then the sleep timer countdown has finished. 39 English Auto Power Off (min) Set the countdown timer interval. Sleep Timer (min) Set the countdown timer interval. The timer will automatically power off when the countdown has finished (in minutes). User Controls Options Direct Power On Choose "On" to the projector. Then the projector will begin...
The countdown timer will start, when there is supplied, without a signal input. The projector will automatically power off then the sleep timer countdown has finished. 39 English Auto Power Off (min) Set the countdown timer interval. Sleep Timer (min) Set the countdown timer interval. The timer will automatically power off when the countdown has finished (in minutes). User Controls Options Direct Power On Choose "On" to the projector. Then the projector will begin...

User's Manual
Page 40
Lamp Reset Reset the lamp life hour after replacing the lamp. Brightness Mode STD: Choose "STD" to dim the projector lamp which will appear 30 hours before suggested replacement of lamp. The message will lower power consumption and extend the lamp life by up to 130%. BRIGHT: Choose "BRIGHT" to hide the warning message when the changing lamp message is displayed. English 40 User Controls Options | Lamp Settings Lamp Hours Display the projection time. Lamp Reminder Choose this function to show or to increase the brightness.
Lamp Reset Reset the lamp life hour after replacing the lamp. Brightness Mode STD: Choose "STD" to dim the projector lamp which will appear 30 hours before suggested replacement of lamp. The message will lower power consumption and extend the lamp life by up to 130%. BRIGHT: Choose "BRIGHT" to hide the warning message when the changing lamp message is displayed. English 40 User Controls Options | Lamp Settings Lamp Hours Display the projection time. Lamp Reminder Choose this function to show or to increase the brightness.

User's Manual
Page 41
... the projector is still not projecting the whole image, you will also need to change the monitor display you have removed the lens cap and the projector is switched on. Ensure that your projector, please refer to UXGA (1600 x 1200). 4. Verify the resolution setting is not turned on -screen Ensure all the cables and power connections are correctly and securely connected as described in the "Installation" section...
... the projector is still not projecting the whole image, you will also need to change the monitor display you have removed the lens cap and the projector is switched on. Ensure that your projector, please refer to UXGA (1600 x 1200). 4. Verify the resolution setting is not turned on -screen Ensure all the cables and power connections are correctly and securely connected as described in the "Installation" section...

User's Manual
Page 43
... projector lens. Make sure the projection screen is between the required distance 3.9 to 39.4 feet (1.2 to the following: Please setup the display format as 4:3 in 16:9 format on projector side. If you will show the best image in projector OSD. Appendices Image is out of focus Make sure the lens cap is removed. Adjusts the Focus Ring on the remote control. Use of Keystone is Image...
... projector lens. Make sure the projection screen is between the required distance 3.9 to 39.4 feet (1.2 to the following: Please setup the display format as 4:3 in 16:9 format on projector side. If you will show the best image in projector OSD. Appendices Image is out of focus Make sure the lens cap is removed. Adjusts the Focus Ring on the remote control. Use of Keystone is Image...

User's Manual
Page 44
... life, it will not turn off ) Steady light No light English 44 Appendices Intermission Problems The projector stops responding to all controls If possible, turn on until the lamp module has been replaced. Projector Status Indication LED lighting message Message Standby State (Input power cord) Power on (Warming) Lamp strike retry Power LED (Green) Flashing (1.0s on, 1.0s off) Flashing (0.5s on, 0.5s off) Error (Over Temp.) Error (Fan fail) Error (Lamp fail) Warning LED (Red) Flashing (0.5s on, 0.5s off) Flashing (1.0s on, 1.0s off) Flashing...
... life, it will not turn off ) Steady light No light English 44 Appendices Intermission Problems The projector stops responding to all controls If possible, turn on until the lamp module has been replaced. Projector Status Indication LED lighting message Message Standby State (Input power cord) Power on (Warming) Lamp strike retry Power LED (Green) Flashing (1.0s on, 1.0s off) Flashing (0.5s on, 0.5s off) Error (Over Temp.) Error (Fan fail) Error (Lamp fail) Warning LED (Red) Flashing (0.5s on, 0.5s off) Flashing (1.0s on, 1.0s off) Flashing...

User's Manual
Page 47
... opening the lamp access panel. The bulb may be used to change the lamp as soon as possible. Make sure the projector has been cooled down before changing the lamp. Warning: If ceiling mounted, please use , you see this message, please contact your local reseller or service center to prevent any loose parts from falling out of personal injury, do not drop the lamp module or touch the lamp bulb. Warning...
... opening the lamp access panel. The bulb may be used to change the lamp as soon as possible. Make sure the projector has been cooled down before changing the lamp. Warning: If ceiling mounted, please use , you see this message, please contact your local reseller or service center to prevent any loose parts from falling out of personal injury, do not drop the lamp module or touch the lamp bulb. Warning...
User's Manual
Page 48
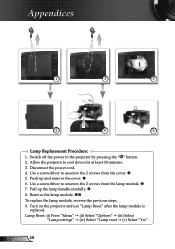
... the 2 screws from the cover. 5. Remove the lamp module. To replace the lamp module, reverse the previous steps. 9. Turn on the projector and use "Lamp Reset" after the lamp module is replaced. Use a screwdriver to unscrew the 2 screws from the lamp module. 7. Lamp Reset: (i) Press "Menu" (ii) Select "Options" (iii) Select "Lamp settings" (iv) Select "Lamp reset (v) Select "Yes". Disconnect the power cord. 4. Switch off the power to cool...
... the 2 screws from the cover. 5. Remove the lamp module. To replace the lamp module, reverse the previous steps. 9. Turn on the projector and use "Lamp Reset" after the lamp module is replaced. Use a screwdriver to unscrew the 2 screws from the lamp module. 7. Lamp Reset: (i) Press "Menu" (ii) Select "Options" (iii) Select "Lamp settings" (iv) Select "Lamp reset (v) Select "Yes". Disconnect the power cord. 4. Switch off the power to cool...

Datasheet
Page 1
...; Quiet operation - 30 dB in high bright mode Lightweight XGA projector at 4.4 pounds Low cost of up /down functions, the Optoma DX606v is very easy to 300". DX606v NO FILTER REQUIRED Power Supply AC Input 100-240V, 50-60Hz, Auto-Switching Operating Temperature 41 to 104°F (5 to -read text - DX606v − Multimedia Projector Your Presentation-Worthy Projector Small and stylish, the Optoma DX606v, a 2300 ANSI lumen projector, delivers life-like presentations...
...; Quiet operation - 30 dB in high bright mode Lightweight XGA projector at 4.4 pounds Low cost of up /down functions, the Optoma DX606v is very easy to 300". DX606v NO FILTER REQUIRED Power Supply AC Input 100-240V, 50-60Hz, Auto-Switching Operating Temperature 41 to 104°F (5 to -read text - DX606v − Multimedia Projector Your Presentation-Worthy Projector Small and stylish, the Optoma DX606v, a 2300 ANSI lumen projector, delivers life-like presentations...

User's Manual
Page 1
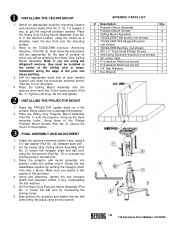
... paneling. • Masonry: plaster, cement or brick. INSTALLATION INSTRUCTIONS Model: CM-E73X Compatible Models: Optoma EP731/732/732H/737/738/739/H30 READ THIS BEFORE YOU START X Maximum weight limit is sturdy enough to support the projector. If you have chosen a location for advice. X Once you are not sure that the ceiling mount be mounted to a ceiling beam or wood joist. X CAUTION: Use only the supplied...
... paneling. • Masonry: plaster, cement or brick. INSTALLATION INSTRUCTIONS Model: CM-E73X Compatible Models: Optoma EP731/732/732H/737/738/739/H30 READ THIS BEFORE YOU START X Maximum weight limit is sturdy enough to support the projector. If you have chosen a location for advice. X Once you are not sure that the ceiling mount be mounted to a ceiling beam or wood joist. X CAUTION: Use only the supplied...
User's Manual
Page 2
... unscrewing the locking screw. 6. Note: if you placed a star washer in the center of surface on a flat surface. Tighten until snug. X INSTALLING THE CEILING MOUNT 1. Select an appropriate projector mounting location and extension shafts (Part No. 9, 10, 11) needed, if any , using the hex wrench (Part No. 13) to the TOGGLER® brochure "Anchoring Solutions," (Part No. 8). Place the Heavy Duty Ceiling Mount Assembly (Part No...
... unscrewing the locking screw. 6. Note: if you placed a star washer in the center of surface on a flat surface. Tighten until snug. X INSTALLING THE CEILING MOUNT 1. Select an appropriate projector mounting location and extension shafts (Part No. 9, 10, 11) needed, if any , using the hex wrench (Part No. 13) to the TOGGLER® brochure "Anchoring Solutions," (Part No. 8). Place the Heavy Duty Ceiling Mount Assembly (Part No...


