Data Sheet
Page 1
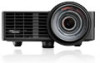
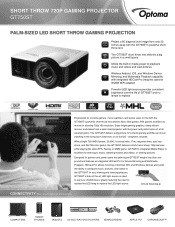
..., the GT750ST's powerful short throw lens delivers Xbox One games, PS4 games, and Blu-ray movies in media player to playback music and videos and view pictures Wireless Android, iOS, and Windows Device Mirroring, and Multimedia Playback capability with integrated HDCast Pro (requires optional WUSB WiFi adapter) Powerful LED light source provides consistent brightness over 20,000 hours, greatly reducing the need to replace the LED lamp.to replace the LED light source.
..., the GT750ST's powerful short throw lens delivers Xbox One games, PS4 games, and Blu-ray movies in media player to playback music and videos and view pictures Wireless Android, iOS, and Windows Device Mirroring, and Multimedia Playback capability with integrated HDCast Pro (requires optional WUSB WiFi adapter) Powerful LED light source provides consistent brightness over 20,000 hours, greatly reducing the need to replace the LED lamp.to replace the LED light source.
Data Sheet
Page 2
....OptomaUSA.com Copyright © 2016 Optoma Technology, Inc. Typical applications include use with support for HDMI/MHL VGA /Audio - Kensington Lock Port USB microSD Universal I /O cable, remote control, battery, quick start card Optional Accessories ZD302 DLP Link 3D glasses, WUSB 802.1-N WiFi Dongle Accessory Part Numbers Remote: BR-ML75N AC power adapter: BC-ML55PDX AC power cord: BC-PUPNXY02 Wireless USB Adapter: SP.71Z01GC01 Universal to change at any time. VGA, microSDslot, USB-A reader with 3D educational or...
....OptomaUSA.com Copyright © 2016 Optoma Technology, Inc. Typical applications include use with support for HDMI/MHL VGA /Audio - Kensington Lock Port USB microSD Universal I /O cable, remote control, battery, quick start card Optional Accessories ZD302 DLP Link 3D glasses, WUSB 802.1-N WiFi Dongle Accessory Part Numbers Remote: BR-ML75N AC power adapter: BC-ML55PDX AC power cord: BC-PUPNXY02 Wireless USB Adapter: SP.71Z01GC01 Universal to change at any time. VGA, microSDslot, USB-A reader with 3D educational or...

User manual
Page 2
... Input / Output Connections 13 Control Panel...14 Remote Control...15 Installing the Remote Control Battery 16 Operating Range with Remote Control 16 Installation...17 Connecting to a Computer 17 Connecting to a DVD Player 18 Connecting to Multi-Media 19 Turning On/Off the Projector 20 Turning Your Projector On 20 Turning Your Projector Off 20 Adjusting the Projected Image 21 Raising the Projector Height 21 Lowering the Projector Height 21 Adjusting the Projector Focus 21 Adjusting Projection Image Size 22 User Controls...24 Using the On-Screen Display 24 Main Menu...
... Input / Output Connections 13 Control Panel...14 Remote Control...15 Installing the Remote Control Battery 16 Operating Range with Remote Control 16 Installation...17 Connecting to a Computer 17 Connecting to a DVD Player 18 Connecting to Multi-Media 19 Turning On/Off the Projector 20 Turning Your Projector On 20 Turning Your Projector Off 20 Adjusting the Projected Image 21 Raising the Projector Height 21 Lowering the Projector Height 21 Adjusting the Projector Focus 21 Adjusting Projection Image Size 22 User Controls...24 Using the On-Screen Display 24 Main Menu...
User manual
Page 4
... the projector. Projector has been exposed to dangerous voltages or other apparatus such as a book case or a cabinet that may expose you send the unit for safety related markings. 9. Safety Instructions The lightning flash with dry cloth. 5. DANGEROUS HIGH VOLTAGES ARE PRESENT INSIDE THE ENCLOSURE. Only use attachments/accessories specified by appropriate service personnel. 4 English Opening or removing covers...
... the projector. Projector has been exposed to dangerous voltages or other apparatus such as a book case or a cabinet that may expose you send the unit for safety related markings. 9. Safety Instructions The lightning flash with dry cloth. 5. DANGEROUS HIGH VOLTAGES ARE PRESENT INSIDE THE ENCLOSURE. Only use attachments/accessories specified by appropriate service personnel. 4 English Opening or removing covers...
User manual
Page 6
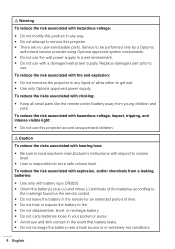
... associated with choking: yy Keep all small parts like the remote control battery away from a leaking batteries: yy Use only with battery type CR2025. yy User is responsible to volume level. yy Use only Optoma approved power supply. Caution To reduce the risks associated with hearing loss: yy Be sure to read earphone manufacturer's instructions with respect to set a safe volume level...
... associated with choking: yy Keep all small parts like the remote control battery away from a leaking batteries: yy Use only with battery type CR2025. yy User is responsible to volume level. yy Use only Optoma approved power supply. Caution To reduce the risks associated with hearing loss: yy Be sure to read earphone manufacturer's instructions with respect to set a safe volume level...
User manual
Page 9
... with Canadian ICES-003. CLASS B This equipment generates, uses and can be used in a manner inconsistent with the instruction manual may cause undesired operation of the cable to operate the equipment. yy Increase the separation between the equipment and receiver. yy Connect the equipment into an outlet on , the user is connected. Cet appareil numérique de la classe...
... with Canadian ICES-003. CLASS B This equipment generates, uses and can be used in a manner inconsistent with the instruction manual may cause undesired operation of the cable to operate the equipment. yy Increase the separation between the equipment and receiver. yy Connect the equipment into an outlet on , the user is connected. Cet appareil numérique de la classe...
User manual
Page 14
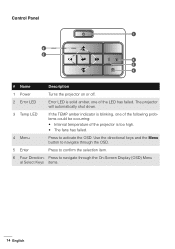
.... 3 Temp LED If the TEMP amber indicator is blinking, one of the projector is solid amber, one of the following problems could be occurring: yy Internal temperature of the LED has failed. yy The fans has failed. 4 Menu Press to navigate through the OSD. 5 Enter Press to confirm the selection item. 6 Four Direction- Control Panel 1 6 5 2 3 4 # Name Description 1 Power Turns the projector on or off. 2 Error LED Error LED is too high. Use...
.... 3 Temp LED If the TEMP amber indicator is blinking, one of the projector is solid amber, one of the following problems could be occurring: yy Internal temperature of the LED has failed. yy The fans has failed. 4 Menu Press to navigate through the OSD. 5 Enter Press to confirm the selection item. 6 Four Direction- Control Panel 1 6 5 2 3 4 # Name Description 1 Power Turns the projector on or off. 2 Error LED Error LED is too high. Use...

User manual
Page 17
English 17 Installation Connecting to a Computer 1 4 6 5 3 2 # Description 1 Power cord 2 AC adapter 3 Audio cable (*1) 4 USB-A to USB-A cable (*2) 5 HDMI cable (*2) 6 Universal 24-pin to VGA cable Note: - (*1)The projector supports only TRS-type audio cables (without microhpone function) which may influence volume quality. - (*2)The accessory is not shipped with your projector.
English 17 Installation Connecting to a Computer 1 4 6 5 3 2 # Description 1 Power cord 2 AC adapter 3 Audio cable (*1) 4 USB-A to USB-A cable (*2) 5 HDMI cable (*2) 6 Universal 24-pin to VGA cable Note: - (*1)The projector supports only TRS-type audio cables (without microhpone function) which may influence volume quality. - (*2)The accessory is not shipped with your projector.

User manual
Page 20
... the Power button. 4. Follow the instruction displayed on screen to Turn Off Projector" message will appear on the screen. Remove the lens cap. 3. Turning Your Projector Off Note: The "Press Power Button to properly turn on the source (computer, DVD player, etc.). Turn on your source to clear it. 1. Press the Power button. The cooling fans continue to Multimedia). The input source is determined by the last connected input source. (By default, the input source of the projector if necessary. Disconnect the power cord...
... the Power button. 4. Follow the instruction displayed on screen to Turn Off Projector" message will appear on the screen. Remove the lens cap. 3. Turning Your Projector Off Note: The "Press Power Button to properly turn on the source (computer, DVD player, etc.). Turn on your source to clear it. 1. Press the Power button. The cooling fans continue to Multimedia). The input source is determined by the last connected input source. (By default, the input source of the projector if necessary. Disconnect the power cord...
User manual
Page 24
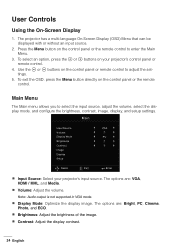
... the Menu button on the control panel or remote control to select the input source, adjust the volume, select the display mode, and configure the brightness, contrast, image, display, and setup settings. Main Input Source Volume Display Mode Brightness Contrast Image Display Setup VGA PC Select Exit Enter Input Source: Select your projector's control panel or remote control. 4. Contrast: Adjust the display contrast. 24 English The projector has a multi-language On-Screen Display (OSD) Menu that can be displayed with or without an input source. 2. Note: Audio output is not supported...
... the Menu button on the control panel or remote control to select the input source, adjust the volume, select the display mode, and configure the brightness, contrast, image, display, and setup settings. Main Input Source Volume Display Mode Brightness Contrast Image Display Setup VGA PC Select Exit Enter Input Source: Select your projector's control panel or remote control. 4. Contrast: Adjust the display contrast. 24 English The projector has a multi-language On-Screen Display (OSD) Menu that can be displayed with or without an input source. 2. Note: Audio output is not supported...
User manual
Page 25
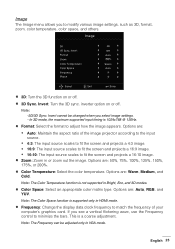
.... Image The Image menu allows you see a vertical flickering wave, use the Frequency control to minimize the bars. inverter option on or off . Invert cannot be adjusted only in HDMI mode. In 3D mode, the maximum supported input timing is a coarse adjustment. yy 4:3: The input source scales to fit the screen and projects a 16:9 image. Color Temperature: Select the color temperature. Note: The Frequency can be changed when you select image settings. - Invert Format Zoom Color Temperature Color Space Frequency Phase On Off Auto...
.... Image The Image menu allows you see a vertical flickering wave, use the Frequency control to minimize the bars. inverter option on or off . Invert cannot be adjusted only in HDMI mode. In 3D mode, the maximum supported input timing is a coarse adjustment. yy 4:3: The input source scales to fit the screen and projects a 16:9 image. Color Temperature: Select the color temperature. Note: The Frequency can be changed when you select image settings. - Invert Format Zoom Color Temperature Color Space Frequency Phase On Off Auto...
User manual
Page 27
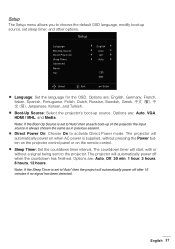
... input source is set sleep timer, and other options. The projector will start, with or without pressing the Power button on the projector control panel or on the remote control. Options are : English, Germany, French, Italian, Spanish, Portuguese, Polish, Dutch, Russian, Swedish, Greek Janpanese, Korean, and Turkish. Setup Language Boot-Up Source Direct Power On Sleep Timer Advanced Reset Ver. Options are: Auto, VGA, HDMI / MHL, and Media. The projector will automatically power...
... input source is set sleep timer, and other options. The projector will start, with or without pressing the Power button on the projector control panel or on the remote control. Options are : English, Germany, French, Italian, Spanish, Portuguese, Polish, Dutch, Russian, Swedish, Greek Janpanese, Korean, and Turkish. Setup Language Boot-Up Source Direct Power On Sleep Timer Advanced Reset Ver. Options are: Auto, VGA, HDMI / MHL, and Media. The projector will automatically power...

User manual
Page 33
... for camera since it would be plugged into the projector if you want to use the multimedia USB function. 2. How to set-up File Type for Multi-Media with AC adapter and turn on the projector by pressing the Power button. 2. English 33 A USB flash disk must be exist compatibility problem. Please don't connect USB port for 1 second the Menu button on the control panel of the projector. The Multi-Media menu opens.
... for camera since it would be plugged into the projector if you want to use the multimedia USB function. 2. How to set-up File Type for Multi-Media with AC adapter and turn on the projector by pressing the Power button. 2. English 33 A USB flash disk must be exist compatibility problem. Please don't connect USB port for 1 second the Menu button on the control panel of the projector. The Multi-Media menu opens.

User manual
Page 36
Access the SD Card menu and select the multimedia files: Photo, Video, or Music. The HD Media menu opens. Office viewer Note: The maximum allowed file name length is 28 characters. 36 English Or select the Settings option to open. Select the file you want to change settings for Photo, Video, or Music. 5. Internal Memory SD Card USB Settings 4. 3. Select the HD Media menu.
Access the SD Card menu and select the multimedia files: Photo, Video, or Music. The HD Media menu opens. Office viewer Note: The maximum allowed file name length is 28 characters. 36 English Or select the Settings option to open. Select the file you want to change settings for Photo, Video, or Music. 5. Internal Memory SD Card USB Settings 4. 3. Select the HD Media menu.

User manual
Page 39
Multi-Media Main Menu HD Media Multi-Media SETTINGS for System, USB, MicroSD, and Internal Memory The multi-media settings menu allows you to change settings for the USB, MicroSD, and Internal Memory. Internal Memory SD Card USB Settings System Photo Video Music Note: Multi-media setup menu and set are the same for System, Photo, Video, and Music. English 39
Multi-Media Main Menu HD Media Multi-Media SETTINGS for System, USB, MicroSD, and Internal Memory The multi-media settings menu allows you to change settings for the USB, MicroSD, and Internal Memory. Internal Memory SD Card USB Settings System Photo Video Music Note: Multi-media setup menu and set are the same for System, Photo, Video, and Music. English 39

User manual
Page 42
... mode. Therefore parts of the video image. If the video resolution is lower than 1280x800 then the video is stretched non-linearly in the horizontal and vertical directions to display the video in 1280x800 resolution. yy Cut screen: Choose to exactly fit the 16:10 screen. yy Full screen: Regardless the native aspect ratio, the video image is displayed in its native resolution without scaling. Video Setup Access the video settings menu...
... mode. Therefore parts of the video image. If the video resolution is lower than 1280x800 then the video is stretched non-linearly in the horizontal and vertical directions to display the video in 1280x800 resolution. yy Cut screen: Choose to exactly fit the 16:10 screen. yy Full screen: Regardless the native aspect ratio, the video image is displayed in its native resolution without scaling. Video Setup Access the video settings menu...
User manual
Page 49
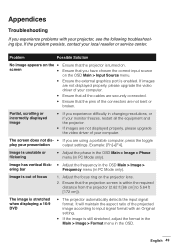
... problems with an Original setting. Example: [Fn]+[F4]. If images are not displayed properly, please upgrade the video driver of your presentation output settings. yy If images are securely connected. Image is still stretched, adjust the format in the Main > Image > Format menu in the OSD. Adjust the focus ring on the yy Ensure that the projector is stretched when displaying a 16:9 DVD yy The projector automatically detects the input signal...
... problems with an Original setting. Example: [Fn]+[F4]. If images are not displayed properly, please upgrade the video driver of your presentation output settings. yy If images are securely connected. Image is still stretched, adjust the format in the Main > Image > Format menu in the OSD. Adjust the focus ring on the yy Ensure that the projector is stretched when displaying a 16:9 DVD yy The projector automatically detects the input signal...

User manual
Page 50
..., replace with a new CR2025 battery. 50 English If the problem persists, contact Optoma. Problem Possible Solution LED warning indicator (LED) is blinking amber yy The projector has overheated. If the problem persists, contact Optoma. yy If the projector fan fails, the projector will automatically shut down . Clear the projector mode by pressing and holding the Power button for about 5 minutes and try to power up again. The remote control is too dim. Check if the LED indication from...
..., replace with a new CR2025 battery. 50 English If the problem persists, contact Optoma. Problem Possible Solution LED warning indicator (LED) is blinking amber yy The projector has overheated. If the problem persists, contact Optoma. yy If the projector fan fails, the projector will automatically shut down . Clear the projector mode by pressing and holding the Power button for about 5 minutes and try to power up again. The remote control is too dim. Check if the LED indication from...

User manual
Page 51
... projector will automatically shut down. If the problem persists, contact us . OFF OFF Amber Note: If there is within operational range. Reset the projector mode by pressing and holding the Power button for about 5 minutes and try to Amber power on. and Blue ON The projector automatically shuts down . Guiding Signals Projector Status Standby mode Power on Projector overheated Fan breakdown LED failure Description Power TEMP Warning (Blue / Amber) (Amber) LED Warning (Amber) Projector in Normal mode, ready to display an image. OFF OFF Projector in Standby...
... projector will automatically shut down. If the problem persists, contact us . OFF OFF Amber Note: If there is within operational range. Reset the projector mode by pressing and holding the Power button for about 5 minutes and try to Amber power on. and Blue ON The projector automatically shuts down . Guiding Signals Projector Status Standby mode Power on Projector overheated Fan breakdown LED failure Description Power TEMP Warning (Blue / Amber) (Amber) LED Warning (Amber) Projector in Normal mode, ready to display an image. OFF OFF Projector in Standby...

User manual
Page 54
... card (up to use special cable), - Not support SDXC & UHS-I card type Mechanical Installation orientation Dimensions Weight Environmental conditions Description Desktop/Front, Desktop/Rear, Ceiling/Front, Ceiling/Rear 112.5 x 105 x 40.5mm (w/o lens ring and rubber foot) 0.45 kg Operating: 5 ~ 40°C in 3,42A) max Multimedia FW based USB-A port Micro-SD slot Description Linux similar OS - Specification Optical Maximum resolution Lighting source Lens Image size (diagonal) Projection distance Description -
... card (up to use special cable), - Not support SDXC & UHS-I card type Mechanical Installation orientation Dimensions Weight Environmental conditions Description Desktop/Front, Desktop/Rear, Ceiling/Front, Ceiling/Rear 112.5 x 105 x 40.5mm (w/o lens ring and rubber foot) 0.45 kg Operating: 5 ~ 40°C in 3,42A) max Multimedia FW based USB-A port Micro-SD slot Description Linux similar OS - Specification Optical Maximum resolution Lighting source Lens Image size (diagonal) Projection distance Description -


