
User's Manual
Page 1
...14 Warning Indicator 14 Adjusting the Projected Image 15 Adjusting the Projector's Height 15 Adjusting the Projector's Zoom / Focus 16 Adjusting Projected Image Size 16 User Controls 17 Control Panel & Remote Control 17 Control Panel ...17 Remote Control...18 On-screen Display Menus 20 How to operate ...20 Menu Tree...21 IMAGE ...24 DISPLAY ...26 SYSTEM ...30 SETUP ...34 Appendices 38 Troubleshooting 38 Image Problems 38 Other Problems 39 Projector Status Indication 40 Remote Control Problems 41 Replacing the Lamp 42 Compatibility Modes 44 Ceiling Mount Installation 46 Optoma...
...14 Warning Indicator 14 Adjusting the Projected Image 15 Adjusting the Projector's Height 15 Adjusting the Projector's Zoom / Focus 16 Adjusting Projected Image Size 16 User Controls 17 Control Panel & Remote Control 17 Control Panel ...17 Remote Control...18 On-screen Display Menus 20 How to operate ...20 Menu Tree...21 IMAGE ...24 DISPLAY ...26 SYSTEM ...30 SETUP ...34 Appendices 38 Troubleshooting 38 Image Problems 38 Other Problems 39 Projector Status Indication 40 Remote Control Problems 41 Replacing the Lamp 42 Compatibility Modes 44 Ceiling Mount Installation 46 Optoma...
User's Manual
Page 2
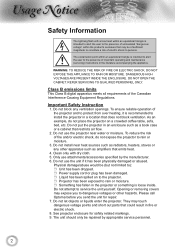
...;ed by appropriate service personnel. 2 DO NOT OPEN THE CABINET. Physical damage/abuse would be repaired by the manufacturer. 6. Do not use the projector near heat sources such as radiators, heaters, stoves or any ventilation openings. See projector enclosure for repair. 7. Do not install near water or moisture. Please call Optoma before you to rain or moisture. 3. DANGEROUS HIGH VOLTAGES ARE PRESENT...
...;ed by appropriate service personnel. 2 DO NOT OPEN THE CABINET. Physical damage/abuse would be repaired by the manufacturer. 6. Do not use the projector near heat sources such as radiators, heaters, stoves or any ventilation openings. See projector enclosure for repair. 7. Do not install near water or moisture. Please call Optoma before you to rain or moisture. 3. DANGEROUS HIGH VOLTAGES ARE PRESENT...

User's Manual
Page 3
... your local reseller or service center to cool down . To replace the lamp, follow all warnings, precautions and maintenance as recommended in operation. ▀■ Warning- When switching the projector off, please ensure the cooling cycle has been completed before disconnecting power. This projector will not turn back on the screen. When the lamp is in this user's guide. ▀■ Warning- Please be sure to...
... your local reseller or service center to cool down . To replace the lamp, follow all warnings, precautions and maintenance as recommended in operation. ▀■ Warning- When switching the projector off, please ensure the cooling cycle has been completed before disconnecting power. This projector will not turn back on the screen. When the lamp is in this user's guide. ▀■ Warning- Please be sure to...
User's Manual
Page 12
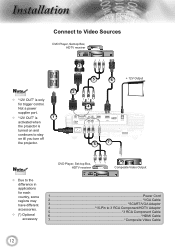
nstallation Connect to Video Sources DVD Player, Set-top Box, HDTV receiver Noottee "12V OUT" is turned on and continues to stay on till you turn off the projector. R E62405SP 3 5 2 6 + 12V Output 4 SERVICE VGA/SCART/YPbPr Y VIDEO Pb Pr HDMI 1 HDMI 2 12V OUT 5 7 Noottee Due to 3 RCA Component/HDTV Adaptor 5 3 RCA Component Cable 6 HDMI Cable 7 Composite Video Cable 12 Not a power supplier port. "12V OUT" is 1 activated...
nstallation Connect to Video Sources DVD Player, Set-top Box, HDTV receiver Noottee "12V OUT" is turned on and continues to stay on till you turn off the projector. R E62405SP 3 5 2 6 + 12V Output 4 SERVICE VGA/SCART/YPbPr Y VIDEO Pb Pr HDMI 1 HDMI 2 12V OUT 5 7 Noottee Due to 3 RCA Component/HDTV Adaptor 5 3 RCA Component Cable 6 HDMI Cable 7 Composite Video Cable 12 Not a power supplier port. "12V OUT" is 1 activated...
User's Manual
Page 13
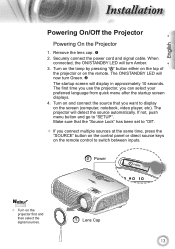
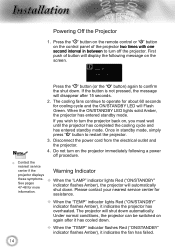
... screen (computer, notebook, video player, etc). Turn on and connect the source that the "Source Lock" has been set to "SETUP". SOURCE 2 Power POWER POWER SOURCE Noottee Turn on the remote control to display on the remote. English nstallation Powering On/Off the Projector Powering On the Projector 1. Securely connect the power cord and signal cable. The ON/STANDBY LED will now turn Amber. 3. Make sure that you want to switch between inputs. Remove the lens cap. 2. The first time you use the projector, you connect...
... screen (computer, notebook, video player, etc). Turn on and connect the source that the "Source Lock" has been set to "SETUP". SOURCE 2 Power POWER POWER SOURCE Noottee Turn on the remote control to display on the remote. English nstallation Powering On/Off the Projector Powering On the Projector 1. Securely connect the power cord and signal cable. The ON/STANDBY LED will now turn Amber. 3. Make sure that you want to switch between inputs. Remove the lens cap. 2. The first time you use the projector, you connect...
User's Manual
Page 14
... to operate for about 60 seconds for cooling cycle and the ON/STANDBY LED will Flash Green. Please contact your nearest service center for more information. When the "LAMP" indicator lights Red ("ON/STANDBY" indicator flashes Amber), the projector will display the following a power off the projector. Press the " " button on the remote control or " " button on the control panel of button will automatically shut down . First push of the projector two times with...
... to operate for about 60 seconds for cooling cycle and the ON/STANDBY LED will Flash Green. Please contact your nearest service center for more information. When the "LAMP" indicator lights Red ("ON/STANDBY" indicator flashes Amber), the projector will display the following a power off the projector. Press the " " button on the remote control or " " button on the control panel of button will automatically shut down . First push of the projector two times with...
User's Manual
Page 17
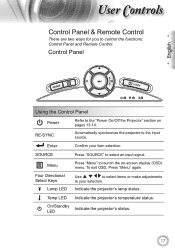
... Directional Select Keys Lamp LED Use to select items or make adjustments to the input source. RE-SYNC Automatically synchronize the projector to your item selection. Temp LED Indicate the projector's temperature status. Enter Confirm your selection. Control Panel English SOURCE POWER Using the Control Panel Power Refer to control the functions: Control Panel and Remote Control. Indicate the projector's lamp status. ser ontrols Control Panel & Remote Control There are two ways for you to the "Power On/Off the Projector" section on -screen display (OSD) menu.
... Directional Select Keys Lamp LED Use to select items or make adjustments to the input source. RE-SYNC Automatically synchronize the projector to your item selection. Temp LED Indicate the projector's temperature status. Enter Confirm your selection. Control Panel English SOURCE POWER Using the Control Panel Power Refer to control the functions: Control Panel and Remote Control. Indicate the projector's lamp status. ser ontrols Control Panel & Remote Control There are two ways for you to the "Power On/Off the Projector" section on -screen display (OSD) menu.
User's Manual
Page 18
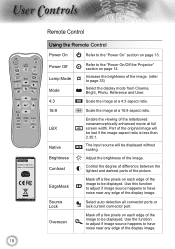
... edge of the image. The input source will be displayed. Scale the image at a 4:3 aspect ratio. 16:9 Scale the image at full screen width. Adjust the brightness of the image to page 33) Select the display mode from Cinema, Bright, Photo, Reference and User. Source Lock Overscan Select auto detection all connector ports or lock current connector port. Use this function to adjust if image source happens to be displayed without scaling. Mask...
... edge of the image. The input source will be displayed. Scale the image at a 4:3 aspect ratio. 16:9 Scale the image at full screen width. Adjust the brightness of the image to page 33) Select the display mode from Cinema, Bright, Photo, Reference and User. Source Lock Overscan Select auto detection all connector ports or lock current connector port. Use this function to adjust if image source happens to be displayed without scaling. Mask...
User's Manual
Page 24
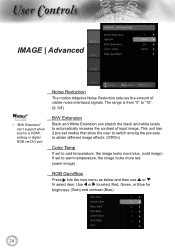
... White Extension can 't support when source is HDMI, analog or digital RGB via DVI port. Use or to select item. Noise Reduction The motion Adaptive Noise Reduction reduces the amount of input image. This unit has 2 pre-set modes that allow the user to switch among the pre-sets to obtain different image effects. (Off/On) Color Temp If set to cold temperature, the image looks more blue. (cold image) If set to warm temperature...
... White Extension can 't support when source is HDMI, analog or digital RGB via DVI port. Use or to select item. Noise Reduction The motion Adaptive Noise Reduction reduces the amount of input image. This unit has 2 pre-set modes that allow the user to switch among the pre-sets to obtain different image effects. (Off/On) Color Temp If set to cold temperature, the image looks more blue. (cold image) If set to warm temperature...
User's Manual
Page 28
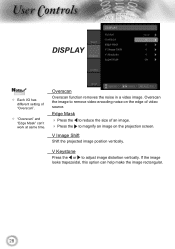
... reduce the size of video source. Overscan the image to remove video encoding noise on the edge of an image. Press the to adjust image distortion vertically. V Keystone Press the or to magnify an image on the projection screen. ser ontrols DISPLAY Noottee Each I/O has different setting of "Overscan". "Overscan" and "Edge Mask" can help make the image rectangular. 28 V Image Shift Shift the projected image position...
... reduce the size of video source. Overscan the image to remove video encoding noise on the edge of an image. Press the to adjust image distortion vertically. V Keystone Press the or to magnify an image on the projection screen. ser ontrols DISPLAY Noottee Each I/O has different setting of "Overscan". "Overscan" and "Edge Mask" can help make the image rectangular. 28 V Image Shift Shift the projected image position...
User's Manual
Page 30
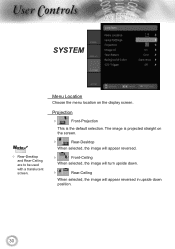
ser ontrols SYSTEM Noottee Rear-Desktop and Rear-Ceiling are to be used with a translucent screen. Projection Front-Projection This is projected straight on the display screen. The image is the default selection. Menu Location Choose the menu location on the screen. Rear-Desktop When selected, the image will appear reversed. Front-Ceiling When selected, the image will turn upside down. Rear-Ceiling When selected, the image will appear reversed in upside down position. 30
ser ontrols SYSTEM Noottee Rear-Desktop and Rear-Ceiling are to be used with a translucent screen. Projection Front-Projection This is projected straight on the display screen. The image is the default selection. Menu Location Choose the menu location on the screen. Rear-Desktop When selected, the image will appear reversed. Front-Ceiling When selected, the image will turn upside down. Rear-Ceiling When selected, the image will appear reversed in upside down position. 30
User's Manual
Page 33
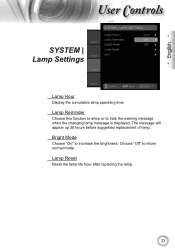
Choose "Off" to increase the brightness. Lamp Reset Reset the lamp life hour after replacing the lamp. 33 English ser ontrols SYSTEM | Lamp Settings Lamp Hour Display the cumulative lamp operating time. Bright Mode Choose "On" to return normal mode. The message will appear up 30 hours before suggested replacement of lamp. Lamp Reminder Choose this function to show or to hide the warning message when the changing lamp message is displayed.
Choose "Off" to increase the brightness. Lamp Reset Reset the lamp life hour after replacing the lamp. 33 English ser ontrols SYSTEM | Lamp Settings Lamp Hour Display the cumulative lamp operating time. Bright Mode Choose "On" to return normal mode. The message will appear up 30 hours before suggested replacement of lamp. Lamp Reminder Choose this function to show or to hide the warning message when the changing lamp message is displayed.
User's Manual
Page 35
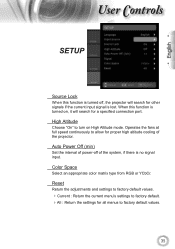
English ser ontrols SETUP Source Lock When this function is lost. Auto Power Off (min) Set the interval of power-off , the projector will search for other signals if the current input signal is turned on High Altitude mode. Operates the fans at full speed continuously to allow for all menus to factory default values. 35 Color Space Select an appropriate color matrix type from RGB or YCbCr. When this function...
English ser ontrols SETUP Source Lock When this function is lost. Auto Power Off (min) Set the interval of power-off , the projector will search for other signals if the current input signal is turned on High Altitude mode. Operates the fans at full speed continuously to allow for all menus to factory default values. 35 Color Space Select an appropriate color matrix type from RGB or YCbCr. When this function...
User's Manual
Page 37
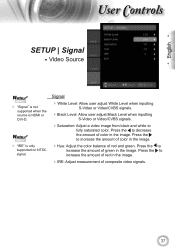
... supported when the source is only supported on NTSC signal. English ser ontrols SETUP | Signal - Signal White Level: Allow user adjust White Level when inputting S-Video or Video/CVBS signals. Black Level: Allow user adjust Black Level when inputting S-Video or Video/CVBS signals. Saturation: Adjust a video image from black and white to decrease the amount of green in the image. Press the to increase the amount of color in the image. IRE: Adjust measurement of red...
... supported when the source is only supported on NTSC signal. English ser ontrols SETUP | Signal - Signal White Level: Allow user adjust White Level when inputting S-Video or Video/CVBS signals. Black Level: Allow user adjust Black Level when inputting S-Video or Video/CVBS signals. Saturation: Adjust a video image from black and white to decrease the amount of green in the image. Press the to increase the amount of color in the image. IRE: Adjust measurement of red...
User's Manual
Page 38
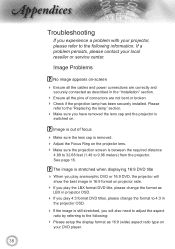
... you play 4:3 format DVD titles, please change the format to 4:3 in the "Installation" section. Ensure all the cables and power connections are not bent or broken. Check if the projection lamp has been securely installed. See page 16. ppendices Troubleshooting If you have removed the lens cap and the projector is switched on. The image is stretched when displaying 16:9 DVD title When...
... you play 4:3 format DVD titles, please change the format to 4:3 in the "Installation" section. Ensure all the cables and power connections are not bent or broken. Check if the projection lamp has been securely installed. See page 16. ppendices Troubleshooting If you have removed the lens cap and the projector is switched on. The image is stretched when displaying 16:9 DVD title When...
User's Manual
Page 39
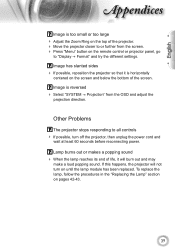
... Select "SYSTEM Projection" from the screen. Press "Menu" button on the screen and below the bottom of life, it is horizontally centered on the remote control or projector panel, go to "Display Format" and try the different settings. Other Problems The projector stops responding to all controls If possible, turn on pages 42-43. 39 Image has slanted sides If possible...
... Select "SYSTEM Projection" from the screen. Press "Menu" button on the screen and below the bottom of life, it is horizontally centered on the remote control or projector panel, go to "Display Format" and try the different settings. Other Problems The projector stops responding to all controls If possible, turn on pages 42-43. 39 Image has slanted sides If possible...
User's Manual
Page 40
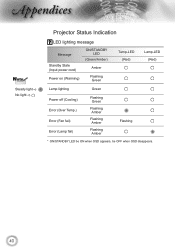
ppendices Noottee Steady light No light Projector Status Indication LED lighting message Message Standby State (Input power cord) Power on (Warming) ON/STANDBY LED (Green/Amber) Amber Flashing Green Temp-LED (Red) Lamp-LED (Red) Lamp lighting Green Power off (Cooling) Error (Over Temp.) Error (Fan fail) Error (Lamp fail) Flashing Green Flashing Amber Flashing Amber Flashing Amber Flashing * ON/STANDBY LED be ON when OSD appears, be OFF when OSD disappears. 40
ppendices Noottee Steady light No light Projector Status Indication LED lighting message Message Standby State (Input power cord) Power on (Warming) ON/STANDBY LED (Green/Amber) Amber Flashing Green Temp-LED (Red) Lamp-LED (Red) Lamp lighting Green Power off (Cooling) Error (Over Temp.) Error (Fan fail) Error (Lamp fail) Flashing Green Flashing Amber Flashing Amber Flashing Amber Flashing * ON/STANDBY LED be ON when OSD appears, be OFF when OSD disappears. 40
User's Manual
Page 41
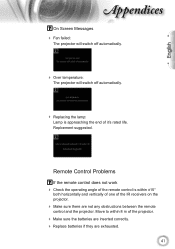
...; Make sure there are exhausted. 41 Remote Control Problems If the remote control does not work Check the operating angle of the remote control is approaching the end of it's rated life. English ppendices On Screen Messages Fan failed: The projector will switch off automatically. Over temperature: The projector will switch off automatically. Replacing the lamp: Lamp is within 8 m of the projector. Make sure the batteries are inserted...
...; Make sure there are exhausted. 41 Remote Control Problems If the remote control does not work Check the operating angle of the remote control is approaching the end of it's rated life. English ppendices On Screen Messages Fan failed: The projector will switch off automatically. Over temperature: The projector will switch off automatically. Replacing the lamp: Lamp is within 8 m of the projector. Make sure the batteries are inserted...
User's Manual
Page 42
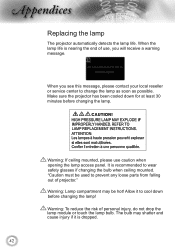
... a warning message. ppendices Replacing the lamp The projector automatically detects the lamp life. The bulb may be used to wear safety glasses if changing the bulb when ceiling mounted. Warning: To reduce the risk of projector." When the lamp life is nearing the end of use caution when opening the lamp access panel. Make sure the projector has been cooled down before changing the lamp. Allow it is recommended to prevent any loose parts from...
... a warning message. ppendices Replacing the lamp The projector automatically detects the lamp life. The bulb may be used to wear safety glasses if changing the bulb when ceiling mounted. Warning: To reduce the risk of projector." When the lamp life is nearing the end of use caution when opening the lamp access panel. Make sure the projector has been cooled down before changing the lamp. Allow it is recommended to prevent any loose parts from...

User's Manual
Page 43
.... 3. Switch off the power to clean the lamp module if it was accidentally touched. 2 4 3 Lamp Replacement Procedure: 1. Turn on the lamp module. 3 7. Disconnect the power cord. 4. Lamp Reset: (i) Press "Menu" (ii) Select "SYSTEM" (iii) Select "Lamp Settings" (iv) Select "Lamp Reset" (v) Select "Yes". 43 Lift up and remove the cover. 2 6. Unscrew the two screws on the projector. Do not touch the glass area of the lamp. Use a dry...
.... 3. Switch off the power to clean the lamp module if it was accidentally touched. 2 4 3 Lamp Replacement Procedure: 1. Turn on the lamp module. 3 7. Disconnect the power cord. 4. Lamp Reset: (i) Press "Menu" (ii) Select "SYSTEM" (iii) Select "Lamp Settings" (iv) Select "Lamp Reset" (v) Select "Yes". 43 Lift up and remove the cover. 2 6. Unscrew the two screws on the projector. Do not touch the glass area of the lamp. Use a dry...


