

User Manual
Page 1
...Precautions 3 Eye Safety Warnings 5 Introduction 6 Product Features 6 Package Overview 7 Product Overview 8 Main Unit...8 Control Panel ...9 Connection Ports 10 Remote Control...11 Installation 12 Connecting the Projector 12 Powering On/Off the Projector 13 Powering On the Projector 13 Powering Off the projector 14 Warning... Options...33 Appendices 35 Troubleshooting 35 Image Problems 35 Intermission Problems 37 Projector Status Indication 38 Remote Control Problems 39 Replacing the Lamp 40 Compatibility Modes 41 Ceiling Mount Installation 42 Optoma Global Office 43 1
...Precautions 3 Eye Safety Warnings 5 Introduction 6 Product Features 6 Package Overview 7 Product Overview 8 Main Unit...8 Control Panel ...9 Connection Ports 10 Remote Control...11 Installation 12 Connecting the Projector 12 Powering On/Off the Projector 13 Powering On the Projector 13 Powering Off the projector 14 Warning... Options...33 Appendices 35 Troubleshooting 35 Image Problems 35 Intermission Problems 37 Projector Status Indication 38 Remote Control Problems 39 Replacing the Lamp 40 Compatibility Modes 41 Ceiling Mount Installation 42 Optoma Global Office 43 1

User Manual
Page 6
... PAL/PAL-M/PAL-N/SECAM HDTV compatible (480p, 576p, 720p, 1080i) Deinterlacer Faroudja DCDi® Full function IR remote control with back light Advanced 2D digital keystone correction and high quality full screen image re-scaling User friendly control panel ...; SXGA+, SXGA compression and HD, XGA, SVGA, VGA re-sizing Optoma's patent-pending O2AirTM Photo Catalyst air purification technology HDMI & DVI support with HDCP compliance True Vivid and ...
... PAL/PAL-M/PAL-N/SECAM HDTV compatible (480p, 576p, 720p, 1080i) Deinterlacer Faroudja DCDi® Full function IR remote control with back light Advanced 2D digital keystone correction and high quality full screen image re-scaling User friendly control panel ...; SXGA+, SXGA compression and HD, XGA, SVGA, VGA re-sizing Optoma's patent-pending O2AirTM Photo Catalyst air purification technology HDMI & DVI support with HDCP compliance True Vivid and ...
User Manual
Page 7
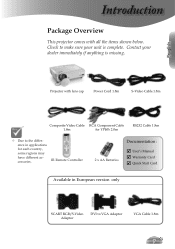
Contact your unit is missing. English Projector with all the items shown below. IR Remote Controller 2 x AA Batteries Documentation : User's Manual Warranty Card Quick Start Card Available in applications for each country, some regions may have different ...
Contact your unit is missing. English Projector with all the items shown below. IR Remote Controller 2 x AA Batteries Documentation : User's Manual Warranty Card Quick Start Card Available in applications for each country, some regions may have different ...
User Manual
Page 11
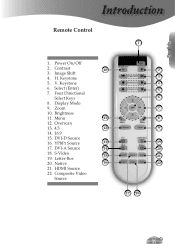
Four Directional Select Keys 6 8. Brightness 11. YPbPr Source 13 19 17. Letter-Box 15 21 20. Composite Video Source 17 18 11 Zoom 7 10. H. Select (Enter) 5 7. Contrast 10 2 3. DVI-D Source 16. Keystone 3 5. Menu 11 68 12. S-Video 19. Display Mode 9. English Introduction Remote Control 1 1. Overscan 13. 4:3 12 9 14. 16:9 15. HDMI Source 22. Image Shift 4. V. Keystone 4 6. Native 16 22 21. Power On/Off 2. DVI-A Source 14 20 18.
Four Directional Select Keys 6 8. Brightness 11. YPbPr Source 13 19 17. Letter-Box 15 21 20. Composite Video Source 17 18 11 Zoom 7 10. H. Select (Enter) 5 7. Contrast 10 2 3. DVI-D Source 16. Keystone 3 5. Menu 11 68 12. S-Video 19. Display Mode 9. English Introduction Remote Control 1 1. Overscan 13. 4:3 12 9 14. 16:9 15. HDMI Source 22. Image Shift 4. V. Keystone 4 6. Native 16 22 21. Power On/Off 2. DVI-A Source 14 20 18.

User Manual
Page 13
... projector, you connected multiple sources at the same time, press the "Source" button on the control panel or direct source key on the remote control to switch between inputs. Turn on . The Power LED will detect your source automatically. If you can... select your source (computer, notebook, video player, etc.). Turn on the remote. English Installation Powering On/Off the Projector Powering On the Projector 1. The projector will flash green. 3. Turn on the lamp by pressing ...
... projector, you connected multiple sources at the same time, press the "Source" button on the control panel or direct source key on the remote control to switch between inputs. Turn on . The Power LED will detect your source automatically. If you can... select your source (computer, notebook, video player, etc.). Turn on the remote. English Installation Powering On/Off the Projector Powering On the Projector 1. The projector will flash green. 3. Turn on the lamp by pressing ...

User Manual
Page 17
Control Panel Remote Control English Using the Control Panel Source Press "Source" to launch the on-screen display (OSD) menu. Select Re-Sync Confirm your selection. ... Directional Select Keys Use to select items or make adjustments to your item selection. Automatically synchronizes the projector to control the functions: Control Panel and Remote Control. User Controls Control Panel & Remote Control There are two ways for you to the input source. 17
Control Panel Remote Control English Using the Control Panel Source Press "Source" to launch the on-screen display (OSD) menu. Select Re-Sync Confirm your selection. ... Directional Select Keys Use to select items or make adjustments to your item selection. Automatically synchronizes the projector to control the functions: Control Panel and Remote Control. User Controls Control Panel & Remote Control There are two ways for you to the input source. 17

User Manual
Page 18
User Controls Using the Remote Control Power Refer to your item selection. Image Shift Shifts the projected image position horizontally. Zoom Press "Zoom" button to zoom in and zoom out ...
User Controls Using the Remote Control Power Refer to your item selection. Image Shift Shifts the projected image position horizontally. Zoom Press "Zoom" button to zoom in and zoom out ...

User Manual
Page 20
... item and adjust the settings by key. 4. The OSD menu will close and the projector will automatically detect the source. While making a selection on the Remote Control or Control Panel. 2 When OSD is displayed, use keys to select any item in the sub menu and adjust as described above. 5. To exit...
... item and adjust the settings by key. 4. The OSD menu will close and the projector will automatically detect the source. While making a selection on the Remote Control or Control Panel. 2 When OSD is displayed, use keys to select any item in the sub menu and adjust as described above. 5. To exit...

User Manual
Page 35
... your projector, please refer to the following steps. (*) The resolution WXGA (1280 x 768) is recommand for details) Image Problems No image appears on the remote control or control panel. If you are using a PC: For Windows 95, 98, 2000, XP: 1. Select the "Settings" tab. 3. English Appendices Troubleshooting If you...
... your projector, please refer to the following steps. (*) The resolution WXGA (1280 x 768) is recommand for details) Image Problems No image appears on the remote control or control panel. If you are using a PC: For Windows 95, 98, 2000, XP: 1. Select the "Settings" tab. 3. English Appendices Troubleshooting If you...

User Manual
Page 37
... centered on the screen and below the bottom of the screen. Press [V.Keystone / ] button until the sides are vertical on the remote control. Press [H.Keystone / ] button until the sides are horizontal on the projector lens. Make sure the projection screen is...- Image is reversed Select "Setup-->Projection" from the screen. Press [4:3], [16:9], [Letter Box], [Native] button on the remot control or [Menu] on the top of the projector. Move the projector closer to "Display-->Format". Intermission Problems The projector stops responding to...
... centered on the screen and below the bottom of the screen. Press [V.Keystone / ] button until the sides are vertical on the remote control. Press [H.Keystone / ] button until the sides are horizontal on the projector lens. Make sure the projection screen is...- Image is reversed Select "Setup-->Projection" from the screen. Press [4:3], [16:9], [Letter Box], [Native] button on the remot control or [Menu] on the top of the projector. Move the projector closer to "Display-->Format". Intermission Problems The projector stops responding to...

User Manual
Page 39
Move to within 6 m (20 ft) of the projector. Make sure batteries are inserted correctly. Make sure batteries are not any obstructions between the remote con- English Thermal Warning: Appendices Replacing the lamp: Remote Control Problems If the remote control does not work Check the operating angle for the remote control is approximately ±22.5°. Make sure there are exhausted. If so, replace weak batteries in the remote control. 39 trol and the projector.
Move to within 6 m (20 ft) of the projector. Make sure batteries are inserted correctly. Make sure batteries are not any obstructions between the remote con- English Thermal Warning: Appendices Replacing the lamp: Remote Control Problems If the remote control does not work Check the operating angle for the remote control is approximately ±22.5°. Make sure there are exhausted. If so, replace weak batteries in the remote control. 39 trol and the projector.


