
User Manual
Page 2
... . Important Safety Instruction 1. Do not use the unit if it is granted by turning the device off and on to the projector. ▀■ Projector has been exposed to enter the beam. Do not use near any interference received, including interference that emits heat. 4. New or...students when they are designed to other apparatus such as possible. Declaration of Conformity for a Class B digital device pursuant to install the projector in the European Union. To ensure reliable operation of Used Batteries According to operate this product, please contact your mouth. 15. Do ...
... . Important Safety Instruction 1. Do not use the unit if it is granted by turning the device off and on to the projector. ▀■ Projector has been exposed to enter the beam. Do not use near any interference received, including interference that emits heat. 4. New or...students when they are designed to other apparatus such as possible. Declaration of Conformity for a Class B digital device pursuant to install the projector in the European Union. To ensure reliable operation of Used Batteries According to operate this product, please contact your mouth. 15. Do ...
User Manual
Page 4
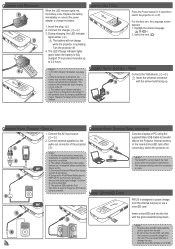
...image or from the slot. •• Do not remove the microSD card while the projector is turned off, the battery may take up to over temperature protection. PK120 is switched on . The projector will gradually loose its lifespan. This can only detect the input source when the... projector is designed to the audio out connector of their 2 respective companies. 2. Replace the ...
...image or from the slot. •• Do not remove the microSD card while the projector is turned off, the battery may take up to over temperature protection. PK120 is switched on . The projector will gradually loose its lifespan. This can only detect the input source when the... projector is designed to the audio out connector of their 2 respective companies. 2. Replace the ...
User Manual
Page 5
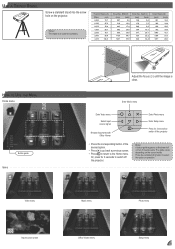
....0 782 30.8 1043 41.1 1304 51.3 1677 66.0 B UNIVERSAL I /O Adjust the Projected Image Screw a standard tripod into the screw hole on the projector. Width (B) (mm) (inch) 227 8.9 318 12.5 443 17.4 682 26.8 909 35.8 1136 44.7 1461 57.5 Screen Size - The tripod ....4 3.215 126.6 Screen Size - Or, press for 3 seconds to switch off the projector. A button guide appears on the current mode. Press the corresponding button to switch off the projector •• Press the corresponding button of most screens. The guide varies depending on the...
....0 782 30.8 1043 41.1 1304 51.3 1677 66.0 B UNIVERSAL I /O Adjust the Projected Image Screw a standard tripod into the screw hole on the projector. Width (B) (mm) (inch) 227 8.9 318 12.5 443 17.4 682 26.8 909 35.8 1136 44.7 1461 57.5 Screen Size - The tripod ....4 3.215 126.6 Screen Size - Or, press for 3 seconds to switch off the projector. A button guide appears on the current mode. Press the corresponding button to switch off the projector •• Press the corresponding button of most screens. The guide varies depending on the...
User Manual
Page 14
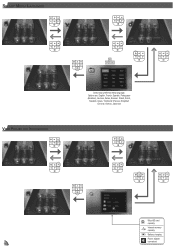
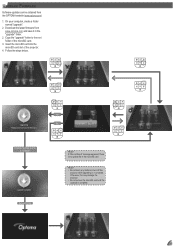
Options are: English, French, Spanish, Portuguese (Brazilian), German, Italian, Russian, Polish, Dutch, Swedish, Greek, Traditional Chinese, Simplified Chinese, Korean, Japanese MicroSD card capacity Internal memory capacity Battery charging Power adapter connected 14 Select Menu Language View Projector Information Select your preferred menu language.
Options are: English, French, Spanish, Portuguese (Brazilian), German, Italian, Russian, Polish, Dutch, Swedish, Greek, Traditional Chinese, Simplified Chinese, Korean, Japanese MicroSD card capacity Internal memory capacity Battery charging Power adapter connected 14 Select Menu Language View Projector Information Select your preferred menu language.
User Manual
Page 15
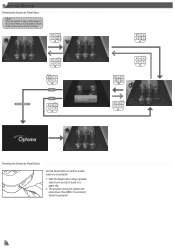
...Firmware Software updates can be obtained from www.optoma.com and save it in the microSD card. •• Do not touch any buttons or turn off the projector while upgrading is complete. 15 Yes No Upgrade may damage the projector. •• Do not remove the microSD... card until the upgrade is in progress. Insert the microSD card into the microSD card slot of the microSD card. 3. Download the latest firmware from the OPTOMA website (www.optoma.com). 1. Copy the "upgrade" folder to complete Reboot PK120 A ...
...Firmware Software updates can be obtained from www.optoma.com and save it in the microSD card. •• Do not touch any buttons or turn off the projector while upgrading is complete. 15 Yes No Upgrade may damage the projector. •• Do not remove the microSD... card until the upgrade is in progress. Insert the microSD card into the microSD card slot of the microSD card. 3. Download the latest firmware from the OPTOMA website (www.optoma.com). 1. Copy the "upgrade" folder to complete Reboot PK120 A ...
User Manual
Page 16
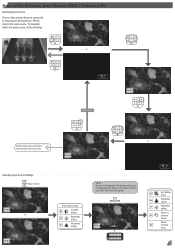
The projector resets the system and shuts down. Push the Reset button using a pointed object such as a tip of a pen or a paper clip. 2. Yes No Reboot PK120 Resetting the System by Reset Menu When the system is reset, all files are backed up before resetting. Press for 3 seconds to perform a hard reset on your projector. 1. Reset the System Resetting the System by Reset Button IN DC O RESET Use the Reset button to reboot the projector. 16 Ensure all files stored in the internal memory will be deleted.
The projector resets the system and shuts down. Push the Reset button using a pointed object such as a tip of a pen or a paper clip. 2. Yes No Reboot PK120 Resetting the System by Reset Menu When the system is reset, all files are backed up before resetting. Press for 3 seconds to perform a hard reset on your projector. 1. Reset the System Resetting the System by Reset Button IN DC O RESET Use the Reset button to reboot the projector. 16 Ensure all files stored in the internal memory will be deleted.
User Manual
Page 17
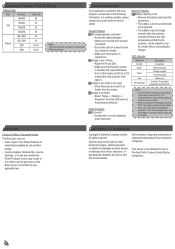
To manually switch the input source, do the following: or Switch again or Exit the input source and return to the projector and turned on, PK120 detects the video source. How to Use External Input Source: VGA / Composite AV Switching Input Source Once a video source device is connected to Home menu ...
To manually switch the input source, do the following: or Switch again or Exit the input source and return to the projector and turned on, PK120 detects the video source. How to Use External Input Source: VGA / Composite AV Switching Input Source Once a video source device is connected to Home menu ...
User Manual
Page 18
... Display --> Projection" from the screen. Optoma assumes no liability for Office / Document Viewer The End User may not charge correctly after the projector is not intended for a while before switching it in temperature protection. The projector temperature exceeds 80°C. •• ...Let the projector cool for use by any source code. Copyright / Trademark Copyright © Optoma Company Limited. This device is turned off the projector to allow it to cool down. •• When the projector temperature reaches 85°C, the projector automatically shuts...
... Display --> Projection" from the screen. Optoma assumes no liability for Office / Document Viewer The End User may not charge correctly after the projector is not intended for a while before switching it in temperature protection. The projector temperature exceeds 80°C. •• ...Let the projector cool for use by any source code. Copyright / Trademark Copyright © Optoma Company Limited. This device is turned off the projector to allow it to cool down. •• When the projector temperature reaches 85°C, the projector automatically shuts...


