Operater's Manual
Page 4
...least 3 feet) away from machine. Read, understand, and follow instructions and warnings in gear when going uphill or tires lose traction, turn over accidents, which can occur if the operator is doubtful. 13. Only mature, responsible persons shall operate the machine and only after ...or shift on the machine, engine and attachments. Use only an approved fuel container. 3. washouts, culverts, fences and protruding objects. 4 www.snapper.com Operator Safety ! DO NOT allow only persons who have to ride on slopes exceeding 10 degrees (18% watchful care of -control and...
...least 3 feet) away from machine. Read, understand, and follow instructions and warnings in gear when going uphill or tires lose traction, turn over accidents, which can occur if the operator is doubtful. 13. Only mature, responsible persons shall operate the machine and only after ...or shift on the machine, engine and attachments. Use only an approved fuel container. 3. washouts, culverts, fences and protruding objects. 4 www.snapper.com Operator Safety ! DO NOT allow only persons who have to ride on slopes exceeding 10 degrees (18% watchful care of -control and...
Operater's Manual
Page 5
... must be OFF except when cutting grass. ground. 13. ning. Remove gas-powered equipment from operator's seat, if possible. Inspect machine and repair damage before turning. 10. DO NOT operate engine in handling gasoline. DO NOT discharge material against Tipovers Operation (Continued From Previous Column) 1. than a gasoline dispenser nozzle. cles or...
... must be OFF except when cutting grass. ground. 13. ning. Remove gas-powered equipment from operator's seat, if possible. Inspect machine and repair damage before turning. 10. DO NOT operate engine in handling gasoline. DO NOT discharge material against Tipovers Operation (Continued From Previous Column) 1. than a gasoline dispenser nozzle. cles or...
Operater's Manual
Page 11
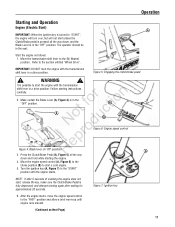
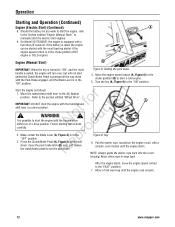
...the Clutch/Brake Pedal is fully depressed, and attempt starting again after waiting for approximately 20 seconds. A Figure 5: Engaging the clutch/brake pedal ! Turn the ignition key (A, Figure 7) to the "FAST" position and allow a brief warm-up until the engine starts. Operation Starting and Operation Engine ...(Electric Start) IMPORTANT: When the ignition key is turned to "START", the engine will turn over, but will not start unless the Clutch/Brake pedal is pressed all the way down , and the Blade Lever...
...the Clutch/Brake Pedal is fully depressed, and attempt starting again after waiting for approximately 20 seconds. A Figure 5: Engaging the clutch/brake pedal ! Turn the ignition key (A, Figure 7) to the "FAST" position and allow a brief warm-up until the engine starts. Operation Starting and Operation Engine ...(Electric Start) IMPORTANT: When the ignition key is turned to "START", the engine will turn over, but will not start unless the Clutch/Brake pedal is pressed all the way down , and the Blade Lever...
Operater's Manual
Page 12
...start the engine with the transmission shift lever in the "OFF" position. After the engine starts, move the park brake latch (B) over , but will turn over , and release R the clutch/brake pedal to the "FAST" position. 7. On Model 3317524BVE, the engine is pressed all the way e down...6) to the choke position (B) to start unless the Clutch/Brake Pedal is equipped with a smooth, even motion until the engine runs smooth. 12 www.snapper.com Move the transmission shift lever to the "ON" position. Pull the starter rope, located on the engine recoil, with a fuel shut-off solenoid...
...start the engine with the transmission shift lever in the "OFF" position. After the engine starts, move the park brake latch (B) over , but will turn over , and release R the clutch/brake pedal to the "FAST" position. 7. On Model 3317524BVE, the engine is pressed all the way e down...6) to the choke position (B) to start unless the Clutch/Brake Pedal is equipped with a smooth, even motion until the engine runs smooth. 12 www.snapper.com Move the transmission shift lever to the "ON" position. Pull the starter rope, located on the engine recoil, with a fuel shut-off solenoid...
Operater's Manual
Page 14
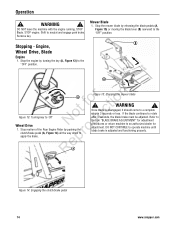
...authorized dealer for adjustment procedures or return machine to the "OFF" position. RepA Figure 14: Engaging the clutch/brake pedal 14 www.snapper.com DO NOT leave the machine with the engine running. STOP Blade. Refer to Section "BLADE BRAKE ADJUSTMENT" for adjustment. Stop ...motion of the Rear Engine Rider by turning the key (A, Figure 13) to r apply the brake. Mower Blade 1. WARNING ! Remove key. Stop the engine by pushing the o clutch...
...authorized dealer for adjustment procedures or return machine to the "OFF" position. RepA Figure 14: Engaging the clutch/brake pedal 14 www.snapper.com DO NOT leave the machine with the engine running. STOP Blade. Refer to Section "BLADE BRAKE ADJUSTMENT" for adjustment. Stop ...motion of the Rear Engine Rider by turning the key (A, Figure 13) to r apply the brake. Mower Blade 1. WARNING ! Remove key. Stop the engine by pushing the o clutch...
Operater's Manual
Page 16
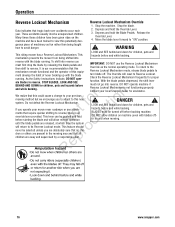
... Mechanism Override 1. WARNING ! To return to avoid danger. ! As the Safety Instructions Indicate, DO NOT oper- This lever can be turned off . Stop the machine. Depress and hold the Override Lever. 3. This mechanism prevents the mower from being taught how to the mechanism... near roadways or use the Reverse Lockout Mechanism then shift to reverse, there is an o override lever provided. Contact your local Snapper dealer for children, pets and hazards before backing machine. Reverse Lockout Mechanism mode, release blade pedals to its Reverse Lockout mode. STOP...
... Mechanism Override 1. WARNING ! To return to avoid danger. ! As the Safety Instructions Indicate, DO NOT oper- This lever can be turned off . Stop the machine. Depress and hold the Override Lever. 3. This mechanism prevents the mower from being taught how to the mechanism... near roadways or use the Reverse Lockout Mechanism then shift to reverse, there is an o override lever provided. Contact your local Snapper dealer for children, pets and hazards before backing machine. Reverse Lockout Mechanism mode, release blade pedals to its Reverse Lockout mode. STOP...

Operater's Manual
Page 19
...slack it must be adjusted. Avoid serious burns, allow all B parts to the "OFF" position or after the blade has been turned off. The belt spacing (B) should be closed securely to rotate longer than 3 seconds less than 1". If the blade continues to prevent fuel spillage.... SNAPPER dealer for assistance. * IMPORTANT: The blade drive belt on each side of deterioration and proper ten- Remove spark plug wire from spark ...
...slack it must be adjusted. Avoid serious burns, allow all B parts to the "OFF" position or after the blade has been turned off. The belt spacing (B) should be closed securely to rotate longer than 3 seconds less than 1". If the blade continues to prevent fuel spillage.... SNAPPER dealer for assistance. * IMPORTANT: The blade drive belt on each side of deterioration and proper ten- Remove spark plug wire from spark ...

Operater's Manual
Page 25
... are at the front and rear of machine) D A Figure 34: Adjusting the mower deck (front-to - With the Rear Engine Rider on machine. Turn the engine off and remove the key. Remove the floor (Figure 34). fo tio 4. If t c the measurement is within 1/8" of each hanger pivot... (D). Levelness) 28" and 33" Decks With the Rear Engine Rider on the angle iron. 5. Recheck both sides of the deck. p 9. Turn each other. Measure the distance from the blade tips to 1/4" lower than the front. Measure the distance from the blade tips to raise or lower...
... are at the front and rear of machine) D A Figure 34: Adjusting the mower deck (front-to - With the Rear Engine Rider on machine. Turn the engine off and remove the key. Remove the floor (Figure 34). fo tio 4. If t c the measurement is within 1/8" of each hanger pivot... (D). Levelness) 28" and 33" Decks With the Rear Engine Rider on the angle iron. 5. Recheck both sides of the deck. p 9. Turn each other. Measure the distance from the blade tips to 1/4" lower than the front. Measure the distance from the blade tips to raise or lower...

Operater's Manual
Page 32
... or frayed belt. 4. Engine needs choking. Engage park brake. 6. o u 2. p 7. Contact authorized dealer. 12. Clean all debris. 5. When Turned To "STOP" 1. Fuel tank empty. Engine Will Not 1. Ignition is in fuel system. 5. Contact authorized dealer. 5. Battery cables loose, broken disconnected ...3. Service spark plug. 4. Spark plug wire disconnected. 4. Sit in the "CHOKE" position. Replace pulley. 32 www.snapper.com Fuel tank empty. Turn ignition switch to the RUN position. Service mower blade(s). 2. Engine air pre-cleaner and or air cleaner dirty. Charge ...
... or frayed belt. 4. Engine needs choking. Engage park brake. 6. o u 2. p 7. Contact authorized dealer. 12. Clean all debris. 5. When Turned To "STOP" 1. Fuel tank empty. Engine Will Not 1. Ignition is in fuel system. 5. Contact authorized dealer. 5. Battery cables loose, broken disconnected ...3. Service spark plug. 4. Spark plug wire disconnected. 4. Sit in the "CHOKE" position. Replace pulley. 32 www.snapper.com Fuel tank empty. Turn ignition switch to the RUN position. Service mower blade(s). 2. Engine air pre-cleaner and or air cleaner dirty. Charge ...
