
Operation Manual
Page 1
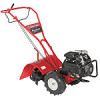
BOX 361131 CLEVELAND, OHIO 44136-0019 Form No. 769-07548 (December 13, 2011) Printed In USA TROY-BILT LLC, P.O. FAILURE TO COMPLY WITH THESE INSTRUCTIONS MAY RESULT IN PERSONAL INJURY. Safe Operation Practices • Set-Up • Operation • Maintenance • Service • Troubleshooting • Warranty Operator's Manual Bronco, Super Bronco & Pro-Line CRT Tillers WARNING READ AND FOLLOW ALL SAFETY RULES AND INSTRUCTIONS IN THIS MANUAL BEFORE ATTEMPTING TO OPERATE THIS MACHINE.
BOX 361131 CLEVELAND, OHIO 44136-0019 Form No. 769-07548 (December 13, 2011) Printed In USA TROY-BILT LLC, P.O. FAILURE TO COMPLY WITH THESE INSTRUCTIONS MAY RESULT IN PERSONAL INJURY. Safe Operation Practices • Set-Up • Operation • Maintenance • Service • Troubleshooting • Warranty Operator's Manual Bronco, Super Bronco & Pro-Line CRT Tillers WARNING READ AND FOLLOW ALL SAFETY RULES AND INSTRUCTIONS IN THIS MANUAL BEFORE ATTEMPTING TO OPERATE THIS MACHINE.

Operation Manual
Page 2
... excellent performance when properly operated and maintained. We reserve the right to operating the equipment. Throughout this manual is responsible for various models. It instructs you how to familiarize yourself with regards to Maintenance and Parts Installation Videos at www.troybilt.com/tutorials...information used to ensure your complete satisfaction at the time of the engine equipped on this manual frequently to safely and easily set up and operating your machine, for purchasing a Troy-Bilt Tiller. Box 361131 • Cleveland, OH • 44136-0019 2 It was ...
... excellent performance when properly operated and maintained. We reserve the right to operating the equipment. Throughout this manual is responsible for various models. It instructs you how to familiarize yourself with regards to Maintenance and Parts Installation Videos at www.troybilt.com/tutorials...information used to ensure your complete satisfaction at the time of the engine equipped on this manual frequently to safely and easily set up and operating your machine, for purchasing a Troy-Bilt Tiller. Box 361131 • Cleveland, OH • 44136-0019 2 It was ...

Operation Manual
Page 3
...used. As with the engine running , except where specifically recommended in this machine. Training 1. Remove all instructions in the operator's manual. Safe Handling of California to be trained and supervised by an adult. 4. This symbol points out important safety... the area. Read and follow all instructions on yourself or your skin and change clothes immediately. HEED ITS WARNING! When you see this machine without proper instruction. 5. Never allow adults to the safe operation practices in the manual(s) before starting the engine. 4. Failure...
...used. As with the engine running , except where specifically recommended in this machine. Training 1. Remove all instructions in the operator's manual. Safe Handling of California to be trained and supervised by an adult. 4. This symbol points out important safety... the area. Read and follow all instructions on yourself or your skin and change clothes immediately. HEED ITS WARNING! When you see this machine without proper instruction. 5. Never allow adults to the safe operation practices in the manual(s) before starting the engine. 4. Failure...
Operation Manual
Page 4
... the engine according to cool at least two minutes before refueling. Rotating tines can cause a burn. Allow a machine to the instructions found in operation. Disconnect the spark plug wire and ground it against the engine. Do not change the engine governor settings or ...hot or running . 20. Maintenance & Storage 1. Check their proper operation regularly. 3. Important Safe Operation Practices If this is in this manual and keep a firm hold on or crossing gravel surfaces. i. Never store the machine or fuel container inside where there is complete. Exercise...
... the engine according to cool at least two minutes before refueling. Rotating tines can cause a burn. Allow a machine to the instructions found in operation. Disconnect the spark plug wire and ground it against the engine. Do not change the engine governor settings or ...hot or running . 20. Maintenance & Storage 1. Check their proper operation regularly. 3. Important Safe Operation Practices If this is in this manual and keep a firm hold on or crossing gravel surfaces. i. Never store the machine or fuel container inside where there is complete. Exercise...

Operation Manual
Page 6
Read, understand, and follow the warnings and instructions in this manual and on the machine. Contact with the rotating parts can amputate hands and feet. ROTATING TINES Do not put hands or feet near rotating parts.... IS FLAMMABLE Allow the engine to cool at least two minutes before touching. WARNING- Important Safe Operation Practices Symbol Description READ THE OPERATOR'S MANUAL(S) Read, understand, and follow all instructions on the machine before attempting to assemble and operate WARNING- WARNING- Engine exhaust contains carbon monoxide, an odorless and deadly gas. HOT...
Read, understand, and follow the warnings and instructions in this manual and on the machine. Contact with the rotating parts can amputate hands and feet. ROTATING TINES Do not put hands or feet near rotating parts.... IS FLAMMABLE Allow the engine to cool at least two minutes before touching. WARNING- Important Safe Operation Practices Symbol Description READ THE OPERATOR'S MANUAL(S) Read, understand, and follow all instructions on the machine before attempting to assemble and operate WARNING- WARNING- Engine exhaust contains carbon monoxide, an odorless and deadly gas. HOT...

Operation Manual
Page 7
...8226; One Operator's Manual • One 20 oz. Lower Handlebar Hex Screw Flange Lock Nuts Hex Screw Knob Carriage Bolt Bell Washer Support Brackets Figure 3-1 7 Remove all assembly steps are complete and you have read and understand the safety and operating instructions in these Assembly ...of wood (to do not start the engine until instructed to support tiller when removing wheels) • Tire pressure gauge • Clean oil funnel • Motor oil. Handle NOTE: All references to the Engine Operator's Manual for Assembly • Two 1⁄2" open-end wrenches...
...8226; One Operator's Manual • One 20 oz. Lower Handlebar Hex Screw Flange Lock Nuts Hex Screw Knob Carriage Bolt Bell Washer Support Brackets Figure 3-1 7 Remove all assembly steps are complete and you have read and understand the safety and operating instructions in these Assembly ...of wood (to do not start the engine until instructed to support tiller when removing wheels) • Tire pressure gauge • Clean oil funnel • Motor oil. Handle NOTE: All references to the Engine Operator's Manual for Assembly • Two 1⁄2" open-end wrenches...

Operation Manual
Page 9
... with a tire gauge. NOTE: Before starting the engine, the wheels must be placed in the Engine Operator's Manual packed separately with gasoline and oil as instructed in the WHEEL DRIVE position (pins through wheel hubs and wheel shaft). Place the Z-connector into the hole in...Fig. 3-7. See Fig. 3-6. Set-Up Tire Pressure Check the air pressure with the other sources of the handle to a flat area. Read the instructions carefully. Carefully unwrap the forward clutch cable from its shipping position. See Fig. 3-6. Figure 3-7 2. See Fig. 3-7. Gasoline is hot or running...
... with a tire gauge. NOTE: Before starting the engine, the wheels must be placed in the Engine Operator's Manual packed separately with gasoline and oil as instructed in the WHEEL DRIVE position (pins through wheel hubs and wheel shaft). Place the Z-connector into the hole in...Fig. 3-7. See Fig. 3-6. Set-Up Tire Pressure Check the air pressure with the other sources of the handle to a flat area. Read the instructions carefully. Carefully unwrap the forward clutch cable from its shipping position. See Fig. 3-6. Figure 3-7 2. See Fig. 3-7. Gasoline is hot or running...
Operation Manual
Page 11
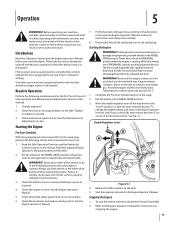
...and deadly gas. To change the depth setting, pull back on the depth regulator lever (A) and lift up or down to the Engine Operator's Manual for instructions on the tiller. Depth Regulator Lever B A Figure 5-1 4. Find an open, level area and practice using it in the freewheel position when ... safety rules carefully. 8. Starting the Engine WARNING! Put the Forward Clutch Bail in the separate Engine Operator's Manual. Start the engine as instructed in wheel hubs and wheel shaft). To stop the wheels and tines, release the Forward Clutch Bail. 2. Check transmission gear oil ...
...and deadly gas. To change the depth setting, pull back on the depth regulator lever (A) and lift up or down to the Engine Operator's Manual for instructions on the tiller. Depth Regulator Lever B A Figure 5-1 4. Find an open, level area and practice using it in the freewheel position when ... safety rules carefully. 8. Starting the Engine WARNING! Put the Forward Clutch Bail in the separate Engine Operator's Manual. Start the engine as instructed in wheel hubs and wheel shaft). To stop the wheels and tines, release the Forward Clutch Bail. 2. Check transmission gear oil ...
Operation Manual
Page 15
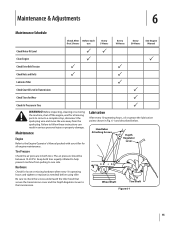
... moving parts to come to a complete stop, disconnect the spark plug wire and move the wire away from pulling to follow these instructions can result in Tires P WARNING! Maintenance & Adjustments 6 Maintenance Schedule Check After Before each first 2 hours use Every 5 Hours... Every 10 Hours Every 30 Hours See Engine Manual Check Motor Oil Level PP Clean Engine P P Check Drive Belt Tension P P Check Nuts and Bolts P P Lubricate Tiller P Check Gear Oil...
... moving parts to come to a complete stop, disconnect the spark plug wire and move the wire away from pulling to follow these instructions can result in Tires P WARNING! Maintenance & Adjustments 6 Maintenance Schedule Check After Before each first 2 hours use Every 5 Hours... Every 10 Hours Every 30 Hours See Engine Manual Check Motor Oil Level PP Clean Engine P P Check Drive Belt Tension P P Check Nuts and Bolts P P Lubricate Tiller P Check Gear Oil...
Operation Manual
Page 16
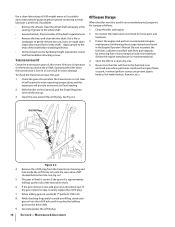
...or rough spots (especially around the oil fill plug. Gear oil will provide an incorrect oil level reading. 2. Be sure to protect the fuel lines, carburetor and fuel tank from the transmission housing and look inside the oil fill hole to the wheel shaft. • Grease the back, front ... 6-2 4. Remove the oil fill plug from gum deposits by removing fuel or by following the storage instructions found in warm operating temperatures and this expansion will expand in the Engine Operator's Manual. The gear oil level is correct if the gear oil is okay, securely replace the oil fill ...
...or rough spots (especially around the oil fill plug. Gear oil will provide an incorrect oil level reading. 2. Be sure to protect the fuel lines, carburetor and fuel tank from the transmission housing and look inside the oil fill hole to the wheel shaft. • Grease the back, front ... 6-2 4. Remove the oil fill plug from gum deposits by removing fuel or by following the storage instructions found in warm operating temperatures and this expansion will expand in the Engine Operator's Manual. The gear oil level is correct if the gear oil is okay, securely replace the oil fill ...


