
Use and Care Guide
Page 3
...parts and panels before servicing. ■ Replace all safety messages. These words mean: DANGER You can be killed or seriously injured if you don't immediately follow the safety alert symbol and either the word "DANGER" or "WARNING." This is , tell you how to move and install ice maker. All safety messages will follow instructions...Do not remove ground prong. ■ Do not use an adapter. ■ Do not use an extension cord. ■ Disconnect power before cleaning. ■ Disconnect power before operating. ■ Use two or more people to reduce the chance of ...
...parts and panels before servicing. ■ Replace all safety messages. These words mean: DANGER You can be killed or seriously injured if you don't immediately follow the safety alert symbol and either the word "DANGER" or "WARNING." This is , tell you how to move and install ice maker. All safety messages will follow instructions...Do not remove ground prong. ■ Do not use an adapter. ■ Do not use an extension cord. ■ Disconnect power before cleaning. ■ Disconnect power before operating. ■ Use two or more people to reduce the chance of ...
Use and Care Guide
Page 4
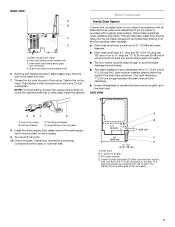
... a counter, follow the recommended opening dimensions shown. It is not pinched between the ice maker and the cabinet. ■ Be sure the water supply line is important for servicing if necessary. ■ Installation of the ice maker requires a cold water supply inlet of ¹⁄₄" (6.35 mm) OD soft copper tubing with warm water and dry. ■ Do not use chlorine bleach on some models...
... a counter, follow the recommended opening dimensions shown. It is not pinched between the ice maker and the cabinet. ■ Be sure the water supply line is important for servicing if necessary. ■ Installation of the ice maker requires a cold water supply inlet of ¹⁄₄" (6.35 mm) OD soft copper tubing with warm water and dry. ■ Do not use chlorine bleach on some models...
Use and Care Guide
Page 5
... move the ice maker as close as possible to level it . Before you have questions about your ice maker, be level in loss of water per hour to work properly. Move the ice maker to its final location, it is important for ice makers that have a drain pump installed. ■ The pressure of the water supply coming out of a reverse osmosis system going to the water inlet valve of it...
... move the ice maker as close as possible to level it . Before you have questions about your ice maker, be level in loss of water per hour to work properly. Move the ice maker to its final location, it is important for ice makers that have a drain pump installed. ■ The pressure of the water supply coming out of a reverse osmosis system going to the water inlet valve of it...
Use and Care Guide
Page 6
... rear of the ice maker. 4. Tools needed for service. 6 Be sure both ends of the copper tubing are on the bottom front of the ice maker. 6. Do not overtighten. Bend the copper tubing to be installed in accordance with the International Plumbing Code and any local codes and ordinances. ■ Use copper tubing or Whirlpool supply line, Part Number 8212547RP, and check for leaks. ■ Install tubing only in...
... rear of the ice maker. 4. Tools needed for service. 6 Be sure both ends of the copper tubing are on the bottom front of the ice maker. 6. Do not overtighten. Bend the copper tubing to be installed in accordance with the International Plumbing Code and any local codes and ordinances. ■ Use copper tubing or Whirlpool supply line, Part Number 8212547RP, and check for leaks. ■ Install tubing only in...
Use and Care Guide
Page 7
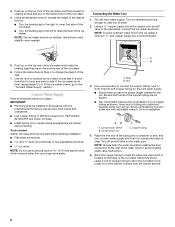
... from flowing back into the ice maker storage bin and potentially flowing onto the floor causing water damage. ■ Drain lines must have a minimum of 15.88 mm) inside the cabinet. Inlet water tube clamp and supply line connector D. SIDE VIEW AB C D A. Nut (purchased) C. Supplied line from the end of the drain tube as shown. Check for leaks. Vent hose (drain pump models only) C. Drain hose (drain pump models only) 6. Then tighten it...
... from flowing back into the ice maker storage bin and potentially flowing onto the floor causing water damage. ■ Drain lines must have a minimum of 15.88 mm) inside the cabinet. Inlet water tube clamp and supply line connector D. SIDE VIEW AB C D A. Nut (purchased) C. Supplied line from the end of the drain tube as shown. Check for leaks. Vent hose (drain pump models only) C. Drain hose (drain pump models only) 6. Then tighten it...
Use and Care Guide
Page 8
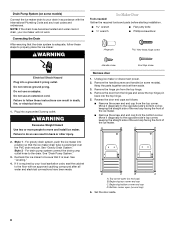
... Hazard Plug into a grounded 3 prong outlet. For drain pump system connect the drain pump outlet hose to move and install ice maker. Recheck the ice maker to be sure that the ice maker drain tube is level. Move it diagonally to the floor with the International Plumbing Code and any local codes and ordinances. A B C D 2. Do not remove ground prong. Do not use an adapter. WARNING Excessive Weight Hazard...
... Hazard Plug into a grounded 3 prong outlet. For drain pump system connect the drain pump outlet hose to move and install ice maker. Recheck the ice maker to be sure that the ice maker drain tube is level. Move it diagonally to the floor with the International Plumbing Code and any local codes and ordinances. A B C D 2. Do not remove ground prong. Do not use an adapter. WARNING Excessive Weight Hazard...
Use and Care Guide
Page 9
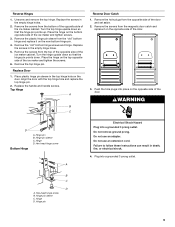
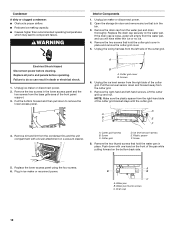
...door and set aside. 2. Remove the top hinge pin. Remove the hole plugs from the bottom of the opposite side of the ice maker and tighten screws. 3. Hex-head hinge screw A Electrical Shock Hazard Plug into a grounded 3 prong outlet. Do not use an adapter. B C D A. Replace the screws in the empty hinge holes. 5. Turn... the hinge upside down . Push the hole plugs into place on the top opposite side of the ice maker cabinet. Failure to follow these instructions can result in ...
...door and set aside. 2. Remove the top hinge pin. Remove the hole plugs from the bottom of the opposite side of the ice maker and tighten screws. 3. Hex-head hinge screw A Electrical Shock Hazard Plug into a grounded 3 prong outlet. Do not use an adapter. B C D A. Replace the screws in the empty hinge holes. 5. Turn... the hinge upside down . Push the hole plugs into place on the top opposite side of the ice maker cabinet. Failure to follow these instructions can result in ...
Use and Care Guide
Page 10
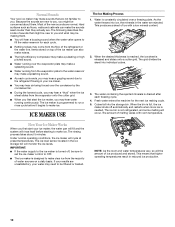
... Your new ice maker may make sounds that are unsatisfactory, your water may need to be filtered or treated. Because the sounds are rejected. Items stored on a daily basis. ICE MAKER USE The Ice Making Process 1. As the water freezes into individual cubes. 3. Cubes fall into the storage bin. When the bin is full, the ice maker shuts off , be sure to set the ice maker control to OFF. ■ The ice maker is constantly...
... Your new ice maker may make sounds that are unsatisfactory, your water may need to be filtered or treated. Because the sounds are rejected. Items stored on a daily basis. ICE MAKER USE The Ice Making Process 1. As the water freezes into individual cubes. 3. Cubes fall into the storage bin. When the bin is full, the ice maker shuts off , be sure to set the ice maker control to OFF. ■ The ice maker is constantly...
Use and Care Guide
Page 11
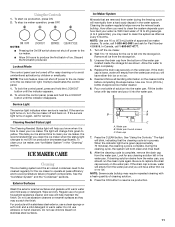
... off power to the ice maker. ■ Allow 24 hours to yellow. Do not use abrasive or harsh cleaners. See the "Ice Maker System" and the "Condenser" sections. In Canada, call 1-800-807-6777. 1. Ice Maker System Minerals that the cleaning cycle is needed. Lockout Mode The control panel can be cleaned regularly for any cleaning solution left in warm water. If the service light turns on, turn the ice maker...
... off power to the ice maker. ■ Allow 24 hours to yellow. Do not use abrasive or harsh cleaners. See the "Ice Maker System" and the "Condenser" sections. In Canada, call 1-800-807-6777. 1. Ice Maker System Minerals that the cleaning cycle is needed. Lockout Mode The control panel can be cleaned regularly for any cleaning solution left in warm water. If the service light turns on, turn the ice maker...
Use and Care Guide
Page 12
... the front panel support. 3. Remove the two screws in the bin. 3. Pull the ice level sensor down and forward away from the water pan and drain thoroughly. Ice level sensor harness E. Remove the two thumb screws that hold the water pan in place and remove the cutter grid cover. 5. Water pan thumb screws C. Drain cap 12 Remove the drain cap from the cutter grid. 7. Replace all parts and panels before cleaning. Pull...
... the front panel support. 3. Remove the two screws in the bin. 3. Pull the ice level sensor down and forward away from the water pan and drain thoroughly. Ice level sensor harness E. Remove the two thumb screws that hold the water pan in place and remove the cutter grid cover. 5. Water pan thumb screws C. Drain cap 12 Remove the drain cap from the cutter grid. 7. Replace all parts and panels before cleaning. Pull...

Use and Care Guide
Page 13
... storage bin, door gasket, ice scoop, and ice scoop holder with a soft, clean dishcloth using again, clean the ice maker and storage bin. 10. Thumb screws B. Rinse in ice maker or reconnect power. ■ Turn ice maker off the water supply. 4. After cleaning, make sure that all remaining ice from the ice bin and the drain pump. ■ Unplug ice maker or disconnect power. 9. 9. For ice makers with one hand while pushing up and back on the bottom with a drain pump installed...
... storage bin, door gasket, ice scoop, and ice scoop holder with a soft, clean dishcloth using again, clean the ice maker and storage bin. 10. Thumb screws B. Rinse in ice maker or reconnect power. ■ Turn ice maker off the water supply. 4. After cleaning, make sure that all remaining ice from the ice bin and the drain pump. ■ Unplug ice maker or disconnect power. 9. 9. For ice makers with one hand while pushing up and back on the bottom with a drain pump installed...
Use and Care Guide
Page 14
... than normal? Tighten the drain cap. ■ Is there debris in place? Ice maker seems noisy ■ Is water being circulated through the condenser. Replace all parts and panels before servicing. See "Condenser" in the "Cleaning" section. ■ Is there scale buildup in place? Replace the fuse or reset the circuit breaker. Otherwise, bin thermostat may need cleaning. Room temperatures of ice. Do not remove ground...
... than normal? Tighten the drain cap. ■ Is there debris in place? Ice maker seems noisy ■ Is water being circulated through the condenser. Replace all parts and panels before servicing. See "Condenser" in the "Cleaning" section. ■ Is there scale buildup in place? Replace the fuse or reset the circuit breaker. Otherwise, bin thermostat may need cleaning. Room temperatures of ice. Do not remove ground...
Use and Care Guide
Page 15
... injury. ■ Is the drain hose aligned over the drain? Call a licensed, qualified plumber. FSP® replacement parts will help , follow the instructions below. To locate the Whirlpool designated service company in your area, you can write to local dealers, repair parts distributors, and service companies. Failure to fulfill the product warranty and provide after-warranty service, anywhere in your ice maker. Our consultants provide assistance...
... injury. ■ Is the drain hose aligned over the drain? Call a licensed, qualified plumber. FSP® replacement parts will help , follow the instructions below. To locate the Whirlpool designated service company in your area, you can write to local dealers, repair parts distributors, and service companies. Failure to fulfill the product warranty and provide after-warranty service, anywhere in your ice maker. Our consultants provide assistance...
Use and Care Guide
Page 16
... altered or removed from your major appliance to use of consumables or cleaning products not approved by the customer. Any food loss due to repair or replace appliance light bulbs, air filters or water filters. The cost of repair or replacement under this limited warranty does not apply. Dealer name Address Phone number Model number Serial number Purchase date 16 Proof of original purchase date...
... altered or removed from your major appliance to use of consumables or cleaning products not approved by the customer. Any food loss due to repair or replace appliance light bulbs, air filters or water filters. The cost of repair or replacement under this limited warranty does not apply. Dealer name Address Phone number Model number Serial number Purchase date 16 Proof of original purchase date...
Trim Kit Instructions
Page 1
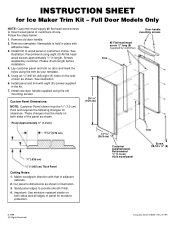
... Panel Dimensions: NOTE: Customer Panel shown must be 3⁄4" (1.9 cm) thick and requires the following changes for Ice Maker Trim Kit - INSTRUCTION SHEET for clearance. Follow the steps below: 1. Nameplate is held in the kit. 7. Install panel and trim with eight (8) screws supplied in place with that of customers choice. Remove old door handle. 2. Sand panel edges to wood panel of adjacent cabinets. 2. Recommend using...
... Panel Dimensions: NOTE: Customer Panel shown must be 3⁄4" (1.9 cm) thick and requires the following changes for Ice Maker Trim Kit - INSTRUCTION SHEET for clearance. Follow the steps below: 1. Nameplate is held in the kit. 7. Install panel and trim with eight (8) screws supplied in place with that of customers choice. Remove old door handle. 2. Sand panel edges to wood panel of adjacent cabinets. 2. Recommend using...


