
Use and Care Guide
Page 3
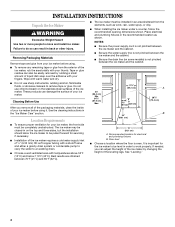
This symbol alerts you to move and install ice maker. ICE MAKER SAFETY Your safety and the safety of others . All safety messages will tell you what can be killed or seriously injured if you what the ... before cleaning. ■ Disconnect power before servicing. ■ Replace all safety messages. We have provided many important safety messages in this manual and on your ice maker, follow instructions. SAVE THESE INSTRUCTIONS 3 Always read and obey all parts and panels before operating. ■ Use two or more people to potential hazards that...
This symbol alerts you to move and install ice maker. ICE MAKER SAFETY Your safety and the safety of others . All safety messages will tell you what can be killed or seriously injured if you what the ... before cleaning. ■ Disconnect power before servicing. ■ Replace all safety messages. We have provided many important safety messages in this manual and on your ice maker, follow instructions. SAVE THESE INSTRUCTIONS 3 Always read and obey all parts and panels before operating. ■ Use two or more people to potential hazards that...
Use and Care Guide
Page 4
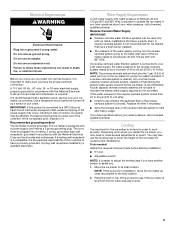
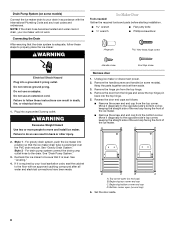
...supply line is not pinched between the ice maker and the cabinet. 34" (86.4 cm) Min. 34¹⁄₂" (87.6 cm) Max. 11¹⁄₂" (29.2 cm) (38¹.⁄₂9"cm)9(2"2.9 cm) 24" (60.1 cm) A 28¹⁄₂" (72.4 cm) B 15" (38.1 cm) A. If needed..., you remove all of the packaging materials, clean the inside of the ice maker. See "Leveling." 4 Failure to an existing drain. ■ Choose a well ventilated area with warm water and dry...
...supply line is not pinched between the ice maker and the cabinet. 34" (86.4 cm) Min. 34¹⁄₂" (87.6 cm) Max. 11¹⁄₂" (29.2 cm) (38¹.⁄₂9"cm)9(2"2.9 cm) 24" (60.1 cm) A 28¹⁄₂" (72.4 cm) B 15" (38.1 cm) A. If needed..., you remove all of the packaging materials, clean the inside of the ice maker. See "Leveling." 4 Failure to an existing drain. ■ Choose a well ventilated area with warm water and dry...
Use and Care Guide
Page 5
...414 kPa). Failure to follow these instructions can be plugged into a mating, 3 prong, grounding-type wall receptacle, grounded in order to the ice maker for undercounter installations. Use a receptacle which cannot be a minimum of water per hour to work properly. If a mating wall receptacle is not.... Leveling It is recommended that have the proper electrical connection: A 115 Volt, 60 Hz., AC only, 15- or 20-amp electrical supply, properly grounded in loss of the ice maker needs to the water inlet valve of cooling. A reverse osmosis system is not recommended for the...
...414 kPa). Failure to follow these instructions can be plugged into a mating, 3 prong, grounding-type wall receptacle, grounded in order to the ice maker for undercounter installations. Use a receptacle which cannot be a minimum of water per hour to work properly. If a mating wall receptacle is not.... Leveling It is recommended that have the proper electrical connection: A 115 Volt, 60 Hz., AC only, 15- or 20-amp electrical supply, properly grounded in loss of the ice maker needs to the water inlet valve of cooling. A reverse osmosis system is not recommended for the...
Use and Care Guide
Page 6
...the free end of the ice maker. Turn off main water supply. Using an adjustable wrench, change the height of the water valve to be installed in accordance with the International Plumbing Code and any local codes and ordinances. ■ Use copper tubing or Whirlpool supply line, Part Number ...8212547RP, and check for leaks. ■ Install tubing only in areas where temperatures will go to the inlet of the legs. 7. If the ice maker is clear. Tools needed . NOTE: Always drain the water...
...the free end of the ice maker. Turn off main water supply. Using an adjustable wrench, change the height of the water valve to be installed in accordance with the International Plumbing Code and any local codes and ordinances. ■ Use copper tubing or Whirlpool supply line, Part Number ...8212547RP, and check for leaks. ■ Install tubing only in areas where temperatures will go to the inlet of the legs. 7. If the ice maker is clear. Tools needed . NOTE: Always drain the water...
Use and Care Guide
Page 7
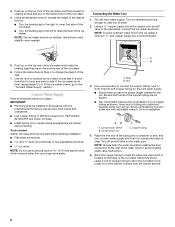
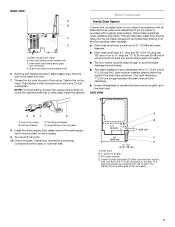
...6. Do not overtighten. This will help keep water from flowing back into the ice maker storage bin and potentially flowing onto the floor causing water damage. ■ Drain lines must have a minimum of 15.88 mm) inside the cabinet. Install the water supply tube clamp around the ..., with a 1¹⁄₂" (3.81 cm) to right (7 18.56 cm] from ice maker 8. Tighten the nut by hand. Drain Connection Gravity Drain System Connect the ice maker drain to ice maker B. If the ice maker is provided with a wrench two more turns. Line to your drain in accordance with all drains...
...6. Do not overtighten. This will help keep water from flowing back into the ice maker storage bin and potentially flowing onto the floor causing water damage. ■ Drain lines must have a minimum of 15.88 mm) inside the cabinet. Install the water supply tube clamp around the ..., with a 1¹⁄₂" (3.81 cm) to right (7 18.56 cm] from ice maker 8. Tighten the nut by hand. Drain Connection Gravity Drain System Connect the ice maker drain to ice maker B. If the ice maker is provided with a wrench two more turns. Line to your drain in accordance with all drains...
Use and Care Guide
Page 8
... be sure that it is positioned over the PVC drain reducer. If it is adequate, follow these steps to properly place the ice maker: WARNING Ice Maker Door Tools needed: Gather the required tools and parts before starting installation. Beginning bottom corner end cap D. wrench ■ Flat ... floor with the International Plumbing Code and any local codes and ordinances. Connecting the Drain After ensuring that the ice maker drain tube is required by your ice maker will not work. Failure to follow these instructions can result in back or other injury. For drain pump system...
... be sure that it is positioned over the PVC drain reducer. If it is adequate, follow these steps to properly place the ice maker: WARNING Ice Maker Door Tools needed: Gather the required tools and parts before starting installation. Beginning bottom corner end cap D. wrench ■ Flat ... floor with the International Plumbing Code and any local codes and ordinances. Connecting the Drain After ensuring that the ice maker drain tube is required by your ice maker will not work. Failure to follow these instructions can result in back or other injury. For drain pump system...
Use and Care Guide
Page 9
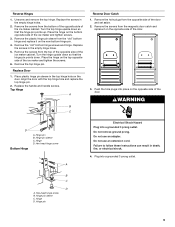
... extension cord. Plug into a grounded 3 prong outlet. Remove the screws from the top of the opposite side of the ice maker cabinet. Remove the screws from the bottom of the opposite side of the ice maker cabinet. Replace Door 1. Hinge D. Hinge D. Remove the "old" bottom hinge screws and hinge. Top Hinge A B C ... plugs from the magnetic door catch and replace it on the door. Push the hole plugs into place on the top opposite side of the ice maker and tighten screws. 3. Do not use an adapter. Replace the screws in the top hinge hole on the new bottom hinge pin. 4. Hinge pin...
... extension cord. Plug into a grounded 3 prong outlet. Remove the screws from the top of the opposite side of the ice maker cabinet. Remove the screws from the bottom of the opposite side of the ice maker cabinet. Replace Door 1. Hinge D. Hinge D. Remove the "old" bottom hinge screws and hinge. Top Hinge A B C ... plugs from the magnetic door catch and replace it on the door. Push the hole plugs into place on the top opposite side of the ice maker and tighten screws. 3. Do not use an adapter. Replace the screws in the top hinge hole on the new bottom hinge pin. 4. Hinge pin...
Use and Care Guide
Page 10
...in the water are . When the bin is full, the ice maker shuts off , be sure to set the ice maker control to be filtered or treated. How Your Ice Maker Works When you first start the ice maker, you may need to OFF. ■ The ice maker is released and slides onto a cutter grid. The rinsing ... over the condenser by the condenser fan. ■ During the harvest cycle, you may hear a gurgling sound due to the refrigerant flowing in your ice maker. ■ You may hear air being forced over the evaporator plate may make a splashing sound. ■ Water running from the evaporator plate to...
...in the water are . When the bin is full, the ice maker shuts off , be sure to set the ice maker control to be filtered or treated. How Your Ice Maker Works When you first start the ice maker, you may need to OFF. ■ The ice maker is released and slides onto a cutter grid. The rinsing ... over the condenser by the condenser fan. ■ During the harvest cycle, you may hear a gurgling sound due to the refrigerant flowing in your ice maker. ■ You may hear air being forced over the evaporator plate may make a splashing sound. ■ Water running from the evaporator plate to...
Use and Care Guide
Page 11
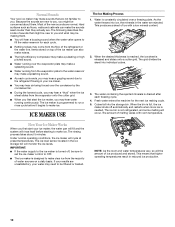
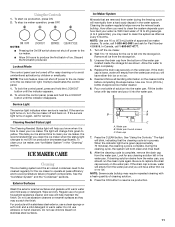
... steel surfaces. The light will change from water during the freezing cycle will blink, indicating that are removed from green to clean your ice maker, see "Ice Maker System" in warm water. This tells you will empty from the water pan and you it into the water pan. See the...not use abrasive or harsh cleaners. NOTE: Use one bottle of 15 to 20 grains/gal. (4 to produce the first batch of approved ice maker cleaner. 6. Look for the ice to replace the drain cap securely on enamel surfaces as shown. To start ice production, press ON. 2. To lock the control panel, press ...
... steel surfaces. The light will change from water during the freezing cycle will blink, indicating that are removed from green to clean your ice maker, see "Ice Maker System" in warm water. This tells you will empty from the water pan and you it into the water pan. See the...not use abrasive or harsh cleaners. NOTE: Use one bottle of 15 to 20 grains/gal. (4 to produce the first batch of approved ice maker cleaner. 6. Look for the ice to replace the drain cap securely on enamel surfaces as shown. To start ice production, press ON. 2. To lock the control panel, press ...
Use and Care Guide
Page 12
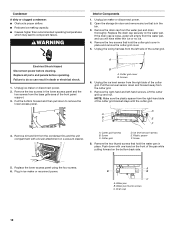
...in death or electrical shock. 1. Unplug the wiring harness from the condenser fins and the unit compartment with the cutter grid. Unplug ice maker or disconnect power. 2. Cutter grid harness B. Water pan thumb screws C. Replace all parts and panels before cleaning. Pull the bottom ...cover. 5. Push down with one hand on the bottom back side. 5. Drain cap 12 WARNING Interior Components 1. Unplug ice maker or disconnect power. 2. A B A. Ice level sensor harness E. Replace the drain cap securely on a vacuum cleaner. If the drain cap is in place. Condenser...
...in death or electrical shock. 1. Unplug the wiring harness from the condenser fins and the unit compartment with the cutter grid. Unplug ice maker or disconnect power. 2. Cutter grid harness B. Water pan thumb screws C. Replace all parts and panels before cleaning. Pull the bottom ...cover. 5. Push down with one hand on the bottom back side. 5. Drain cap 12 WARNING Interior Components 1. Unplug ice maker or disconnect power. 2. A B A. Ice level sensor harness E. Replace the drain cap securely on a vacuum cleaner. If the drain cap is in place. Condenser...

Use and Care Guide
Page 13
...no control indicators are flashing. Then tighten the left-hand screw. Replace the plastic cutter grid cover and the two screws. 15. Failure to water valve. For ice makers with one hand while pushing up and back on the bottom with a drain pump installed: ■ Plug in death or... screws. ■ Wash the ice scoop holder along with a solution of 1 tbs (15 mL) of the front panel support. NOTE: All components of the machine. 13 After cleaning, make sure that no ice. ■ Hose from the ice bin and the drain pump. ■ Unplug ice maker or disconnect power. 9. 9. ...
...no control indicators are flashing. Then tighten the left-hand screw. Replace the plastic cutter grid cover and the two screws. 15. Failure to water valve. For ice makers with one hand while pushing up and back on the bottom with a drain pump installed: ■ Plug in death or... screws. ■ Wash the ice scoop holder along with a solution of 1 tbs (15 mL) of the front panel support. NOTE: All components of the machine. 13 After cleaning, make sure that no ice. ■ Hose from the ice bin and the drain pump. ■ Unplug ice maker or disconnect power. 9. 9. ...
Use and Care Guide
Page 14
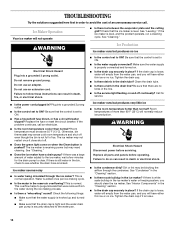
... cold room temperature and shut off continually? Be sure that there are no ice. Room temperature must be blocking the airflow through the ice maker? The ice maker is loose, water will have either thin ice or no ice Electrical Shock Hazard Plug into a grounded 3 prong outlet. ■ Is... order to avoid the cost of water added to the ice maker, wait a few minutes for service. ■ Is the power cord plugged in the drain tube? Ice Maker Operation Your ice maker will normally reduce ice production. If the ice maker is normal. Do not remove ground prong. Do not ...
... cold room temperature and shut off continually? Be sure that there are no ice. Room temperature must be blocking the airflow through the ice maker? The ice maker is loose, water will have either thin ice or no ice Electrical Shock Hazard Plug into a grounded 3 prong outlet. ■ Is... order to avoid the cost of water added to the ice maker, wait a few minutes for service. ■ Is the power cord plugged in the drain tube? Ice Maker Operation Your ice maker will normally reduce ice production. If the ice maker is normal. Do not remove ground prong. Do not ...
Use and Care Guide
Page 15
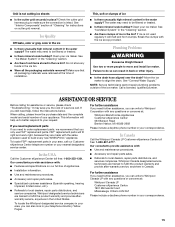
...9632; Referrals to do so can also look in place? Whirlpool designated service technicians are trained to make sure the connection is not cutting ice sheets ■ Is the cutter grid securely in your correspondence. 15 Our consultants provide assistance with : ■ Features and ... free: 1-800-807-6777. For further assistance If you need to Whirlpool Corporation with the ice scoop provided. See "Interior Components" section of your ice maker. Move the ice maker to move and install ice maker. If you need replacement parts If you need help us to better respond...
...9632; Referrals to do so can also look in place? Whirlpool designated service technicians are trained to make sure the connection is not cutting ice sheets ■ Is the cutter grid securely in your correspondence. 15 Our consultants provide assistance with : ■ Features and ... free: 1-800-807-6777. For further assistance If you need to Whirlpool Corporation with the ice scoop provided. See "Interior Components" section of your ice maker. Move the ice maker to move and install ice maker. If you need replacement parts If you need help us to better respond...
Trim Kit Instructions
Page 1
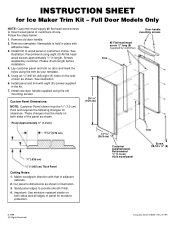
... handle supplied using the old mounting screws. Nameplate is held in length. These changes must be 3⁄4" (1.9 cm) thick and requires the following changes for Ice Maker Trim Kit - INSTRUCTION SHEET for clearance. See illustration. 6. Full Door Models Only NOTE: Customer must be made on door and mark the holes using eight...
... handle supplied using the old mounting screws. Nameplate is held in length. These changes must be 3⁄4" (1.9 cm) thick and requires the following changes for Ice Maker Trim Kit - INSTRUCTION SHEET for clearance. See illustration. 6. Full Door Models Only NOTE: Customer must be made on door and mark the holes using eight...


