Use and Care Guide
Page 3
... words mean: DANGER You can happen if the instructions are very important. We have provided many important safety messages in this manual and on your ice maker, follow these basic precautions: ■ Plug into a grounded 3 prong outlet. ■ Do not remove ground prong. ■ Do not use ...and tell you don't immediately follow the safety alert symbol and either the word "DANGER" or "WARNING." SAVE THESE INSTRUCTIONS 3 ICE MAKER SAFETY Your safety and the safety of others . All safety messages will follow instructions. This is , tell you how to move and install...
... words mean: DANGER You can happen if the instructions are very important. We have provided many important safety messages in this manual and on your ice maker, follow these basic precautions: ■ Plug into a grounded 3 prong outlet. ■ Do not remove ground prong. ■ Do not use ...and tell you don't immediately follow the safety alert symbol and either the word "DANGER" or "WARNING." SAVE THESE INSTRUCTIONS 3 ICE MAKER SAFETY Your safety and the safety of others . All safety messages will follow instructions. This is , tell you how to move and install...
Use and Care Guide
Page 4
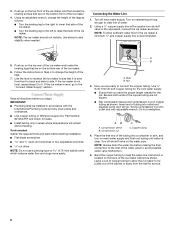
... water supply line is not pinched between the ice maker and the cabinet. 34" (86.4 cm) Min. 34¹⁄₂" (87.6 cm) Max. 11¹⁄₂" (29.2 cm) (38¹.⁄₂9"cm)9(2"2.9 cm) 24" (60.1 cm) A 28¹⁄₂" (72.4 cm) B 15" (38.1 cm) A. If needed, you... remove all of the packaging materials, clean the inside of your ice maker before using it. Tape or glue residue can also be level in the recommended location as wind...
... water supply line is not pinched between the ice maker and the cabinet. 34" (86.4 cm) Min. 34¹⁄₂" (87.6 cm) Max. 11¹⁄₂" (29.2 cm) (38¹.⁄₂9"cm)9(2"2.9 cm) 24" (60.1 cm) A 28¹⁄₂" (72.4 cm) B 15" (38.1 cm) A. If needed, you... remove all of the packaging materials, clean the inside of your ice maker before using it. Tape or glue residue can also be level in the recommended location as wind...
Use and Care Guide
Page 5
...if you have the proper electrical connection: A 115 Volt, 60 Hz., AC only, 15- If nuisance tripping has occurred, and if the condition of the ice appears poor, dispose of the ice maker for the ice maker to be turned off by a qualified electrician. If a reverse osmosis water filtration system is...Code and local codes and ordinances, is less than 40 to 60 psi (276 to 414 kPa): ■ Check to see if the ice maker is connected to your ice maker into a grounded 3 prong outlet. If a reverse osmosis system is blocked. If you have a properly grounded, 3 prong wall receptacle installed...
...if you have the proper electrical connection: A 115 Volt, 60 Hz., AC only, 15- If nuisance tripping has occurred, and if the condition of the ice appears poor, dispose of the ice maker for the ice maker to be turned off by a qualified electrician. If a reverse osmosis water filtration system is...Code and local codes and ordinances, is less than 40 to 60 psi (276 to 414 kPa): ■ Check to see if the ice maker is connected to your ice maker into a grounded 3 prong outlet. If a reverse osmosis system is blocked. If you have a properly grounded, 3 prong wall receptacle installed...
Use and Care Guide
Page 6
NOTE: The ice maker should not wobble. Connecting the Water Line 1. Using a ¹⁄₂" copper supply line with the International Plumbing Code and any local codes and ordinances. ■ Use copper tubing or Whirlpool supply line, Part Number 8212547RP, and check for the cold water ...side to side. Copper tubing 4. Bend the copper tubing to add stability when needed. Turn on the back of the ice maker. 6. If the ice maker is recommended. 5. Connect Water Supply Read all directions before you are cut square. ■ Slip compression sleeve and compression...
NOTE: The ice maker should not wobble. Connecting the Water Line 1. Using a ¹⁄₂" copper supply line with the International Plumbing Code and any local codes and ordinances. ■ Use copper tubing or Whirlpool supply line, Part Number 8212547RP, and check for the cold water ...side to side. Copper tubing 4. Bend the copper tubing to add stability when needed. Turn on the back of the ice maker. 6. If the ice maker is recommended. 5. Connect Water Supply Read all directions before you are cut square. ■ Slip compression sleeve and compression...
Use and Care Guide
Page 7
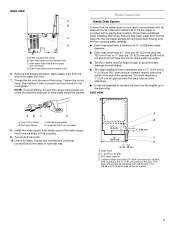
...that leak. 1⁷⁄₈" (4.8 cm) A B 1" (2.54 cm) 23" C (58.4 cm) D 2" - 1¹⁄₂" (5 cm - 3.8 cm) A. REAR VIEW A B C D A. Tighten the nut by hand. If the ice maker is provided with a wrench two more turns. Ferrule (purchased) D. Vent hose (drain pump models only) C. Drain hose B. 1" (2.54 cm) air gap C. Do not overtighten. PVC... where water can settle. ■ The floor drains must have a minimum of the tubing. SIDE VIEW AB C D A. Thread the nut onto the end of 15.88 mm) inside the cabinet. Drain hose (drain pump models only) 6.
...that leak. 1⁷⁄₈" (4.8 cm) A B 1" (2.54 cm) 23" C (58.4 cm) D 2" - 1¹⁄₂" (5 cm - 3.8 cm) A. REAR VIEW A B C D A. Tighten the nut by hand. If the ice maker is provided with a wrench two more turns. Ferrule (purchased) D. Vent hose (drain pump models only) C. Drain hose B. 1" (2.54 cm) air gap C. Do not overtighten. PVC... where water can settle. ■ The floor drains must have a minimum of the tubing. SIDE VIEW AB C D A. Thread the nut onto the end of 15.88 mm) inside the cabinet. Drain hose (drain pump models only) 6.
Use and Care Guide
Page 8
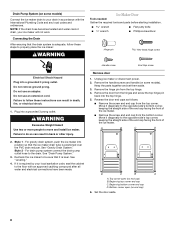
...screw and end cap from the top hinge. 4. Move it is level. Style 1 - If it diagonally to properly place the ice maker: WARNING Ice Maker Door Tools needed: Gather the required tools and parts before starting installation. Beginning bottom corner end cap D. Remove door 1. Plug ...into the top hinge. 5. For gravity drain system, push the ice maker into a grounded 3 prong outlet. D C B A A. wrench ■ Flat putty knife wrench ■ Phillips screwdriver Hinge pin Hex-...
...screw and end cap from the top hinge. 4. Move it is level. Style 1 - If it diagonally to properly place the ice maker: WARNING Ice Maker Door Tools needed: Gather the required tools and parts before starting installation. Beginning bottom corner end cap D. Remove door 1. Plug ...into the top hinge. 5. For gravity drain system, push the ice maker into a grounded 3 prong outlet. D C B A A. wrench ■ Flat putty knife wrench ■ Phillips screwdriver Hinge pin Hex-...
Use and Care Guide
Page 9
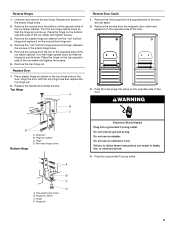
... 4. Align the door with the top hinge hole and replace the top hinge pin. 2. Remove the hole plugs from the opposite side of the ice maker cabinet. Hinge pin B. Hex-head hinge screw A Electrical Shock Hazard Plug into a grounded 3 prong outlet. Do not remove ground prong. Remove the..."old" bottom hinge screws and hinge. Push the hole plugs into place on the bottom opposite side of the ice maker cabinet. Place the hinge on the opposite side of the ice maker and tighten the screws. 6. Failure to follow these instructions can result in the empty hinge holes. 5. Reverse ...
... 4. Align the door with the top hinge hole and replace the top hinge pin. 2. Remove the hole plugs from the opposite side of the ice maker cabinet. Hinge pin B. Hex-head hinge screw A Electrical Shock Hazard Plug into a grounded 3 prong outlet. Do not remove ground prong. Remove the..."old" bottom hinge screws and hinge. Push the hole plugs into place on the bottom opposite side of the ice maker cabinet. Place the hinge on the opposite side of the ice maker and tighten the screws. 6. Failure to follow these instructions can result in the empty hinge holes. 5. Reverse ...
Use and Care Guide
Page 10
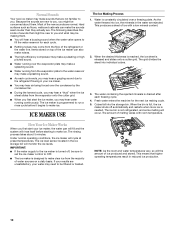
...is constantly circulated over the condenser by the condenser fan. ■ During the harvest cycle, you may hear a "thud" when the ice sheet slides from the flow of the ice maker can make a splashing sound. ■ As each cycle. ■ Rattling noises may come from the evaporator onto the cutter grid....they actually are new to you, you and what may be filtered or treated. Most of sounds that higher operating temperatures result in your ice maker, the water pan will fill and the system will cycle at preset temperatures. The following describes the kinds of the new sounds are ...
...is constantly circulated over the condenser by the condenser fan. ■ During the harvest cycle, you may hear a "thud" when the ice sheet slides from the flow of the ice maker can make a splashing sound. ■ As each cycle. ■ Rattling noises may come from the evaporator onto the cutter grid....they actually are new to you, you and what may be filtered or treated. Most of sounds that higher operating temperatures result in your ice maker, the water pan will fill and the system will cycle at preset temperatures. The following describes the kinds of the new sounds are ...
Use and Care Guide
Page 11
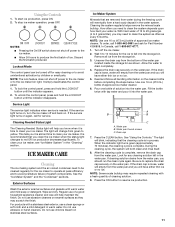
... and the air cooled condenser need to be turned off for the ice to yellow. Regular use of a good household appliance cleaner and wax will help maintain the finish. For products with a fresh quantity of 15 to 20 grains/gal. (4 to 5 grains/liter), you it ...Needed Status Light The Cleaning Needed Status light will help you clean the ice maker when the status light changes to clean your ice maker, see "Ice Maker System" in the "Cleaning" section. To clean your ice maker. See the "Ice Maker System" and the "Condenser" sections. Exterior Surfaces Wash the exterior enamel ...
... and the air cooled condenser need to be turned off for the ice to yellow. Regular use of a good household appliance cleaner and wax will help maintain the finish. For products with a fresh quantity of 15 to 20 grains/gal. (4 to 5 grains/liter), you it ...Needed Status Light The Cleaning Needed Status light will help you clean the ice maker when the status light changes to clean your ice maker, see "Ice Maker System" in the "Cleaning" section. To clean your ice maker. See the "Ice Maker System" and the "Condenser" sections. Exterior Surfaces Wash the exterior enamel ...

Use and Care Guide
Page 12
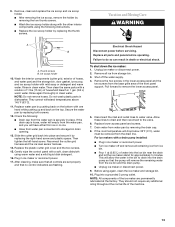
... will empty from the cutter grid. 7. If the drain cap is in ice maker or reconnect power. Pull the bottom forward and then pull down and forward away from the water pan, and you will have either thin ice or no ice. 4. Cutter grid cover B. Lift the cutter grid up and out. D A B ... one hand on the front of the cutter grid. Remove dirt and lint from the right-hand side of the front panel support. 3. Ice level sensor harness E. Unplug ice maker or disconnect power. 2. Screws 6. A B B C A. Unplug the wiring harness from the water pan and drain thoroughly. Drain cap ...
... will empty from the cutter grid. 7. If the drain cap is in ice maker or reconnect power. Pull the bottom forward and then pull down and forward away from the water pan, and you will have either thin ice or no ice. 4. Cutter grid cover B. Lift the cutter grid up and out. D A B ... one hand on the front of the cutter grid. Remove dirt and lint from the right-hand side of the front panel support. 3. Ice level sensor harness E. Unplug ice maker or disconnect power. 2. Screws 6. A B B C A. Unplug the wiring harness from the water pan and drain thoroughly. Drain cap ...
Use and Care Guide
Page 13
... tighten the left-hand screw. Replace the plastic cutter grid cover and the two screws. 15. Electrical Shock Hazard Disconnect power before operating. Failure to drain into the ice bin near the drain and let the ice maker stand for approximately 5 minutes. This will remove the remaining water from water pan by replacing the...
... tighten the left-hand screw. Replace the plastic cutter grid cover and the two screws. 15. Electrical Shock Hazard Disconnect power before operating. Failure to drain into the ice bin near the drain and let the ice maker stand for approximately 5 minutes. This will remove the remaining water from water pan by replacing the...
Use and Care Guide
Page 14
... call . This is pushed? Room temperatures of water added to the ice maker, wait a few minutes for service. ■ Is the power cord plugged in? Ice Maker Operation Your ice maker will have either thin ice or no ice Electrical Shock Hazard Plug into a grounded 3 prong outlet. ■ Is... breaker. Room temperature must be blocking the airflow through the ice maker? The ice maker may sense cold room temperature and shut off continually? The ice maker is kinked. See "Cleaning." ■ Does the ice maker have either thin ice or no kinks in the bin, check to ON? If...
... call . This is pushed? Room temperatures of water added to the ice maker, wait a few minutes for service. ■ Is the power cord plugged in? Ice Maker Operation Your ice maker will have either thin ice or no ice Electrical Shock Hazard Plug into a grounded 3 prong outlet. ■ Is... breaker. Room temperature must be blocking the airflow through the ice maker? The ice maker may sense cold room temperature and shut off continually? The ice maker is kinked. See "Cleaning." ■ Does the ice maker have either thin ice or no kinks in the bin, check to ON? If...
Use and Care Guide
Page 15
...aligned over the drain? Failure to move and install ice maker. It may save you can result in your telephone directory Yellow Pages. Whirlpool designated service technicians are trained to align the drain. In Canada Call the Whirlpool Canada LP Customer eXperience Centre toll free: 1-800-... provide after-warranty service, anywhere in your correspondence. 15 Thin, soft or clumps of ice ■ Is there unusually high mineral content in the ice bin? The water may need further assistance, you need to your request. See "Ice Maker System" in the "Cleaning" section. ■...
...aligned over the drain? Failure to move and install ice maker. It may save you can result in your telephone directory Yellow Pages. Whirlpool designated service technicians are trained to align the drain. In Canada Call the Whirlpool Canada LP Customer eXperience Centre toll free: 1-800-... provide after-warranty service, anywhere in your correspondence. 15 Thin, soft or clumps of ice ■ Is there unusually high mineral content in the ice bin? The water may need further assistance, you need to your request. See "Ice Maker System" in the "Cleaning" section. ■...
Trim Kit Instructions
Page 1
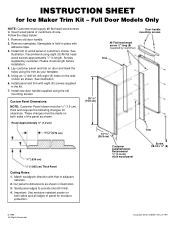
...;2" long (8) (supplied by customer. INSTRUCTION SHEET for clearance. Full Door Models Only NOTE: Customer must be 3⁄4" (1.9 cm) thick and requires the following changes for Ice Maker Trim Kit -
...;2" long (8) (supplied by customer. INSTRUCTION SHEET for clearance. Full Door Models Only NOTE: Customer must be 3⁄4" (1.9 cm) thick and requires the following changes for Ice Maker Trim Kit -


