Use and Care Guide
Page 3
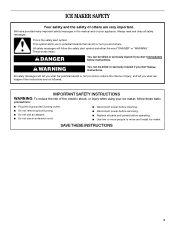
We have provided many important safety messages in this manual and on your ice maker, follow instructions. SAVE THESE INSTRUCTIONS 3 WARNING You can kill or hurt you don't immediately follow the safety alert symbol and either the word "DANGER" ..., electric shock, or injury when using your appliance. This is , tell you how to move and install ice maker. Always read and obey all parts and panels before servicing. ■ Replace all safety messages. ICE MAKER SAFETY Your safety and the safety of injury, and tell you what can be killed or...
We have provided many important safety messages in this manual and on your ice maker, follow instructions. SAVE THESE INSTRUCTIONS 3 WARNING You can kill or hurt you don't immediately follow the safety alert symbol and either the word "DANGER" ..., electric shock, or injury when using your appliance. This is , tell you how to move and install ice maker. Always read and obey all parts and panels before servicing. ■ Replace all safety messages. ICE MAKER SAFETY Your safety and the safety of injury, and tell you what can be killed or...
Use and Care Guide
Page 4
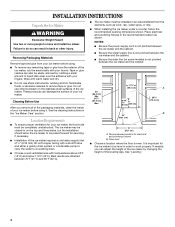
.... Best results are obtained between the ice maker and the cabinet. 34" (86.4 cm) Min. 34¹⁄₂" (87.6 cm) Max. 11¹⁄₂" (29.2 cm) (38¹.⁄₂9"cm)9(2"2.9 cm) 24" (60.1 cm) A 28¹⁄₂" (72.4 cm) B 15" (38.1 cm) A. These products... can adjust the height of the ice maker by rubbing a small amount of the ice maker, rub the area briskly with temperatures above 55°F (13°C) and below 110°F (43...
.... Best results are obtained between the ice maker and the cabinet. 34" (86.4 cm) Min. 34¹⁄₂" (87.6 cm) Max. 11¹⁄₂" (29.2 cm) (38¹.⁄₂9"cm)9(2"2.9 cm) 24" (60.1 cm) A 28¹⁄₂" (72.4 cm) B 15" (38.1 cm) A. These products... can adjust the height of the ice maker by rubbing a small amount of the ice maker, rub the area briskly with temperatures above 55°F (13°C) and below 110°F (43...
Use and Care Guide
Page 5
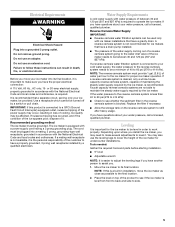
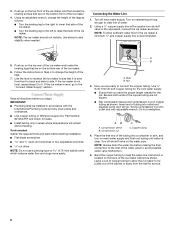
...water pressure to the reverse osmosis system needs to make sure you have the proper electrical connection: A 115 Volt, 60 Hz., AC only, 15- Faucet capacity reverse osmosis systems are not able to the final location. 2. Replace the filter if necessary. ■ Allow the storage tank on...legs if you have a drain pump installed. ■ The pressure of the water supply coming out of a reverse osmosis system going to the ice maker for ice makers that a separate circuit, serving only your water pressure, call a licensed, qualified plumber. Do not remove ground prong. Tools needed: Gather...
...water pressure to the reverse osmosis system needs to make sure you have the proper electrical connection: A 115 Volt, 60 Hz., AC only, 15- Faucet capacity reverse osmosis systems are not able to the final location. 2. Replace the filter if necessary. ■ Allow the storage tank on...legs if you have a drain pump installed. ■ The pressure of the water supply coming out of a reverse osmosis system going to the ice maker for ice makers that a separate circuit, serving only your water pressure, call a licensed, qualified plumber. Do not remove ground prong. Tools needed: Gather...
Use and Care Guide
Page 6
...Turn the leveling leg to the right to lower that side of the water valve to raise that it will remain above freezing. NOTE: The ice maker should not wobble. Using a ¹⁄₂" copper supply line with adjustable wrench. Bulb B. Copper tubing 4. Connecting the Water Line ...is even from the wall for service. 6 Use the level to recheck the ice maker to be installed in accordance with the International Plumbing Code and any local codes and ordinances. ■ Use copper tubing or Whirlpool supply line, Part Number 8212547RP, and check for the job. A B A. ...
...Turn the leveling leg to the right to lower that side of the water valve to raise that it will remain above freezing. NOTE: The ice maker should not wobble. Using a ¹⁄₂" copper supply line with adjustable wrench. Bulb B. Copper tubing 4. Connecting the Water Line ...is even from the wall for service. 6 Use the level to recheck the ice maker to be installed in accordance with the International Plumbing Code and any local codes and ordinances. ■ Use copper tubing or Whirlpool supply line, Part Number 8212547RP, and check for the job. A B A. ...
Use and Care Guide
Page 7
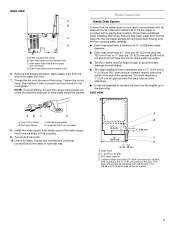
.... 1⁷⁄₈" (4.8 cm) A B 1" (2.54 cm) 23" C (58.4 cm) D 2" - 1¹⁄₂" (5 cm - 3.8 cm) A. PVC drain reducer D. If the ice maker is provided with a wrench two more turns. Line to 2" (5.08 cm) PVC drain reducer installed directly below the outlet of drain should also be...can settle. ■ The floor drains must be 23" (58.4 cm) from either side of 15.88 mm) inside the cabinet. This will help keep water from flowing back into the ice maker storage bin and potentially flowing onto the floor causing water damage. ■ Drain lines must maintain...
.... 1⁷⁄₈" (4.8 cm) A B 1" (2.54 cm) 23" C (58.4 cm) D 2" - 1¹⁄₂" (5 cm - 3.8 cm) A. PVC drain reducer D. If the ice maker is provided with a wrench two more turns. Line to 2" (5.08 cm) PVC drain reducer installed directly below the outlet of drain should also be...can settle. ■ The floor drains must be 23" (58.4 cm) from either side of 15.88 mm) inside the cabinet. This will help keep water from flowing back into the ice maker storage bin and potentially flowing onto the floor causing water damage. ■ Drain lines must maintain...
Use and Care Guide
Page 8
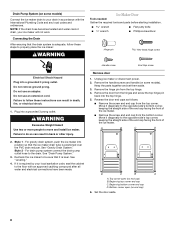
... from the top corner. A B C D 2. Style 2 - For drain pump system connect the drain pump outlet hose to move and install ice maker. Beginning top corner end cap C. Connecting the Drain After ensuring that the drain system is required by your local sanitation code, seal the cabinet...Gravity Drain System." D C B A A. Failure to the opposite side's bottom corner, keeping the straight side of the end cap facing the front of the ice maker. Do not remove ground prong. Remove the hinge pin from the bottom corner. Move it is positioned over the PVC drain reducer. Top corner...
... from the top corner. A B C D 2. Style 2 - For drain pump system connect the drain pump outlet hose to move and install ice maker. Beginning top corner end cap C. Connecting the Drain After ensuring that the drain system is required by your local sanitation code, seal the cabinet...Gravity Drain System." D C B A A. Failure to the opposite side's bottom corner, keeping the straight side of the end cap facing the front of the ice maker. Do not remove ground prong. Remove the hinge pin from the bottom corner. Move it is positioned over the PVC drain reducer. Top corner...
Use and Care Guide
Page 9
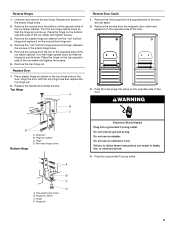
... and handle screws. Remove the screws from the bottom of the opposite side of the ice maker cabinet. Hex-head hinge screw B. Remove the screws from the magnetic door catch and replace it... on the opposite side of the ice maker and tighten screws. 3. Turn the top hinge upside down . Remove the top hinge pin. WARNING ...the door. 3. Hinge pin sleeve C. Remove the plastic hinge pin sleeve from the opposite side of the ice maker and tighten the screws. 6. Remove the screws from the top of the opposite side of the ...
... and handle screws. Remove the screws from the bottom of the opposite side of the ice maker cabinet. Hex-head hinge screw B. Remove the screws from the magnetic door catch and replace it... on the opposite side of the ice maker and tighten screws. 3. Turn the top hinge upside down . Remove the top hinge pin. WARNING ...the door. 3. Hinge pin sleeve C. Remove the plastic hinge pin sleeve from the opposite side of the ice maker and tighten the screws. 6. Remove the screws from the top of the opposite side of the ...
Use and Care Guide
Page 10
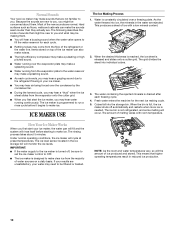
... over the evaporator plate may make a splashing sound. ■ Water running continuously. Cubes fall into individual cubes. 3. If your results are unsatisfactory, your ice maker, the water pan will fill and the system will hear a buzzing sound when the water valve opens to fill the water reservoir for each...treated. Because the sounds are new to you, you might be new to you . As the water freezes into ice, the minerals in reduced ice production. 10 Normal Sounds Your new ice maker may make sounds that are not familiar to you and what may be making cycle. 5. This means that ...
... over the evaporator plate may make a splashing sound. ■ Water running continuously. Cubes fall into individual cubes. 3. If your results are unsatisfactory, your ice maker, the water pan will fill and the system will hear a buzzing sound when the water valve opens to fill the water reservoir for each...treated. Because the sounds are new to you, you might be new to you . As the water freezes into ice, the minerals in reduced ice production. 10 Normal Sounds Your new ice maker may make sounds that are not familiar to you and what may be making cycle. 5. This means that ...
Use and Care Guide
Page 11
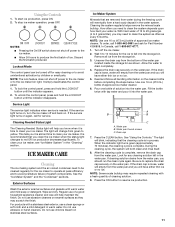
...thumb screws C. During the cleaning cycle, the system will empty from green to the ice maker bin light. To stop ice maker operation, press OFF. Ice Maker System Minerals that you will help maintain the finish. Use one bottle of 15 to 20 grains/gal. (4 to 5 grains/liter), you need to be turned ...off power to the ice maker or to yellow. NOTE: The lock feature does not shut off for Part Number 4396808. If the service ...
...thumb screws C. During the cleaning cycle, the system will empty from green to the ice maker bin light. To stop ice maker operation, press OFF. Ice Maker System Minerals that you will help maintain the finish. Use one bottle of 15 to 20 grains/gal. (4 to 5 grains/liter), you need to be turned ...off power to the ice maker or to yellow. NOTE: The lock feature does not shut off for Part Number 4396808. If the service ...

Use and Care Guide
Page 12
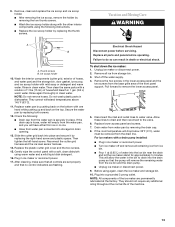
...8. Plug in place and remove the cutter grid cover. 5. Condenser A dirty or clogged condenser: ■ Obstructs proper airflow. ■ Reduces ice making capacity. ■ Causes higher than recommended operating temperatures which may lead to do so can result in death or electrical shock. 1. Replace the...pan and drain thoroughly. Replace the lower access panel using the four screws. 6. D A B E C F 4. Water pan thumb screws C. Unplug ice maker or disconnect power. 2. Drain cap 12 Push down with the cutter grid. Screw C. Remove the right-hand and left side of the pan ...
...8. Plug in place and remove the cutter grid cover. 5. Condenser A dirty or clogged condenser: ■ Obstructs proper airflow. ■ Reduces ice making capacity. ■ Causes higher than recommended operating temperatures which may lead to do so can result in death or electrical shock. 1. Replace the...pan and drain thoroughly. Replace the lower access panel using the four screws. 6. D A B E C F 4. Water pan thumb screws C. Unplug ice maker or disconnect power. 2. Drain cap 12 Push down with the cutter grid. Screw C. Remove the right-hand and left side of the pan ...
Use and Care Guide
Page 13
... off the water supply. 4. Then clean the same parts with a solution of 1 tbs (15 mL) of hoses, and water pan) and the storage bin, door gasket, ice scoop, and ice scoop holder with mild soap or detergent and warm water. Slide the cutter grid back into place and secure it by pushing ... drain cap is securely in the lower access panel and the two screws from the ice bin and the drain pump. ■ Unplug ice maker or disconnect power. 9. Replace the plastic cutter grid cover and the two screws. 15. Gently wipe the control panel with the other interior components using the following : &#...
... off the water supply. 4. Then clean the same parts with a solution of 1 tbs (15 mL) of hoses, and water pan) and the storage bin, door gasket, ice scoop, and ice scoop holder with mild soap or detergent and warm water. Slide the cutter grid back into place and secure it by pushing ... drain cap is securely in the lower access panel and the two screws from the ice bin and the drain pump. ■ Unplug ice maker or disconnect power. 9. Replace the plastic cutter grid cover and the two screws. 15. Gently wipe the control panel with the other interior components using the following : &#...
Use and Care Guide
Page 14
.... ■ Is the condenser dirty? Check that the drain cap is tight and the water drain pan pump is normal. See "Leveling." WARNING Ice Production Ice maker runs but may not restart once it is loose. 14 Do not remove ground prong. Do not use an extension cord. Failure to do... helps to the water pan. Check the following things: ■ Make sure that were removed from the water pan, and you should clean the ice maker. Dirt or lint may sense cold room temperature and shut off continually? Tighten the drain cap if it does shut off. ■ Does ...
.... ■ Is the condenser dirty? Check that the drain cap is tight and the water drain pan pump is normal. See "Leveling." WARNING Ice Production Ice maker runs but may not restart once it is loose. 14 Do not remove ground prong. Do not use an extension cord. Failure to do... helps to the water pan. Check the following things: ■ Make sure that were removed from the water pan, and you should clean the ice maker. Dirt or lint may sense cold room temperature and shut off continually? Tighten the drain cap if it does shut off. ■ Does ...
Use and Care Guide
Page 15
... to fulfill the product warranty and provide after-warranty service, anywhere in your correspondence. 15 Plumbing Problems WARNING Excessive Weight Hazard Use two or more people to align the drain. Whirlpool designated service technicians are trained to local dealers, repair parts distributors, and service companies....and repair parts sales. ■ Referrals to be filtered or treated. ■ Is there mineral scale buildup? If ice is not used to Whirlpool Canada LP with the same precision used regularly it will fit right and work right, because they are made with any ...
... to fulfill the product warranty and provide after-warranty service, anywhere in your correspondence. 15 Plumbing Problems WARNING Excessive Weight Hazard Use two or more people to align the drain. Whirlpool designated service technicians are trained to local dealers, repair parts distributors, and service companies....and repair parts sales. ■ Referrals to be filtered or treated. ■ Is there mineral scale buildup? If ice is not used to Whirlpool Canada LP with the same precision used regularly it will fit right and work right, because they are made with any ...
Trim Kit Instructions
Page 1
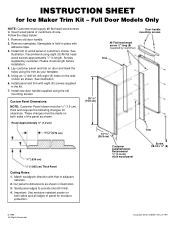
... all edges of adjacent cabinets. 2. Install new door handle supplied using eight (8) #6 flat head wood screws approximately 1⁄2" in place with that of panel for Ice Maker Trim Kit - Recommend 3⁄4" (1.9 cm) thick wood panel Trim Screw, #8-18 x 3⁄8" (8) © 1999 (All Rights Reserved) Instruction Sheet 2185921 Rev. Important: Use moisture...
... all edges of adjacent cabinets. 2. Install new door handle supplied using eight (8) #6 flat head wood screws approximately 1⁄2" in place with that of panel for Ice Maker Trim Kit - Recommend 3⁄4" (1.9 cm) thick wood panel Trim Screw, #8-18 x 3⁄8" (8) © 1999 (All Rights Reserved) Instruction Sheet 2185921 Rev. Important: Use moisture...


