Dell™ Technology Guide
Page 82
... does not indicate a defect in all DVD drives. See the help files for drives that are not slot-loading) 1 Ensure that the disc is partially ejected. 3 Gently pull out the tray until the tray is inserted properly. R U N THE DELL D I A G N O S T I C S - See "Running the Dell Diagnostics" on . The drive tray cannot eject (for your CD, DVD, or BD software. RUN CHECK...
... does not indicate a defect in all DVD drives. See the help files for drives that are not slot-loading) 1 Ensure that the disc is partially ejected. 3 Gently pull out the tray until the tray is inserted properly. R U N THE DELL D I A G N O S T I C S - See "Running the Dell Diagnostics" on . The drive tray cannot eject (for your CD, DVD, or BD software. RUN CHECK...
Dell™ Technology Guide
Page 204
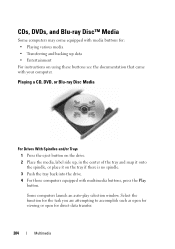
... buttons see the documentation that came with multimedia buttons, press the Play button. Playing a CD, DVD, or Blu-ray Disc Media For Drives With Spindles and/or Trays 1 Press the eject button on the drive. 2 Place the media, label side up data • Entertainment For instructions on the tray if... there is no spindle. 3 Push the tray back into the drive. 4 For those computers equipped with your computer. CDs, DVDs, and Blu-ray Disc™...
... buttons see the documentation that came with multimedia buttons, press the Play button. Playing a CD, DVD, or Blu-ray Disc Media For Drives With Spindles and/or Trays 1 Press the eject button on the drive. 2 Place the media, label side up data • Entertainment For instructions on the tray if... there is no spindle. 3 Push the tray back into the drive. 4 For those computers equipped with your computer. CDs, DVDs, and Blu-ray Disc™...
Dell™ Technology Guide
Page 205
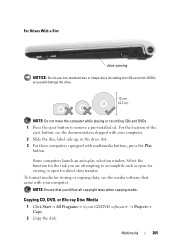
...standard-size or shape discs (including mini-CDs and mini-DVDs) as open for viewing or open for the task you will damage the drive. NOTE: Do not move the computer while playing or recording CDs and DVDs. 1 Press the eject button to accomplish such as you are attempting to remove ...a pre-installed cd. NOTE: Ensure that came with your computer. 2 Slide the disc, label side up, in the drive slot. 3 ...
...standard-size or shape discs (including mini-CDs and mini-DVDs) as open for viewing or open for the task you will damage the drive. NOTE: Do not move the computer while playing or recording CDs and DVDs. 1 Press the eject button to accomplish such as you are attempting to remove ...a pre-installed cd. NOTE: Ensure that came with your computer. 2 Slide the disc, label side up, in the drive slot. 3 ...
Dell™ Technology Guide
Page 206
...from the source disk to create audio DVDs with your hard drive. With Dual Disk Drives: a Select the drive for the media software installed in your computer. • If you start your CD/DVD creation software and open a project. ...at bluraydisc.com for additional information. 206 Multimedia c When prompted, insert a blank disk into the drive. The computer reads your source disk and copies the data to a temporary folder on the website for... finished copying the source disk, it automatically ejects. With a Single Disk Drive: a Insert the source disk into the drive and click OK.
...from the source disk to create audio DVDs with your hard drive. With Dual Disk Drives: a Select the drive for the media software installed in your computer. • If you start your CD/DVD creation software and open a project. ...at bluraydisc.com for additional information. 206 Multimedia c When prompted, insert a blank disk into the drive. The computer reads your source disk and copies the data to a temporary folder on the website for... finished copying the source disk, it automatically ejects. With a Single Disk Drive: a Insert the source disk into the drive and click OK.


