
Users Guide
Page 2
... the provisions of the Low Voltage Directive of the European Communities as of May 1989. Operation of this equipment requires a shielded cable. Federal Communications Commission Radio Frequency Interference Statement This equipment has been tested and found to comply with the International Standards EN 60950-1, following the provisions of the Electro Magnetic Compatibility Directive of the European Communities...
... the provisions of the Low Voltage Directive of the European Communities as of May 1989. Operation of this equipment requires a shielded cable. Federal Communications Commission Radio Frequency Interference Statement This equipment has been tested and found to comply with the International Standards EN 60950-1, following the provisions of the Electro Magnetic Compatibility Directive of the European Communities...
Users Guide
Page 3
... the Rubber Roller...34 9-3. Reliability Specifications...38 10-7. Parallel Interface Model...41 11-2. USB Interface Model...46 Unpacking and Installation...1 1-1. Choosing a place for the printer 2 2. Setup...4 3-1. Installing the Printer Software...8 3-4. Thermal Label Paper Roll (Tack Label Paper 23 5-4. Adjusting the Near-end Sensor...31 8. Periodical Cleaning...34 9-1. Auto Cutter Specifications...36 10-3. Connecting the Cable to the Printer 5 3-3. Connecting the Optional AC Adapter 9 3-5. Turning Power On...10 3-6. Connecting to a Peripheral Unit 11...
... the Rubber Roller...34 9-3. Reliability Specifications...38 10-7. Parallel Interface Model...41 11-2. USB Interface Model...46 Unpacking and Installation...1 1-1. Choosing a place for the printer 2 2. Setup...4 3-1. Installing the Printer Software...8 3-4. Thermal Label Paper Roll (Tack Label Paper 23 5-4. Adjusting the Near-end Sensor...31 8. Periodical Cleaning...34 9-1. Auto Cutter Specifications...36 10-3. Connecting the Cable to the Printer 5 3-3. Connecting the Optional AC Adapter 9 3-5. Turning Power On...10 3-6. Connecting to a Peripheral Unit 11...
Users Guide
Page 7
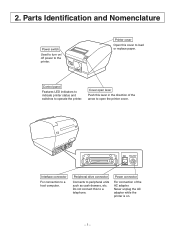
... printer. Cover open the printer cover. 2. Power connector For connection of the arrow to load or replace paper. Peripheral drive connector Connects to operate the printer. Control panel Features LED indicators to indicate printer status and switches to peripheral units such as cash drawers, etc. Do not connect this lever in the direction of the AC adapter. Never unplug the AC adapter while the printer is on / off power to a telephone. Parts Identification and Nomenclature Power switch Used...
... printer. Cover open the printer cover. 2. Power connector For connection of the arrow to load or replace paper. Peripheral drive connector Connects to operate the printer. Control panel Features LED indicators to indicate printer status and switches to peripheral units such as cash drawers, etc. Do not connect this lever in the direction of the AC adapter. Never unplug the AC adapter while the printer is on / off power to a telephone. Parts Identification and Nomenclature Power switch Used...
Users Guide
Page 16
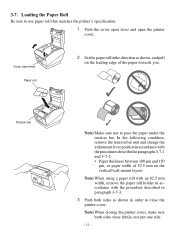
... you. In the following condition, remove the tension bar unit and change the adjustment lever position in accordance with the procedure described in paragraph 3-7-3. 3 Push both sides close the printer cover. 3-7. Tension bar Note: Make sure not to use paper roll that matches the printer's specification. 1 Push the cover open lever and open lever Paper roll 2 Set the paper roll in the direction as shown, and pull on the...
... you. In the following condition, remove the tension bar unit and change the adjustment lever position in accordance with the procedure described in paragraph 3-7-3. 3 Push both sides close the printer cover. 3-7. Tension bar Note: Make sure not to use paper roll that matches the printer's specification. 1 Push the cover open lever and open lever Paper roll 2 Set the paper roll in the direction as shown, and pull on the...

Users Guide
Page 18
... the separate Specifications Manual. This is factory-set to move the adjustment lever inward. For instructions on the adjustment lever engages with the hole in direct contact with the paper thickness. Changing the Adjustment Lever Position The adjustment lever position must be changed in which the protrusion on setting the memory switch, refer to a paper roll with a 57.5 mm width, remove the paper roll holder, and install the paper roll holder...
... the separate Specifications Manual. This is factory-set to move the adjustment lever inward. For instructions on the adjustment lever engages with the hole in direct contact with the paper thickness. Changing the Adjustment Lever Position The adjustment lever position must be changed in which the protrusion on setting the memory switch, refer to a paper roll with a 57.5 mm width, remove the paper roll holder, and install the paper roll holder...
Users Guide
Page 19
... a connector, make sure to indicate that is in progress. • The printer cover can cause the printing or cutter movement to the printer, instead of the thermal head. Do not touch it, as you could cause a problem if you not put your hand in the paper outlet slot while printing is connected. Never directly touch the IC. 7) The printing quality and working life...
... a connector, make sure to indicate that is in progress. • The printer cover can cause the printing or cutter movement to the printer, instead of the thermal head. Do not touch it, as you could cause a problem if you not put your hand in the paper outlet slot while printing is connected. Never directly touch the IC. 7) The printing quality and working life...
Users Guide
Page 22
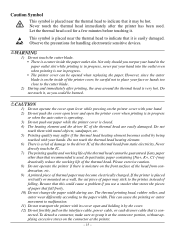
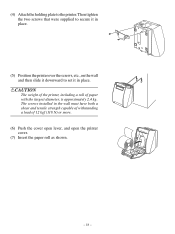
The screws installed in place. CAUTION The weight of the printer, including a roll of 12 kgf (118 N) or more. (6) Push the cover open lever, and open the printer cover. (7) Insert the paper roll as shown. - 18 - (4) Attach the holding plate to set it downward to the printer. Then tighten the two screws that were supplied to secure it in place. (5) Position the printer over the screws, etc., on the wall and then slide it in the wall must have both a shear and tensile strength capable of withstanding a load of paper with the largest diameter, is approximately 2.4 kg.
The screws installed in place. CAUTION The weight of the printer, including a roll of 12 kgf (118 N) or more. (6) Push the cover open lever, and open the printer cover. (7) Insert the paper roll as shown. - 18 - (4) Attach the holding plate to set it downward to the printer. Then tighten the two screws that were supplied to secure it in place. (5) Position the printer over the screws, etc., on the wall and then slide it in the wall must have both a shear and tensile strength capable of withstanding a load of paper with the largest diameter, is approximately 2.4 kg.
Users Guide
Page 25
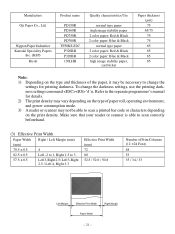
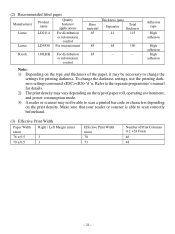
... 52.5 / 52.0 / 50.8 Number of the paper, it may be necessary to change the darkness settings, use the printing darkness settings command 'd'n. To change the settings for details. 2) The print density may vary depending on the type of paper roll, operating environment, and power consumption mode. 3) A reader or scanner may not be able to the separate programmer's manual for printing darkness. Refer to scan a printed bar code or characters depending on...
... 52.5 / 52.0 / 50.8 Number of the paper, it may be necessary to change the darkness settings, use the printing darkness settings command 'd'n. To change the settings for details. 2) The print density may vary depending on the type of paper roll, operating environment, and power consumption mode. 3) A reader or scanner may not be able to the separate programmer's manual for printing darkness. Refer to scan a printed bar code or characters depending on...
Users Guide
Page 26
... to the separate programmer's manual for printing darkness. Adhesion type High adhesion High adhesion High adhesion Note: 1) Depending on the type and thickness of the paper, it may not be able to scan a printed bar code or characters depending on the type of paper roll, operating environment, and power consumption mode. 3) A reader or scanner may be necessary to change the darkness settings, use paste or glue to...
... to the separate programmer's manual for printing darkness. Adhesion type High adhesion High adhesion High adhesion Note: 1) Depending on the type and thickness of the paper, it may not be able to scan a printed bar code or characters depending on the type of paper roll, operating environment, and power consumption mode. 3) A reader or scanner may be necessary to change the darkness settings, use paste or glue to...
Users Guide
Page 28
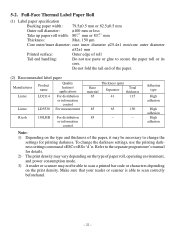
... to change the darkness settings, use the printing darkness settings command 'd'n. Adhesion type High adhesion High adhesion High adhesion Note: 1) Depending on the type and thickness of the paper, it may be necessary to scan correctly beforehand. (3) Effective Print Width Paper Width (mm) Right / Left Margin (mm) 76 ± 0.5 3 79 ± 0.5 3 Effective Print Width (mm) 70 73 Number of paper roll, operating environment, and power consumption mode...
... to change the darkness settings, use the printing darkness settings command 'd'n. Adhesion type High adhesion High adhesion High adhesion Note: 1) Depending on the type and thickness of the paper, it may be necessary to scan correctly beforehand. (3) Effective Print Width Paper Width (mm) Right / Left Margin (mm) 76 ± 0.5 3 79 ± 0.5 3 Effective Print Width (mm) 70 73 Number of paper roll, operating environment, and power consumption mode...
Users Guide
Page 32
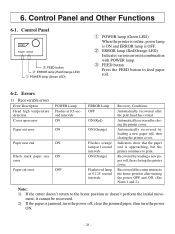
... jammed, turn the power off, clear the jammed paper, then turn the power ON. - 28 - Automatically recovered by loading a new paper roll, then closing the printer cover. Automatically recovered by loading a new paper roll, then closing the printer cover. Indicators show that the paper end is OFF. ② ERROR lamp (Red/Orange LED) Indicates various errors in combination with POWER lamp. ③ FEED button Press the FEED button to the home position after the print head has cooled. Control Panel...
... jammed, turn the power off, clear the jammed paper, then turn the power ON. - 28 - Automatically recovered by loading a new paper roll, then closing the printer cover. Automatically recovered by loading a new paper roll, then closing the printer cover. Indicators show that the paper end is OFF. ② ERROR lamp (Red/Orange LED) Indicates various errors in combination with POWER lamp. ③ FEED button Press the FEED button to the home position after the print head has cooled. Control Panel...
Users Guide
Page 34
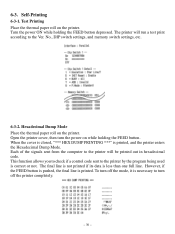
... allows you to check if a control code sent to turn the power on while holding the FEED button depressed. Turn the power ON while holding the FEED button. No., DIP switch settings, and memory switch settings, etc. 6-3-2. The printer will run a test print according to the printer will be printed out in hexadecimal code. Open the printer cover, then turn off the mode, it is necessary to the printer by the program being used is printed, and the printer enters the...
... allows you to check if a control code sent to turn the power on while holding the FEED button depressed. Turn the power ON while holding the FEED button. No., DIP switch settings, and memory switch settings, etc. 6-3-2. The printer will run a test print according to the printer will be printed out in hexadecimal code. Open the printer cover, then turn off the mode, it is necessary to the printer by the program being used is printed, and the printer enters the...

Users Guide
Page 36
... Detected diameter (C) (Approx. out. 2) The control switch or the memory switch A may be some variances depending on the rolled state of the Paper roll core C paper or the actual mechanism. 4) If thick paper is factory-set the adjustor to the separate Specifications Manual. 3) The detected diameter and remained paper length A given above are using Paper thick-ness When using the paper roll with a core whose inside...
... Detected diameter (C) (Approx. out. 2) The control switch or the memory switch A may be some variances depending on the rolled state of the Paper roll core C paper or the actual mechanism. 4) If thick paper is factory-set the adjustor to the separate Specifications Manual. 3) The detected diameter and remained paper length A given above are using Paper thick-ness When using the paper roll with a core whose inside...
Users Guide
Page 38
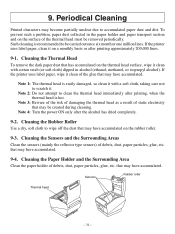
... completely. 9-2. Note 4: Turn the power ON only after printing approximately 200,000 lines. 9-1. that may be removed periodically. Note 1: The thermal head is easily damaged, so clean it . Cleaning the Paper Holder and the Surrounding Area Clean the paper holder of the glue that may have accumulated on the surface of the thermal head must be created during cleaning. Cleaning the Rubber Roller Use a dry, soft...
... completely. 9-2. Note 4: Turn the power ON only after printing approximately 200,000 lines. 9-1. that may be removed periodically. Note 1: The thermal head is easily damaged, so clean it . Cleaning the Paper Holder and the Surrounding Area Clean the paper holder of the glue that may have accumulated on the surface of the thermal head must be created during cleaning. Cleaning the Rubber Roller Use a dry, soft...
Users Guide
Page 44
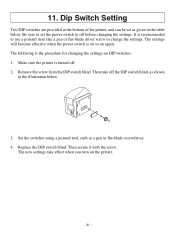
... the power switch is recommended to use a pointed item like a pen or flat-blade driver screw to off the DIP switch blind, as shown in the table below . 3. Set the switches using a pointed tool, such as given in the illustration below . It is set the power switch to change the settings. Then take effect when you turn on again. The new settings take off before changing the settings...
... the power switch is recommended to use a pointed item like a pen or flat-blade driver screw to off the DIP switch blind, as shown in the table below . 3. Set the switches using a pointed tool, such as given in the illustration below . It is set the power switch to change the settings. Then take effect when you turn on again. The new settings take off before changing the settings...
Users Guide
Page 45
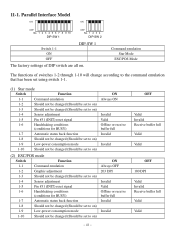
... factory settings of switches 1-2 through 1-10 will change according to the command emulation that has been set using switch 1-1. (1) Star mode Switch Function 1-1 Command emulation 1-2 Should not be changed (Should be set to on) 1-3 Should not be changed (Should be set to on) 1-4 Sensor adjustment 1-5 Pin #31 (INIT) reset signal 1-6 Handshaking conditions (conditions for BUSY) 1-7 Automatic status back function 1-8 Should not be changed (Should be set to on) 1-9 Low-power...
... factory settings of switches 1-2 through 1-10 will change according to the command emulation that has been set using switch 1-1. (1) Star mode Switch Function 1-1 Command emulation 1-2 Should not be changed (Should be set to on) 1-3 Should not be changed (Should be set to on) 1-4 Sensor adjustment 1-5 Pin #31 (INIT) reset signal 1-6 Handshaking conditions (conditions for BUSY) 1-7 Automatic status back function 1-8 Should not be changed (Should be set to on) 1-9 Low-power...
Users Guide
Page 47
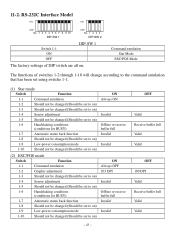
... been set using switche 1-1. (1) Star mode Switch Function 1-1 Command emulation 1-2 Should not be changed (Should be set to on) 1-3 Should not be changed (Should be set to on) 1-4 Sensor adjustment 1-5 Should not be changed (Should be set to on) 1-6 Handshaking conditions (conditions for BUSY) 1-7 Automatic status back function 1-8 Should not be changed (Should be set to on) 1-9 Low-power consumption mode 1-10 Should not be changed (Should be set to...
... been set using switche 1-1. (1) Star mode Switch Function 1-1 Command emulation 1-2 Should not be changed (Should be set to on) 1-3 Should not be changed (Should be set to on) 1-4 Sensor adjustment 1-5 Should not be changed (Should be set to on) 1-6 Handshaking conditions (conditions for BUSY) 1-7 Automatic status back function 1-8 Should not be changed (Should be set to on) 1-9 Low-power consumption mode 1-10 Should not be changed (Should be set to...
Users Guide
Page 50
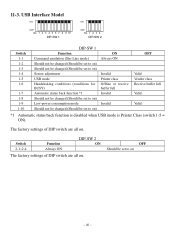
... not be changed (Should be set to on) Low-power consumption mode Should not be changed (Should be set to on ) ON Always ON Invalid Printer class Offline or receive buffer full Invalid Invalid OFF Valid Vendor class Receive buffer full Valid Valid *1 Automatic status back function is disabled when USB mode is Printer Class (switch 1-5 = ON). The factory settings of DIP switch are all on . Switch 2-1~2-4 Function Always...
... not be changed (Should be set to on) Low-power consumption mode Should not be changed (Should be set to on ) ON Always ON Invalid Printer class Offline or receive buffer full Invalid Invalid OFF Valid Vendor class Receive buffer full Valid Valid *1 Automatic status back function is disabled when USB mode is Printer Class (switch 1-5 = ON). The factory settings of DIP switch are all on . Switch 2-1~2-4 Function Always...
Users Guide
Page 51
... 2 Switch 1-1 1-2 1-3 1-4 1-5 1-6 1-7 1-8 1-9 1-10 DIP-SW 1 Function Command emulation (Ster Line mode) Should not be changed (Should be set to on) Should not be changed (Should be set to on) Sensor adjustment Should not be changed (Should be set to on) Handshaking conditions (conditions for BUSY) Should not be changed (Should be set to on) Should not be changed (Should be set to on) Low-power consumption mode Should...
... 2 Switch 1-1 1-2 1-3 1-4 1-5 1-6 1-7 1-8 1-9 1-10 DIP-SW 1 Function Command emulation (Ster Line mode) Should not be changed (Should be set to on) Should not be changed (Should be set to on) Sensor adjustment Should not be changed (Should be set to on) Handshaking conditions (conditions for BUSY) Should not be changed (Should be set to on) Should not be changed (Should be set to on) Low-power consumption mode Should...
Users Guide
Page 52
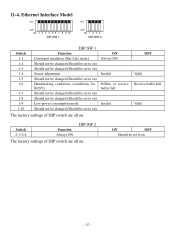
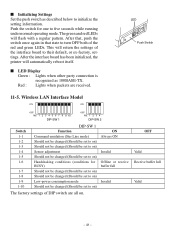
... running under normal operating mode. Wireless LAN Interface Model ON ON OFF No. 1 2 3 4 5 6 7 8 9 10 DIP-SW 1 OFF No. 1 2 3 4 DIP-SW 2 Switch 1-1 1-2 1-3 1-4 1-5 1-6 1-7 1-8 1-9 1-10 DIP-SW 1 Function Command emulation (Ster Line mode) Should not be changed (Should be set to on) Should not be changed (Should be set to on ) ON Always ON Invalid Offline or receive buffer full Invalid The factory settings of the red...
... running under normal operating mode. Wireless LAN Interface Model ON ON OFF No. 1 2 3 4 5 6 7 8 9 10 DIP-SW 1 OFF No. 1 2 3 4 DIP-SW 2 Switch 1-1 1-2 1-3 1-4 1-5 1-6 1-7 1-8 1-9 1-10 DIP-SW 1 Function Command emulation (Ster Line mode) Should not be changed (Should be set to on) Should not be changed (Should be set to on ) ON Always ON Invalid Offline or receive buffer full Invalid The factory settings of the red...


