

User Manual
Page 1
... Usage Notice 2 Precautions ...2 Introduction 4 Product Features 4 Package Overview 5 Product Overview 6 Main Unit ...6 Control Panel ...7 Connection Ports ...8 Remote Control with Mouse Function & Laser Pointer 9 Installation 10 Connecting the Projector 10 Powering On/Off the Projector 11 Powering On the Projector 11 ...the Projector Image Height 13 Adjusting the Projector Zoom / Focus 14 Adjusting Projected Image Size 14 User Controls 15 Control Panel & Remote Control 15 On-Screen Display Menus 18 How to operate ...18 Language ...19 Image-I (Computer Mode 20 Image-I (Video Mode...
... Usage Notice 2 Precautions ...2 Introduction 4 Product Features 4 Package Overview 5 Product Overview 6 Main Unit ...6 Control Panel ...7 Connection Ports ...8 Remote Control with Mouse Function & Laser Pointer 9 Installation 10 Connecting the Projector 10 Powering On/Off the Projector 11 Powering On the Projector 11 ...the Projector Image Height 13 Adjusting the Projector Zoom / Focus 14 Adjusting Projected Image Size 14 User Controls 15 Control Panel & Remote Control 15 On-Screen Display Menus 18 How to operate ...18 Language ...19 Image-I (Computer Mode 20 Image-I (Video Mode...
User Manual
Page 4
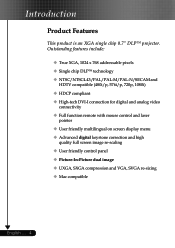
...-N/SECAM and HDTV compatible (480i/p, 576i/p, 720p, 1080i) ‹ HDCP compliant ‹ High-tech DVI-I connection for digital and analog video connectivity ‹ Full function remote with mouse control and laser pointer ‹ User friendly multilingual on screen display menu ‹ Advanced digital keystone correction and high quality full screen image...
...-N/SECAM and HDTV compatible (480i/p, 576i/p, 720p, 1080i) ‹ HDCP compliant ‹ High-tech DVI-I connection for digital and analog video connectivity ‹ Full function remote with mouse control and laser pointer ‹ User friendly multilingual on screen display menu ‹ Advanced digital keystone correction and high quality full screen image...

User Manual
Page 5
Quick Start Card ; Warranty Card 2 x Battery Optional Case 5 ... User's Guide ; Check to D-Sub Cable RCA Component Cable 1.8m 1.8m for YPbPr 1.8m S-Video Cable 1.8m Documents : Remote Control with all the items shown below. Introduction Package Overview This projector comes with Mouse Function & Laser Pointer ; Contact your dealer immediately if anything is missing.Option Projector with lens cap Power Cord 1.8m VGA Cable 1.8m Composite Video Cable DVI to make sure your unit is complete. English
Quick Start Card ; Warranty Card 2 x Battery Optional Case 5 ... User's Guide ; Check to D-Sub Cable RCA Component Cable 1.8m 1.8m for YPbPr 1.8m S-Video Cable 1.8m Documents : Remote Control with all the items shown below. Introduction Package Overview This projector comes with Mouse Function & Laser Pointer ; Contact your dealer immediately if anything is missing.Option Projector with lens cap Power Cord 1.8m VGA Cable 1.8m Composite Video Cable DVI to make sure your unit is complete. English
User Manual
Page 6
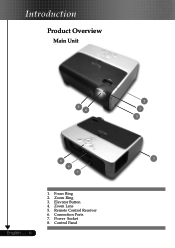
Elevator Button 4. Remote Control Receiver 6. Power Socket 8. Zoom Ring 3. Zoom Lens 5. Introduction Product Overview Main Unit 5 4 2 1 3 8 3 6 7 English ... 6 1. Focus Ring 2. Control Panel Connection Ports 7.
Elevator Button 4. Remote Control Receiver 6. Power Socket 8. Zoom Ring 3. Zoom Lens 5. Introduction Product Overview Main Unit 5 4 2 1 3 8 3 6 7 English ... 6 1. Focus Ring 2. Control Panel Connection Ports 7.
User Manual
Page 9
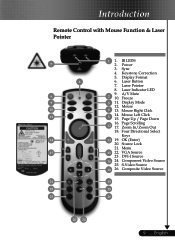
... / Page Down 12 16. Zoom In/Zoom Out 18. English IR LEDS 2. Display Format 6. Mouse Left Click 15. OK (Enter) 20. Source Lock 21. Introduction Remote Control with Mouse Function & Laser Pointer 7 8 6 9 10 11 14 17 21 22 23 1 1. Mouse 4 13. Four Directional Select Keys 13 19. Component Video Source 25...
... / Page Down 12 16. Zoom In/Zoom Out 18. English IR LEDS 2. Display Format 6. Mouse Left Click 15. OK (Enter) 20. Source Lock 21. Introduction Remote Control with Mouse Function & Laser Pointer 7 8 6 9 10 11 14 17 21 22 23 1 1. Mouse 4 13. Four Directional Select Keys 13 19. Component Video Source 25...
User Manual
Page 15
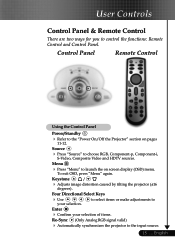
... 4 Press "Menu" to launch the on pages Source 4 Press "Source" to choose RGB, S-Video, Composite Video and Component-p, Component-i, HDTV sources. User Controls Control Panel & Remote Control There are two ways for you to 11-12. English Keystone / 4 Adjusts image degrees). distortion caused by tilting the projector (±16 Four Directional...
... 4 Press "Menu" to launch the on pages Source 4 Press "Source" to choose RGB, S-Video, Composite Video and Component-p, Component-i, HDTV sources. User Controls Control Panel & Remote Control There are two ways for you to 11-12. English Keystone / 4 Adjusts image degrees). distortion caused by tilting the projector (±16 Four Directional...

User Manual
Page 16
... (*) 4 Use this button to page down . Page Down (*) 4 Use this A/V Mute 4 Momentarily turns off the audio and video. the onscreen display Laser Button 4 Aim the remote at the viewing screen, button to pause the screen image. Freeze 4 Press "Freeze" to activate the laser pointer. Display Mode 4 Select the and User. Zoom... items or make adjustments to zoom the lens in or zoom out. Keystone 4 Adjusts image degrees). Four Directional Select Keys 4 Use your selection. Using the Remote Control Power 4 Refer to 11-12.
... (*) 4 Use this button to page down . Page Down (*) 4 Use this A/V Mute 4 Momentarily turns off the audio and video. the onscreen display Laser Button 4 Aim the remote at the viewing screen, button to pause the screen image. Freeze 4 Press "Freeze" to activate the laser pointer. Display Mode 4 Select the and User. Zoom... items or make adjustments to zoom the lens in or zoom out. Keystone 4 Adjusts image degrees). Four Directional Select Keys 4 Use your selection. Using the Remote Control Power 4 Refer to 11-12.

User Manual
Page 18
... the desired item and adjust the settings by key. 4. If you to make image adjustments and change a variety of settings. While making a selection on the Remote Control or Control Panel. 2. To exit, press "Menu "again. Use keys to operate 1. The OSD menu will close and the projector will automatically detect the...
... the desired item and adjust the settings by key. 4. If you to make image adjustments and change a variety of settings. While making a selection on the Remote Control or Control Panel. 2. To exit, press "Menu "again. Use keys to operate 1. The OSD menu will close and the projector will automatically detect the...

User Manual
Page 28
... removed the lens cap and the projector is higher than 1024 x 768. Problem: Partial, scrolling or incorrectly displayed image. 4 Press the "Sync" button on the Remote Control or Press the "Re-Sync" button on . 4 Press A/V Mute button to maker sure the image has not been turned off temporarily. In the Windows...
... removed the lens cap and the projector is higher than 1024 x 768. Problem: Partial, scrolling or incorrectly displayed image. 4 Press the "Sync" button on the Remote Control or Press the "Re-Sync" button on . 4 Press A/V Mute button to maker sure the image has not been turned off temporarily. In the Windows...


