
User Manual
Page 1
... 10 Connect to Video Sources 11 Powering the projector On / Off.........12 Powering On the Projector 12 Powering off the projector 13 Warning Indicator 13 Adjusting the Projected Image..........14 Adjusting the Projector's Height ........ 14 Adjusting the Projector's Zoom / Focus 15 Adjusting Projection Image Size......... 15 User Controls 17 Remote Control 17 On-screen Display Menus 19 How to operate 19 Menu Tree 20 IMAGE 22 IMAGE | Advanced 24 IMAGE | Advanced | Signal (RGB) .... 26 DISPLAY 27 DISPLAY | 3D 30 SETUP 31 SETUP | Security 33 SETUP | Audio Settings 35 SETUP...
... 10 Connect to Video Sources 11 Powering the projector On / Off.........12 Powering On the Projector 12 Powering off the projector 13 Warning Indicator 13 Adjusting the Projected Image..........14 Adjusting the Projector's Height ........ 14 Adjusting the Projector's Zoom / Focus 15 Adjusting Projection Image Size......... 15 User Controls 17 Remote Control 17 On-screen Display Menus 19 How to operate 19 Menu Tree 20 IMAGE 22 IMAGE | Advanced 24 IMAGE | Advanced | Signal (RGB) .... 26 DISPLAY 27 DISPLAY | 3D 30 SETUP 31 SETUP | Security 33 SETUP | Audio Settings 35 SETUP...
User Manual
Page 2
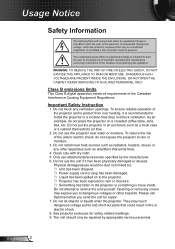
... or moisture. DO NOT OPEN THE CABINET. Only use attachments/accessories specified by appropriate service personnel. Opening or removing covers may touch dangerous voltage points and short out parts that could result in a location that emits heat. 4. DANGEROUS HIGH VOLTAGES ARE PRESENT INSIDE THE ENCLOSURE. The unit should only be (but not limited to install the projector in fire or electric...
... or moisture. DO NOT OPEN THE CABINET. Only use attachments/accessories specified by appropriate service personnel. Opening or removing covers may touch dangerous voltage points and short out parts that could result in a location that emits heat. 4. DANGEROUS HIGH VOLTAGES ARE PRESENT INSIDE THE ENCLOSURE. The unit should only be (but not limited to install the projector in fire or electric...
User Manual
Page 3
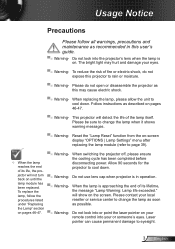
... eyes. ▀■ Warning- the Lamp" section on your remote control into the projector's lens when the lamp is on -screen display "OPTIONS | Lamp Settings" menu after replacing the lamp module (refer to eyesight. 3 English Do not look into or point the laser pointer on pages 46-47. ▀■ Warning- When replacing the lamp, please allow the unit to cool down . Reset the "Lamp Reset" function from the on...
... eyes. ▀■ Warning- the Lamp" section on your remote control into the projector's lens when the lamp is on -screen display "OPTIONS | Lamp Settings" menu after replacing the lamp module (refer to eyesight. 3 English Do not look into or point the laser pointer on pages 46-47. ▀■ Warning- When replacing the lamp, please allow the unit to cool down . Reset the "Lamp Reset" function from the on...

User Manual
Page 9
... model 8. No Function on this model 22. No Function on this model 14 11 23. Video 21 4 12. Contrast 18 7 16. LED Indicator 2. VGA 20 5 13. Enter 15 10 21. Freeze 14. Numbered keypad (for password input) 23 13 12 9 English Introduction Remote Control 1 1. Power On/Off 3. No Function on this model 5. No Function on this model 9. Zoom 22 3 10. AV mute 11. Menu 17 8 18. Keystone +/- 19. Source...
... model 8. No Function on this model 22. No Function on this model 14 11 23. Video 21 4 12. Contrast 18 7 16. LED Indicator 2. VGA 20 5 13. Enter 15 10 21. Freeze 14. Numbered keypad (for password input) 23 13 12 9 English Introduction Remote Control 1 1. Power On/Off 3. No Function on this model 5. No Function on this model 9. Zoom 22 3 10. AV mute 11. Menu 17 8 18. Keystone +/- 19. Source...

User Manual
Page 12
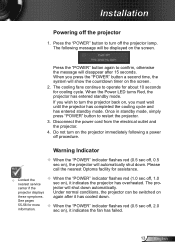
When connected, the Power LED will (Standby) is set to Eco ( The Power LED will turn Red. 2. Securely connect the power cord and signal cable. Installation Powering the projector On / Off Powering On the Projector 1. Turn on the lamp by pressing "POWER" button either on the When Power mode top of the projector or on the remote.
When connected, the Power LED will (Standby) is set to Eco ( The Power LED will turn Red. 2. Securely connect the power cord and signal cable. Installation Powering the projector On / Off Powering On the Projector 1. Turn on the lamp by pressing "POWER" button either on the When Power mode top of the projector or on the remote.
User Manual
Page 13
... projector immediately following message will be switched on the screen. projector displays Under normal conditions, the projector can be displayed on these symptoms. again after 15 seconds. Press the "POWER" button again to turn off , 0.5 sec on ), it has cooled down . Warning Indicator When the "POWER" indicator flashes red (0.5 sec off the projector lamp. Once in standby mode, simply press "POWER" button to operate for about 10 seconds for cooling cycle. Disconnect the power cord...
... projector immediately following message will be switched on the screen. projector displays Under normal conditions, the projector can be displayed on these symptoms. again after 15 seconds. Press the "POWER" button again to turn off , 0.5 sec on ), it has cooled down . Warning Indicator When the "POWER" indicator flashes red (0.5 sec off the projector lamp. Once in standby mode, simply press "POWER" button to operate for about 10 seconds for cooling cycle. Disconnect the power cord...
User Manual
Page 20
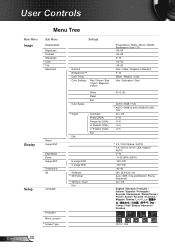
....xls Color Settings Red / Green / Blue / Cyan / Magenta / Yellow / Presentation / Bright / Movie / sRGB / Blackboard / User / 3D -50~50 -50~50 1~15 -50~50 -50~50 Film / Video / Graphics / Standard 1~10 Warm / Medium / Cold Hue / Saturation / Gain Color Space #2 Signal Exit White Reset Exit Automatic Phase (VGA) Frequency (VGA) H. Position (VGA) V. User Controls Menu Tree Main Menu Image Sub Menu Display Mode Brightness Contrast Sharpness #1 Color #1 Tint Advanced Display Reset Image Shift Edge Mask Zoom Image Shift V Keystone 3D Setup Language Projection Menu Location #5 Screen...
....xls Color Settings Red / Green / Blue / Cyan / Magenta / Yellow / Presentation / Bright / Movie / sRGB / Blackboard / User / 3D -50~50 -50~50 1~15 -50~50 -50~50 Film / Video / Graphics / Standard 1~10 Warm / Medium / Cold Hue / Saturation / Gain Color Space #2 Signal Exit White Reset Exit Automatic Phase (VGA) Frequency (VGA) H. Position (VGA) V. User Controls Menu Tree Main Menu Image Sub Menu Display Mode Brightness Contrast Sharpness #1 Color #1 Tint Advanced Display Reset Image Shift Edge Mask Zoom Image Shift V Keystone 3D Setup Language Projection Menu Location #5 Screen...

User Manual
Page 21
... OSD Menu Tree.xls 21 English User Controls Main Menu Setup Options Sub Menu Security Projector ID Audio Settings Advanced Input Source Source Lock High Altitude Information Hide Test Pattern Background Color Advanced Lamp Settings Optional Filter Settings Reset Settings Security Security Timer Change Password Exit Internal Speaker Mute Volume Logo Closed Captioning Exit Direct Power On Auto Power Off (min.) Sleep Timer (min.) Power Mode (Standby) Exit Lamp Hours Lamp Reminder Brightness Mode Lamp Reset Exit Optional Filter Installed Filter Usage Hours Filter Reminder Filter Reset Exit...
... OSD Menu Tree.xls 21 English User Controls Main Menu Setup Options Sub Menu Security Projector ID Audio Settings Advanced Input Source Source Lock High Altitude Information Hide Test Pattern Background Color Advanced Lamp Settings Optional Filter Settings Reset Settings Security Security Timer Change Password Exit Internal Speaker Mute Volume Logo Closed Captioning Exit Direct Power On Auto Power Off (min.) Sleep Timer (min.) Power Mode (Standby) Exit Lamp Hours Lamp Reminder Brightness Mode Lamp Reset Exit Optional Filter Installed Filter Usage Hours Filter Reminder Filter Reset Exit...
User Manual
Page 31
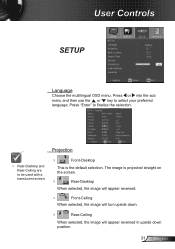
... projected straight on the screen. Rear-Desktop When selected, the image will appear reversed. Front-Ceiling When selected, the image will turn upside down. Rear-Ceiling When selected, the image will appear reversed in upside down position. 31 English Press or into the sub menu and then use the or key to finalize the selection. The image is the default selection. User Controls SETUP...
... projected straight on the screen. Rear-Desktop When selected, the image will appear reversed. Front-Ceiling When selected, the image will turn upside down. Rear-Ceiling When selected, the image will appear reversed in upside down position. 31 English Press or into the sub menu and then use the or key to finalize the selection. The image is the default selection. User Controls SETUP...

User Manual
Page 33
... enter your password. Change Password: 1. Press " " to confirm. 4. Press " " to set the how long (Month/Day/Hour) the projector can be requested to confirm your password again. Enter new password (4 digits in length) using the number buttons on the projector without password verification. The password has to be able to switch on the remote, then press " " to input old password. 2. User Controls SETUP | Security Password default value is "1234" (first time). Security Timer Use this time has...
... enter your password. Change Password: 1. Press " " to confirm. 4. Press " " to set the how long (Month/Day/Hour) the projector can be requested to confirm your password again. Enter new password (4 digits in length) using the number buttons on the projector without password verification. The password has to be able to switch on the remote, then press " " to input old password. 2. User Controls SETUP | Security Password default value is "1234" (first time). Security Timer Use this time has...
User Manual
Page 38
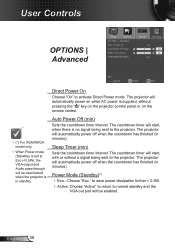
User Controls OPTIONS | Advanced (*) For XGA/WXGA model only. When Power mode (Standby) is set to Eco (
User Controls OPTIONS | Advanced (*) For XGA/WXGA model only. When Power mode (Standby) is set to Eco (
User Manual
Page 39
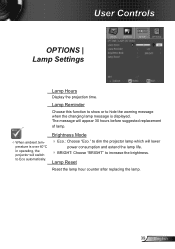
User Controls OPTIONS | Lamp Settings Lamp Hours Display the projection time. Lamp Reset Reset the lamp hour counter after replacing the lamp. 39 English Lamp Reminder Choose this function to show or to Eco automatically. The message will appear 30 hours before suggested replacement of lamp. When ambient temperature is over 40°C in operating, the projector will lower power consumption and extend the lamp life. BRIGHT: Choose "BRIGHT" to increase the brightness. to dim the projector lamp which...
User Controls OPTIONS | Lamp Settings Lamp Hours Display the projection time. Lamp Reset Reset the lamp hour counter after replacing the lamp. 39 English Lamp Reminder Choose this function to show or to Eco automatically. The message will appear 30 hours before suggested replacement of lamp. When ambient temperature is over 40°C in operating, the projector will lower power consumption and extend the lamp life. BRIGHT: Choose "BRIGHT" to increase the brightness. to dim the projector lamp which...
User Manual
Page 40
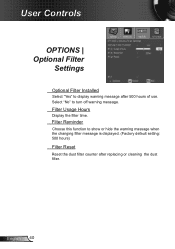
Select "No" to turn off warning message. Filter Reminder Choose this function to show or hide the warning massage when the changing filter message is displayed. (Factory default setting: 500 hours) Filter Reset Reset the dust filter counter after 500 hours of use. User Controls OPTIONS | Optional Filter Settings Optional Filter Installed Select "Yes" to display warning message after replacing or cleaning the dust filter. English 40 Filter Usage Hours Display the filter time.
Select "No" to turn off warning message. Filter Reminder Choose this function to show or hide the warning massage when the changing filter message is displayed. (Factory default setting: 500 hours) Filter Reset Reset the dust filter counter after 500 hours of use. User Controls OPTIONS | Optional Filter Settings Optional Filter Installed Select "Yes" to display warning message after replacing or cleaning the dust filter. English 40 Filter Usage Hours Display the filter time.
User Manual
Page 41
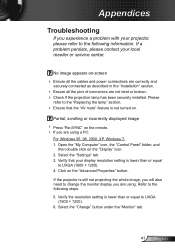
... not projecting the whole image, you will also need to UXGA (1600 × 1200). 6. Verify the resolution setting is not turned on the remote. If you experience a problem with your local reseller or service center. Select the "Settings" tab. 3. Appendices Troubleshooting If you are using . Open the "My Computer" icon, the "Control Panel" folder, and then double click on the "Display" icon. 2. Select the "Change" button...
... not projecting the whole image, you will also need to UXGA (1600 × 1200). 6. Verify the resolution setting is not turned on the remote. If you experience a problem with your local reseller or service center. Select the "Settings" tab. 3. Appendices Troubleshooting If you are using . Open the "My Computer" icon, the "Control Panel" folder, and then double click on the "Display" icon. 2. Select the "Change" button...

User Manual
Page 43
... different settings. Use of Keystone is not recommended. Image has slanted sides If possible, reposition the projector so that it is horizontally centered on the screen and below the bottom of the screen. Press "Keystone +/-" button on the projector lens. Make sure the projection screen is between the required distance. Appendices Image is out of focus Adjust the Focus Ring on the remote control until...
... different settings. Use of Keystone is not recommended. Image has slanted sides If possible, reposition the projector so that it is horizontally centered on the screen and below the bottom of the screen. Press "Keystone +/-" button on the projector lens. Make sure the projection screen is between the required distance. Appendices Image is out of focus Adjust the Focus Ring on the remote control until...
User Manual
Page 44
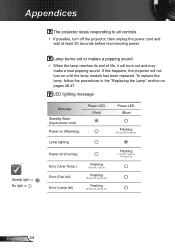
... life, it will not turn off , 1 sec on) To replace the lamp, follow the procedures in the "Replacing the Lamp" section on pages 46-47. LED lighting message Message Standby State (Input power cord) Power on (Warming) Lamp lighting Power LED (Red) Power off (Cooling) Error (Over Temp.) Error (Fan fail) Steady light No light Error (Lamp fail) Flashing (1 sec off, 1 sec on) Flashing (0.5 sec off, 2.0 sec on) Flashing (0.5 sec off, 0.5 sec on) Power LED (Blue) Flashing (0.5 sec off, 0.5 sec on) Flashing (1 sec off the projector...
... life, it will not turn off , 1 sec on) To replace the lamp, follow the procedures in the "Replacing the Lamp" section on pages 46-47. LED lighting message Message Standby State (Input power cord) Power on (Warming) Lamp lighting Power LED (Red) Power off (Cooling) Error (Over Temp.) Error (Fan fail) Steady light No light Error (Lamp fail) Flashing (1 sec off, 1 sec on) Flashing (0.5 sec off, 2.0 sec on) Flashing (0.5 sec off, 0.5 sec on) Power LED (Blue) Flashing (0.5 sec off, 0.5 sec on) Flashing (1 sec off the projector...
User Manual
Page 45
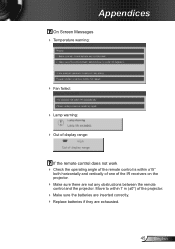
... On Screen Messages Temperature warning: Fan failed: Lamp warning: Out of display range: If the remote control does not work Check the operating angle of the remote control is within 7 m (±0°) of the IR receivers on the projector. Make sure there are exhausted. 45 English Move to within ±15° both horizontally and vertically of one of the projector...
... On Screen Messages Temperature warning: Fan failed: Lamp warning: Out of display range: If the remote control does not work Check the operating angle of the remote control is within 7 m (±0°) of the IR receivers on the projector. Make sure there are exhausted. 45 English Move to within ±15° both horizontally and vertically of one of the projector...

User Manual
Page 46
... drop the lamp module or touch the lamp bulb. English 46 Warning: If ceiling mounted, please use , you see this message, please contact your local reseller or service center to wear safety glasses if changing the bulb when ceiling mounted. It is dropped. Allow it is recommended to change the lamp as soon as possible. When you will receive a warning message. Appendices Replacing the lamp The projector automatically detects the lamp life.
... drop the lamp module or touch the lamp bulb. English 46 Warning: If ceiling mounted, please use , you see this message, please contact your local reseller or service center to wear safety glasses if changing the bulb when ceiling mounted. It is dropped. Allow it is recommended to change the lamp as soon as possible. When you will receive a warning message. Appendices Replacing the lamp The projector automatically detects the lamp life.
User Manual
Page 47
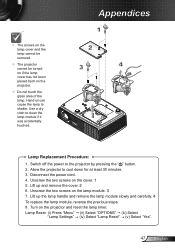
... 1 2 3 4 Lamp Replacement Procedure: 1. Allow the projector to the projector by pressing the " " button. 2. Disconnect the power cord. 4. Unscrew the two screws on the projector and reset the lamp timer. Lift up the lamp handle and remove the lamp module slowly and carefully. 4 To replace the lamp module, reverse the previous steps. 8. Lift up and remove the cover. 2 6. Lamp Reset: (i) Press "Menu" (ii) Select "OPTIONS" (iii) Select "Lamp Settings" (iv) Select "Lamp Reset" ...
... 1 2 3 4 Lamp Replacement Procedure: 1. Allow the projector to the projector by pressing the " " button. 2. Disconnect the power cord. 4. Unscrew the two screws on the projector and reset the lamp timer. Lift up the lamp handle and remove the lamp module slowly and carefully. 4 To replace the lamp module, reverse the previous steps. 8. Lift up and remove the cover. 2 6. Lamp Reset: (i) Press "Menu" (ii) Select "OPTIONS" (iii) Select "Lamp Settings" (iv) Select "Lamp Reset" ...

User Manual
Page 54
...30 31 30 30 20 31 0D Source Lock On ~XX100 0 7E 30 30 31 30 30 20 30 0D Off (0/2 for backward compatible) ~XX101 1 7E 30 30 31 30 31 20 31 0D High Altitude On ~XX101 0 7E 30 ...Color Blue ~XX104 2 7E 30 30 31 30 34 20 32 0D Black ~XX104 3 7E 30 30 31 30 34 20 33 0D Red ~XX104 4 7E 30 30 31 30 34 20 34 0D Green ~XX104 5 7E 30 30 31 30 34 20 35 0D White... for backward compatible) ~XX106 n 7E 30 30 31 30 36 20 a 0D Auto Power Off (min) n = 0 (a=30) ~ 180 (a=31 38 30) step:5 ~XX107 n 7E 30 30 31 30 37 20 a 0D Sleep Timer (min) n = 0 (a=30) ~ 995 (a=39 39 39) step:5 ~XX114...
...30 31 30 30 20 31 0D Source Lock On ~XX100 0 7E 30 30 31 30 30 20 30 0D Off (0/2 for backward compatible) ~XX101 1 7E 30 30 31 30 31 20 31 0D High Altitude On ~XX101 0 7E 30 ...Color Blue ~XX104 2 7E 30 30 31 30 34 20 32 0D Black ~XX104 3 7E 30 30 31 30 34 20 33 0D Red ~XX104 4 7E 30 30 31 30 34 20 34 0D Green ~XX104 5 7E 30 30 31 30 34 20 35 0D White... for backward compatible) ~XX106 n 7E 30 30 31 30 36 20 a 0D Auto Power Off (min) n = 0 (a=30) ~ 180 (a=31 38 30) step:5 ~XX107 n 7E 30 30 31 30 37 20 a 0D Sleep Timer (min) n = 0 (a=30) ~ 995 (a=39 39 39) step:5 ~XX114...


