Operater's Manual
Page 6
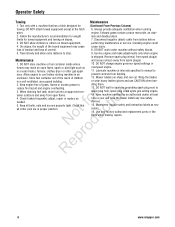
... exiting engine. 14. in manual to ance. When draining fuel tank, drain fuel into an approved con- Use only factory authorized replacement parts or like parts when making repairs. 6 www.snapper.com DO NOT attach towed equipment except at least once a year and have the dealer install any new safety devices. 15. engine...
... exiting engine. 14. in manual to ance. When draining fuel tank, drain fuel into an approved con- Use only factory authorized replacement parts or like parts when making repairs. 6 www.snapper.com DO NOT attach towed equipment except at least once a year and have the dealer install any new safety devices. 15. engine...
Operater's Manual
Page 8
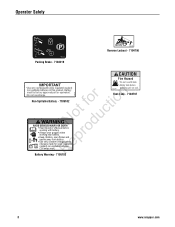
.... Do not overcharge. for valve regulated e + - Keep children, open flames and p sparks away from battery. Battery must be factory approved part or equivalent. Fuel Tank - 7104797 Battery Warning - 7105103 8 www.snapper.com R (3.6 amps max.) 7105103 7104797 standing unit on end. Use only constant voltage battery chargers made for tion Non-Spillable Battery...
.... Do not overcharge. for valve regulated e + - Keep children, open flames and p sparks away from battery. Battery must be factory approved part or equivalent. Fuel Tank - 7104797 Battery Warning - 7105103 8 www.snapper.com R (3.6 amps max.) 7105103 7104797 standing unit on end. Use only constant voltage battery chargers made for tion Non-Spillable Battery...

Operater's Manual
Page 18
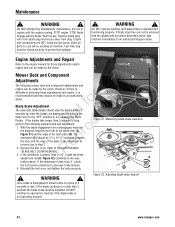
... We recommend returning the Rear Engine Rider to cool before standing the machine on the Rear Engine Rider. the correct part or information for parts and service assistance. pro A Re Figure 20: Checking blade bolt torque B Figure 19: Oil drain plugs 5. ...Refer to the section Riding Mower, always mention the model and serial number. As necessary, torque to 30 to the engine manual for straightness. N d A wear or damage on its rear bumper. 18 www.snapper...
... We recommend returning the Rear Engine Rider to cool before standing the machine on the Rear Engine Rider. the correct part or information for parts and service assistance. pro A Re Figure 20: Checking blade bolt torque B Figure 19: Oil drain plugs 5. ...Refer to the section Riding Mower, always mention the model and serial number. As necessary, torque to 30 to the engine manual for straightness. N d A wear or damage on its rear bumper. 18 www.snapper...

Operater's Manual
Page 19
...functioning properly, brake adjustment must be completed before working on 33" decks does not require tension adjustment. Avoid serious burns, allow all B parts to rotate longer than 3 seconds less than 1", the belt tension should be 1-1/4" but no less than 5 ft. 2. With the ...operate machine until blade brake has been adjusted and functioning properly. be adjusted. If the blade continues to cool before operating the machine. SNAPPER dealer for proper function. Service Brake / Park Brake 1. Drive the machine forward and apply the brake. If the brakes are HOT...
...functioning properly, brake adjustment must be completed before working on 33" decks does not require tension adjustment. Avoid serious burns, allow all B parts to rotate longer than 3 seconds less than 1", the belt tension should be 1-1/4" but no less than 5 ft. 2. With the ...operate machine until blade brake has been adjusted and functioning properly. be adjusted. If the blade continues to cool before operating the machine. SNAPPER dealer for proper function. Service Brake / Park Brake 1. Drive the machine forward and apply the brake. If the brakes are HOT...

Operater's Manual
Page 21
... fitting (A, Figure 26) with the engine running. DO NOT attempt any adjustments, maintenance, service or repairs with two shots of the mower deck, removing all parts to prevent fuel spillage.
... fitting (A, Figure 26) with the engine running. DO NOT attempt any adjustments, maintenance, service or repairs with two shots of the mower deck, removing all parts to prevent fuel spillage.
Operater's Manual
Page 22
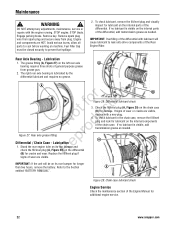
...and components are HOT. Remove spark plug wire from spark plug and secure away from grease gun. 2. Avoid serious burns, allow all parts to the Section B entitled "BATTERY REMOVAL". IMPORTANT: Overfilling of general purpose grease from plug. The right rear axle bearing is visible, ...add transmission grease as needed . Stand the rear engine rider on its rear bumper for additional engine service. 22 www.snapper.com Remove key. Rear Axle Bearing - A B Notrfoodruction Figure 27: Rear axle grease fitting p Differential / Chain Case - Check the fill/...
...and components are HOT. Remove spark plug wire from spark plug and secure away from grease gun. 2. Avoid serious burns, allow all parts to the Section B entitled "BATTERY REMOVAL". IMPORTANT: Overfilling of general purpose grease from plug. The right rear axle bearing is visible, ...add transmission grease as needed . Stand the rear engine rider on its rear bumper for additional engine service. 22 www.snapper.com Remove key. Rear Axle Bearing - A B Notrfoodruction Figure 27: Rear axle grease fitting p Differential / Chain Case - Check the fill/...

Operater's Manual
Page 23
... Discard the filter. 5. Check the fuel system for leaks. 2. Transmission shift lever and detent. 4. Start the engine and allow all parts to regular maintenance, the following procedures to insure the Rear Engine Rider will operate properly when taken out of Season) If desired, the...Rider can be closed securely to run until the engine runs r n out of fuel. 3. Maintenance ! Use only factory authorized Engine replacement parts or like parts when making repairs. IMPORTANT: Service the fuel filter on its rear bumper in the desired location for wear or damage. 1. t c ...
... Discard the filter. 5. Check the fuel system for leaks. 2. Transmission shift lever and detent. 4. Start the engine and allow all parts to regular maintenance, the following procedures to insure the Rear Engine Rider will operate properly when taken out of Season) If desired, the...Rider can be closed securely to run until the engine runs r n out of fuel. 3. Maintenance ! Use only factory authorized Engine replacement parts or like parts when making repairs. IMPORTANT: Service the fuel filter on its rear bumper in the desired location for wear or damage. 1. t c ...
Operater's Manual
Page 24
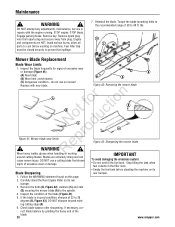
... 31) and the edge of the plate. Remove spark plug wire from spark plug and secure away from plug. Avoid serious burns, allow all parts to the section entitled R "BLADE BELT COVER REMOVAL". WARNING ! If blade stop time can not be 3" to rotate after 3 seconds the ...moving the o blade lever to decrease brake tension. 4. The dimension (C) should stop in achieving these repairs be closed securely to an authorized Snapper dealer. With the blade engagement lever disengaged, measure o the distance between p the lever and the edge of the latch plate (B). Once blade...
... 31) and the edge of the plate. Remove spark plug wire from spark plug and secure away from plug. Avoid serious burns, allow all parts to the section entitled R "BLADE BELT COVER REMOVAL". WARNING ! If blade stop time can not be 3" to rotate after 3 seconds the ...moving the o blade lever to decrease brake tension. 4. The dimension (C) should stop in achieving these repairs be closed securely to an authorized Snapper dealer. With the blade engagement lever disengaged, measure o the distance between p the lever and the edge of the latch plate (B). Once blade...

Operater's Manual
Page 25
.... 5. Place a piece of angle iron, pipe, or similar object under r n the rear center of rota- Remove the rear hanger chains (A, Figure 34) and allow all parts to cool before working on the eye-bolt to raise or lower the rear of the deck to - o u side is greater than the front. Adjustment...
.... 5. Place a piece of angle iron, pipe, or similar object under r n the rear center of rota- Remove the rear hanger chains (A, Figure 34) and allow all parts to cool before working on the eye-bolt to raise or lower the rear of the deck to - o u side is greater than the front. Adjustment...

Operater's Manual
Page 26
... ADJUSTMENT". Recheck the service brake/park brake and readjust if necessary. IMPORTANT: The SNAPPER Rear Engine Rider Models with the engine running. Figure 37: Clutch/brake cable adjustment 26 www.snapper.com Engage parking brake. Avoid serious burns, allow the pedal (A, Figure 37) ...to cool before working on machine. Figure 36: Mower belt adjustment 2. Disengage the parking brake and allow all parts to remain in the cable. If ...
... ADJUSTMENT". Recheck the service brake/park brake and readjust if necessary. IMPORTANT: The SNAPPER Rear Engine Rider Models with the engine running. Figure 37: Clutch/brake cable adjustment 26 www.snapper.com Engage parking brake. Avoid serious burns, allow the pedal (A, Figure 37) ...to cool before working on machine. Figure 36: Mower belt adjustment 2. Disengage the parking brake and allow all parts to remain in the cable. If ...

Operater's Manual
Page 27
... bottom of the housing (C). Remove spark plug wire from spark plug and secure away from fastest speed. Depress the clutch/brake pedal (A, Figure 38) all parts to prevent fuel spillage. 4. Hold the clutch/brake cable (B) to set the park brake. Figure 40: Brake cable adjusting nuts 27 Engage parking brake. Engine...
... bottom of the housing (C). Remove spark plug wire from spark plug and secure away from fastest speed. Depress the clutch/brake pedal (A, Figure 38) all parts to prevent fuel spillage. 4. Hold the clutch/brake cable (B) to set the park brake. Figure 40: Brake cable adjusting nuts 27 Engage parking brake. Engine...
Operater's Manual
Page 28
Engage parking brake. Avoid serious burns, allow all parts to the recommended range of excessive wear or damage (Figure 41): B (A) New blade; (B) Wear limit (notch starts); Replace with the engine running. Inspect the condition of the blade. 28 www.snapper.com ing cutting edge (A). 6. rect blade balance by grinding the heavy end of...
Engage parking brake. Avoid serious burns, allow all parts to the recommended range of excessive wear or damage (Figure 41): B (A) New blade; (B) Wear limit (notch starts); Replace with the engine running. Inspect the condition of the blade. 28 www.snapper.com ing cutting edge (A). 6. rect blade balance by grinding the heavy end of...

Operater's Manual
Page 29
... idler belt guide tab should be closed securely to cool before standing the machine on the idler arm. Adjust the belt guide to allow all parts to prevent fuel spillage. 9. Reinstall the mower drive belt cover. Route the new belt through the engine belt guide (B, t c Figure 44) up to the section...
... idler belt guide tab should be closed securely to cool before standing the machine on the idler arm. Adjust the belt guide to allow all parts to prevent fuel spillage. 9. Reinstall the mower drive belt cover. Route the new belt through the engine belt guide (B, t c Figure 44) up to the section...

Operater's Manual
Page 30
...to prevent fuel spillage. Always shield the positive terminal with the removed hardware (A). 7. Stop blade. Avoid serious burns, allow all parts to the positive terminal (+) on machine. Remove the battery from the positive battery terminal. Remove the hardware (A, Figure 48) ... bracket (B), and remove the bracket. Reinstall the battery holddown bracket (B, Figure 48), securing with the positive terminal cover. 30 www.snapper.com Connect the RED positive (+) cable (A, Figure 49) to cool before working on the battery with the removed hardware. ! Always...
...to prevent fuel spillage. Always shield the positive terminal with the removed hardware (A). 7. Stop blade. Avoid serious burns, allow all parts to the positive terminal (+) on machine. Remove the battery from the positive battery terminal. Remove the hardware (A, Figure 48) ... bracket (B), and remove the bracket. Reinstall the battery holddown bracket (B, Figure 48), securing with the positive terminal cover. 30 www.snapper.com Connect the RED positive (+) cable (A, Figure 49) to cool before working on the battery with the removed hardware. ! Always...

Operater's Manual
Page 32
.... Clean free of balance or bent mower blades. 1. Lessen load. 2. Debris build up on engine. 2. Service and tighten loose parts. 3. Replace air lifts. Bent Idler, stationary or spindle pulley. 5. Troubleshooting PROBLEM PROBABLE CAUSE CORRECTIVE ACTION Engine Will Not 1. Fill ... 13. Choke control in the OFF position. 5. p 7. If broken, replace with new starter cable. 13. Replace pulley. 32 www.snapper.com Ignition is in the "CHOKE" position. Electric Starter 3. Spark plug wire disconnected. 4. Engine Stalls After Running Engine Loses Power 9.Battery...
.... Clean free of balance or bent mower blades. 1. Lessen load. 2. Debris build up on engine. 2. Service and tighten loose parts. 3. Replace air lifts. Bent Idler, stationary or spindle pulley. 5. Troubleshooting PROBLEM PROBABLE CAUSE CORRECTIVE ACTION Engine Will Not 1. Fill ... 13. Choke control in the OFF position. 5. p 7. If broken, replace with new starter cable. 13. Replace pulley. 32 www.snapper.com Ignition is in the "CHOKE" position. Electric Starter 3. Spark plug wire disconnected. 4. Engine Stalls After Running Engine Loses Power 9.Battery...
Operater's Manual
Page 34
... particular purpose, are not covered by law. Warranty service is requested, the manufacturing date of non-original parts is not covered by the engine manufacturer. 34 www.snapper.com Normal Wear - Warranty BRIGGS & STRATTON POWER PRODUCTS GROUP, L.L.C. Using the product in e a ...way not described in the Operator's Manual, and serviced or repaired using genuine Briggs & Stratton parts. Stale Fuel - Implied warranties, ...
... particular purpose, are not covered by law. Warranty service is requested, the manufacturing date of non-original parts is not covered by the engine manufacturer. 34 www.snapper.com Normal Wear - Warranty BRIGGS & STRATTON POWER PRODUCTS GROUP, L.L.C. Using the product in e a ...way not described in the Operator's Manual, and serviced or repaired using genuine Briggs & Stratton parts. Stale Fuel - Implied warranties, ...
Operater's Manual
Page 36
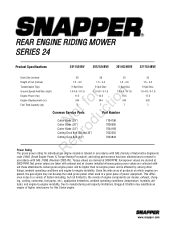
... are taken with - This differ- tude), and engine-to , the variety of engine components (air cleaner, exhaust, charg- www.snapper.com ence is due to a variety of factors including, but not limited to -engine variability. out these attachments. ing, cooling,... Capacity (qt) 5-Spd Disc 1.0-4.6 / 0-1.9 11.5 344 7 5-Spd Disc 1.0-4.6 / 0-1.9 12.5 344 7 5-Spd Disc 1.0-4.6 / 0-1.9 14.5 344 7 t c Common Service Parts Part Number o u Cutter Blade (28") N d Cutter Blade (30") Cutter Blade (33") o Cutting Deck Belt (28 and 30") r Cutting Deck Belt (33") 7104196 7026565 7034168 ...
... are taken with - This differ- tude), and engine-to , the variety of engine components (air cleaner, exhaust, charg- www.snapper.com ence is due to a variety of factors including, but not limited to -engine variability. out these attachments. ing, cooling,... Capacity (qt) 5-Spd Disc 1.0-4.6 / 0-1.9 11.5 344 7 5-Spd Disc 1.0-4.6 / 0-1.9 12.5 344 7 5-Spd Disc 1.0-4.6 / 0-1.9 14.5 344 7 t c Common Service Parts Part Number o u Cutter Blade (28") N d Cutter Blade (30") Cutter Blade (33") o Cutting Deck Belt (28 and 30") r Cutting Deck Belt (33") 7104196 7026565 7034168 ...
