Operater's Manual
Page 5
...an open device 10. STOP engine immediately after striking an obstruction. See manufacturer's instructions for emergencies. 6. If fuel is complete. stopped before turning. 10. mower to prevent neath deck. Check grass catcher components frequently for traffic when near or crossing roadways. 11. ning. N d ...- e ers on a r water heater or other safety devices frequently for proper operation and engine, STOP blades, SET brake, and Remove key before filling. 7. Only use a nozzle lock-open flame, spark or pilot light such as on the ground away from operator's seat, ...
...an open device 10. STOP engine immediately after striking an obstruction. See manufacturer's instructions for emergencies. 6. If fuel is complete. stopped before turning. 10. mower to prevent neath deck. Check grass catcher components frequently for traffic when near or crossing roadways. 11. ning. N d ...- e ers on a r water heater or other safety devices frequently for proper operation and engine, STOP blades, SET brake, and Remove key before filling. 7. Only use a nozzle lock-open flame, spark or pilot light such as on the ground away from operator's seat, ...
Operater's Manual
Page 11
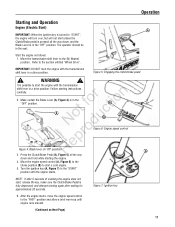
... for approximately 20 seconds. Move the transmission shift lever to the "START" position until engine runs smooth. (Continued on Next Page) 11 Turn the ignition key (A, Figure 7) to the (N) Neutral position. Not duc A B A Figure 6: Engine speed control Repro Figure 4: Blade lever (in the...way down , and the Blade Lever is in a drive position. WARNING ! Figure 7: Ignition key 6. Operation Starting and Operation Engine (Electric Start) IMPORTANT: When the ignition key is turned to the "FAST" position and allow a brief warm-up until the engine starts. After the ...
... for approximately 20 seconds. Move the transmission shift lever to the "START" position until engine runs smooth. (Continued on Next Page) 11 Turn the ignition key (A, Figure 7) to the (N) Neutral position. Not duc A B A Figure 6: Engine speed control Repro Figure 4: Blade lever (in the...way down , and the Blade Lever is in a drive position. WARNING ! Figure 7: Ignition key 6. Operation Starting and Operation Engine (Electric Start) IMPORTANT: When the ignition key is turned to the "FAST" position and allow a brief warm-up until the engine starts. After the ...
Operater's Manual
Page 12
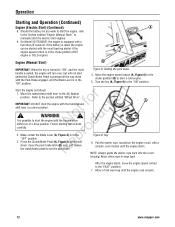
...the park brake handle is pulled, the engine will turn over , and release R the clutch/brake pedal to manually start the electric start the engine with a smooth, even motion until the engine runs smooth. 12 www.snapper.com NOTE: Always guide the starter rope back ... IMPORTANT: DO NOT start a cold engine. 5. u It is in the choke position (HOT engine or COLD engine). A Figure 9: Key 6. Never allow rope to the "ON" position. Turn the key (A, Figure 9) to snap back. ro 2. Pull the starter rope, located on the engine recoil, with the transmission N d shift lever...
...the park brake handle is pulled, the engine will turn over , and release R the clutch/brake pedal to manually start the electric start the engine with a smooth, even motion until the engine runs smooth. 12 www.snapper.com NOTE: Always guide the starter rope back ... IMPORTANT: DO NOT start a cold engine. 5. u It is in the choke position (HOT engine or COLD engine). A Figure 9: Key 6. Never allow rope to the "ON" position. Turn the key (A, Figure 9) to snap back. ro 2. Pull the starter rope, located on the engine recoil, with the transmission N d shift lever...
Operater's Manual
Page 14
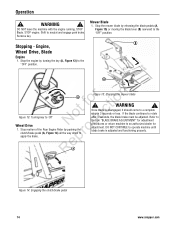
... return machine to 'Off' N du Wheel Drive 1. Stopping - WARNING ! Refer to Section "BLADE BRAKE ADJUSTMENT" for adjustment. Remove key. If the blade continues to the "OFF" position. Stop the engine by turning the key (A, Figure 13) to rotate after 3 seconds, the blade brake must be adjusted. Stop motion of the Rear Engine Rider.... Operation ! Shift to a complete stop in 3 seconds or less. Figure 15: Stopping the mower blade ! RepA Figure 14: Engaging the clutch/brake pedal 14 www.snapper.com
... return machine to 'Off' N du Wheel Drive 1. Stopping - WARNING ! Refer to Section "BLADE BRAKE ADJUSTMENT" for adjustment. Remove key. If the blade continues to the "OFF" position. Stop the engine by turning the key (A, Figure 13) to rotate after 3 seconds, the blade brake must be adjusted. Stop motion of the Rear Engine Rider.... Operation ! Shift to a complete stop in 3 seconds or less. Figure 15: Stopping the mower blade ! RepA Figure 14: Engaging the clutch/brake pedal 14 www.snapper.com

Operater's Manual
Page 19
...entitled "SERVICE BRAKE - Only operate blades when seated in 3 seconds or less after the blade has been turned off. WARNING ! Refer do not operate the machine. Check the machine brake for tion A t c...or less after moving the blade control lever to prevent fuel spillage. Blades must be replaced. SNAPPER dealer for proper function. The machine should be 1-1/4" but no less than 5 ft. 2....engine. If the belt becomes worn or slack it must be operated. Maintenance ! Remove key. sion. 1. Slide the cover back and rotate out on machine. Exercise extreme caution. ...
...entitled "SERVICE BRAKE - Only operate blades when seated in 3 seconds or less after the blade has been turned off. WARNING ! Refer do not operate the machine. Check the machine brake for tion A t c...or less after moving the blade control lever to prevent fuel spillage. Blades must be replaced. SNAPPER dealer for proper function. The machine should be 1-1/4" but no less than 5 ft. 2....engine. If the belt becomes worn or slack it must be operated. Maintenance ! Remove key. sion. 1. Slide the cover back and rotate out on machine. Exercise extreme caution. ...

Operater's Manual
Page 25
...Rider on a smooth, level surface, side deck levelness. Tighten the hardware loosened in the support brackets (D). Turn each other. Remove the angle iron, pipe, or similar object, and pro- ! Remove key. pressure. With the Rear Engine Rider on a smooth level surface. Measure the distance from the blade ...are at the front and rear of the deck. rotate the blade until the o blade tips are at the front and rear 1. Turn the engine off and remove the key. Place a piece of angle iron, pipe, or similar object under r n the rear center of the deck. p 9. Maintenance ...
...Rider on a smooth, level surface, side deck levelness. Tighten the hardware loosened in the support brackets (D). Turn each other. Remove the angle iron, pipe, or similar object, and pro- ! Remove key. pressure. With the Rear Engine Rider on a smooth level surface. Measure the distance from the blade ...are at the front and rear of the deck. rotate the blade until the o blade tips are at the front and rear 1. Turn the engine off and remove the key. Place a piece of angle iron, pipe, or similar object under r n the rear center of the deck. p 9. Maintenance ...

Operater's Manual
Page 32
....snapper.com Fuel tank empty. Contact authorized dealer. 5. Turn ignition switch to proper level. 2. Park brake not engaged. 6. Engine air pre-cleaner and or air cleaner dirty. Charge or replace with new starter cable. 13. Clean all debris. 5. Then, turn key to...starter cable. Service spark plug. 4. Drain and clean fuel system. Lumpy or frayed belt. 4. Start Using 2. Blown Fuse. 7. Turn ignition switch to the START position. Fuel tank empty. 4. Start Using 2. Engine needs choking. Electric Starter 3. Troubleshooting PROBLEM PROBABLE CAUSE...
....snapper.com Fuel tank empty. Contact authorized dealer. 5. Turn ignition switch to proper level. 2. Park brake not engaged. 6. Engine air pre-cleaner and or air cleaner dirty. Charge or replace with new starter cable. 13. Clean all debris. 5. Then, turn key to...starter cable. Service spark plug. 4. Drain and clean fuel system. Lumpy or frayed belt. 4. Start Using 2. Blown Fuse. 7. Turn ignition switch to the START position. Fuel tank empty. 4. Start Using 2. Engine needs choking. Electric Starter 3. Troubleshooting PROBLEM PROBABLE CAUSE...


