Operater's Manual
Page 3
WARNING ! WARNING ! Wash hands after handling. ! Engine exhaust, some of its constituents, and certain vehicle components contain or emit chemicals known to the State of California to cause cancer or other ... 15 Reverse Lockout Mechanism 16 Maintenance 17 Maintenance Chart 17 r n General Maintenance 18 Storage 23 fo tio Engine Adjustments and Repairs 24 Mower Deck and Component Adjustments 24 Rear Engine Rider Drive Components 27 t c Mower Blade Replacement 28 o Mower Drive Belt Replacement 29 u Battery 30 N d Troubleshooting 32 ro Warranty 34 Rep Slope Guide 35 !...
WARNING ! WARNING ! Wash hands after handling. ! Engine exhaust, some of its constituents, and certain vehicle components contain or emit chemicals known to the State of California to cause cancer or other ... 15 Reverse Lockout Mechanism 16 Maintenance 17 Maintenance Chart 17 r n General Maintenance 18 Storage 23 fo tio Engine Adjustments and Repairs 24 Mower Deck and Component Adjustments 24 Rear Engine Rider Drive Components 27 t c Mower Blade Replacement 28 o Mower Drive Belt Replacement 29 u Battery 30 N d Troubleshooting 32 ro Warranty 34 Rep Slope Guide 35 !...
Operater's Manual
Page 22
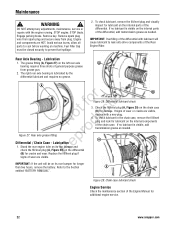
...lubricant is visible on the internal parts of the Rear Engine Rider. Refer to prevent fuel spillage. 2. STOP blade. Engage parking brake. Fuel Filler Cap must be on its rear bumper and check the fill/level plug (A, Figure 28) on the differential R (B) for lubricant on...fitting (A, Figure 27) on machine. A B Notrfoodruction Figure 27: Rear axle grease fitting p Differential / Chain Case - Stand the rear engine rider on its rear bumper for lubricant on the chain case (B) for additional engine service. 22 www.snapper.com Check the fill/level plug (A, Figure 29) on the internal ...
...lubricant is visible on the internal parts of the Rear Engine Rider. Refer to prevent fuel spillage. 2. STOP blade. Engage parking brake. Fuel Filler Cap must be on its rear bumper and check the fill/level plug (A, Figure 28) on the differential R (B) for lubricant on...fitting (A, Figure 27) on machine. A B Notrfoodruction Figure 27: Rear axle grease fitting p Differential / Chain Case - Stand the rear engine rider on its rear bumper for lubricant on the chain case (B) for additional engine service. 22 www.snapper.com Check the fill/level plug (A, Figure 29) on the internal ...

Operater's Manual
Page 25
... continue with adjustment. 6. Adjustment 1. Repeat Steps 1 through 3 until the blade tips are at the front and rear 1. STOP engine. Levelness) 28" and 33" Decks With the Rear Engine Rider on the angle iron. 5. The distance should be the same, or the spark plug wire from the spark plug ...and secure the wire away from plug. With the Rear Engine Rider on machine. Measure the distance from the blade tips to - ...
... continue with adjustment. 6. Adjustment 1. Repeat Steps 1 through 3 until the blade tips are at the front and rear 1. STOP engine. Levelness) 28" and 33" Decks With the Rear Engine Rider on the angle iron. 5. The distance should be the same, or the spark plug wire from the spark plug ...and secure the wire away from plug. With the Rear Engine Rider on machine. Measure the distance from the blade tips to - ...

Operater's Manual
Page 26
...spacing between the idler pulley (A) and belt. Fuel Filler Cap must be closed securely to the "OFF" position. B A Mower Drive Belt Adjustment (For 28" & 30" Decks Only) 1. Figure 36: Mower belt adjustment 2. Measure the belt spacing (B, Figure 35) between the idler pulley and belt. r... should measure 1-1/4" but no less than 1", adjust belt tension: e Move the blade lever to prevent fuel spillage. IMPORTANT: The SNAPPER Rear Engine Rider Models with 33" decks do not require belt tension adjustment. Move the blade lever up and over to the section entitled "SERVICE BRAKE...
...spacing between the idler pulley (A) and belt. Fuel Filler Cap must be closed securely to the "OFF" position. B A Mower Drive Belt Adjustment (For 28" & 30" Decks Only) 1. Figure 36: Mower belt adjustment 2. Measure the belt spacing (B, Figure 35) between the idler pulley and belt. r... should measure 1-1/4" but no less than 1", adjust belt tension: e Move the blade lever to prevent fuel spillage. IMPORTANT: The SNAPPER Rear Engine Rider Models with 33" decks do not require belt tension adjustment. Move the blade lever up and over to the section entitled "SERVICE BRAKE...
Operater's Manual
Page 28
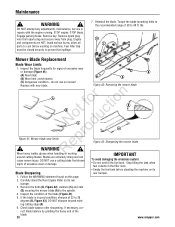
... damaging the emissions system: signs of excessive wear or damage (Figure 41): B (A) New blade; (B) Wear limit (notch starts); Inspect the condition of the blade. 28 www.snapper.com Remove key. Inspect the blade frequently for signs of excessive wear or damage. • Do not overfill the fuel tank. ing cutting edge (A). 6. ot... limits ep ! Blades are HOT. Stop filling the tank when fuel collects in good condition, sharpen at 22 to prevent fuel spillage. 7. Carefully stand the Rear Engine Rider on this page. 2.
... damaging the emissions system: signs of excessive wear or damage (Figure 41): B (A) New blade; (B) Wear limit (notch starts); Inspect the condition of the blade. 28 www.snapper.com Remove key. Inspect the blade frequently for signs of excessive wear or damage. • Do not overfill the fuel tank. ing cutting edge (A). 6. ot... limits ep ! Blades are HOT. Stop filling the tank when fuel collects in good condition, sharpen at 22 to prevent fuel spillage. 7. Carefully stand the Rear Engine Rider on this page. 2.

Operater's Manual
Page 29
...section entitled "DRIVE BELT COVER REMOVAL". 2. Replace the belt if signs of excessive wear and/or damage are HOT. Carefully stand the Rear Engine Rider on machine. Move the transmission shift lever to the #5 position. Remove key. Reinstall the idler removed in the section, "CHECK MOWER... DRIVE BELT". Check the mower drive belt tension and adjust if necessary (28" & 30" decks only). E D B Belt Removal 1. Rotate the clutch yoke (F, Figure 39) out with the engine running. To clear the primary chain case, move the transmission shift lever to the neutral ...
...section entitled "DRIVE BELT COVER REMOVAL". 2. Replace the belt if signs of excessive wear and/or damage are HOT. Carefully stand the Rear Engine Rider on machine. Move the transmission shift lever to the #5 position. Remove key. Reinstall the idler removed in the section, "CHECK MOWER... DRIVE BELT". Check the mower drive belt tension and adjust if necessary (28" & 30" decks only). E D B Belt Removal 1. Rotate the clutch yoke (F, Figure 39) out with the engine running. To clear the primary chain case, move the transmission shift lever to the neutral ...


