Operater's Manual
Page 1
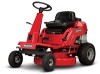
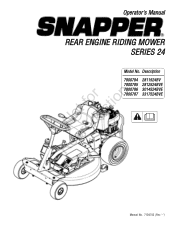
Operator's Manual REAR ENGINE RIDING MOWER SERIES 24 Model No. Description 7800784 2811524BV 7800785 2812524BVE 7800786 3014524BVE 7800787 3317524BVE RNeoptrfoodruction ! Manual No. 7104742 (Rev. '-')
Operator's Manual REAR ENGINE RIDING MOWER SERIES 24 Model No. Description 7800784 2811524BV 7800785 2812524BVE 7800786 3014524BVE 7800787 3317524BVE RNeoptrfoodruction ! Manual No. 7104742 (Rev. '-')
Operater's Manual
Page 3
... of Contents Operator Safety 4 Features and Controls 9 Operation 10 Before Starting 10 Operator Seat Adjustment 10 Starting Engine 11 Engaging Mower Blade 13 Engaging Wheel Drive 13 Stopping Engine, Wheel Drive, Blade 14 Setting Park Brake 15 Cutting Height Adjustment 15 Reverse ... Chart 17 r n General Maintenance 18 Storage 23 fo tio Engine Adjustments and Repairs 24 Mower Deck and Component Adjustments 24 Rear Engine Rider Drive Components 27 t c Mower Blade Replacement 28 o Mower Drive Belt Replacement 29 u Battery 30 N d Troubleshooting 32 ro Warranty 34 Rep Slope ...
... of Contents Operator Safety 4 Features and Controls 9 Operation 10 Before Starting 10 Operator Seat Adjustment 10 Starting Engine 11 Engaging Mower Blade 13 Engaging Wheel Drive 13 Stopping Engine, Wheel Drive, Blade 14 Setting Park Brake 15 Cutting Height Adjustment 15 Reverse ... Chart 17 r n General Maintenance 18 Storage 23 fo tio Engine Adjustments and Repairs 24 Mower Deck and Component Adjustments 24 Rear Engine Rider Drive Components 27 t c Mower Blade Replacement 28 o Mower Drive Belt Replacement 29 u Battery 30 N d Troubleshooting 32 ro Warranty 34 Rep Slope ...
Operater's Manual
Page 4
... these instructions to operate the degrees (27% grade). DO NOT put your satisfaction, contact Customer Service (1-800-935-2967 or www.snapper.com). Data indicates that could cause sliding. 11. Operator Safety ! DO NOT operate machine on slopes exceeding 15 These operators should evaluate.... 3. Always begin forward motion slowly and with grass catchers or other than the operator. If you feel uneasy on a slope. mower safely enough to protect themselves and others to the operator or other hidden hazards. DO NOT smoke. 4. The machine could result in...
... these instructions to operate the degrees (27% grade). DO NOT put your satisfaction, contact Customer Service (1-800-935-2967 or www.snapper.com). Data indicates that could cause sliding. 11. Operator Safety ! DO NOT operate machine on slopes exceeding 15 These operators should evaluate.... 3. Always begin forward motion slowly and with grass catchers or other than the operator. If you feel uneasy on a slope. mower safely enough to protect themselves and others to the operator or other hidden hazards. DO NOT smoke. 4. The machine could result in...
Operater's Manual
Page 5
.... feet on a truck or trailer bed with a plastic liner. STOP BLADES and ENGINE and make sure blades have a dust mask, long pants and substantial footwear. mower to prevent loss of any reason. 9. Set 12. wear or deterioration and replace as specified with good artificial light. 13. Use only an approved fuel...
.... feet on a truck or trailer bed with a plastic liner. STOP BLADES and ENGINE and make sure blades have a dust mask, long pants and substantial footwear. mower to prevent loss of any reason. 9. Set 12. wear or deterioration and replace as specified with good artificial light. 13. Use only an approved fuel...
Operater's Manual
Page 6
... engine and make adjustments only when engine is stopped. Use only factory authorized replacement parts or like parts when making repairs. 6 www.snapper.com Travel slowly and allow children or others on slopes. 7. Remove spark plug wire(s) from spark plug(s) Maintenance and secure wire(s) ... r n tainer outdoors and away from spark plug(s). 1. Tow only with a machine that RNeoptroduc all bolts, nuts and screws properly tight. Mower blades are in manual to dling them. adjust, repair or replace as fo tio needed. 5. or wear heavy leather gloves and use CAUTION when...
... engine and make adjustments only when engine is stopped. Use only factory authorized replacement parts or like parts when making repairs. 6 www.snapper.com Travel slowly and allow children or others on slopes. 7. Remove spark plug wire(s) from spark plug(s) Maintenance and secure wire(s) ... r n tainer outdoors and away from spark plug(s). 1. Tow only with a machine that RNeoptroduc all bolts, nuts and screws properly tight. Mower blades are in manual to dling them. adjust, repair or replace as fo tio needed. 5. or wear heavy leather gloves and use CAUTION when...
Operater's Manual
Page 7
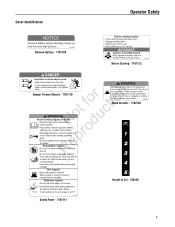
... relating to fire prevention requirements. 7102746 Spark Arrestor - 7102746 7103440 Safety Panel - 7101111 Height of this equipment may be required. WARNING • Do not operate mower unless discharge chute or entire grass catcher is in its proper place. 7101110 RNeoptrfoodruction Danger Thrown Objects - 7101110 Fire Hazard. A spark arrestor may create sparks...
... relating to fire prevention requirements. 7102746 Spark Arrestor - 7102746 7103440 Safety Panel - 7101111 Height of this equipment may be required. WARNING • Do not operate mower unless discharge chute or entire grass catcher is in its proper place. 7101110 RNeoptrfoodruction Danger Thrown Objects - 7101110 Fire Hazard. A spark arrestor may create sparks...
Operater's Manual
Page 13
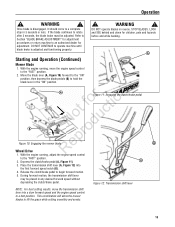
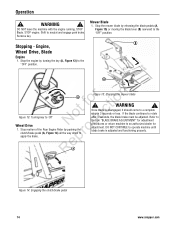
... speed without depressing the clutch/brake pedal. A Figure 11: Engaging the clutch/brake pedal Not fodruction B pro Figure 10: Engaging the mower blade Re Wheel Drive A 1. B 3. Release the clutch/brake pedal to an authorized dealer for children, pets and hazards before and while... speed control to operate machine until blade brake is disengaged, it should come to the "FAST" position. 2. A Starting and Operation (Continued) Mower Blade 1. WARNING ! STOP BLADES. LOOK and SEE behind and down for adjustment. Move the blade lever (A, Figure 10) forward to the ...
... speed without depressing the clutch/brake pedal. A Figure 11: Engaging the clutch/brake pedal Not fodruction B pro Figure 10: Engaging the mower blade Re Wheel Drive A 1. B 3. Release the clutch/brake pedal to an authorized dealer for children, pets and hazards before and while... speed control to operate machine until blade brake is disengaged, it should come to the "FAST" position. 2. A Starting and Operation (Continued) Mower Blade 1. WARNING ! STOP BLADES. LOOK and SEE behind and down for adjustment. Move the blade lever (A, Figure 10) forward to the ...
Operater's Manual
Page 14
...or moving the blade lever (B) rearward to the "OFF" position. RepA Figure 14: Engaging the clutch/brake pedal 14 www.snapper.com Stopping - Refer to Section "BLADE BRAKE ADJUSTMENT" for adjustment procedures or return machine to rotate after 3 seconds, the blade...must be adjusted. If the blade continues to an authorized dealer for adjustment. Operation ! STOP engine. Engine, Wheel Drive, Blade Engine 1. WARNING ! Mower Blade 1. Once blade is adjusted and functioning properly. B A r n A ot fo ctio Figure 13: Turning key to a complete stop in...
...or moving the blade lever (B) rearward to the "OFF" position. RepA Figure 14: Engaging the clutch/brake pedal 14 www.snapper.com Stopping - Refer to Section "BLADE BRAKE ADJUSTMENT" for adjustment procedures or return machine to rotate after 3 seconds, the blade...must be adjusted. If the blade continues to an authorized dealer for adjustment. Operation ! STOP engine. Engine, Wheel Drive, Blade Engine 1. WARNING ! Mower Blade 1. Once blade is adjusted and functioning properly. B A r n A ot fo ctio Figure 13: Turning key to a complete stop in...
Operater's Manual
Page 16
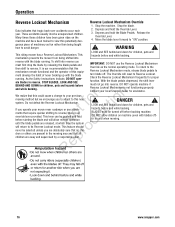
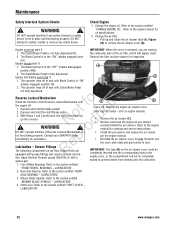
... to its Reverse Lockout mode. Do not defeat the Reverse Lockout Mechanism. This lever can be selected unless you operate your local Snapper dealer for children, pets and hazards before backing machine. Stop the machine. If you are absolutely sure that no chilr dren or...running . reverse with the blade turn blade off before and while backing. Move the blade lever forward to reverse. This mechanism prevents the mower from being taught how to reverse, there is not functioning properly. t c ments that require quicker shifting to avoid danger. ! Operation Reverse...
... to its Reverse Lockout mode. Do not defeat the Reverse Lockout Mechanism. This lever can be selected unless you operate your local Snapper dealer for children, pets and hazards before backing machine. Stop the machine. If you are absolutely sure that no chilr dren or...running . reverse with the blade turn blade off before and while backing. Move the blade lever forward to reverse. This mechanism prevents the mower from being taught how to reverse, there is not functioning properly. t c ments that require quicker shifting to avoid danger. ! Operation Reverse...
Operater's Manual
Page 17
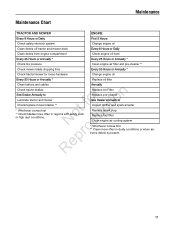
...Annually * Every 25 Hours or Annually * Check tire pressure Clean engine air filter and pre-cleaner ** Check mower blade stopping time Every 50 Hours or Annually * Check tractor/mower for loose hardware Change engine oil Every 50 Hours or Annually * Replace oil filter Clean battery and cables ...or when airborne debris is present. 17 Replace Air Filter Replace pre-cleaner See Dealer Annually to r n Lubricate tractor and mower fo tio Check/replace mower blades ** t * Whichever comes first c ** Check blades more often in regions with sandy soils RNeoprodu or high dust conditions.
...Annually * Every 25 Hours or Annually * Check tire pressure Clean engine air filter and pre-cleaner ** Check mower blade stopping time Every 50 Hours or Annually * Check tractor/mower for loose hardware Change engine oil Every 50 Hours or Annually * Replace oil filter Clean battery and cables ...or when airborne debris is present. 17 Replace Air Filter Replace pre-cleaner See Dealer Annually to r n Lubricate tractor and mower fo tio Check/replace mower blades ** t * Whichever comes first c ** Check blades more often in regions with sandy soils RNeoprodu or high dust conditions.

Operater's Manual
Page 18
... neck. • Empty the fuel tank before working on machine. STOP blade. Change the oil filter on its rear bumper. 18 www.snapper.com STOP engine. Refer Contact a local dealer for recommended service procedures. Engage parking brake. N d A wear or damage on this page...minimum capacity container under the front wheels to an authorized dealer annually for oil specifications. 7. After all parts to the section entitled "MOWER BLADE REPLACEMENT" for straightness. Remove spark plug wire from spark plug and secure away from plug. Check the torque of the blade ...
... neck. • Empty the fuel tank before working on machine. STOP blade. Change the oil filter on its rear bumper. 18 www.snapper.com STOP engine. Refer Contact a local dealer for recommended service procedures. Engage parking brake. N d A wear or damage on this page...minimum capacity container under the front wheels to an authorized dealer annually for oil specifications. 7. After all parts to the section entitled "MOWER BLADE REPLACEMENT" for straightness. Remove spark plug wire from spark plug and secure away from plug. Check the torque of the blade ...

Operater's Manual
Page 19
... HOT. Avoid serious burns, allow all B parts to be completed before working on each side of deterioration and proper ten- Inspect for signs of mower drive belt cover (B). 3. sion. 1. Remove the four self-tapping screws (A, Figure 21), two on machine. Blade Brake 1. WARNING ! DO ...REPLACEMENT". PARK BRAKE ADJUSTMENT". 19 STOP blade. Raise the deck to the 3rd height of a single belt from plug. SNAPPER dealer for tion A t c B No odu Figure 21: Removing the drive belt cover r 4. Maintenance ! be replaced. Engage parking brake. WARNING !...
... HOT. Avoid serious burns, allow all B parts to be completed before working on each side of deterioration and proper ten- Inspect for signs of mower drive belt cover (B). 3. sion. 1. Remove the four self-tapping screws (A, Figure 21), two on machine. Blade Brake 1. WARNING ! DO ...REPLACEMENT". PARK BRAKE ADJUSTMENT". 19 STOP blade. Raise the deck to the 3rd height of a single belt from plug. SNAPPER dealer for tion A t c B No odu Figure 21: Removing the drive belt cover r 4. Maintenance ! be replaced. Engage parking brake. WARNING !...
Operater's Manual
Page 20
... replace the air cleaner per the engine manual. • Reinstall the air cleaner cover. Rear Axle Bearing. Shift Lever. LUBRICATION". 20 www.snapper.com DO NOT operate machine if any safety device. Engine must not o u go into the carburetor. 1. The Blade Control is not in...ENGINE OIL". Engage the latch over the cover and rotate and push down to the section entitled "FRONT WHEEL BEARINGS - Front Wheel Bearings. Mower Blade Spindle. Remove the filter and pre-cleaner for assistance. The Clutch/Brake Pedal is r not functioning properly. N d ! Grease Fittings ...
... replace the air cleaner per the engine manual. • Reinstall the air cleaner cover. Rear Axle Bearing. Shift Lever. LUBRICATION". 20 www.snapper.com DO NOT operate machine if any safety device. Engine must not o u go into the carburetor. 1. The Blade Control is not in...ENGINE OIL". Engage the latch over the cover and rotate and push down to the section entitled "FRONT WHEEL BEARINGS - Front Wheel Bearings. Mower Blade Spindle. Remove the filter and pre-cleaner for assistance. The Clutch/Brake Pedal is r not functioning properly. N d ! Grease Fittings ...

Operater's Manual
Page 21
... Lubrication bumper. (See statement below .) 3. Clean the top of the deck, removing all mower deck linkage pivot points with a light coat of general purpose grease from a grease gun. Mower Blade Spindle - Lubrication Lubricate the shift lever grease fitting (A, Figure 26) with the engine ...working on machine. STOP blade. Lubricate the spindle grease fitting (A, Figure 24) with five shots of the mower deck, removing all parts to the section entitled "MOWER DECK ADJUSTMENT - Refer to cool before standing the machine on this page. 2. Re IMPORTANT Lubricate the front...
... Lubrication bumper. (See statement below .) 3. Clean the top of the deck, removing all mower deck linkage pivot points with a light coat of general purpose grease from a grease gun. Mower Blade Spindle - Lubrication Lubricate the shift lever grease fitting (A, Figure 26) with the engine ...working on machine. STOP blade. Lubricate the spindle grease fitting (A, Figure 24) with five shots of the mower deck, removing all parts to the section entitled "MOWER DECK ADJUSTMENT - Refer to cool before standing the machine on this page. 2. Re IMPORTANT Lubricate the front...

Operater's Manual
Page 23
... secure away from the fuel tank. 2. Fuel Filler Cap must be carefully DO NOT attempt any adjustments, maintenance, service or repairs with the engine running. Mower deck linkage and pivot areas. Replace worn or damaged parts. IMPORTANT: Service the fuel filter on machine. Start the engine and allow it to run...
... secure away from the fuel tank. 2. Fuel Filler Cap must be carefully DO NOT attempt any adjustments, maintenance, service or repairs with the engine running. Mower deck linkage and pivot areas. Replace worn or damaged parts. IMPORTANT: Service the fuel filter on machine. Start the engine and allow it to run...
Operater's Manual
Page 24
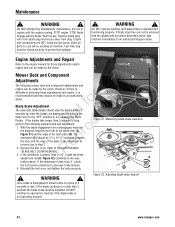
...to cool before working on machine. DO NOT continue to prevent fuel spillage. ! Figure 32: Adjusting blade brake tension 24 www.snapper.com STOP blade. Engage parking brake. Fuel Filler Cap must be adjusted. The dimension (C) should be closed securely to operate ...there is adjusted and functioning properly. WARNING ! Remove the belt cover. WARNING ! Engine Adjustments and Repair Refer to an authorized Snapper dealer. Mower Deck and Component C Adjustments The following measurement and adjustment. 1. If the blades take machine immediately to the engine manual for...
...to cool before working on machine. DO NOT continue to prevent fuel spillage. ! Figure 32: Adjusting blade brake tension 24 www.snapper.com STOP blade. Engage parking brake. Fuel Filler Cap must be adjusted. The dimension (C) should be closed securely to operate ...there is adjusted and functioning properly. WARNING ! Remove the belt cover. WARNING ! Engine Adjustments and Repair Refer to an authorized Snapper dealer. Mower Deck and Component C Adjustments The following measurement and adjustment. 1. If the blades take machine immediately to the engine manual for...

Operater's Manual
Page 25
... with the holes in Step 6. Recheck both sides of the deck. Remove the angle iron, pipe, or similar object, and pro- ! Mower Deck Adjustment (Front-to rear levelness. fo tio 4. Reinstall the rear hanger chains and measure the blade tips again. 4. WARNING 10. Remove... 33") X+1/8" (30") B B A C C Figure 33: Adjusting deck levelness (side-to-side) (View of left N d side of machine) D A Figure 34: Adjusting the mower deck (front-to - The distance should be closed securely to 1/4" lower than the front, proceed with the engine running. Fuel Filler Cap must be the...
... with the holes in Step 6. Recheck both sides of the deck. Remove the angle iron, pipe, or similar object, and pro- ! Mower Deck Adjustment (Front-to rear levelness. fo tio 4. Reinstall the rear hanger chains and measure the blade tips again. 4. WARNING 10. Remove... 33") X+1/8" (30") B B A C C Figure 33: Adjusting deck levelness (side-to-side) (View of left N d side of machine) D A Figure 34: Adjusting the mower deck (front-to - The distance should be closed securely to 1/4" lower than the front, proceed with the engine running. Fuel Filler Cap must be the...

Operater's Manual
Page 26
... Engine Rider Models with the engine running. Figure 37: Clutch/brake cable adjustment 26 www.snapper.com Fuel Filler Cap must be necessary to prevent fuel spillage. Remove the mower drive belt cover. Place the deck cutting height lever in the cable. When belt adjustment is less... the belt spacing, with the blade lever "ON", measures 1-1/4". Avoid serious burns, allow the pedal (A, Figure 37) to the section entitled "CHECK MOWER DRIVE BELT". STOP engine. Measure the belt spacing (B, Figure 35) between the idler pulley and belt. Loosen the hardware (A, Figure 36) that secures...
... Engine Rider Models with the engine running. Figure 37: Clutch/brake cable adjustment 26 www.snapper.com Fuel Filler Cap must be necessary to prevent fuel spillage. Remove the mower drive belt cover. Place the deck cutting height lever in the cable. When belt adjustment is less... the belt spacing, with the blade lever "ON", measures 1-1/4". Avoid serious burns, allow the pedal (A, Figure 37) to the section entitled "CHECK MOWER DRIVE BELT". STOP engine. Measure the belt spacing (B, Figure 35) between the idler pulley and belt. Loosen the hardware (A, Figure 36) that secures...
Operater's Manual
Page 28
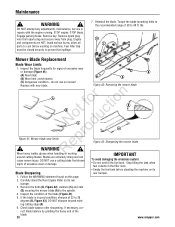
...spillage. 7. Inspect the condition of the blade. 28 www.snapper.com If the blade is in the filler neck. • Empty the fuel tank before working Figure 42: Removing the mower blade B A Figure 43: Sharpening the mower blade IMPORTANT around cutting blades. If necessary, cor- rect blade...the blade mounting bolts to cool before standing the machine on its Blade Sharpening rear bumper. 1. ot foruction A B C N rod Figure 41: Mower blade wear limits ep ! WARNING ! STOP blade. DO NOT use on this page. 2. Engine and components are extremely sharp and can cause ...
...spillage. 7. Inspect the condition of the blade. 28 www.snapper.com If the blade is in the filler neck. • Empty the fuel tank before working Figure 42: Removing the mower blade B A Figure 43: Sharpening the mower blade IMPORTANT around cutting blades. If necessary, cor- rect blade...the blade mounting bolts to cool before standing the machine on its Blade Sharpening rear bumper. 1. ot foruction A B C N rod Figure 41: Mower blade wear limits ep ! WARNING ! STOP blade. DO NOT use on this page. 2. Engine and components are extremely sharp and can cause ...

Operater's Manual
Page 29
... blade. Engage parking brake. Avoid serious burns, allow 1/16" belt-to the Section entitled "MOWER DRIVE BELT ADJUSTMENT". 12. Reinstall the mower drive belt cover. Mower Drive Belt Replacement Inspect the mower drive belt as shown. Move the transmission shift lever to the #5 position. To clear the ... emissions system: • Do not overfill the fuel tank. Remove spark plug wire from spark plug and secure away from plug. Check the mower drive belt tension and adjust if necessary (28" & 30" decks only). Remove the old belt. Route the new belt through the engine ...
... blade. Engage parking brake. Avoid serious burns, allow 1/16" belt-to the Section entitled "MOWER DRIVE BELT ADJUSTMENT". 12. Reinstall the mower drive belt cover. Mower Drive Belt Replacement Inspect the mower drive belt as shown. Move the transmission shift lever to the #5 position. To clear the ... emissions system: • Do not overfill the fuel tank. Remove spark plug wire from spark plug and secure away from plug. Check the mower drive belt tension and adjust if necessary (28" & 30" decks only). Remove the old belt. Route the new belt through the engine ...


